2007 NISSAN NOTE rear door
[x] Cancel search: rear doorPage 71 of 235
3Pre-driving checks and adjustmentsPre-driving checks and adjustments
Keys ........................................................................ 3-2
Integrated keyfob/remote control system .................. 3-3
Using the remote keyless entry system ................ 3-3
Locking the doors ............................................... 3-3
Unlocking the doors – convenience mode ........... 3-4
Unlocking the doors – anti-hijack mode ............... 3-4
Switching from convenience mode to
anti-hijack mode.................................................. 3-4
Keyfob operation failure ...................................... 3-4
Intelligent Key system (where fitted) ......................... 3-5
Locking/unlocking .............................................. 3-5
Starting the engine with the Intelligent Key .......... 3-6
Door locks ............................................................... 3-6
Super Lock System (Right-hand drive models) .... 3-6
Vehicle dead battery – left-hand side door
handle ................................................................ 3-7
Locking with power door lock switch .................. 3-7Child safety rear door lock .................................. 3-8
Back door lock ................................................... 3-8
Security system ....................................................... 3-9
NISSAN Anti-Theft System (NATS)..................... 3-9
Bonnet release ........................................................ 3-10
Fuel filler lid ............................................................. 3-11
Fuel filler lid opener lever .................................... 3-11
Fuel filler cap ...................................................... 3-11
Handbrake lever ...................................................... 3-11
Tilting steering wheel ............................................... 3-12
Mirrors..................................................................... 3-12
Inside rear-view mirror ........................................ 3-12
Outside rear-view mirrors.................................... 3-12
Vanity mirror ....................................................... 3-13
Rear parcel shelf...................................................... 3-14
Rear parcel shelf removal.................................... 3-14
Rear parcel shelf installation................................ 3-14
Page 77 of 235

VEHICLE DEAD BATTERY –
LEFT-HAND SIDE DOOR HANDLE
The left-hand side door can be locked or unlocked
with the door key/emergency key when the vehi-
cle’s battery is dead.
To lock the door with the key/emergency
key
1. If necessary, carefully remove the protection capjA (where fitted) on the left-hand side door
handle by inserting the key/emergency key in the
cap’s base slot and pry it off.
2. To lock the door
j1 , insert the key/emergency
key in the left-hand side door handle key cylinder
and turn it towards the front of the vehicle
jF.
To unlock the door
j2 , turn the key/emergency
key towards the rear of the vehicle.
The left-hand side door handle can only be locked
from the outside by using the key/emergency key
when the door is closed.See “Ignition knob (where fitted)” in the “5. Starting
and driving” section for access to the Intelligent sys-
tem emergency key.
CAUTION
The alarm system will be triggered when the door
is opened using the key/emergency key (NISSAN
alarm equipped models). To stop the alarm, turn
the ignition key/emergency key to the ON posi-
tion.
Initialising the system after vehicle
battery loading or replacement
After recharging or replacing the battery, you should
release (initialise) the system by:
•Inserting the key/emergency key into the ignition
switch and then turning it to the ON position.
•Unlocking the vehicle using the integrated key-
fob.
LOCKING WITH POWER DOOR
LOCK SWITCH
CAUTION
When locking the door with the power door lock
switch, be sure not to leave the key inside the
vehicle.
Central door lock equipped models
Operating the power door lock switch located on
the centre console will lockj1 or unlockj2 all
doors when the driver’s door is closed (the indica-
tor light
j3 comes on when all doors are locked).
However, a chime will sound and the doors will not
lock if the power door lock switch is pressed when
a passenger door is open, even if the driver’s door
is closed.
NOTE
•It is also possible to open the driver’s door,
move the power door lock switch to the lock
j1 position and close the door to lock all doors
unless the key is in the ignition or the Intelli-
gent Key (where fitted) is left inside the ve-
hicle.
•If the integrated Intelligent Keyfob lock button
(where fitted) is pressed inside the vehicle, all
doors lock, the power door lock indicator light
j3 comes on and the power door unlock side
of the switchj2 cannot be activated (central
door lock equipped models and Super Lock
equipped models). To unlock, press the inte-
grated Intelligent Keyfob unlock button. How-
ever, note that if the door is manually opened
from inside after having pressed the Keyfob
NPA927Z
NPA868Z
Centre console
Pre-driving checks and adjustments3-7
Page 78 of 235

lock button (central door lock equipped mod-
els), the indicator lightj3 remains illuminated
and the door unlocks.
•When the power door lock switch is moved to
the lock positionj1 while the driver’s door is
open and the integrated Intelligent Keyfob
(where fitted) is left inside the vehicle, all
doors unlock as the driver’s door is closed
and the buzzer sounds (central door lock
equipped models and Super Lock equipped
models). This is to prevent from locking the
vehicle while the Intelligent Key has been left
inside the vehicle.
Super Lock equipped models
Operating the power door lock switch located on
the centre console will lockj1 or unlockj2all
doors (the indicator lightj3 comes on when all
doors are locked). However, when the Super Lock
is set, it is not possible to unlock the doors with the
power door lock switch
j2 . Note that a chime will
sound and the doors will not lock if the power door
lock switch is pressed when a passenger door is
open, even if the driver’s door is closed.
In order to lock all doors without activating the Su-
per Lock system, open the driver’s door, move the
power door lock switch to the lock position
j1and
close the door.
CAUTION
Note that the above operation will not be pos-sible with a key in the ignition switch or when the
Intelligent Key is left inside the vehicle; a chime
will then sound in order to draw your attention
and the vehicle unlocks.
1.Lock position
2.Unlock position
A.Front of the vehicle
CHILD SAFETY REAR DOOR LOCK
Child safety locking helps prevent doors from being
opened accidentally. This mechanism is especially
handy when small children are in the vehicle.
When the lever is in the lock position
j1 , the rear
door can only be opened from the outside.
Set the lock lever in position
j2 in order to disable
the child safety rear door lock mechanism.
BACK DOOR LOCK
The power door lock system allows you to lock or
unlock all doors including the back door.
The back door can be manually released from the
outside when the vehicle is not locked by operating
the microswitch located on the back door under-
side.
NOTE
The back door cannot be opened from the out-
side when the power door lock switch is acti-
vated. An audible warning is heard when the
microswitch located on the back door underside
is operated.
To close, lower and push down the back door se-
curely.NPA735Z
Rear door side panel
NPA725Z
3-8Pre-driving checks and adjustments
Page 84 of 235
WARNING
Never put anything on the rear parcel shelf, no
matter how small. Any object on it could cause
an injury in an accident or when the brakes are
applied suddenly.
CAUTION
The rear parcel shelf flap provides a hide-awayfacility to the luggage compartment whether the
rear seat is at its rearmost position or not. Do not
store objects onto the rear parcel shelf flap as it
may impair the sliding operation of the rear seat.
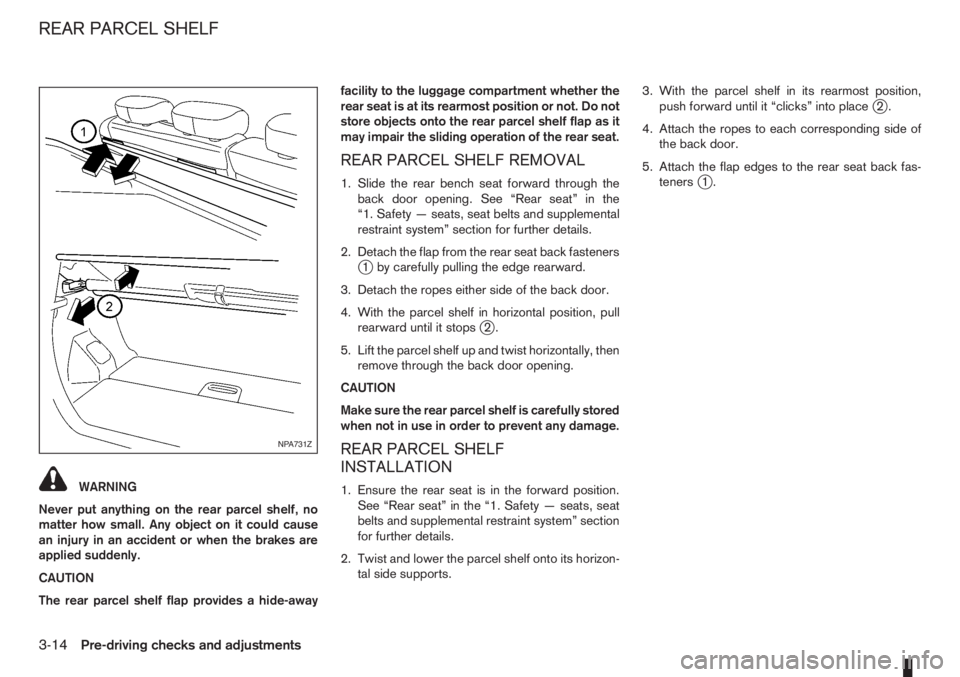
REAR PARCEL SHELF REMOVAL
1. Slide the rear bench seat forward through the
back door opening. See “Rear seat” in the
“1. Safety — seats, seat belts and supplemental
restraint system” section for further details.
2. Detach the flap from the rear seat back fasteners
j1 by carefully pulling the edge rearward.
3. Detach the ropes either side of the back door.
4. With the parcel shelf in horizontal position, pull
rearward until it stops
j2.
5. Lift the parcel shelf up and twist horizontally, then
remove through the back door opening.
CAUTION
Make sure the rear parcel shelf is carefully stored
when not in use in order to prevent any damage.
REAR PARCEL SHELF
INSTALLATION
1. Ensure the rear seat is in the forward position.
See “Rear seat” in the “1. Safety — seats, seat
belts and supplemental restraint system” section
for further details.
2. Twist and lower the parcel shelf onto its horizon-
tal side supports.3. With the parcel shelf in its rearmost position,
push forward until it “clicks” into place
j2.
4. Attach the ropes to each corresponding side of
the back door.
5. Attach the flap edges to the rear seat back fas-
teners
j1.
NPA731Z
REAR PARCEL SHELF
3-14Pre-driving checks and adjustments
Page 126 of 235
During the first 1,600 km (1,000 miles), follow these
recommendations for the future reliability and
economy of your new vehicle. Failure to follow the
recommendations may result in shortened engine
life and reduced engine performance.
•Avoid driving for long periods at a constant
speed, either fast or slow.
•Do not accelerate at full throttle in any gear.
•Avoid quick starts.
•Avoid hard braking as much as possible.
•Do not tow a trailer during the first 800 km (500
miles).
NOTE
Models with K9K diesel engine will achieve top
performance only after approximately 5,000 km
(3,000 miles).
WARNING
The driving characteristics of your vehicle can be
changed remarkably by any additional load and
its distribution as well as by adding optional
equipment (trailer couplings, roof racks, etc.).
Your driving style and speed have to be adjusted
accordingly. Especially when carrying heavy
loads, your speed must be reduced adequately.
•Make sure the area around the vehicle is free of
obstacles.
•Check fluid levels such as engine oil, coolant,
brake and clutch fluid, and window washer fluid
as frequently as possible, at least whenever you
refuel.
•Visually inspect tyres for their appearance and
condition. Also check the tyre pressure for
proper inflation.
•Maintenance items in the “8. Maintenance and
do-it-yourself” section should be checked peri-
odically.
•Check that all windows and light lenses are
clean.
•Check that all doors are closed.
•Position the seat and adjust the head restraints.
•Adjust the inside and outside mirrors.
•Fasten your seat belt and ask all passengers to
do likewise.
•Check the operation of the warning/indicator
lights when the ignition switch is turned to the
ON position.
•Do not place hard or heavy objects on the dash-
board or rear parcel shelf in order to prevent
injury in the event of a sudden stop.
RUNNING-IN SCHEDULE BEFORE STARTING THE ENGINE
5-2Starting and driving
Page 127 of 235
WARNING
•Do not leave children or adults who would
normally require the support of others alone
in your vehicle. Pets should also not be left
alone. They could accidentally injure them-
selves or others through inadvertent opera-
tion of the vehicle. Also, on hot, sunny days,
temperatures in a closed vehicle could quickly
become high enough to cause severe or pos-
sibly fatal injuries to people or animals.
•To prevent luggage or packages from sliding
forward during braking, do not stack anything
in the cargo area higher than the seatbacks.
•Secure all cargo with ropes or straps to pre-
vent it from sliding or shifting.
•Failure to follow proper seating instructions
see “Seats” in the “1. Safety — seats, seat
belts and supplemental restraint system” sec-
tion, could result in serious personal injury in
an accident or sudden stop.
EXHAUST GAS (Carbon Monoxide)
WARNING
•Do not breathe exhaust gases; they contain
colourless and odourless carbon monoxide.
Carbon monoxide is a dangerous gas and can
cause unconsciousness or death.
•If you suspect that exhaust fumes are enter-
ing the vehicle, drive with all windows fully
open and have the vehicle inspected immedi-
ately.
•Do not run the engine in closed spaces, such
as a garage, for any longer than is absolutely
necessary.
•Do not park the vehicle with the engine run-
ning for any extended length of time.
•Keep the back door closed while driving, oth-
erwise exhaust gases could be drawn into the
passenger compartment. If you must drive in
this way for some reason, take the following
steps:
1) Open all the windows.
2) Manual air conditioner equipped models:
Move the air intake lever to the
posi-
tion.
Automatic air conditioner equipped mod-
els: Switch on the outside air mode.
3) Set the fan speed control to the maximum
position to circulate the air.
•If electrical wiring or other cable connections
must pass to a trailer through the seal of the
body, follow the manufacturer’s recommen-
dations to prevent carbon monoxide entry into
the vehicle.
•When a vehicle has been stopped in an open
area with its engine running for any significant
length of time, turn the fan on to force outside
air into the vehicle.
•The exhaust system and body should be in-
spected by a NISSAN dealer or qualified work-
shop whenever:
– the vehicle is raised for service.
– you suspect that exhaust fumes are enter-
ing into the passenger compartment.
– you notice a change in the sound of the
exhaust system.
– you have had an accident involving dam-
age to the exhaust system, underbody, or
rear of the vehicle.
PRECAUTIONS WHEN STARTING
AND DRIVING
Starting and driving5-3
Page 150 of 235
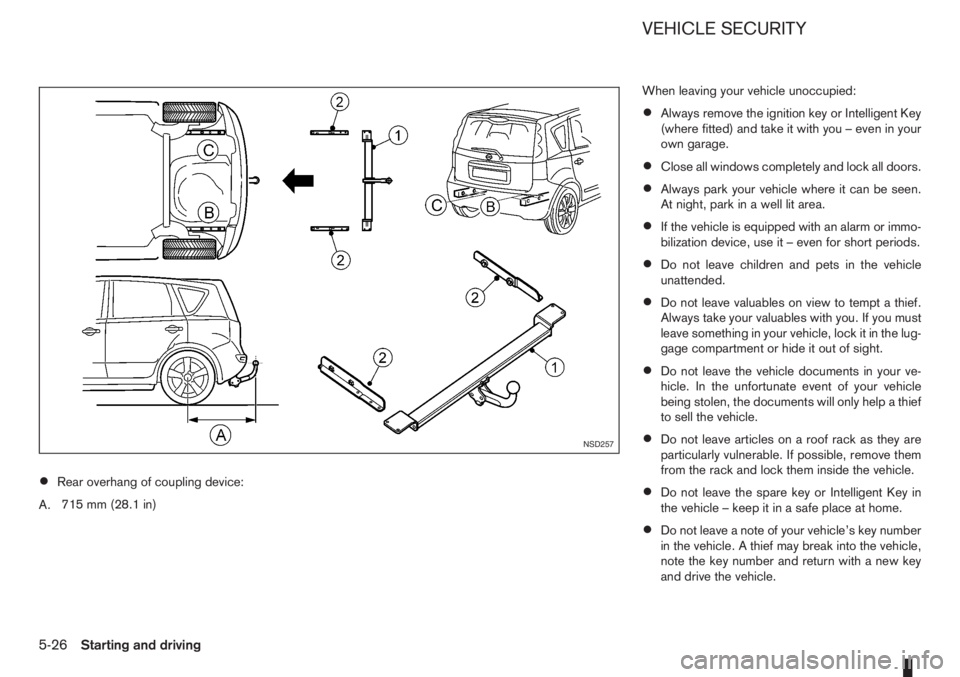
•Rear overhang of coupling device:
A.715 mm (28.1 in)When leaving your vehicle unoccupied:
•Always remove the ignition key or Intelligent Key
(where fitted) and take it with you – even in your
own garage.
•Close all windows completely and lock all doors.
•Always park your vehicle where it can be seen.
At night, park in a well lit area.
•If the vehicle is equipped with an alarm or immo-
bilization device, use it – even for short periods.
•Do not leave children and pets in the vehicle
unattended.
•Do not leave valuables on view to tempt a thief.
Always take your valuables with you. If you must
leave something in your vehicle, lock it in the lug-
gage compartment or hide it out of sight.
•Do not leave the vehicle documents in your ve-
hicle. In the unfortunate event of your vehicle
being stolen, the documents will only help a thief
to sell the vehicle.
•Do not leave articles on a roof rack as they are
particularly vulnerable. If possible, remove them
from the rack and lock them inside the vehicle.
•Do not leave the spare key or Intelligent Key in
the vehicle – keep it in a safe place at home.
•Do not leave a note of your vehicle’s key number
in the vehicle. A thief may break into the vehicle,
note the key number and return with a new key
and drive the vehicle.
NSD257
VEHICLE SECURITY
5-26Starting and driving
Page 160 of 235
Getting the tools and spare wheel
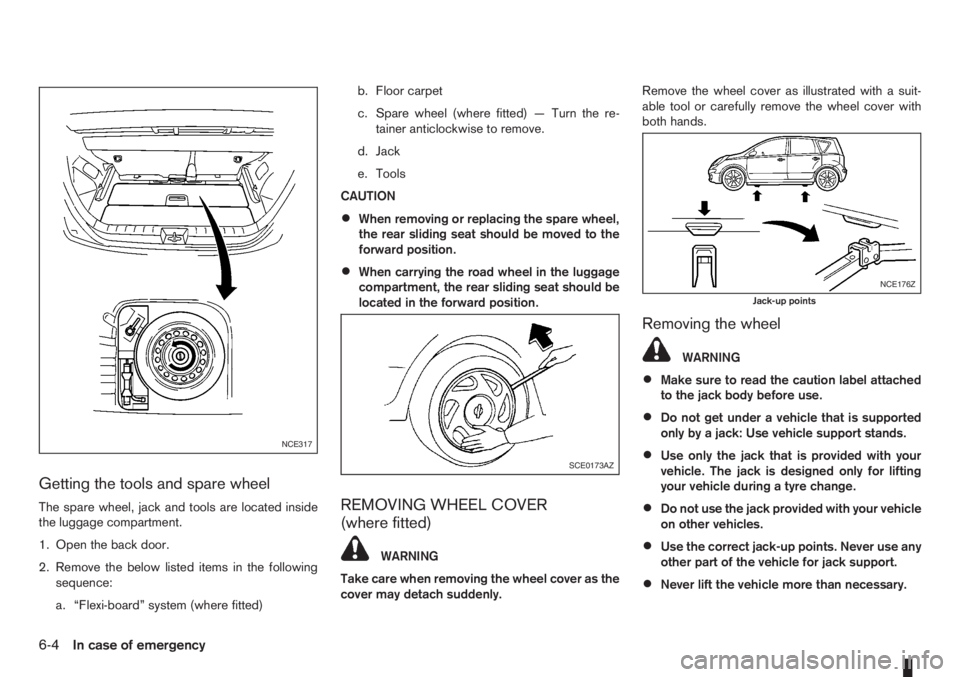
The spare wheel, jack and tools are located inside
the luggage compartment.
1. Open the back door.
2. Remove the below listed items in the following
sequence:
a. “Flexi-board” system (where fitted)b. Floor carpet
c. Spare wheel (where fitted) — Turn the re-
tainer anticlockwise to remove.
d. Jack
e. Tools
CAUTION
•When removing or replacing the spare wheel,
the rear sliding seat should be moved to the
forward position.
•When carrying the road wheel in the luggage
compartment, the rear sliding seat should be
located in the forward position.
REMOVING WHEEL COVER
(where fitted)
WARNING
Take care when removing the wheel cover as the
cover may detach suddenly.Remove the wheel cover as illustrated with a suit-
able tool or carefully remove the wheel cover with
both hands.
Removing the wheel
WARNING
•Make sure to read the caution label attached
to the jack body before use.
•Do not get under a vehicle that is supported
only by a jack: Use vehicle support stands.
•Use only the jack that is provided with your
vehicle. The jack is designed only for lifting
your vehicle during a tyre change.
•Do not use the jack provided with your vehicle
on other vehicles.
•Use the correct jack-up points. Never use any
other part of the vehicle for jack support.
•Never lift the vehicle more than necessary.
NCE317
SCE0173AZ
NCE176Z
Jack-up points
6-4In case of emergency