2007 NISSAN NOTE child lock
[x] Cancel search: child lockPage 71 of 235
3Pre-driving checks and adjustmentsPre-driving checks and adjustments
Keys ........................................................................ 3-2
Integrated keyfob/remote control system .................. 3-3
Using the remote keyless entry system ................ 3-3
Locking the doors ............................................... 3-3
Unlocking the doors – convenience mode ........... 3-4
Unlocking the doors – anti-hijack mode ............... 3-4
Switching from convenience mode to
anti-hijack mode.................................................. 3-4
Keyfob operation failure ...................................... 3-4
Intelligent Key system (where fitted) ......................... 3-5
Locking/unlocking .............................................. 3-5
Starting the engine with the Intelligent Key .......... 3-6
Door locks ............................................................... 3-6
Super Lock System (Right-hand drive models) .... 3-6
Vehicle dead battery – left-hand side door
handle ................................................................ 3-7
Locking with power door lock switch .................. 3-7Child safety rear door lock .................................. 3-8
Back door lock ................................................... 3-8
Security system ....................................................... 3-9
NISSAN Anti-Theft System (NATS)..................... 3-9
Bonnet release ........................................................ 3-10
Fuel filler lid ............................................................. 3-11
Fuel filler lid opener lever .................................... 3-11
Fuel filler cap ...................................................... 3-11
Handbrake lever ...................................................... 3-11
Tilting steering wheel ............................................... 3-12
Mirrors..................................................................... 3-12
Inside rear-view mirror ........................................ 3-12
Outside rear-view mirrors.................................... 3-12
Vanity mirror ....................................................... 3-13
Rear parcel shelf...................................................... 3-14
Rear parcel shelf removal.................................... 3-14
Rear parcel shelf installation................................ 3-14
Page 76 of 235
•The Intelligent Key contains a miniature radio
transmitter that may be affected when placed
near metal objects.
•Keep the Intelligent Key away from mobile
phones, lap-top computers and other metal
objects or electronics.
STARTING THE ENGINE WITH THE
INTELLIGENT KEY
See “Ignition knob (where fitted)” in the “5. Starting
and driving” section.
CAUTION
•Make sure you carry the Intelligent Key with
you when starting and driving the vehicle.
•If the Intelligent Key is too far away from the
passenger compartment, the vehicle may not
start.
WARNING
•Always look before opening any doors, to
avoid an accident with oncoming traffic.
•Never leave children or adults who would nor-
mally require the support of others alone in
the vehicle. They could unknowingly activate
switches or controls and inadvertently
become involved in a serious accident.
SUPER LOCK SYSTEM (Right-hand
drive models)
WARNING
For Super Lock System equipped models, failure
to follow the precautions below may lead to haz-
ardous situations. Make sure the Super Lock Sys-
tem activation is always safely conducted.
•When the vehicle is occupied, never lock the
doors with the integrated keyfob. Doing so
will trap the occupants, since the Super Lock
System prevents the doors from being opened
from the inside of the vehicle.
•Only operate the integrated keyfob lock but-
ton when there is a clear view of the vehicle.
This is to prevent anybody from being trapped
inside the vehicle through the Super Lock
System activation.
Locking the doors with the integrated keyfob will
lock all doors including the back door and activate
the Super Lock System. This means that none ofthe doors can be opened from the inside, adding
extra security in case of break-in or theft.
The system will be released when the door is un-
locked with the integrated keyfob.
The Super Lock System will not activate when the
doors are locked with the power door lock switch or
the key.
Emergency situations
If the Super Lock System is activated due to a traf-
fic accident or other unexpected circumstances
while you are in the vehicle:
•Insert the key/emergency key in the ignition
switch, turn it to the ON position, the Super Lock
system will be released and all doors can be
unlocked.
•Open or break the door window on the front
passenger’s side, remove the protection cap on
the passenger’s side door handle, insert the key
into the passenger’s side door key cylinder and
turn it to the unlock position, after which you will
be able to open the door.
•Remove the key from the ignition switch and un-
lock the door using the integrated keyfob.
DOOR LOCKS
3-6Pre-driving checks and adjustments
Page 78 of 235

lock button (central door lock equipped mod-
els), the indicator lightj3 remains illuminated
and the door unlocks.
•When the power door lock switch is moved to
the lock positionj1 while the driver’s door is
open and the integrated Intelligent Keyfob
(where fitted) is left inside the vehicle, all
doors unlock as the driver’s door is closed
and the buzzer sounds (central door lock
equipped models and Super Lock equipped
models). This is to prevent from locking the
vehicle while the Intelligent Key has been left
inside the vehicle.
Super Lock equipped models
Operating the power door lock switch located on
the centre console will lockj1 or unlockj2all
doors (the indicator lightj3 comes on when all
doors are locked). However, when the Super Lock
is set, it is not possible to unlock the doors with the
power door lock switch
j2 . Note that a chime will
sound and the doors will not lock if the power door
lock switch is pressed when a passenger door is
open, even if the driver’s door is closed.
In order to lock all doors without activating the Su-
per Lock system, open the driver’s door, move the
power door lock switch to the lock position
j1and
close the door.
CAUTION
Note that the above operation will not be pos-sible with a key in the ignition switch or when the
Intelligent Key is left inside the vehicle; a chime
will then sound in order to draw your attention
and the vehicle unlocks.
1.Lock position
2.Unlock position
A.Front of the vehicle
CHILD SAFETY REAR DOOR LOCK
Child safety locking helps prevent doors from being
opened accidentally. This mechanism is especially
handy when small children are in the vehicle.
When the lever is in the lock position
j1 , the rear
door can only be opened from the outside.
Set the lock lever in position
j2 in order to disable
the child safety rear door lock mechanism.
BACK DOOR LOCK
The power door lock system allows you to lock or
unlock all doors including the back door.
The back door can be manually released from the
outside when the vehicle is not locked by operating
the microswitch located on the back door under-
side.
NOTE
The back door cannot be opened from the out-
side when the power door lock switch is acti-
vated. An audible warning is heard when the
microswitch located on the back door underside
is operated.
To close, lower and push down the back door se-
curely.NPA735Z
Rear door side panel
NPA725Z
3-8Pre-driving checks and adjustments
Page 79 of 235

WARNING
•Do not drive with the back door opened. This
could allow dangerous exhaust gases to be
drawn into the vehicle.
•Closely supervise children when they are
around the vehicle to prevent them from play-
ing and being locked in the luggage compart-
ment where they could be seriously injured.
Keep the vehicle locked, with the back door
closed, when not in use, and prevent chil-
dren’s access to the vehicle’s keys.
NISSAN ANTI-THEFT SYSTEM (NATS)
The NISSAN Anti-Theft System (NATS)* will not
allow the engine to start without the use of the reg-
istered NATS key.
* Immobilizer
If the engine fails to start using the registered NATS
key, it may be due to interference from another
NATS key, an automated toll road device or an auto-
mated payment device on the key ring. Restart the
engine using the following procedure:
1. Leave the ignition switch in the ON position for
approximately 5 seconds.
2. Turn the ignition switch to the “OFF” or LOCK
position and wait approximately 5 seconds.
3. Repeat steps 1 and 2.
4. Restart the engine while holding the device
(which may have caused the interference) sepa-
rated from the registered NATS key or NATS
Intelligent Key (where fitted).
If this procedure allows the engine to start,
NISSAN recommends placing the registered
NATS key or NATS Intelligent Key (where fitted)
on a separate key-ring to avoid interference from
other devices.
NATS security warning light
The security warning light blinks whenever the igni-
tion switch is in the LOCK, “OFF” or Acc position.
This function indicates that NATS is equipped on
the vehicle.
If the NISSAN Anti-Theft System (NATS) is mal-
functioning, this light will remain on while the ignition
key is in the ON position.
If the light remains on and/or the engine will not
start, see your NISSAN dealer for NATS service
as soon as possible. Please bring all NATS keys
or NATS Intelligent Keys when visiting your
NISSAN dealer for service.
Additional information for RHD models
If the NATS is malfunctioning, this light will turn on
after flashing six times while the ignition switch is in
the ON position.
However, if the NATS security warning light turns
off after the light has remained on for 15 minutes,
SIC2045Z
Meters and gauges
SECURITY SYSTEM
Pre-driving checks and adjustments3-9
Page 150 of 235
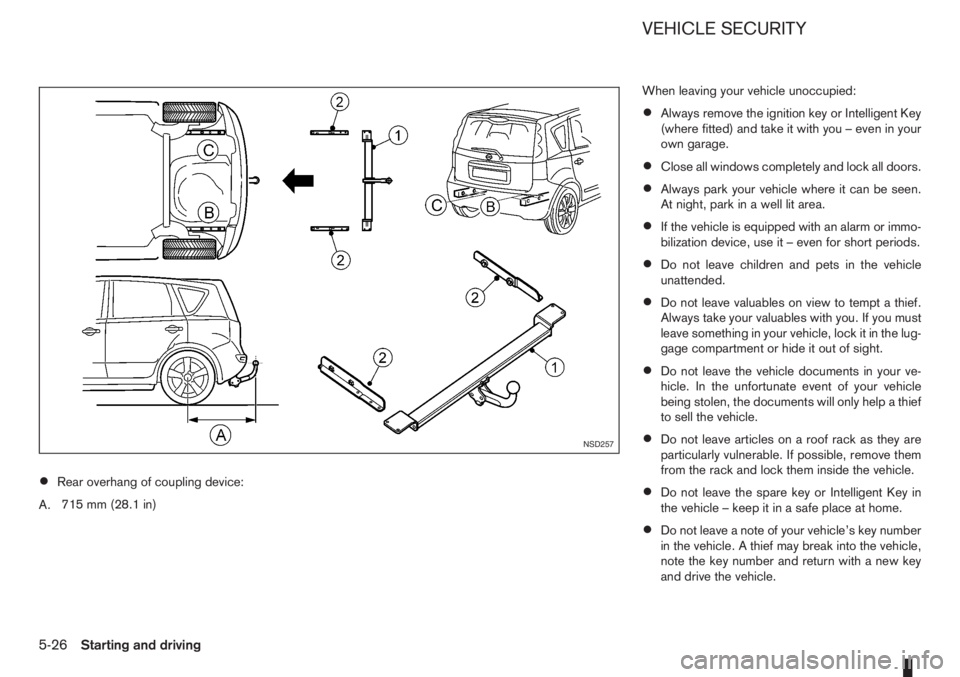
•Rear overhang of coupling device:
A.715 mm (28.1 in)When leaving your vehicle unoccupied:
•Always remove the ignition key or Intelligent Key
(where fitted) and take it with you – even in your
own garage.
•Close all windows completely and lock all doors.
•Always park your vehicle where it can be seen.
At night, park in a well lit area.
•If the vehicle is equipped with an alarm or immo-
bilization device, use it – even for short periods.
•Do not leave children and pets in the vehicle
unattended.
•Do not leave valuables on view to tempt a thief.
Always take your valuables with you. If you must
leave something in your vehicle, lock it in the lug-
gage compartment or hide it out of sight.
•Do not leave the vehicle documents in your ve-
hicle. In the unfortunate event of your vehicle
being stolen, the documents will only help a thief
to sell the vehicle.
•Do not leave articles on a roof rack as they are
particularly vulnerable. If possible, remove them
from the rack and lock them inside the vehicle.
•Do not leave the spare key or Intelligent Key in
the vehicle – keep it in a safe place at home.
•Do not leave a note of your vehicle’s key number
in the vehicle. A thief may break into the vehicle,
note the key number and return with a new key
and drive the vehicle.
NSD257
VEHICLE SECURITY
5-26Starting and driving
Page 166 of 235
•Never lean over the battery while jump-start-
ing.
•Never allow battery fluid to come into contact
with eyes, skin, clothes or the vehicle’s
painted surfaces. Battery fluid is a corrosive
sulphuric acid which can cause severe burns.
If the fluid comes into contact with anything,
immediately flush the contacted area with
plenty of water.
•Keep the battery out of the reach of children.
•The booster battery must be rated at 12 volts.
Use of an incorrectly rated battery will dam-
age your vehicle.
•Never attempt to jump-start a frozen battery.
It could explode and cause serious injury.
1. Prepare vehicle
jA with the booster battery for
the vehiclejB being jump-started.
CAUTION
Do not allow the two vehicles to touch.
2. Apply the handbrake.
3. Shift the gear lever (MT models) into the N (Neu-
tral) position [AT models, move the selector lever
to the P (Park) position].
4. Switch off all unnecessary electrical systems
(headlights, hazard lights etc,).
5. Ensure that the ignition switch of the vehicle be-
ing jump-started is in the LOCK position.6. Open the bonnet. For details, see “Bonnet
release” in the “3. Pre-driving checks and
adjustments” section.
7. Remove the vent caps (where fitted) on the bat-
tery and cover the battery with an old cloth.
8. Connect the jump leads in the sequence (
j1→j2→j3→j4 ) as illustrated.
CAUTION
•Always connect positivej+ to positivej+
and negativej- to body ground (for ex-
ample, engine lift bracket, etc.) – not to
the battery’s negative
j-.
•An incorrect connection could damage the
charging system.
•Be sure that the jumper cables do not
touch moving parts in the engine compart-
ment.
•Be careful not to allow contact between
the positive jump lead connector and the
vehicle or the negative lead during con-
nection and disconnection.
9. Start the engine of the other vehicle
jA and let it
run for a few minutes. Keep the engine speed at
about 2,000 rpm.
10. Start the engine of your vehicle
jB in the nor-
mal way.
CAUTION
Do not keep the starter motor engaged formore than 10 seconds. If the engine does not
start immediately, turn the ignition switch to
“OFF” and wait 10 seconds before trying
again.
11. After starting the engine of your vehicle, care-
fully disconnect the negative lead and then the
positive lead (
j4→j3→j2→j1).
12. Remove and dispose of the cloth that was used
to cover the vent holes as it may be contami-
nated with corrosive acid.
13. Install the vent caps (where fitted).
14. Close the bonnet.
6-10In case of emergency
Page 183 of 235
WARNING
•To avoid the danger of being scalded, never
change the coolant when the engine is hot.
•Avoid direct skin contact with used coolant. If
skin contact is made, wash thoroughly with
soap or hand cleaner and plenty of water as
soon as possible.
•Keep coolant out of reach of children and
pets.
NISSAN GREEN PROGRAM
Engine coolant must be disposed of properly.
Check your local regulations.
CR14DE or HR16DE engine
1. Set the heater or air conditioner temperature
control to the maximum “HOT” position.
2. Open the bonnet. For details, see “Bonnet
release” in the “3. Pre-driving checks and
adjustments” section.
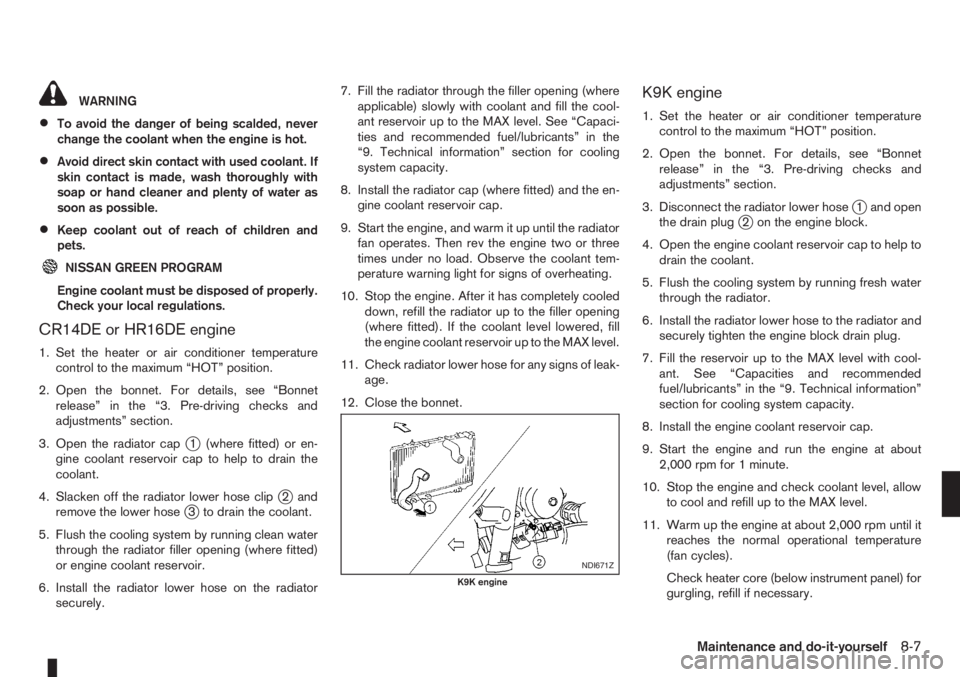
3. Open the radiator cap
j1 (where fitted) or en-
gine coolant reservoir cap to help to drain the
coolant.
4. Slacken off the radiator lower hose clip
j2and
remove the lower hosej3 to drain the coolant.
5. Flush the cooling system by running clean water
through the radiator filler opening (where fitted)
or engine coolant reservoir.
6. Install the radiator lower hose on the radiator
securely.7. Fill the radiator through the filler opening (where
applicable) slowly with coolant and fill the cool-
ant reservoir up to the MAX level. See “Capaci-
ties and recommended fuel/lubricants” in the
“9. Technical information” section for cooling
system capacity.
8. Install the radiator cap (where fitted) and the en-
gine coolant reservoir cap.
9. Start the engine, and warm it up until the radiator
fan operates. Then rev the engine two or three
times under no load. Observe the coolant tem-
perature warning light for signs of overheating.
10. Stop the engine. After it has completely cooled
down, refill the radiator up to the filler opening
(where fitted). If the coolant level lowered, fill
the engine coolant reservoir up to the MAX level.
11. Check radiator lower hose for any signs of leak-
age.
12. Close the bonnet.
K9K engine
1. Set the heater or air conditioner temperature
control to the maximum “HOT” position.
2. Open the bonnet. For details, see “Bonnet
release” in the “3. Pre-driving checks and
adjustments” section.
3. Disconnect the radiator lower hose
j1 and open
the drain plugj2 on the engine block.
4. Open the engine coolant reservoir cap to help to
drain the coolant.
5. Flush the cooling system by running fresh water
through the radiator.
6. Install the radiator lower hose to the radiator and
securely tighten the engine block drain plug.
7. Fill the reservoir up to the MAX level with cool-
ant. See “Capacities and recommended
fuel/lubricants” in the “9. Technical information”
section for cooling system capacity.
8. Install the engine coolant reservoir cap.
9. Start the engine and run the engine at about
2,000 rpm for 1 minute.
10. Stop the engine and check coolant level, allow
to cool and refill up to the MAX level.
11. Warm up the engine at about 2,000 rpm until it
reaches the normal operational temperature
(fan cycles).
Check heater core (below instrument panel) for
gurgling, refill if necessary.
NDI671Z
K9K engine
Maintenance and do-it-yourself8-7
Page 222 of 235
– Trailer brakes ................................................................ 5-25
C
Capacities and recommended fuel/lubricants ......................... 9-2
– Fuel recommendation ...................................................... 9-4
Car phone or CB radio ........................................................ 4-39
Care when driving ................................................................. 5-5
Changing
– Changing engine coolant ................................................. 8-6
– Changing engine oil ......................................................... 8-9
– Changing engine oil filter ............................................... 8-11
– Changing tyres and wheels ........................................... 8-31
Checking
– Checking brake pedal ................................................... 8-13
– Checking engine coolant level ......................................... 8-6
– Checking engine oil level ................................................. 8-9
– Checking handbrake ..................................................... 8-13
Child restraint anchorage (top tether) .................................. 1-23
Child restraints .................................................................... 1-16
– Installation on front passenger seat ................................ 1-19
– Installation on rear seats ................................................ 1-20
Child safety ........................................................................... 1-7
Cleaning
– Alloy wheels .................................................................... 7-3
– Chrome parts .................................................................. 7-3
– Exterior ............................................................................ 7-2
– Glass ....................................................................... 7-3, 7-4
– Interior ............................................................................ 7-3
– Plastic parts .................................................................... 7-4
– Removing spots ............................................................... 7-2
– Underbody ...................................................................... 7-3
Clock (digital) ........................................................................ 2-5
Clutch fluid .......................................................................... 8-13
Cold weather driving ........................................................... 5-31Coolant
– Changing engine coolant ................................................. 8-6
– Checking engine coolant level ......................................... 8-6
– Engine coolant ............................................................... 5-31
– Engine cooling system ..................................................... 8-6
Corrosion protection .................................................... 5-32, 7-4
– Environmental factors ...................................................... 7-4
Cruise control system .......................................................... 5-18
Cruise control system operations ......................................... 5-19
D
Defogger switch
– Outside mirror defogger ................................................ 2-15
– Rear window defogger .................................................. 2-15
Diesel particulate filter ........................................................... 5-5
Dimensions ........................................................................... 9-6
Door
– Back door lock ................................................................ 3-8
– Child safety rear door lock ............................................... 3-8
– Door locks ....................................................................... 3-6
– Emergency situation – Super Lock system ....................... 3-6
– Locking/unlocking with emergency key or key (vehicle dead
battery situation) .............................................................. 3-7
– Power door lock switch ................................................... 3-7
– Super Lock system .......................................................... 3-6
Drive belts ........................................................................... 8-18
Driving
– Care when driving ........................................................... 5-5
– Cold weather driving ..................................................... 5-31
– Driving on wet road ......................................................... 5-5
– Driving the vehicle ......................................................... 5-11
– Driving under winter conditions ........................................ 5-5
– Driving with automatic transmission ............................... 5-12
– Driving with manual transmission ................................... 5-11
– Precautions when starting and driving .............................. 5-3
10-2Index