2007 NISSAN NOTE spare wheel
[x] Cancel search: spare wheelPage 152 of 235

hill gradient. Overheated brakes may reduce brak-
ing performance and could result in loss of vehicle
control.
CAUTION
While driving on a slippery surface, be careful
when braking, accelerating or downshifting.
Abrupt braking actions or sudden acceleration
could cause the wheels to skid and result in an
accident.
Be aware that brakes will fade if repeated heavy
brake applications are made.
Driving uphill
When starting on a steep gradient, it is sometimes
difficult to operate the brake (AT models) or both the
brake and clutch (MT models). Use the handbrake
to hold the vehicle. Do not slip the clutch (MT mod-
els). When ready to start, slowly release the hand-
brake while depressing the accelerator pedal and
releasing the clutch (MT models) or depressing the
accelerator pedal (AT models).
Driving downhill
The engine braking action is effective for controlling
the vehicle while descending hills.
The gear lever (MT models) should be placed in a
gear position low enough to obtain sufficient engine
braking.
For AT models, the 2 (Second) or 1 (First) gear
should be selected.
ANTI-LOCK BRAKING SYSTEM (ABS)
WARNING
•The Anti-lock Braking System (ABS) is a so-
phisticated device, but it cannot prevent acci-
dents resulting from careless or dangerous
driving techniques. It can help maintain ve-
hicle control during braking on slippery sur-
faces. Remember that stopping distances
may also be longer on rough, gravel or snow
covered roads, or if you are using snow
chains. Always maintain a safe distance from
the vehicle in front of you. Ultimately, the
driver is responsible for safety.
•Tyre type and condition may also affect brak-
ing effectiveness.
– When replacing tyres, install the specified
size of tyres on all four wheels.
– When installing a spare tyre, make sure it
is the proper size and type as specified on
the tyre placard. See “Vehicle
identification” in the “9. Technical
information” section for the tyre placard
location.
– For detailed information, see “Wheels and
tyres” in the “8. Maintenance and
do-it-yourself” section.
The Anti-lock Braking System (ABS) controls the
brakes so that the wheels do not lock during hard
braking or when braking on slippery surfaces. The
system detects the rotation speed at each wheeland varies the brake fluid pressure to prevent each
wheel from locking and sliding. By preventing each
wheel from locking, the system helps the driver to
maintain steering control and helps to minimise
swerving and spinning on slippery surfaces.
Using the system
Depress the brake pedal and hold it down. Depress
the brake pedal with firm steady pressure, but do
not pump the brakes. The ABS will operate to pre-
vent the wheels from locking up. Steer the vehicle to
avoid obstacles.
WARNING
Do not pump the brake pedal. Doing so may in-
crease the stopping distance.
Self-test feature
The ABS includes electronic sensors, electric
pumps, hydraulic solenoids and a computer. The
computer has a built-in diagnostic feature that tests
the system each time you start the engine and move
the vehicle at a low speed in forward or reverse.
When the self-test occurs, you may hear a “clunk”
noise and/or feel a pulsation in the brake pedal. This
is normal and does not indicate a malfunction. If the
computer senses a malfunction, it switches the ABS
off and illuminates the ABS warning light on the
instrument panel. The brake system then operates
normally, but without anti-lock assistance.
If the ABS warning light illuminates during the self-
test or while driving, have the vehicle checked by a
NISSAN dealer or qualified workshop.
5-28Starting and driving
Page 157 of 235
6In case of emergencyIn case of emergency
Spare tyre................................................................ 6-2
Temporary-use spare tyre ................................... 6-2
Flat tyre ................................................................... 6-3
Stopping the vehicle ........................................... 6-3
Changing flat tyre (Models with spare wheel,
where fitted) ....................................................... 6-3
Repairing flat tyre (Models with emergency
tyre puncture repair kit, where fitted) ................... 6-7Jump-starting ........................................................... 6-9
Push-starting ........................................................... 6-11
Engine overheat ....................................................... 6-11
Tow truck towing ..................................................... 6-12
Towing precautions ............................................ 6-12
Recommended towing ........................................ 6-13
Towing eye ......................................................... 6-13
Freeing the vehicle from sand, snow or mud ....... 6-14
Page 159 of 235
In case of a flat tyre, follow the instructions as de-
scribed below:
STOPPING THE VEHICLE
WARNING
•Make sure that the handbrake is securely ap-
plied.
•For Manual Transmission (MT) models: Make
sure the gear lever is in the R (Reverse) posi-
tion.
For Automatic Transmission (AT) models:
Make sure that the selector lever is in the P
(Park) position.
•Never change tyres when the vehicle is on a
slope, ice or a slippery area. This is hazard-
ous.
•Never change tyres if oncoming traffic is close
to your vehicle. Wait for professional road as-
sistance.
1. Safely move the vehicle off the road, away from
traffic.
2. Switch on the hazard warning flashers.
3. Park on a level surface.
4. Apply the handbrake.
5. Shift the gear lever (MT models) into the R (Re-
verse) position [AT models, move the selector
lever to the P (Park) position].
6. Turn off the engine.7. Open the bonnet (for details, see “Bonnet
release” in the “3. Pre-driving checks and
adjustments” section) in order to:
•Warn other traffic.
•Signal to professional road assistance that
you require assistance.
8. Have all passengers exit the vehicle and stand in
a safe place, away from traffic and clear of the
vehicle.
CHANGING FLAT TYRE (Models with
spare wheel, where fitted)
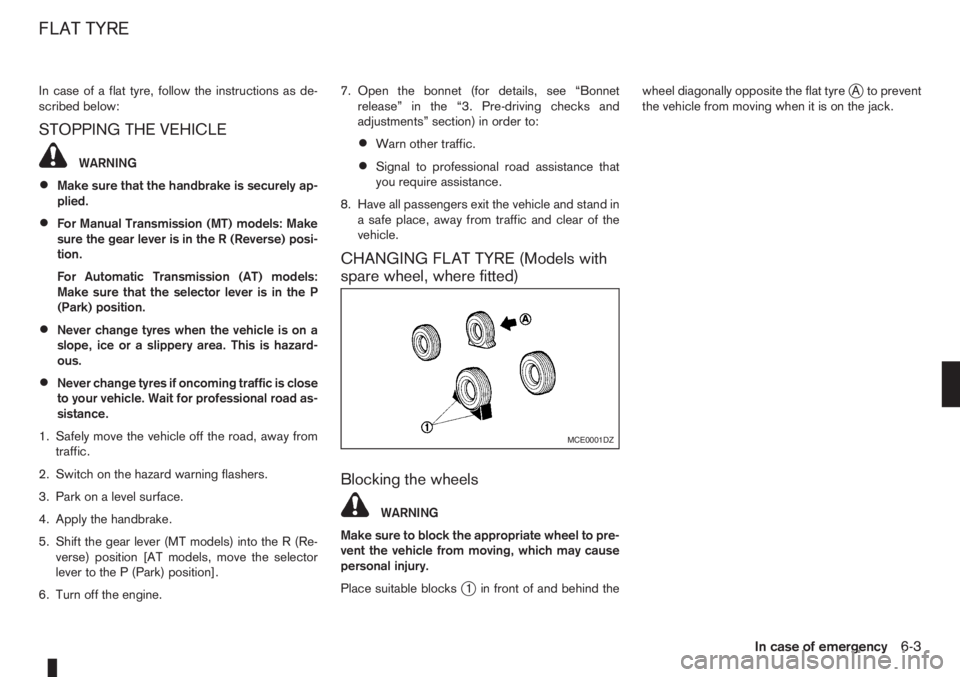
Blocking the wheels
WARNING
Make sure to block the appropriate wheel to pre-
vent the vehicle from moving, which may cause
personal injury.
Place suitable blocks
j1 in front of and behind thewheel diagonally opposite the flat tyre
jA to prevent
the vehicle from moving when it is on the jack.
MCE0001DZ
FLAT TYRE
In case of emergency6-3
Page 160 of 235
Getting the tools and spare wheel
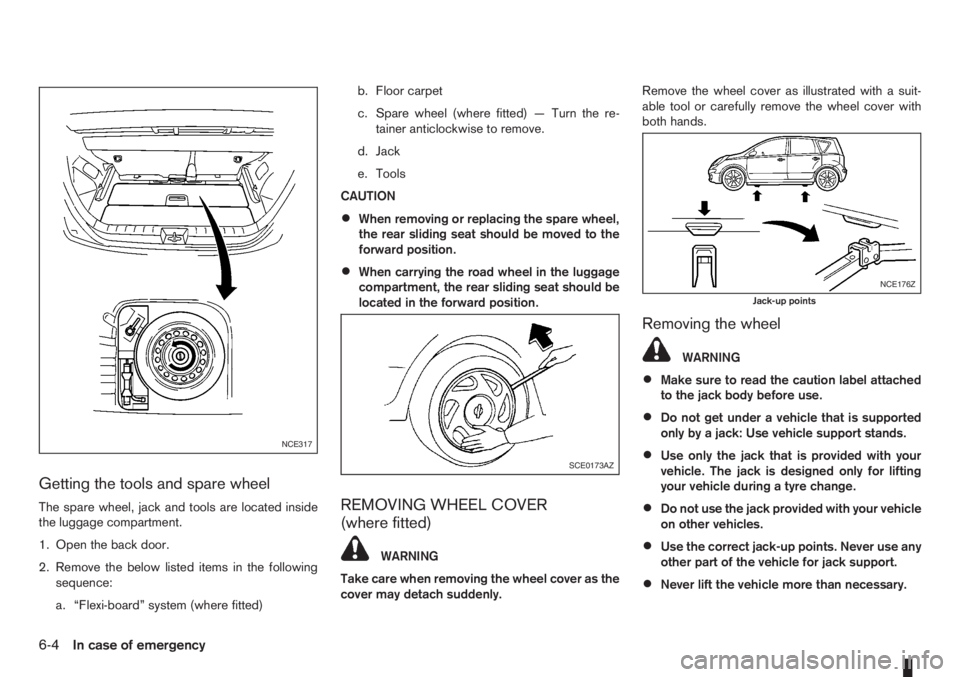
The spare wheel, jack and tools are located inside
the luggage compartment.
1. Open the back door.
2. Remove the below listed items in the following
sequence:
a. “Flexi-board” system (where fitted)b. Floor carpet
c. Spare wheel (where fitted) — Turn the re-
tainer anticlockwise to remove.
d. Jack
e. Tools
CAUTION
•When removing or replacing the spare wheel,
the rear sliding seat should be moved to the
forward position.
•When carrying the road wheel in the luggage
compartment, the rear sliding seat should be
located in the forward position.
REMOVING WHEEL COVER
(where fitted)
WARNING
Take care when removing the wheel cover as the
cover may detach suddenly.Remove the wheel cover as illustrated with a suit-
able tool or carefully remove the wheel cover with
both hands.
Removing the wheel
WARNING
•Make sure to read the caution label attached
to the jack body before use.
•Do not get under a vehicle that is supported
only by a jack: Use vehicle support stands.
•Use only the jack that is provided with your
vehicle. The jack is designed only for lifting
your vehicle during a tyre change.
•Do not use the jack provided with your vehicle
on other vehicles.
•Use the correct jack-up points. Never use any
other part of the vehicle for jack support.
•Never lift the vehicle more than necessary.
NCE317
SCE0173AZ
NCE176Z
Jack-up points
6-4In case of emergency
Page 162 of 235
CAUTION
The wheel is heavy. Be sure that your feet are
clear of the wheel and use gloves as necessary
to avoid injury.
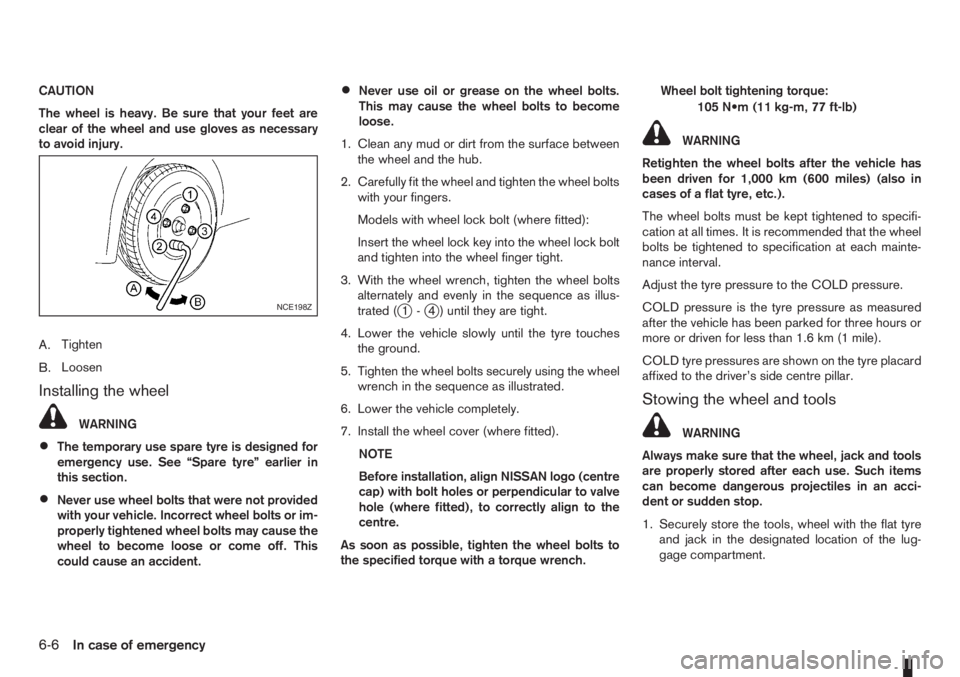
A.Tighten
B.Loosen
Installing the wheel
WARNING
•The temporary use spare tyre is designed for
emergency use. See “Spare tyre” earlier in
this section.
•Never use wheel bolts that were not provided
with your vehicle. Incorrect wheel bolts or im-
properly tightened wheel bolts may cause the
wheel to become loose or come off. This
could cause an accident.
•Never use oil or grease on the wheel bolts.
This may cause the wheel bolts to become
loose.
1. Clean any mud or dirt from the surface between
the wheel and the hub.
2. Carefully fit the wheel and tighten the wheel bolts
with your fingers.
Models with wheel lock bolt (where fitted):
Insert the wheel lock key into the wheel lock bolt
and tighten into the wheel finger tight.
3. With the wheel wrench, tighten the wheel bolts
alternately and evenly in the sequence as illus-
trated (
j1-j4 ) until they are tight.
4. Lower the vehicle slowly until the tyre touches
the ground.
5. Tighten the wheel bolts securely using the wheel
wrench in the sequence as illustrated.
6. Lower the vehicle completely.
7. Install the wheel cover (where fitted).
NOTE
Before installation, align NISSAN logo (centre
cap) with bolt holes or perpendicular to valve
hole (where fitted), to correctly align to the
centre.
As soon as possible, tighten the wheel bolts to
the specified torque with a torque wrench.Wheel bolt tightening torque:
105 N•m (11 kg-m, 77 ft-lb)
WARNING
Retighten the wheel bolts after the vehicle has
been driven for 1,000 km (600 miles) (also in
cases of a flat tyre, etc.).
The wheel bolts must be kept tightened to specifi-
cation at all times. It is recommended that the wheel
bolts be tightened to specification at each mainte-
nance interval.
Adjust the tyre pressure to the COLD pressure.
COLD pressure is the tyre pressure as measured
after the vehicle has been parked for three hours or
more or driven for less than 1.6 km (1 mile).
COLD tyre pressures are shown on the tyre placard
affixed to the driver’s side centre pillar.
Stowing the wheel and tools
WARNING
Always make sure that the wheel, jack and tools
are properly stored after each use. Such items
can become dangerous projectiles in an acci-
dent or sudden stop.
1. Securely store the tools, wheel with the flat tyre
and jack in the designated location of the lug-
gage compartment.
NCE198Z
6-6In case of emergency
Page 169 of 235
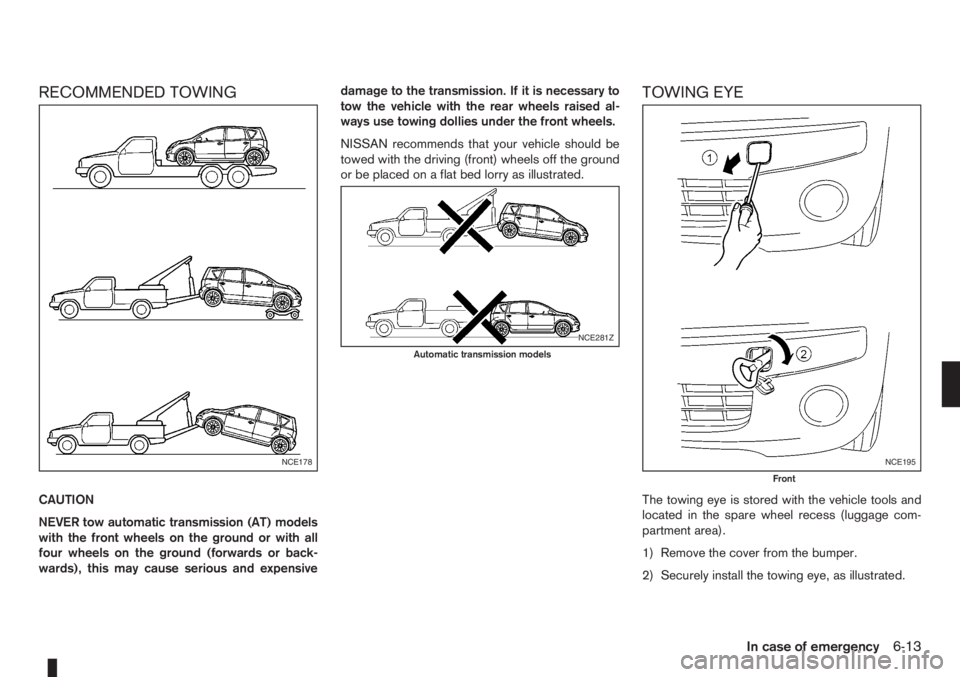
RECOMMENDED TOWING
CAUTION
NEVER tow automatic transmission (AT) models
with the front wheels on the ground or with all
four wheels on the ground (forwards or back-
wards), this may cause serious and expensivedamage to the transmission. If it is necessary to
tow the vehicle with the rear wheels raised al-
ways use towing dollies under the front wheels.
NISSAN recommends that your vehicle should be
towed with the driving (front) wheels off the ground
or be placed on a flat bed lorry as illustrated.
TOWING EYE
The towing eye is stored with the vehicle tools and
located in the spare wheel recess (luggage com-
partment area).
1) Remove the cover from the bumper.
2) Securely install the towing eye, as illustrated.
NCE178
NCE281Z
Automatic transmission models
NCE195
Front
In case of emergency6-13
Page 176 of 235

8Maintenance and do-it-yourselfMaintenance and do-it-yourself
Maintenance requirements ....................................... 8-2
Scheduled maintenance...................................... 8-2
General maintenance .......................................... 8-2
Where to go for service ...................................... 8-2
General maintenance ............................................... 8-2
Explanation of general maintenance items ........... 8-2
Maintenance precautions ......................................... 8-4
Engine compartment ................................................ 8-5
Engine cooling system ............................................. 8-6
Checking engine coolant level............................. 8-6
Changing engine coolant .................................... 8-6
Engine oil................................................................. 8-8
Checking engine oil level .................................... 8-9
Changing engine oil ............................................ 8-9
Changing engine oil filter .................................... 8-11
Protect the environment ...................................... 8-12
Fuel filter (Diesel engine models) ............................. 8-12
Bleeding the fuel system ..................................... 8-12
Automatic transmission fluid (ATF) ........................... 8-13
Brakes ..................................................................... 8-13
Checking brake pedal......................................... 8-13
Checking handbrake........................................... 8-13
Brake and clutch fluid .............................................. 8-13
Window washer fluid/headlight cleaner fluid
(where fitted) ........................................................... 8-14
Battery..................................................................... 8-15
Vehicle battery .................................................... 8-15
Reinitialisation procedure after battery
reconnection....................................................... 8-16
Jump-starting ...................................................... 8-16Integrated Keyfob/Intelligent Key battery
replacement........................................................ 8-17
Drive belts ............................................................... 8-18
Spark plugs (Petrol engine models).......................... 8-18
Air cleaner filter........................................................ 8-19
Viscous paper type ............................................. 8-19
Dry paper type (where fitted) .............................. 8-19
Wiper blades ........................................................... 8-19
Cleaning ............................................................. 8-19
Front window wiper replacement ........................ 8-20
Back door window wiper replacement ................ 8-20
Windscreen washer nozzle ................................. 8-20
Fuses ...................................................................... 8-21
Passenger compartment ..................................... 8-21
Engine compartment ........................................... 8-22
Lights ...................................................................... 8-23
Headlights .......................................................... 8-23
Exterior lights ...................................................... 8-24
Interior lights....................................................... 8-24
Light locations .................................................... 8-25
Wheels and tyres ..................................................... 8-29
Tyre inflation pressure......................................... 8-29
Types of tyres ..................................................... 8-29
Snow chains....................................................... 8-30
Tyre rotation ....................................................... 8-30
Tyre wear and damage ....................................... 8-30
Tyre age ............................................................. 8-31
Changing tyres and wheels ................................. 8-31
Wheel balance.................................................... 8-31
Spare tyre .......................................................... 8-31
Page 179 of 235

Lights*:
Clean the headlights on a regular basis. Make sure
that the headlights, stop lights, tail lights, turn signal
lights, and other lights are all operating properly and
installed securely. Also check headlight aim.
Tyres*:
Check the pressure with a gauge periodically when
at a service station (including the spare) and adjust
to the specified pressure if necessary. Check care-
fully for damage, cuts or excessive wear.
Tyre rotation*:
Tyres should be rotated at least every 10,000 km
(6,000 miles). However, the timing for tyre rotation
may vary according to your driving habits and road
surface conditions.
Wheel alignment and balance:
If the vehicle pull to either side while driving on a
straight and level road, or if you detect uneven or
abnormal tyre wear, there may be a need for wheel
alignment. If the steering wheel or seat vibrates at
normal highway speeds, wheel balancing may be
needed.
Wheel bolts:
When checking the tyres, make sure no wheel bolts
are missing, and check for any loose wheel bolts.
Tighten if necessary.Windscreen:
Clean the windscreen on a regular basis. Check the
windscreen at least every six months for cracks or
other damage. Have a damaged windscreen re-
paired by a qualified repair facility.
Wiper blades*:
Check for cracks or wear if they do not wipe prop-
erly.
Under the bonnet and vehicle
The maintenance items listed here should be
checked periodically, e.g. each time you check the
engine oil or refuel.
Battery*:
Check if the green indicator on the top of the main-
tenance free battery is visible. If it is not visible,
replace the battery as soon as possible.
Vehicles operated in high temperatures or under
severe conditions, check the fluid level frequently.
Brake and clutch fluid level*:
Make sure that the brake and clutch fluid level is
between the MAX and MIN lines on the reservoir.
Engine coolant level*:
Check the coolant level when the engine is cold.
Engine drive belts*:
Make sure that the drive belts are not frayed, worn,
cracked or oily.Engine oil level*:
Check the level after parking the vehicle on a level
surface and turning off the engine.
Fluid leaks:
Check under the vehicle for fuel, oil, water or other
fluid leaks after the vehicle has been parked for a
while. Water dripping from the air conditioner after
use is normal. If you should notice any leaks or if
petrol fumes are evident, check for the cause and
have it corrected immediately.
Window washer fluid*:
Check that there is adequate fluid in the tank.
Inside the vehicle
The maintenance items listed here should be
checked on a regular basis, such as when perform-
ing periodic maintenance, cleaning the vehicle, etc.
Accelerator pedal:
Check the pedal for smooth operation and make
sure that the pedal does not catch or require uneven
effort. Keep the floor mats away from the pedal.
Brake pedal*:
Check the pedal for smooth operation. If the brake
pedal suddenly goes down further than normal, the
pedal feels spongy or the vehicle seems to take
longer to stop, contact a NISSAN dealer or qualified
workshop immediately. Keep the floor mat away
from the pedal.
Maintenance and do-it-yourself8-3