Page 145 of 345

even though the ignition switch is in the
ONposition.
5. The hazard indicator flashes twice and the
horn chirps once.
�When the LOCK button
�Ais pushed with all
doors locked, the hazard indicator flashes
twice and the horn chirps once as a reminder
that the doors are already locked.
*1: Doors lock with the Intelligent Key while the
mechanical key or the valet key is in the
ignition switch or the ignition switch is
pushed in.
*2: Doors do not lock and buzzer sounds when
the LOCK button is pushed while any door
is open.
Unlocking doors and fuel-filler door:
1. Push the UNLOCK button�B
on the Intelli-
gent Key once.
�The driver’s door and fuel-filler door unlock
�The hazard indicator flashes once if all doors
are completely closed with the ignition switch
in any position except the ON position.
�The interior light turns on and the light timer
activates for 30 seconds when the switch is
in the DOOR position with the ignition switch
in any position except the ON position.2. Push the UNLOCK button
�B
on the Intelli-
gent Key again within 5 seconds.
�All doors unlock.
�Lift gate unlocks.
�The hazard indicator flashes once if all doors
are completely closed.
All doors will be locked automatically unless one
of the following operations is performed within 1
minute of pushing the UNLOCK button
�B.
�any door is open
�the ignition switch is pushed
�the mechanical key or the valet key is inserted
into the ignition switch
The interior light can be turned off without
waiting for 30 seconds by turning the ignition
switch to the ON position or by locking the
doors with the Intelligent Key.
Opening and closing front windows:
�To open the windows, push the UNLOCK
button
�B
forabout 3 secondsor turn the
driver’s door key lock with the metal key to
the rear of the vehicle forabout 2 seconds
after the door is unlocked.
To stop opening, release the UNLOCK but-
ton
�Bor turn the key to the neutral position.�To close the front windows, turn the driver’s
door key lock to the front of the vehicle for
about 2 secondsafter the door is locked.
To stop closing, turn the key to the neutral
position.
The door windows will open or close while
turning the metal key. See “Doors” earlier in this
section.
Using the panic alarm:
If you are near your vehicle and feel threatened,
you may activate the alarm to call attention as
follows:
1. Push the PANIC button
�C
on the Intelligent
Key forlonger than 0.5 secondswith the
metal key removed from the ignition switch or
the ignition switch not pushed in.
2. The theft warning alarm and headlights will
stay on for 25 seconds.
3. The panic alarm stops when:
�It has run for 25 seconds, or
�Any of the buttons on the Intelligent Key are
pushed.
3-22
Pre-driving checks and adjustments
�
06.7.5/Z50-D/V5.0
�
Page 147 of 345
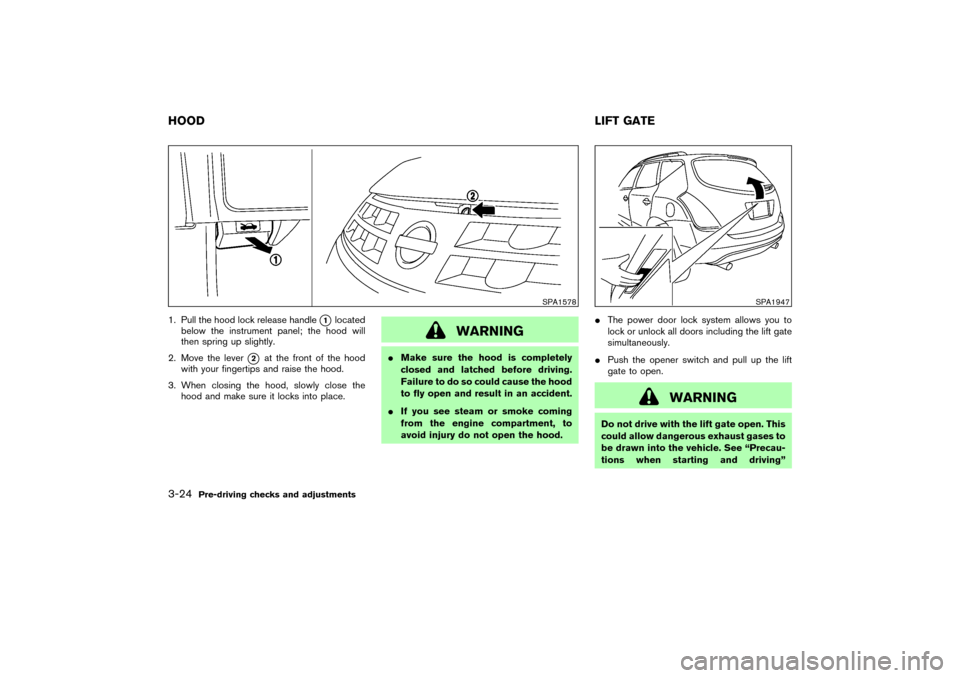
1. Pull the hood lock release handle
�1
located
below the instrument panel; the hood will
then spring up slightly.
2. Move the lever
�2
at the front of the hood
with your fingertips and raise the hood.
3. When closing the hood, slowly close the
hood and make sure it locks into place.
WARNING
�Make sure the hood is completely
closed and latched before driving.
Failure to do so could cause the hood
to fly open and result in an accident.
�If you see steam or smoke coming
from the engine compartment, to
avoid injury do not open the hood.�The power door lock system allows you to
lock or unlock all doors including the lift gate
simultaneously.
�Push the opener switch and pull up the lift
gate to open.
WARNING
Do not drive with the lift gate open. This
could allow dangerous exhaust gases to
be drawn into the vehicle. See “Precau-
tions when starting and driving”
SPA1578
SPA1947
HOODLIFT GATE3-24
Pre-driving checks and adjustments
�
06.7.5/Z50-D/V5.0
�
Page 148 of 345
in the “5. Starting and driving” section
for exhaust gas.
Emergency unlock leverIf the lift gate cannot be opened with the door
lock switch or remote controller due to a dis-
charged battery, follow the next steps.
1. Remove the cover inside of the lift gate with a
suitable tool.
2. Move the lever toward the direction
�A
as
illustrated to open the lift gate.
Contact a NISSAN dealer as soon as possible.
WARNING
�Always be sure the lift gate has been
closed securely to prevent it from
opening while driving.
�Do not drive with the lift gate open.
This could allow dangerous exhaust
gases to be drawn into the vehicle.
SPA1915
Pre-driving checks and adjustments
3-25
�
06.7.5/Z50-D/V5.0
�
Page 150 of 345

FUEL-FILLER CAPThe fuel-filler cap is a ratcheting type. Turn the
cap counterclockwise
�A
to remove.
To tighten, turn the cap clockwise until ratchet-
ing clicks are heard.
Put the fuel-filler cap on the cap holder
�Bwhile
refueling.
WARNING
�Gasoline is extremely flammable andhighly explosive under certain condi-
tions. You could be burned or seri-
ously injured if it is misused or mis-
handled. Always stop the engine and
do not smoke or allow open flames
or sparks near the vehicle when refu-
eling.
�Fuel may be under pressure. Turn the
cap a third of a turn, and wait for any
“hissing sound” to stop to prevent
fuel from spraying out and possibly
causing personal injury. Then remove
the cap.�Do not attempt to top off the fuel
tank after the fuel pump nozzle shuts
off automatically.
Continued refueling may cause fuel
overflow, resulting in fuel spray and
possibly a fire.
�Use only an original equipment type
fuel-filler cap as a replacement. It has
a built-in safety valve needed for
proper operation of the fuel system
and emission control system. An in-
correct cap can result in a serious
malfunction and possible injury. It
could also cause the
malfunc-
tion indicator light to come on.
�Do not fill a portable fuel container in
the vehicle or trailer. Static electricity
can cause an explosion of flammable
liquid, vapor or gas in any vehicle or
trailer. To reduce the risk of serious
injury or death when filling portable
fuel containers:
— Always place the container on the
ground when filling.
— Do not use electronic devices
SPA1581A
Pre-driving checks and adjustments
3-27
�
06.7.5/Z50-D/V5.0
�
Page 151 of 345

when filling.
— Keep the pump nozzle in contact
with the container while you are
filling it.
— Use only approved portable fuel
containers for flammable liquid.
�Never pour fuel into the throttle body
to attempt to start your vehicle.
CAUTION
�If fuel is spilled on the vehicle body,
flush it away with water to avoid
paint damage.
�Tighten until the fuel-filler cap clicks.
Failure to tighten the fuel-filler cap
properly may cause the
mal-
function indicator light (MIL) to illu-
minate. If the
light illuminates
because the fuel-filler cap is loose or
missing, tighten or install the cap and
continue to drive the vehicle. The
light should turn off after a few
driving trips. If the
light doesnot turn off after a few driving trips,
have the vehicle inspected by a
NISSAN dealer.
�For additional information, see the
“Malfunction indicator light (MIL)” in
the “Instruments and controls” sec-
tion.
WARNING
�Do not adjust the steering wheel
while driving. You could lose control
of your vehicle and cause an acci-
dent.
�Do not put anything on or near the
steering wheel when tilting.TILT OPERATIONThe steering wheel will pop up when the lock
SPA1582
STEERING WHEEL
3-28
Pre-driving checks and adjustments
�
06.7.5/Z50-D/V5.0
�
Page 153 of 345
CAUTION
�Do not store the main sun visor be-
fore storing the extension sun visor.
�Do not pull the extension sun visor
forcedly downward.
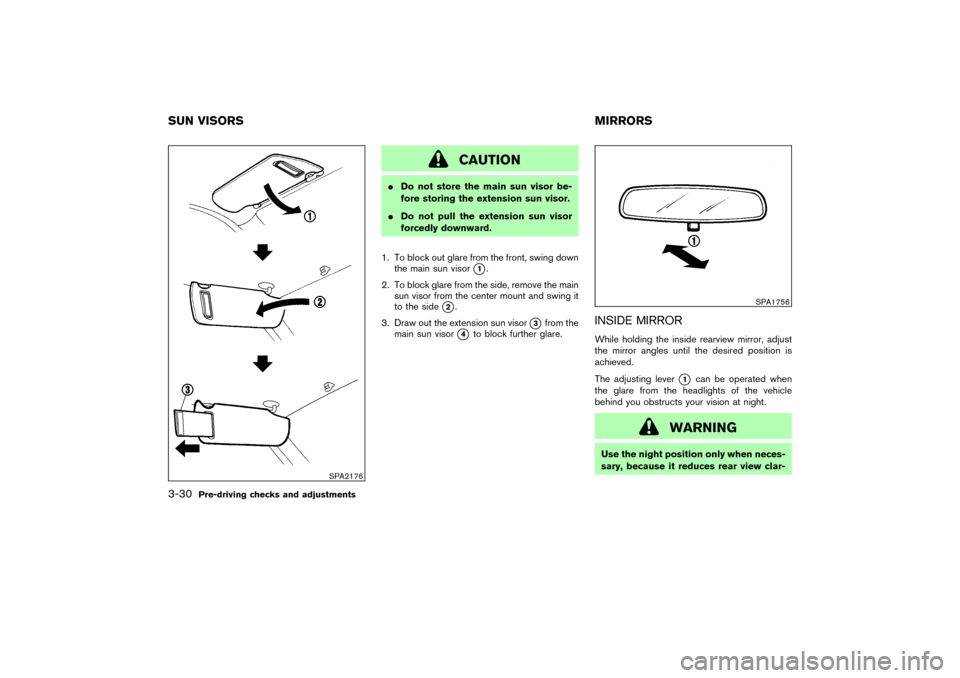
1. To block out glare from the front, swing down
the main sun visor
�1.
2. To block glare from the side, remove the main
sun visor from the center mount and swing it
to the side
�2.
3. Draw out the extension sun visor
�3from the
main sun visor
�4
to block further glare.
INSIDE MIRRORWhile holding the inside rearview mirror, adjust
the mirror angles until the desired position is
achieved.
The adjusting lever
�1
can be operated when
the glare from the headlights of the vehicle
behind you obstructs your vision at night.
WARNING
Use the night position only when neces-
sary, because it reduces rear view clar-
SPA2176
SPA1756
SUNVISORS MIRRORS3-30
Pre-driving checks and adjustments
�
06.7.5/Z50-D/V5.0
�
Page 155 of 345
OUTSIDE MIRRORS
WARNING
Objects viewed in the outside mirror on
the passenger side are closer than they
appear. Be careful when moving to the
right. Using only this mirror could cause
an accident. Use the inside mirror or
glance over your shoulder to properly
judge distances to other objects.
The outside mirror switch, located in front of theselector lever, will operate only when the ignition
switch is in the ACC or ON position.
Move the switch to right
�A
or left
�B
to select
the right or left outside mirror, then adjust the
mirror to the desired position by pushing the
button
�C.
Foldable outside mirrorsFold the outside mirror by pushing it toward the
rear of the vehicle.
SPA1449A
SPA1829
3-32
Pre-driving checks and adjustments
�
06.7.5/Z50-D/V5.0
�
Page 161 of 345
WARNING
�Do not disassemble or modify this
system. If you do, it may result in
accidents, fire, or electrical shock.
�Do not use this system if you notice
any abnormality, such as a frozen
screen or lack of sound. Continued
use of the system may result in acci-
dent, fire or electric shock.
�In case you notice any foreign object
in the system hardware, spill liquid
on it, or notice smoke or smell com-
ing from it, stop using the system
immediately and contact a NISSAN
dealer. Ignoring such conditions may
lead to accidents, fire, or electrical
shock.
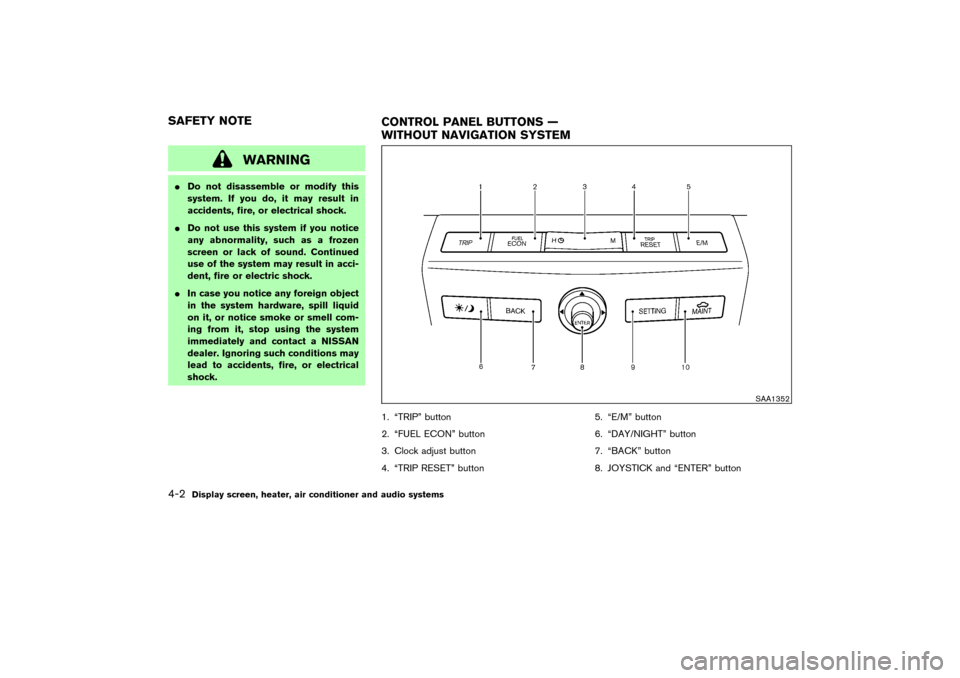
1. “TRIP” button
2. “FUEL ECON” button
3. Clock adjust button
4. “TRIP RESET” button5. “E/M” button
6. “DAY/NIGHT” button
7. “BACK” button
8. JOYSTICK and “ENTER” button
SAA1352
SAFETY NOTE
CONTROL PANEL BUTTONS —
WITHOUT NAVIGATION SYSTEM4-2
Display screen, heater, air conditioner and audio systems
�
06.7.5/Z50-D/V5.0
�