2007 NISSAN MAXIMA brake
[x] Cancel search: brakePage 11 of 336

1. Glove box (P. 2-34)
2. Automatic anti-glare inside mirror
(P. 3-25)
3. Sun visors (P. 3-24)
4. Interior lights, illuminated entry (P. 2-42)
5. Front seat (P. 1-2)
6. Sunroof (if so equipped) (P. 2-39)
7. Rear console (P. 2-35)
8. Rear seat (P. 1-6)
9. Rear cup holders (P. 2-32)
10. Front console (P. 2-34)
11. Front cup holders (P. 2-32)
12. Park brake, parking on hills
(P. 5-13, P. 5-17)
13. HomeLinkT(P. 2-44)
See the page number indicated in paren-
theses for operating details.
LII0069
PASSENGER COMPARTMENT
Illustrated table of contents0-5
ZREVIEW COPYÐ2007 Maxima(max)
Owners ManualÐUSA_English(nna)
01/26/07Ðarosenma
X
Page 13 of 336

1. Power steering fluid reservoir (P. 8-11)
2. Engine oil filler cap (P. 8-8)
3. Brake fluid reservoir (P. 8-12)
4. Air cleaner (P. 8-16)
5. Battery (P. 8-13)
6. Fuse/fusible link box (P. 8-21)
7. Engine oil dipstick (P. 8-8)
8. Radiator cap (P. 8-7)
9. Drive belt location (P.8-14)
10. Fuse block (P. 8-21)
11. Windshield washer fluid reservoir
(P. 8-12)
12. Engine coolant reservoir (P. 8-7)
NOTE:
Engine cover removed for clarity.
See the page number indicated in paren-
theses for operating details.
WDI0525
ENGINE COMPARTMENT CHECK
LOCATIONS
Illustrated table of contents0-7
ZREVIEW COPYÐ2007 Maxima(max)
Owners ManualÐUSA_English(nna)
01/26/07Ðarosenma
X
Page 14 of 336

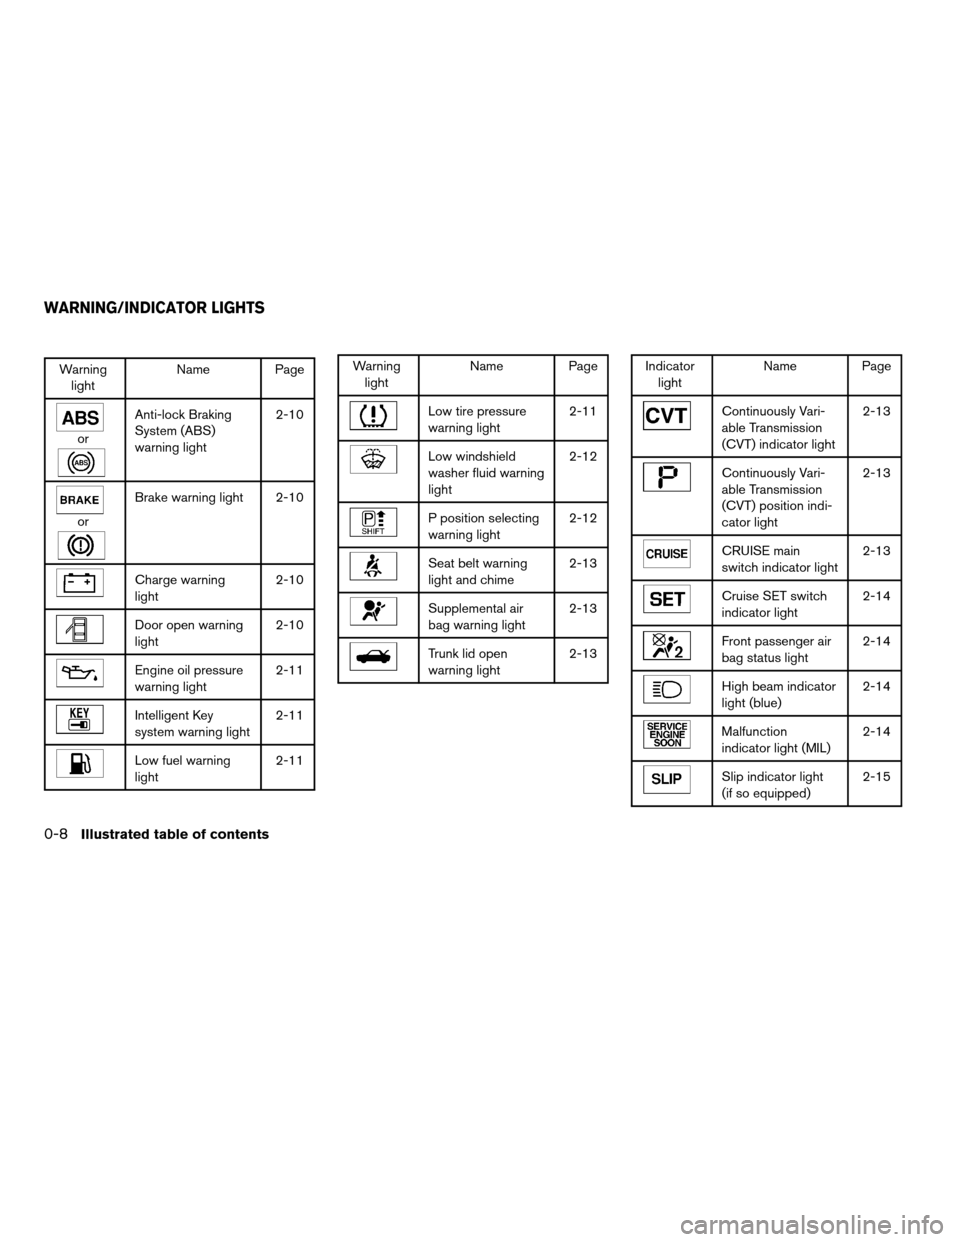
Warning
lightName Page
or
Anti-lock Braking
System (ABS)
warning light2-10
or
Brake warning light 2-10
Charge warning
light2-10
Door open warning
light2-10
Engine oil pressure
warning light2-11
Intelligent Key
system warning light2-11
Low fuel warning
light2-11
Warning
lightName Page
Low tire pressure
warning light2-11
Low windshield
washer fluid warning
light2-12
P position selecting
warning light2-12
Seat belt warning
light and chime2-13
Supplemental air
bag warning light2-13
Trunk lid open
warning light2-13
Indicator
lightName Page
Continuously Vari-
able Transmission
(CVT) indicator light2-13
Continuously Vari-
able Transmission
(CVT) position indi-
cator light2-13
CRUISE main
switch indicator light2-13
Cruise SET switch
indicator light2-14
Front passenger air
bag status light2-14
High beam indicator
light (blue)2-14
Malfunction
indicator light (MIL)2-14
Slip indicator light
(if so equipped)2-15
WARNING/INDICATOR LIGHTS
0-8Illustrated table of contents
ZREVIEW COPYÐ2007 Maxima(max)
Owners ManualÐUSA_English(nna)
01/26/07Ðarosenma
X
Page 79 of 336

orAnti-lock Braking System
(ABS) warning lightLow windshield washer fluid warning lightCruise SET switch indicator light
orBrake warning lightP Position selecting warning lightFront passenger air bag status light
Charge warning lightSeat belt warning light and chimeHigh beam indicator light (Blue)
Door open warning lightSupplemental air bag warning lightMalfunction indicator light (MIL)
Engine oil pressure warning lightTrunk lid open warning lightSlip indicator light (if so equipped)
Intelligent Key system warning lightContinuously Variable Transmission (CVT)
indicator lightTraction control system off indicator light
(if so equipped)
Low fuel warning lightContinuously Variable Transmission (CVT)
position indicator lightTurn signal/hazard indicator lights
Low tire pressure warning lightCRUISE main switch indicator lightVehicle dynamic control off indicator light
(if so equipped)
CHECKING BULBS
With all doors closed, apply the parking brake
and turn the ignition key to the ON position
without starting the engine. The following lights
will come on:
,or,,,
If equipped, the following lights come on briefly
and then go off:
or,,,,,,
,,
If any light fails to come on, it may indicate
a burned-out bulb or an open circuit in the
electrical system. Have the system repaired
promptly.
WARNING/INDICATOR LIGHTS AND
AUDIBLE REMINDERS
Instruments and controls2-9
ZREVIEW COPYÐ2007 Maxima(max)
Owners ManualÐUSA_English(nna)
01/26/07Ðarosenma
X
Page 80 of 336

WARNING LIGHTS
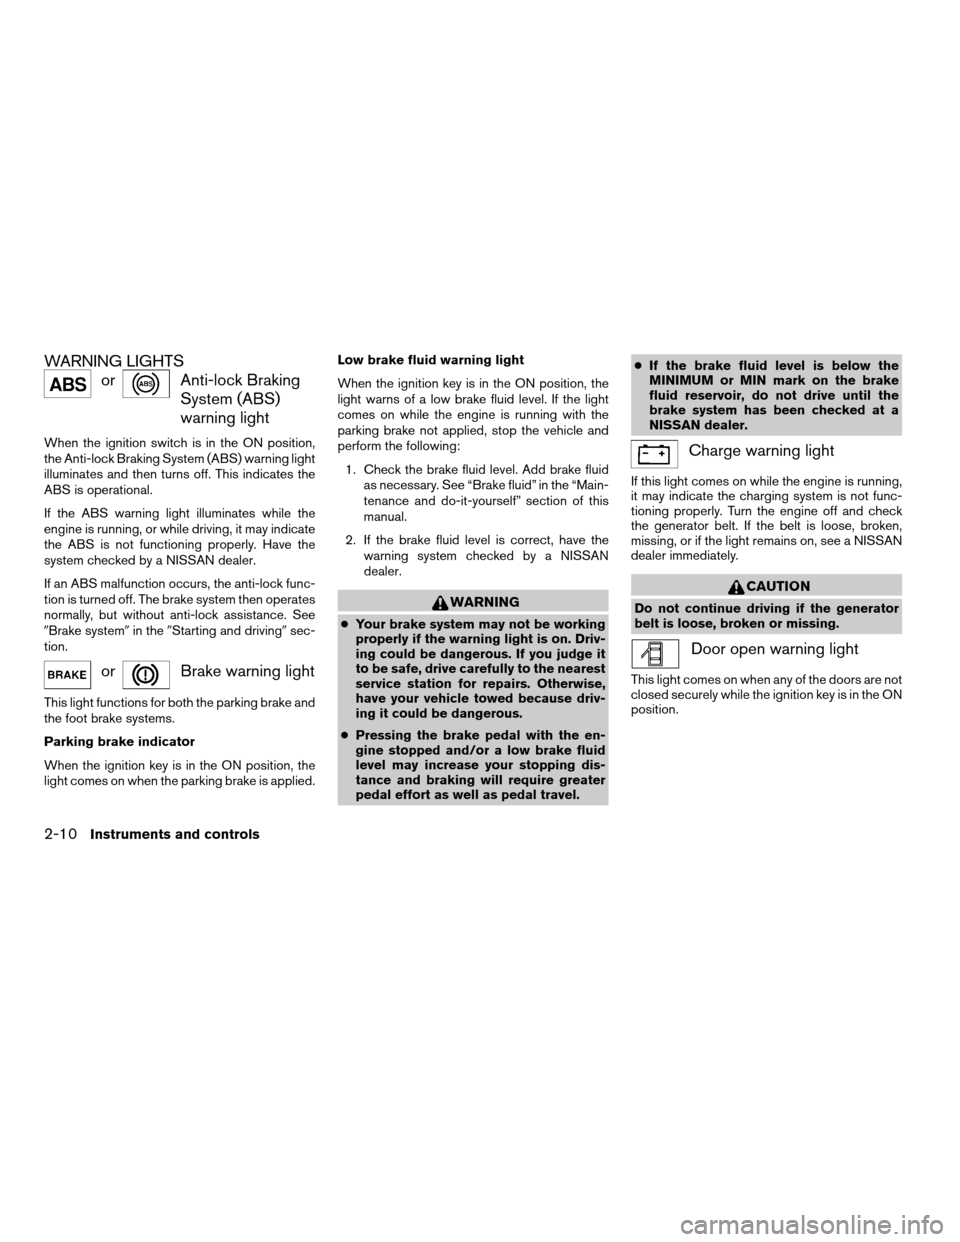
orAnti-lock Braking
System (ABS)
warning light
When the ignition switch is in the ON position,
the Anti-lock Braking System (ABS) warning light
illuminates and then turns off. This indicates the
ABS is operational.
If the ABS warning light illuminates while the
engine is running, or while driving, it may indicate
the ABS is not functioning properly. Have the
system checked by a NISSAN dealer.
If an ABS malfunction occurs, the anti-lock func-
tion is turned off. The brake system then operates
normally, but without anti-lock assistance. See
9Brake system9in the9Starting and driving9sec-
tion.
orBrake warning light
This light functions for both the parking brake and
the foot brake systems.
Parking brake indicator
When the ignition key is in the ON position, the
light comes on when the parking brake is applied.Low brake fluid warning light
When the ignition key is in the ON position, the
light warns of a low brake fluid level. If the light
comes on while the engine is running with the
parking brake not applied, stop the vehicle and
perform the following:
1. Check the brake fluid level. Add brake fluid
as necessary. See “Brake fluid” in the “Main-
tenance and do-it-yourself” section of this
manual.
2. If the brake fluid level is correct, have the
warning system checked by a NISSAN
dealer.
WARNING
cYour brake system may not be working
properly if the warning light is on. Driv-
ing could be dangerous. If you judge it
to be safe, drive carefully to the nearest
service station for repairs. Otherwise,
have your vehicle towed because driv-
ing it could be dangerous.
cPressing the brake pedal with the en-
gine stopped and/or a low brake fluid
level may increase your stopping dis-
tance and braking will require greater
pedal effort as well as pedal travel.cIf the brake fluid level is below the
MINIMUM or MIN mark on the brake
fluid reservoir, do not drive until the
brake system has been checked at a
NISSAN dealer.
Charge warning light
If this light comes on while the engine is running,
it may indicate the charging system is not func-
tioning properly. Turn the engine off and check
the generator belt. If the belt is loose, broken,
missing, or if the light remains on, see a NISSAN
dealer immediately.
CAUTION
Do not continue driving if the generator
belt is loose, broken or missing.
Door open warning light
This light comes on when any of the doors are not
closed securely while the ignition key is in the ON
position.
2-10Instruments and controls
ZREVIEW COPYÐ2007 Maxima(max)
Owners ManualÐUSA_English(nna)
01/26/07Ðarosenma
X
Page 86 of 336

AUDIBLE REMINDERS
Brake pad wear warning
The disc brake pads have audible wear warnings.
When a disc brake pad requires replacement, it
makes a high pitched scraping sound when the
vehicle is in motion, whether or not the brake
pedal is depressed. Have the brakes checked as
soon as possible if the warning sound is heard.
Key reminder chime
A chime sounds if the driver’s door is opened
while the key is left in the ignition switch. Remove
the key and take it with you when leaving the
vehicle.
Light reminder chime
With the ignition switch in the OFF position, a
chime sounds when the driver’s door is opened if
the headlights or parking lights are on.
Turn the headlight control switch off before leav-
ing the vehicle.
Intelligent Key door buzzer
The Intelligent Key door buzzer sounds if any one
of the following improper operations is found.
cThe Intelligent Key is left inside the vehicle
when locking the doors.cAny doors are not closed securely when
locking the doors.
When the buzzer sounds, be sure to check both
the vehicle and the Intelligent Key. See “Intelli-
gent Key system” in the “Pre-driving checks and
adjustments” section.
Your vehicle has two types of security systems:
cVehicle security system
cNISSAN Vehicle Immobilizer System
VEHICLE SECURITY SYSTEM
The vehicle security system provides visual and
audible alarm signals if someone opens the doors
or trunk lid when the system is armed. It is not,
however, a motion detection type system that
activates when a vehicle is moved or when a
vibration occurs.
The system helps deter vehicle theft but cannot
prevent it, nor can it prevent the theft of interior or
exterior vehicle components in all situations. Al-
LIC0301
SECURITY SYSTEMS
2-16Instruments and controls
ZREVIEW COPYÐ2007 Maxima(max)
Owners ManualÐUSA_English(nna)
01/26/07Ðarosenma
X
Page 94 of 336

CAUTION
Even though the battery saver feature au-
tomatically turns off the headlights after a
period of time, you should turn the head-
light switch to the OFF position when the
engine is not running to avoid discharging
the vehicle battery.
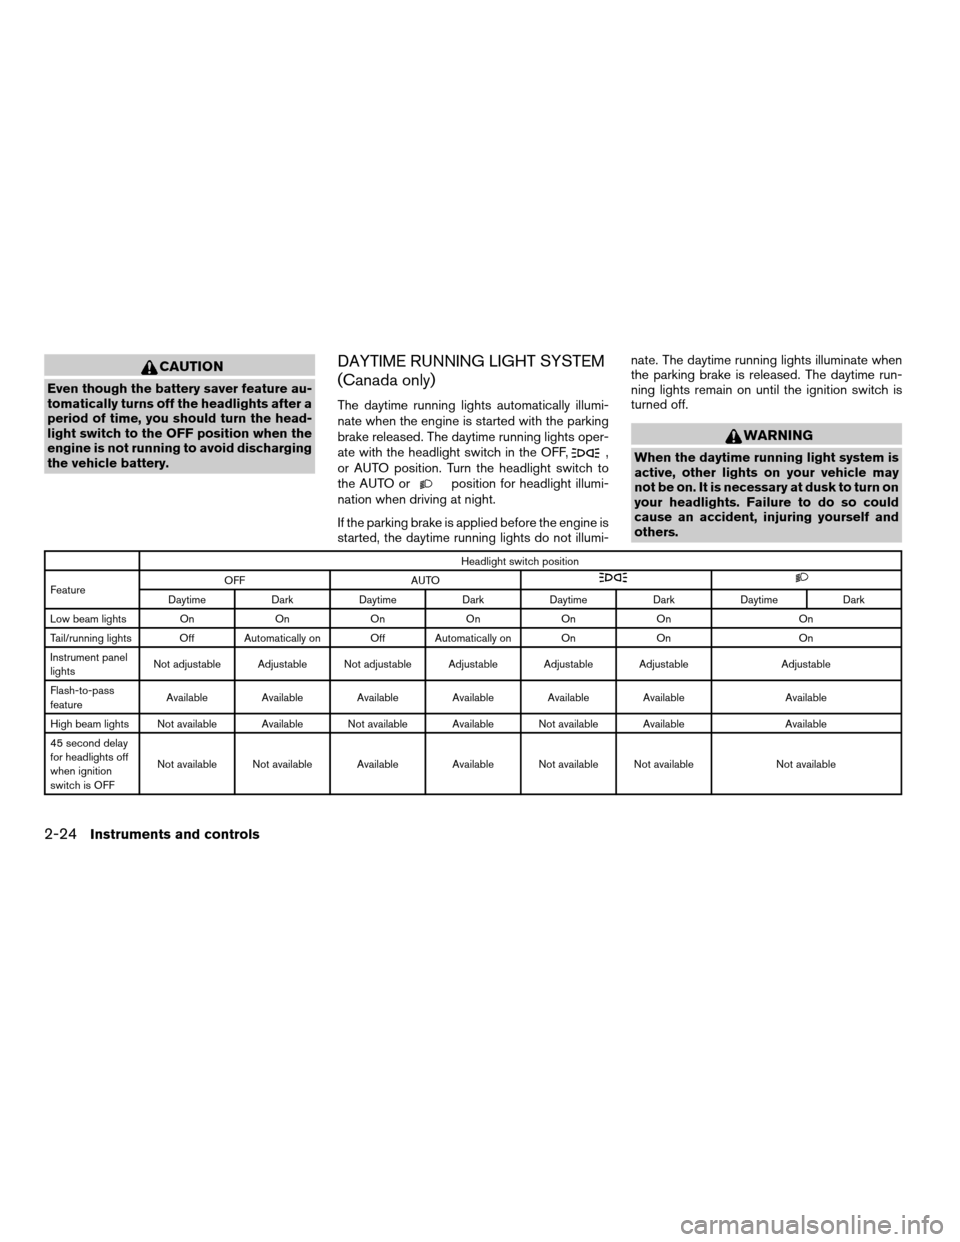
DAYTIME RUNNING LIGHT SYSTEM
(Canada only)
The daytime running lights automatically illumi-
nate when the engine is started with the parking
brake released. The daytime running lights oper-
ate with the headlight switch in the OFF,
,
or AUTO position. Turn the headlight switch to
the AUTO or
position for headlight illumi-
nation when driving at night.
If the parking brake is applied before the engine is
started, the daytime running lights do not illumi-nate. The daytime running lights illuminate when
the parking brake is released. The daytime run-
ning lights remain on until the ignition switch is
turned off.
WARNING
When the daytime running light system is
active, other lights on your vehicle may
not be on. It is necessary at dusk to turn on
your headlights. Failure to do so could
cause an accident, injuring yourself and
others.
Headlight switch position
FeatureOFF AUTO
Daytime Dark Daytime Dark Daytime Dark Daytime Dark
Low beam lights On On On On On On On
Tail/running lights Off Automatically on Off Automatically on On On On
Instrument panel
lightsNot adjustable Adjustable Not adjustable Adjustable Adjustable Adjustable Adjustable
Flash-to-pass
featureAvailable Available Available Available Available Available Available
High beam lights Not available Available Not available Available Not available Available Available
45 second delay
for headlights off
when ignition
switch is OFFNot available Not available Available Available Not available Not available Not available
2-24Instruments and controls
ZREVIEW COPYÐ2007 Maxima(max)
Owners ManualÐUSA_English(nna)
01/26/07Ðarosenma
X
Page 147 of 336

3. Adjust the driver’s seat, steering column,
and outside mirrors to the desired positions
by manually operating each adjusting
switch. For additional information, see
“Seats” in the “Safety—Seats, seat belts and
supplemental restraint system” section and
“Pedal position adjustment” and “Outside
mirrors” earlier in this section.
During this step, do not turn the ignition to
any position other than ON.
4. Push the SET switch and, within 5 seconds,
push the memory switch (1 or 2) fully for at
least 1 second.
The indicator light for the pushed memory
switch will come on and stay on for approxi-
mately 5 seconds after pushing the switch.
After the indicator light goes off, the se-
lected positions are stored in the selected
memory (1 or 2) .
If a new memory is stored in the same memory
switch, the previous memory will be deleted.
Linking a keyfob to a stored memory
position
Each keyfob can be linked to a stored memory
position (memory switch 1 or 2) with the follow-
ing procedure.1. Follow the steps for storing a memory posi-
tion.
2. While the indicator light for the memory
switch being set is illuminated for 5 sec-
onds, press the
button on the keyfob.
The indicator light will blink. After the indica-
tor light goes off, the keyfob is linked to that
memory setting.
With the key removed from the ignition switch,
press the
button on the keyfob. The driv-
er’s seat and outside mirrors will move to the
memorized position.
NOTE:
If a new memory position is saved to the
memory switch, the keyfob automatically
re-links.
Procedure for storing the outside
mirror positions for best visibility when
backing up
An outside mirror position for backing up can be
stored for each memory switch (1 and 2) .
1. Set the parking brake.
2. Turn the ignition ON. (Do not start the en-
gine.)3. Push the memory switch 1 or 2 fully for at
least 1 second to operate the automatic
drive positioner.
4. Turn the outside mirror control switch to L
(left) .
5. Depress the brake pedal.
6. Move the CVT selector lever to R (Reverse) .
7. Adjust the mirror to the desired viewing po-
sition for backing up by operating the out-
side mirror control switch.
8. Push the SET switch and, within 5 seconds,
push the memory switch 1 or 2 selected in
step 3 fully for at least 1 second.
cThe indicator light for the pushed memory
switch will come on and stay on for approxi-
mately 5 seconds after pushing the switch.
After the indicator light goes off, the se-
lected mirror position is stored in the se-
lected memory (1 or 2) .
9. Turn the outside mirror control switch to R
(right) . Repeat the above procedure to ad-
just the right mirror position and store in the
selected memory.
cWhen the driver’s seat, accelerator and
brake pedals, and outside mirrors are not in
the memorized position, the outside mirror
will move with the initial tilt-down angle.
Pre-driving checks and adjustments3-29
ZREVIEW COPYÐ2007 Maxima(max)
Owners ManualÐUSA_English(nna)
01/26/07Ðarosenma
X