2007 NISSAN FRONTIER roof
[x] Cancel search: roofPage 73 of 336

WARNING
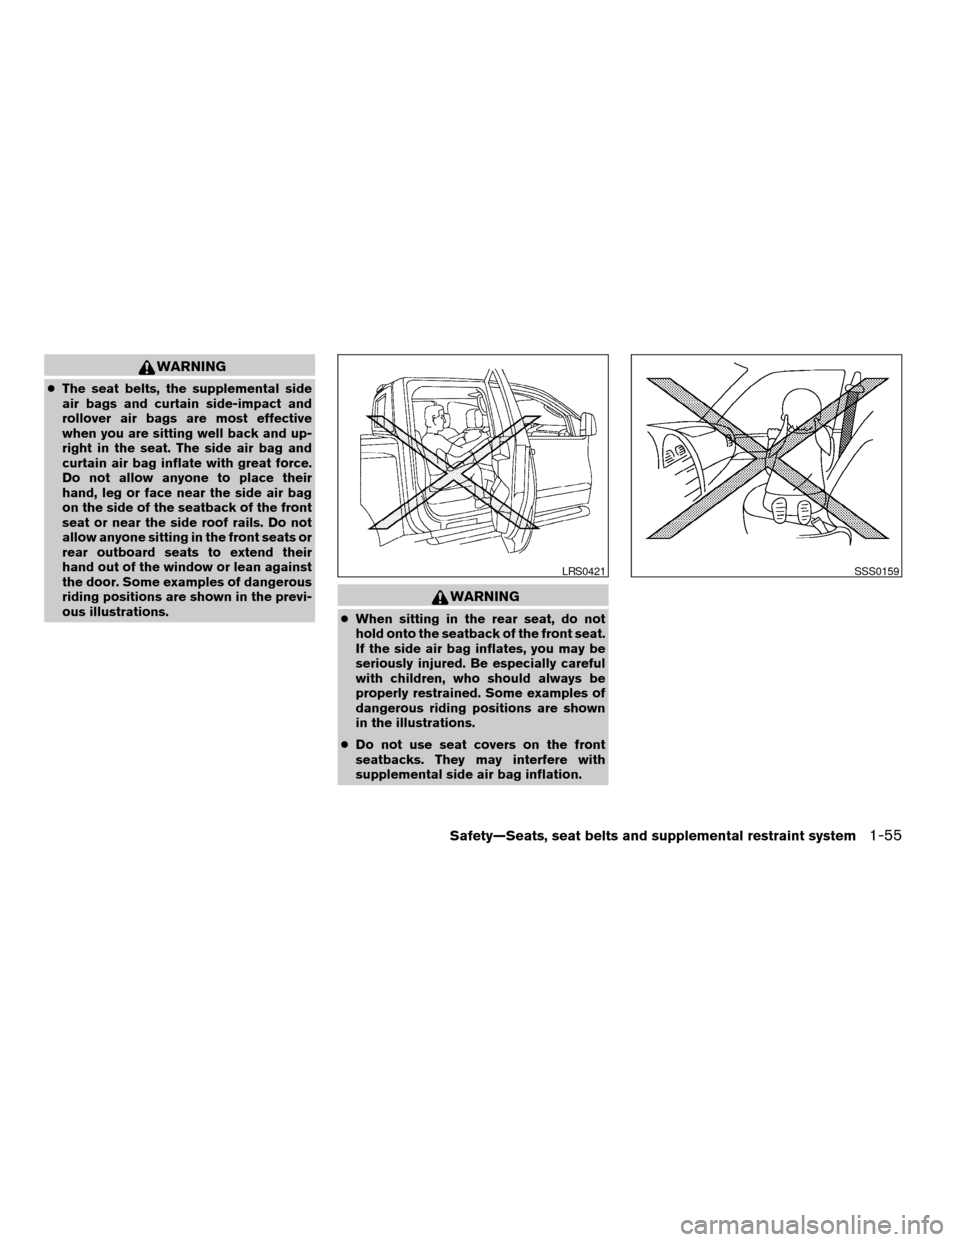
cThe seat belts, the supplemental side
air bags and curtain side-impact and
rollover air bags are most effective
when you are sitting well back and up-
right in the seat. The side air bag and
curtain air bag inflate with great force.
Do not allow anyone to place their
hand, leg or face near the side air bag
on the side of the seatback of the front
seat or near the side roof rails. Do not
allow anyone sitting in the front seats or
rear outboard seats to extend their
hand out of the window or lean against
the door. Some examples of dangerous
riding positions are shown in the previ-
ous illustrations.
WARNING
cWhen sitting in the rear seat, do not
hold onto the seatback of the front seat.
If the side air bag inflates, you may be
seriously injured. Be especially careful
with children, who should always be
properly restrained. Some examples of
dangerous riding positions are shown
in the illustrations.
cDo not use seat covers on the front
seatbacks. They may interfere with
supplemental side air bag inflation.
LRS0421SSS0159
Safety—Seats, seat belts and supplemental restraint system1-55
ZREVIEW COPYÐ2007 Truck/Frontier(d22)
Owners ManualÐUSA_English(nna)
12/13/06Ðcathy
X
Page 79 of 336

Supplemental side-impact air bag and
curtain side-impact and rollover air
bags system (if so equipped)
The supplemental side-impact air bags are lo-
cated in the outside of the seatback of the front
seats. The supplemental curtain side-impact and
rollover air bags are located in the side roof rails.
These systems are designed to meet voluntary
guidelines to help reduce the risk of injury to
out-of-position occupants.However, all of the
information, cautions and warnings in this
manual still apply and must be followed.
The supplemental side air bags and curtain side-
impact and rollover air bags are designed toinflate in higher severity side collisions, although
they may inflate if the forces in another type of
collision are similar to those of a higher severity
side impact. They are designed to inflate on the
side where the vehicle is impacted. They may not
inflate in certain side collisions.
Curtain side-impact and rollover air bags are also
designed to inflate in certain types of rollover
collisions or near rollovers. As a result, certain
vehicle movements (for example, during severe
off roading) may cause the airbags to inflate.
Vehicle damage (or lack of it) is not always an
indication of proper supplemental side air bag and
curtain side-impact and rollover air bag operation.
When the supplemental side air bag and curtain
air bags inflate, a fairly loud noise may be heard,
followed by release of smoke. This smoke is not
harmful and does not indicate a fire. Care should
be taken not to inhale it, as it may cause irritation
and choking. Those with a history of a breathing
condition should get fresh air promptly.
Supplemental side air bags, along with the use of
seat belts, help to cushion the impact force on
the chest of the front occupants. Curtain side-
impact and rollover air bags help to cushion the
impact force to the head of occupants in the front
and rear outboard seating positions. They can
help save lives and reduce serious injuries. How-
ever, an inflating side air bag, or curtain air bagmay cause abrasions or other injuries. Supple-
mental side air bags and curtain side-impact and
rollover air bags do not provide restraint to the
lower body.
The seat belts should be correctly worn and the
driver and passenger seated upright as far as
practical away from the supplemental side air
bag. Rear seat passengers should be seated as
far away as practical from the door finishers and
side roof rails. The side air bags and curtain
side-impact and rollover air bag inflate quickly in
order to help protect the occupants. Because of
this, the force of the side air bag and curtain air
bag inflating can increase the risk of injury if the
occupant is too close to, or is against, these air
bag modules during inflation. The side air bag will
deflate quickly after the collision is over.
The curtain side-impact and rollover air bag will
remain inflated for a short time.
The supplemental side air bags and curtain
side-impact and rollover air bags operate
only when the ignition switch is in the ON
or START positions.
After turning the ignition key to the ON
position, the supplemental air bag warning
light illuminates. The supplemental air bag
warning light will turn off after about 7
seconds if the system is operational.
WRS0422
Safety—Seats, seat belts and supplemental restraint system1-61
ZREVIEW COPYÐ2007 Truck/Frontier(d22)
Owners ManualÐUSA_English(nna)
12/21/06Ðcathy
X
Page 86 of 336

Under-seat storage bins........................2-39
Console box..................................2-40
Glove box....................................2-41
Sunglasses holder (if so equipped)..............2-41
Map pockets..................................2-42
Seat pockets (if so equipped)...................2-43
Cup holders..................................2-43
Roof rack (if so equipped)......................2-45
Windows........................................2-46
Power windows (if so equipped)................2-46
Manual windows..............................2-49
Rear sliding window (if so equipped)............2-49
Sunroof (if so equipped)...........................2-49
Automatic sunroof.............................2-49Interior lights.....................................2-51
Personal lights (if so equipped)....................2-52
Map lights (if so equipped)........................2-52
HomeLinkTuniversal transceiver (if so equipped).....2-52
Programming HomeLinkT.......................2-53
Programming HomeLinkTfor Canadian
customers....................................2-54
Operating the HomeLinkTuniversal
transceiver....................................2-54
Programming trouble-diagnosis.................2-55
Clearing the programmed information............2-55
Reprogramming a single HomeLinkTbutton......2-55
If your vehicle is stolen.........................2-55
ZREVIEW COPYÐ2007 Truck/Frontier(d22)
Owners ManualÐUSA_English(nna)
12/21/06Ðcathy
X
Page 129 of 336

ROOF RACK (if so equipped)
Always evenly distribute the cargo on the tubular
roof rack.The maximum total load is 125 lb
(56 kg) evenly distributed.Be careful that your
vehicle does not exceed the Gross Vehicle
Weight Rating (GVWR) or the Gross AxleWeight Ratings (GAWR front and rear) . The
GVWR and GAWR are located on the F.M.V.S.S.
label (located on the driver’s side door jamb
pillar) . For more information regarding GVWR
and GAWR, refer to “Vehicle loading information”
in the “Technical and consumer information” sec-
tion later in this manual.
Bottle holder (2nd row, Crew cab)
WIC0828
WIC0857
Instruments and controls2-45
ZREVIEW COPYÐ2007 Truck/Frontier(d22)
Owners ManualÐUSA_English(nna)
12/13/06Ðcathy
X
Page 130 of 336

The front crossbar can be adjusted or removed.
Use the Torxdriver provided in the tool kit to
loosen both crossbar adjusting screws.
To adjust:
1. Loosen the adjusting screws with the
Torxdriver
s1by turning counterclockwise
sA.
2. When the clamp is loosened, move the
crossbar so the cargo can be positioned on
the crossbar
sB.
3. Tighten the crossbar adjusting screws with
the Torxdriver by turning clockwise.
4. Secure the cargo with rope.
5. Always check the tightness of the crossbar
adjusting screws.
To remove:
1. Loosen the adjusting screws with the
Torxdriver
s1by turning counterclockwise
sA.
2. Rotate the clamps
sC.
3. Remove the crossbar.
4. Reverse to install.
5. Always check the tightness of the crossbar
adjusting screws.If you hear wind noise coming from the roof rack
while driving, adjust the roof rack crossbar to the
neutral position, rearward ofDon the side rails.
WARNING
Properly secure all cargo with ropes or
straps to help prevent it from sliding or
shifting. In a sudden stop or collision, un-
secured cargo could cause personal
injury.
CAUTION
Use care when placing or removing items
from the roof rack. If you cannot comfort-
ably lift the items onto the roof rack from
the ground, use a ladder or stool.
POWER WINDOWS (if so equipped)
WARNING
cMake sure that all passengers have
their hands, etc. inside the vehicle while
it is in motion and before closing the
windows. Use the window lock switch
to prevent unexpected use of the power
windows.
cDo not leave children unattended inside
the vehicle. They could unknowingly ac-
tivate switches or controls and become
trapped in a window. Unattended chil-
dren could become involved in serious
accidents.
The power windows operate when the ignition
switch is in the ON position, or for about 45
seconds after the ignition switch is turned to the
OFF position. If the driver’s or passenger’s door
is opened during this period of about 45 sec-
onds, power to the windows is canceled.
WINDOWS
2-46Instruments and controls
ZREVIEW COPYÐ2007 Truck/Frontier(d22)
Owners ManualÐUSA_English(nna)
12/13/06Ðcathy
X
Page 133 of 336

MANUAL WINDOWS
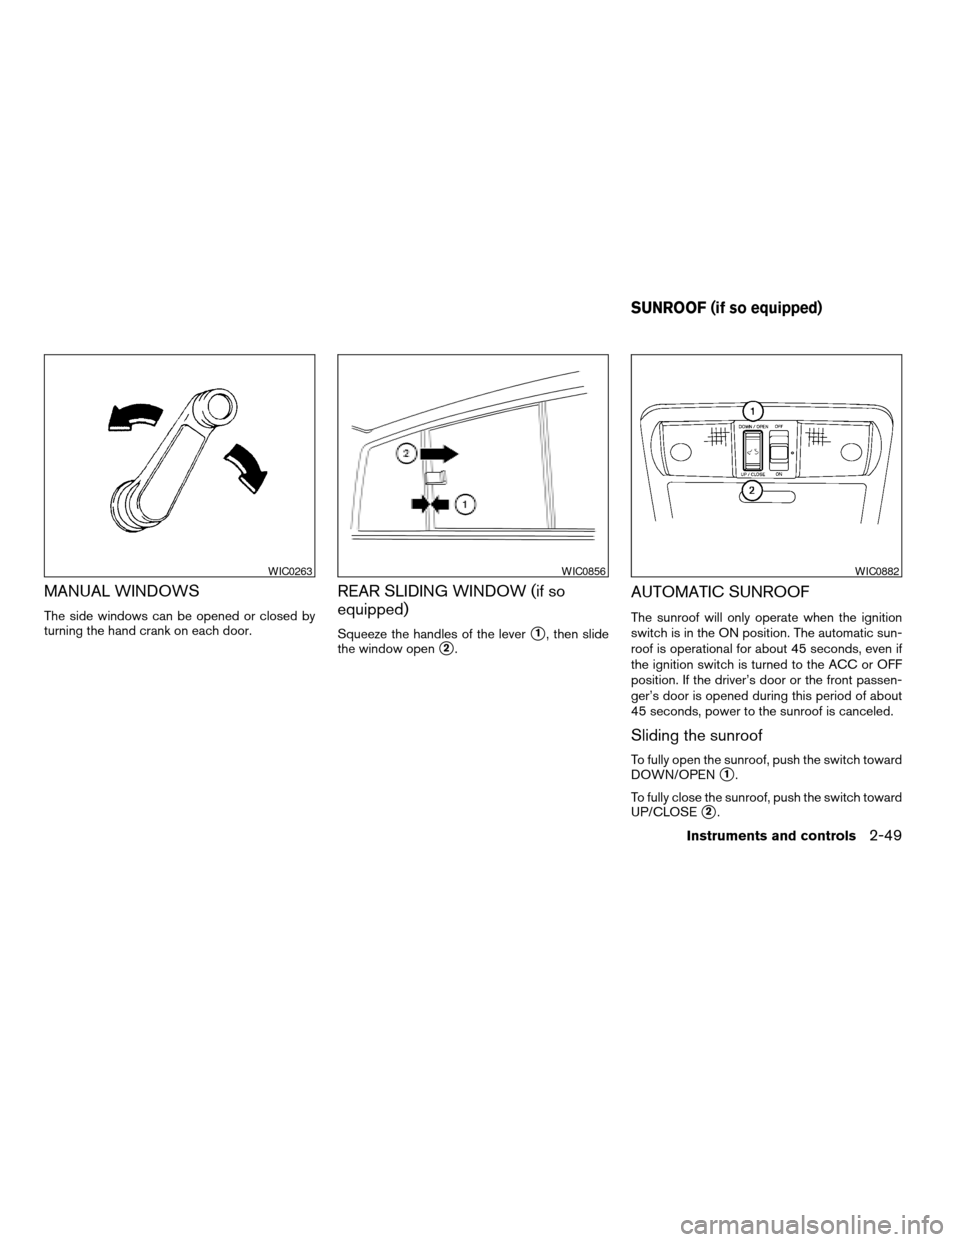
The side windows can be opened or closed by
turning the hand crank on each door.
REAR SLIDING WINDOW (if so
equipped)
Squeeze the handles of the levers1, then slide
the window open
s2.
AUTOMATIC SUNROOF
The sunroof will only operate when the ignition
switch is in the ON position. The automatic sun-
roof is operational for about 45 seconds, even if
the ignition switch is turned to the ACC or OFF
position. If the driver’s door or the front passen-
ger’s door is opened during this period of about
45 seconds, power to the sunroof is canceled.
Sliding the sunroof
To fully open the sunroof, push the switch toward
DOWN/OPEN
s1.
To fully close the sunroof, push the switch toward
UP/CLOSE
s2.
WIC0263WIC0856WIC0882
SUNROOF (if so equipped)
Instruments and controls2-49
ZREVIEW COPYÐ2007 Truck/Frontier(d22)
Owners ManualÐUSA_English(nna)
12/13/06Ðcathy
X
Page 134 of 336

To open or close the sunroof part way, push the
switch in any direction while the sunroof is sliding
to stop it in the desired position.
Tilting the sunroof
Close the sunroof by pushing the switch toward
UP/CLOSE
s2. Release the switch, then push
the UP/CLOSE switch again to tilt the sunroof
up.
To tilt the sunroof down, push the switch toward
DOWN/OPEN
s1.
WARNING
cIn an accident you could be thrown from
the vehicle through an open sunroof.
Always use seat belts and child
restraints.
cDo not allow anyone to stand up or
extend any portion of their body out of
the sunroof opening while the vehicle is
in motion or while the sunroof is
closing.
CAUTION
cRemove water drops, snow, ice or sand
from the sunroof before opening.
cDo not place heavy objects on the sun-
roof or surrounding area.
Auto reverse function (when closing or
tilting down the sunroof)
The auto reverse function can be activated when
the sunroof is closed or tilted down by automatic
operation when the ignition key is in the ON
position or for about 45 seconds after the ignition
key is turned to the OFF position.
Depending on the environment or driving
conditions, the auto reverse function may
be activated if an impact or load similar to
something being caught in the sunroof oc-
curs.
WARNING
There are some small distances immedi-
ately before the closed position which
cannot be detected. Make sure that all
passengers have their hands, etc., inside
the vehicle before closing the sunroof.
When closing:
If the control unit detects something caught in the
sunroof as it moves to the front, the sunroof will
immediately open backward.
When tilting down:
If the control unit detects something caught in the
sunroof as it tilts down, the sunroof will immedi-
ately tilt up.If the auto reverse function malfunctions and re-
peats opening or tilting up the sunroof, keep
pushing the tilt down switch within 5 seconds
after it happens; the sunroof will fully close gradu-
ally. Make sure nothing is caught in the sunroof.
WARNING
cIn an accident you could be thrown from
the vehicle through an open sunroof. Al-
ways use seat belts and child restraints.
cDo not allow anyone to stand up or extend
any portion of their body out of the sun-
roof opening while the vehicle is in motion
or while the sunroof is closing.
CAUTION
cRemove water drops, snow, ice or sand
from the sunroof before opening.
cDo not place heavy objects on the sun-
roof or surrounding area.
Sunshade
Open and close the sunshade by sliding it for-
ward or backward.
If the sunroof does not close
Have your NISSAN dealer check and repair the
sunroof.
2-50Instruments and controls
ZREVIEW COPYÐ2007 Truck/Frontier(d22)
Owners ManualÐUSA_English(nna)
12/13/06Ðcathy
X
Page 164 of 336

3. Turn the fan control dial to the desired posi-
tion.
4. Push the
button. The indicator light
comes on.
5. Turn the temperature control dial to the de-
sired position.
Dehumidified defogging
This mode is used to defog the windows and
dehumidify the air.
1. Turn the air flow control dial to the
position.
2.
Turn the fan control dial to the desired position.
3. Push thebutton. The indicator light
comes on.
When the
,or positions in between
are selected, the air conditioner automatically
turns on (however, the indicator light will not
illuminate) if the outside temperature is more than
36°F (2°C) . The air conditioning system will con-
tinue to operate until the fan control dial is turned
to OFF or the vehicle is shut off, even if the air flow
control dial is turned to a position other than
the
position. This dehumidifies the air
which helps defog the windshield. The
mode automatically turns off, allowing outside air
to be drawn into the passenger compartment to
further improve the defogging performance.4. Turn the temperature control dial to the de-
sired position.
Operating tips
cKeep the windows and sunroof (if so
equipped) closed while the air conditioner is
in operation.
cAfter parking in the sun, drive for 2 or 3
minutes with the windows open to vent hot
air from the passenger compartment. Then,
close the windows. This allows the air con-
ditioner to cool the interior more quickly.
cThe air conditioning system should be
operated for approximately 10 minutes
at least once a month. This helps pre-
vent damage to the system due to lack
of lubrication.
cA visible mist may be seen coming from the
ventilators in hot, humid conditions as the air
is cooled rapidly. This does not indicate a
malfunction.
cIf the engine coolant temperature
gauge indicates engine coolant tem-
perature over the normal range, turn
the air conditioner off. See “If your
vehicle overheats” in the “In case of
emergency” section of this manual.
AIR FLOW CHARTS
The following charts show the button and dial
positions forMAXIMUM AND QUICKheating,
cooling or defrosting. For additional information
on heating and cooling see “Heater and air con-
ditioner” in this section”.The air recirculation
(
) button should always be in the OFF
position for heating and defrosting.
4-6Heater, air conditioner and audio systems
ZREVIEW COPYÐ2007 Truck/Frontier(d22)
Owners ManualÐUSA_English(nna)
12/13/06Ðcathy
X