2007 NISSAN FRONTIER key
[x] Cancel search: keyPage 199 of 336
WARNING
Apply the parking brake if the selector
lever is in any position while the engine is
not running. Failure to do so could cause
the vehicle to move unexpectedly or roll
away and result in serious personal injury
or property damage.
If the key is turned to the OFF or ACC position for
any reason while the vehicle is in N (Neutral) , or
any D (Drive) position, the key cannot be turned
to the LOCK position and be removed from the
ignition switch. Move the selector lever to the P
(Park) position, then the key can be turned to
LOCK.
P (Park):
Use this selector position when the vehicle is
parked or when starting the engine. Make sure
the vehicle is completely stopped.The brake
pedal must be depressed to move the se-
lector lever from N (Neutral) or any drive
position to P (Park) .Apply the parking brake.
When parking on a hill, apply the parking brake
first, then shift the selector lever into the P (Park)
position.R (Reverse):CAUTION
Use this position only when the vehicle is
completely stopped.
Use this position to back up. Make sure the
vehicle is completely stopped before selecting
the R (Reverse) position.The brake pedal
must be depressed to move the selector
lever from P (Park) , N (Neutral) or any drive
position to R (Reverse) .
N (Neutral):
Neither forward nor reverse gear is engaged. The
engine can be started in this position. You may
shift to N (Neutral) and restart a stalled engine
while the vehicle is moving.
D (Drive):
Use this position for all normal forward driving.
3 (Third gear):
Use this position for driving up and down long
slopes where engine braking would be advanta-
geous.
Do not downshift into the 3 position at speeds
over the following and do not exceed the follow-
ing speeds in the 3 position.2WD and AUTO:
62 MPH (100 km/h)
4H:
62 MPH (100 km/h)
4LO:
31 MPH (50 km/h)
2 (Second gear):
Use this position for hill climbing or engine brak-
ing on downhill grades.
Do not downshift into the 2 position at speeds
over the following and do not exceed the follow-
ing speeds in the 2 position.
2WD and AUTO:
71 MPH (115 km/h)
4H:
62 MPH (100 km/h)
4LO:
31 MPH (50 km/h)
1 (Low gear):
Use this position when climbing steep hills slowly
or slow driving through deep snow, sand or mud,
or for maximum engine braking on steep downhill
grades.
Starting and driving5-13
ZREVIEW COPYÐ2007 Truck/Frontier(d22)
Owners ManualÐUSA_English(nna)
12/13/06Ðcathy
X
Page 200 of 336
Do not downshift into the 1 position at speeds
over the following and do not exceed the follow-
ing speeds in the 1 position.
2WD and AUTO:
43 MPH (70 km/h)
4H:
43 MPH (70 km/h)
4LO:
31 MPH (50 km/h)
Shift lock release
If the battery is discharged, the shift selector lever
may not be moved from the P (Park) position even
with the brake pedal depressed.
To move the shift selector lever, release the shift
lock. The shift selector lever can be moved to N
(Neutral) . However, the steering wheel will be
locked unless the ignition switch is turned to the
ON position. This allows the vehicle to be moved
if the battery is discharged.To push the shift lock release, complete the fol-
lowing procedure:
1. Turn the ignition key to the LOCK position
and remove the key
2. Apply the parking brake.
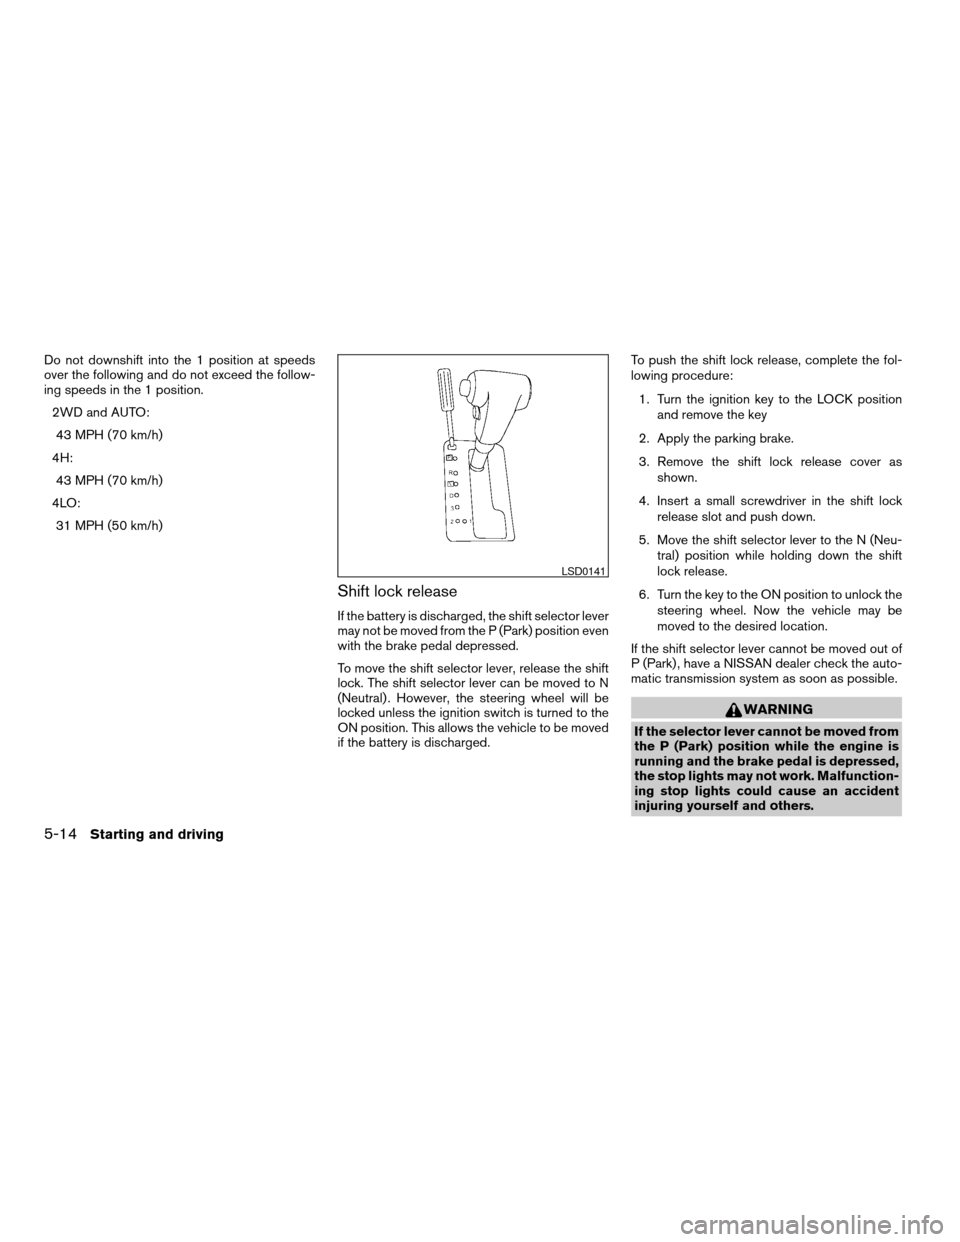
3. Remove the shift lock release cover as
shown.
4. Insert a small screwdriver in the shift lock
release slot and push down.
5. Move the shift selector lever to the N (Neu-
tral) position while holding down the shift
lock release.
6. Turn the key to the ON position to unlock the
steering wheel. Now the vehicle may be
moved to the desired location.
If the shift selector lever cannot be moved out of
P (Park) , have a NISSAN dealer check the auto-
matic transmission system as soon as possible.
WARNING
If the selector lever cannot be moved from
the P (Park) position while the engine is
running and the brake pedal is depressed,
the stop lights may not work. Malfunction-
ing stop lights could cause an accident
injuring yourself and others.
LSD0141
5-14Starting and driving
ZREVIEW COPYÐ2007 Truck/Frontier(d22)
Owners ManualÐUSA_English(nna)
12/13/06Ðcathy
X
Page 209 of 336

2WD or 4WD shift procedure:
4WD Shift
Switch PositionWheels
DrivenIndicator Light
Use Conditions 4WD Shift Procedure
4WD shift Transfer 4LO
position
2WDRear
wheels
For driving on dry, paved roads (Economy drive)
or state dynamometer I/M testingMove the 4WD switch.
2WD <—> 4H
4WD shift indicator light will indicate transfer shift position engaged.
4H4 wheels
For driving on rocky, sandy or snow-covered
roads
Neutral
*1
May blinkNeutral disengages the automatic transmission
mechanical parking lock, which will allow the
vehicle to roll. Do not leave the transfer shift
position in Neutral.*21. Stop the vehicle.
2. For automatic transmission vehicles: Shift the transmission selector to the (N)
position with the brake pedal depressed.
For manual transmission vehicles: Shift the transmission shift lever to the (N) posi-
tion with the clutch depressed.
3. For automatic transmission vehicles: Depress and turn the 4WD shift switch to
4LO or 4H with the brake pedal depressed.
For manual transmission vehicles: Depress and turn the 4WD switch to 4LO or
4H with the clutch pedal depressed.
THE TRANSFER CASE DOES NOT ENGAGE BETWEEN 4H AND 4LO (OR 4LO TO
4H) UNLESS YOU HAVE FIRST STOPPED THE VEHICLE, DEPRESSED THE
BRAKE PEDAL AND MOVED THE TRANSMISSION SELECTOR TO NEUTRAL FOR
AUTOMATIC TRANSMISSION VEHICLES. FOR MANUAL TRANSMISSION VE-
HICLES YOU MUST MOVE THE TRANSMISSION SHIFT LEVER TO NEUTRAL. *3
4LO
4 wheels
IlluminatedFor use when maximum power and traction is
required (for example: on steep grades or rocky,
sandy, muddy roads)
*1: Before moving the transmission selector or shift lever from neutral, wait until the 4LO indicator light stays on steady. This indicates that the 4WD shift procedure is completed and the transfer gear is correctly set in
the 4LO position. If the vehicle is shifted into gear before the indicator is on steady, the transfer gear may grind, not engage correctly or stay in the neutral position.
- If the 4WD warning light illuminates, perform the following procedure to return the transfer case to correct operating condition.
1. Turn off the engine by turning the ignition switch9OFF9.
2. Start the engine.
- Check that the 4WD warning light turns off. If the 4WD warning light illuminates, have the system checked by a NISSAN dealer.
3. Apply the parking brake, for automatic transmission vehicles, depress the brake pedal and move the transmission selector to Neutral position. Formanual transmission vehicles, move the transmission shift lever to
Neutral position.
4. With the brake pedal depressed on automatic transmission vehicles or with the clutch pedal depressed on manual transmission vehicles, move the 4WDshift switch to desired mode.
- Be sure to wait until the transfer gear change completes before shifting the transmission selector or transmission shift lever from Neutral position.
*2: While changing in and out of 4LO, the ignition key must be ON and the vehicle’s engine must be running for a shift to take place and for the indicator lights (4WD shift and 4LO position indicator) to be operable.
Otherwise, the shift will not take place and no indicator lights will be on or flashing.
*3: Make sure the transfer 4LO position indicator light turns on when you shift the 4WD shift switch to 4LO. The
indicator light (if so equipped) will also turn on when 4LO is selected. See “Vehicle dynamic control
system” later in this section.
Starting and driving5-23
ZREVIEW COPYÐ2007 Truck/Frontier(d22)
Owners ManualÐUSA_English(nna)
12/13/06Ðcathy
X
Page 211 of 336
When the vehicle is stuck,
cSet the 4WD shift switch to 4H or 4LO.
cUse the Electronic Locking Rear Differential
(E-Lock) system (if so equipped) . Turn the
switch ON while the vehicle is stationary and
apply the throttle to try to free the vehicle.
cIf it is difficult to free the vehicle, rock the
vehicle back and forth between reverse and
drive gears.
cIf the vehicle is stuck deep in mud, place
stones or wooden blocks under the tires.
Then try the recovery procedures above. Tire
chains may be effective.
CAUTION
cDo not spin the tires excessively. Tires
will sink deep into the mud, making it
difficult to free the vehicle.
cAvoid shifting gears with the engine
running at high speeds as this may
cause malfunction.
4WD shift switch operations
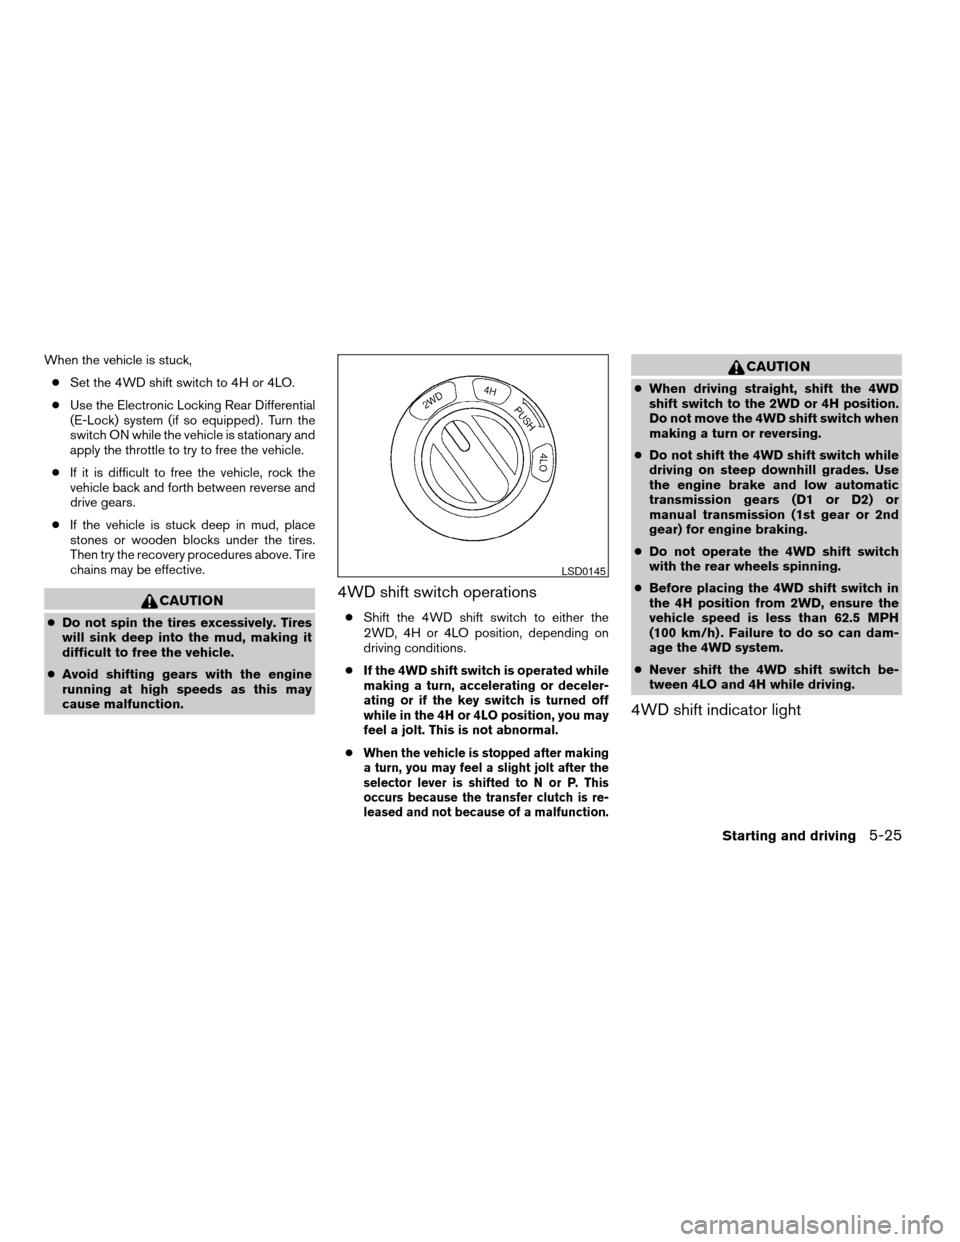
cShift the 4WD shift switch to either the
2WD, 4H or 4LO position, depending on
driving conditions.
c
If the 4WD shift switch is operated while
making a turn, accelerating or deceler-
ating or if the key switch is turned off
while in the 4H or 4LO position, you may
feel a jolt. This is not abnormal.
cWhen the vehicle is stopped after making
a turn, you may feel a slight jolt after the
selector lever is shifted to N or P. This
occurs because the transfer clutch is re-
leased and not because of a malfunction.
CAUTION
cWhen driving straight, shift the 4WD
shift switch to the 2WD or 4H position.
Do not move the 4WD shift switch when
making a turn or reversing.
cDo not shift the 4WD shift switch while
driving on steep downhill grades. Use
the engine brake and low automatic
transmission gears (D1 or D2) or
manual transmission (1st gear or 2nd
gear) for engine braking.
cDo not operate the 4WD shift switch
with the rear wheels spinning.
cBefore placing the 4WD shift switch in
the 4H position from 2WD, ensure the
vehicle speed is less than 62.5 MPH
(100 km/h) . Failure to do so can dam-
age the 4WD system.
cNever shift the 4WD shift switch be-
tween 4LO and 4H while driving.
4WD shift indicator light
LSD0145
Starting and driving5-25
ZREVIEW COPYÐ2007 Truck/Frontier(d22)
Owners ManualÐUSA_English(nna)
12/13/06Ðcathy
X
Page 212 of 336
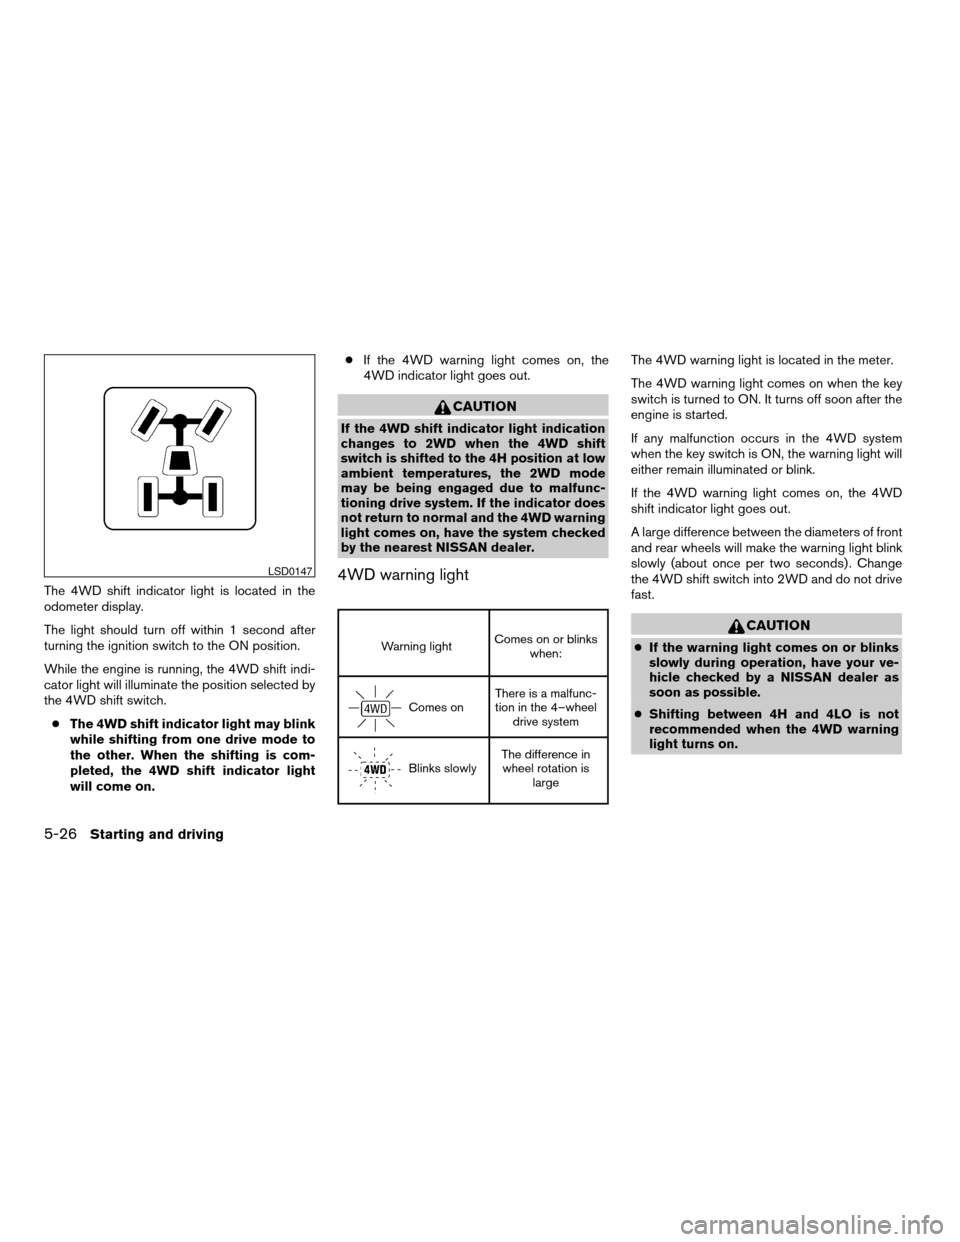
The 4WD shift indicator light is located in the
odometer display.
The light should turn off within 1 second after
turning the ignition switch to the ON position.
While the engine is running, the 4WD shift indi-
cator light will illuminate the position selected by
the 4WD shift switch.
cThe 4WD shift indicator light may blink
while shifting from one drive mode to
the other. When the shifting is com-
pleted, the 4WD shift indicator light
will come on.cIf the 4WD warning light comes on, the
4WD indicator light goes out.
CAUTION
If the 4WD shift indicator light indication
changes to 2WD when the 4WD shift
switch is shifted to the 4H position at low
ambient temperatures, the 2WD mode
may be being engaged due to malfunc-
tioning drive system. If the indicator does
not return to normal and the 4WD warning
light comes on, have the system checked
by the nearest NISSAN dealer.
4WD warning light
Warning lightComes on or blinks
when:
Comes onThere is a malfunc-
tion in the 4–wheel
drive system
Blinks slowlyThe difference in
wheel rotation is
large
The 4WD warning light is located in the meter.
The 4WD warning light comes on when the key
switch is turned to ON. It turns off soon after the
engine is started.
If any malfunction occurs in the 4WD system
when the key switch is ON, the warning light will
either remain illuminated or blink.
If the 4WD warning light comes on, the 4WD
shift indicator light goes out.
A large difference between the diameters of front
and rear wheels will make the warning light blink
slowly (about once per two seconds) . Change
the 4WD shift switch into 2WD and do not drive
fast.
CAUTION
cIf the warning light comes on or blinks
slowly during operation, have your ve-
hicle checked by a NISSAN dealer as
soon as possible.
cShifting between 4H and 4LO is not
recommended when the 4WD warning
light turns on.
LSD0147
5-26Starting and driving
ZREVIEW COPYÐ2007 Truck/Frontier(d22)
Owners ManualÐUSA_English(nna)
12/13/06Ðcathy
X
Page 215 of 336
WARNING
cDo not stop or park the vehicle over
flammable materials such as dry grass,
waste paper or rags. They may ignite
and cause a fire.
cSafe parking procedures require that
both the parking brake be set and the
transmission placed into P (Park) for
automatic transmission models or in an
appropriate gear for manual transmis-
sion models. Failure to do so could
cause the vehicle to move unexpectedly
or roll away and result in an accident.Make sure the shift lever has been
pushed as far forward as it can go and
cannot be moved without depressing
the foot brake pedal.
cNever leave the engine running while
the vehicle is unattended.
cDo not leave children unattended inside
the vehicle. They could unknowingly ac-
tivate switches or controls. Unattended
children could become involved in seri-
ous accidents.
1. Firmly apply the parking brake.2.Manual transmission models:
Place the shift lever in the R (Reverse) posi-
tion. When parking on an uphill grade, place
the shift lever in 1st gear.
Automatic transmission models:
Move the shift selector lever to the P (Park)
position.
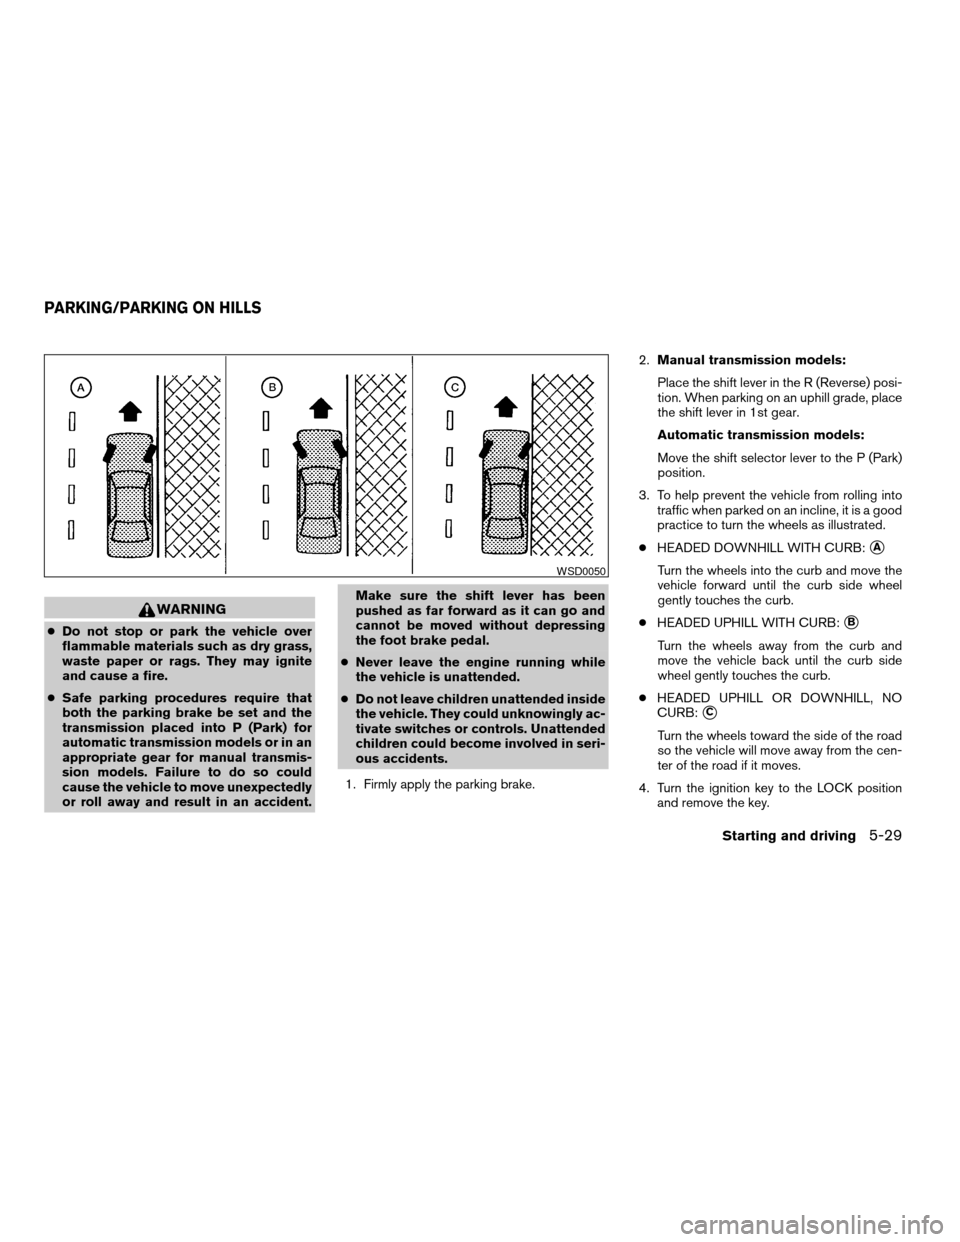
3. To help prevent the vehicle from rolling into
traffic when parked on an incline, it is a good
practice to turn the wheels as illustrated.
cHEADED DOWNHILL WITH CURB:
sA
Turn the wheels into the curb and move the
vehicle forward until the curb side wheel
gently touches the curb.
cHEADED UPHILL WITH CURB:
sB
Turn the wheels away from the curb and
move the vehicle back until the curb side
wheel gently touches the curb.
cHEADED UPHILL OR DOWNHILL, NO
CURB:
sC
Turn the wheels toward the side of the road
so the vehicle will move away from the cen-
ter of the road if it moves.
4. Turn the ignition key to the LOCK position
and remove the key.
WSD0050
PARKING/PARKING ON HILLS
Starting and driving5-29
ZREVIEW COPYÐ2007 Truck/Frontier(d22)
Owners ManualÐUSA_English(nna)
12/13/06Ðcathy
X
Page 221 of 336

The hill start assist system automatically keeps
the brakes applied to help prevent the vehicle
from rolling backwards in the time it takes the
driver to release the brake pedal and apply the
accelerator when the vehicle is stopped on a hill.
Hill start assist will operate automatically under
the following conditions:
cThe selector lever is shifted to a forward or
reverse gear.
cThe vehicle is stopped completely on a hill
by applying the brake.
The maximum holding time is 2 seconds. After 2
seconds the vehicle will begin to roll back and hill
start assist will stop operating completely.
Hill start assist will not operate when the selector
lever is shifted to N or P or on a flat and level road.FREEING A FROZEN DOOR LOCK
To prevent a door lock from freezing, apply de-
icer through the key hole. If the lock becomes
frozen, heat the key before inserting it into the key
hole or use the remote keyless entry keyfob (if so
equipped) .
ANTI-FREEZE
In the winter when it is anticipated that the tem-
perature will drop below 32°F (0°C) , check the
anti-freeze to assure proper winter protection.
For details, see “Engine cooling system” in the
“Maintenance and do-it-yourself” section of this
manual.
BATTERY
If the battery is not fully charged during extremely
cold weather conditions, the battery fluid may
freeze and damage the battery. To maintain maxi-
mum efficiency, the battery should be checked
regularly. For details, see “Battery” in the “Main-
tenance and do-it-yourself” section of this
manual.
DRAINING OF COOLANT WATER
If the vehicle is to be left outside without anti-
freeze, drain the cooling system, including the
engine block. Refill before operating the vehicle.
For details, see “Changing engine coolant” in the
“Maintenance and do-it-yourself” section of this
manual.
TIRE EQUIPMENT
1. SUMMER tires have a tread designed to
provide superior performance on dry pave-
ment. However, the performance of these
tires will be substantially reduced in snowy
and icy conditions. If you operate your ve-
hicle on snowy or icy roads, NISSAN recom-
mends the use of MUD & SNOW or ALL
SEASON TIRES on all four wheels. Please
consult a NISSAN dealer for the tire type,
size, speed rating and availability informa-
tion.
2. For additional traction on icy roads, studded
tires may be used. However, some U.S.
states and Canadian provinces prohibit their
use. Check local, state and provincial laws
before installing studded tires.
Skid and traction capabilities of studded
snow tires on wet or dry surfaces may be
poorer than that of non-studded snow tires.
COLD WEATHER DRIVING
Starting and driving5-35
ZREVIEW COPYÐ2007 Truck/Frontier(d22)
Owners ManualÐUSA_English(nna)
12/13/06Ðcathy
X
Page 234 of 336
CAUTION
cAlways connect positive (1) to positive
(1) and negative (2) to body ground (for
example, strut mounting bolt, engine
lift bracket, etc.) — not to the battery.
cMake sure the jumper cables do not
touch moving parts in the engine com-
partment and that the cable clamps do
not contact any other metal.
5. Start the engine of the booster vehicle and
let it run for a few minutes.
6. Keep the engine speed of the booster ve-
hicle at about 2,000 rpm, and start the en-
gine of the vehicle being jump started.
CAUTION
Do not keep the starter motor engaged for
more than 10 seconds. If the engine does
not start right away, turn the key off and
wait 3 to 4 seconds before trying again.
7. After starting the engine, carefully discon-
nect the negative cable and then the positive
cable.8. Replace the vent caps (if so equipped) . Be
sure to dispose of the cloth used to cover
the vent holes as it may be contaminated
with corrosive acid.
CAUTION
cThree-way catalyst equipped models
should not be started by pushing. The
three-way catalyst may be damaged.
cAutomatic transmission models cannot
be push-started or tow-started. At-
tempting to do so may cause transmis-
sion damage.
cFor manual transmission models, never
try to start the vehicle by towing it.
When the engine starts, the forward
surge could cause the vehicle to collide
with the tow vehicle.
PUSH STARTING
6-10In case of emergency
ZREVIEW COPYÐ2007 Truck/Frontier(d22)
Owners ManualÐUSA_English(nna)
12/13/06Ðcathy
X