2007 NISSAN FRONTIER light
[x] Cancel search: lightPage 275 of 336

4. Turn the bulb retaining ring counterclock-
wise until it is free form the headlight reflec-
tor and then remove it
sA.
5. Carefully remove the headlight bulb. Do not
shake or rotate the bulb when removing it
sB.
Replacing the headlight bulb
1. Insert the bulb.
DO NOT TOUCH THE BULB.
2. Install and tighten the bulb retainer.
cBe sure the lip of the bulb socket con-
tacts the headlight body.
3. Push the electrical connector into the bulb
plastic base until it snaps and stops.
4. Connect the negative (-) battery cable.
5. Close the hood.
Fog may temporarily form inside the lens of the
exterior lights in the rain or in a car wash. A
temperature difference between the inside and
the outside of the lens causes the fog. This is not
a malfunction. If large drops of water collect
inside the lens, contact a NISSAN dealer.
EXTERIOR AND INTERIOR LIGHTS
Item Wattage (W) Bulb No.*1
Headlight 65/55 9007 (HB5)
Turn signal light/Parking light 28/8 3457K
Side marker 3.8 194
Rear combination light
Turn signal 27 3156AK
Stop/Tail 27/8 3157K
Back-up 18 921
License plate light 5 2J6
Fog light*
2(if so equipped) 55 H11
Map lights/ personal lights 8 AL38
Room light 8 AL41
High-mounted stop light/cargo lights*
2——
*1Always check with the Parts Department at a NISSAN dealer for the latest parts information.
*2The bulb is not serviceable in-vehicle. See a NISSAN dealer for assistance.
Maintenance and do-it-yourself8-29
ZREVIEW COPYÐ2007 Truck/Frontier(d22)
Owners ManualÐUSA_English(nna)
12/13/06Ðcathy
X
Page 276 of 336
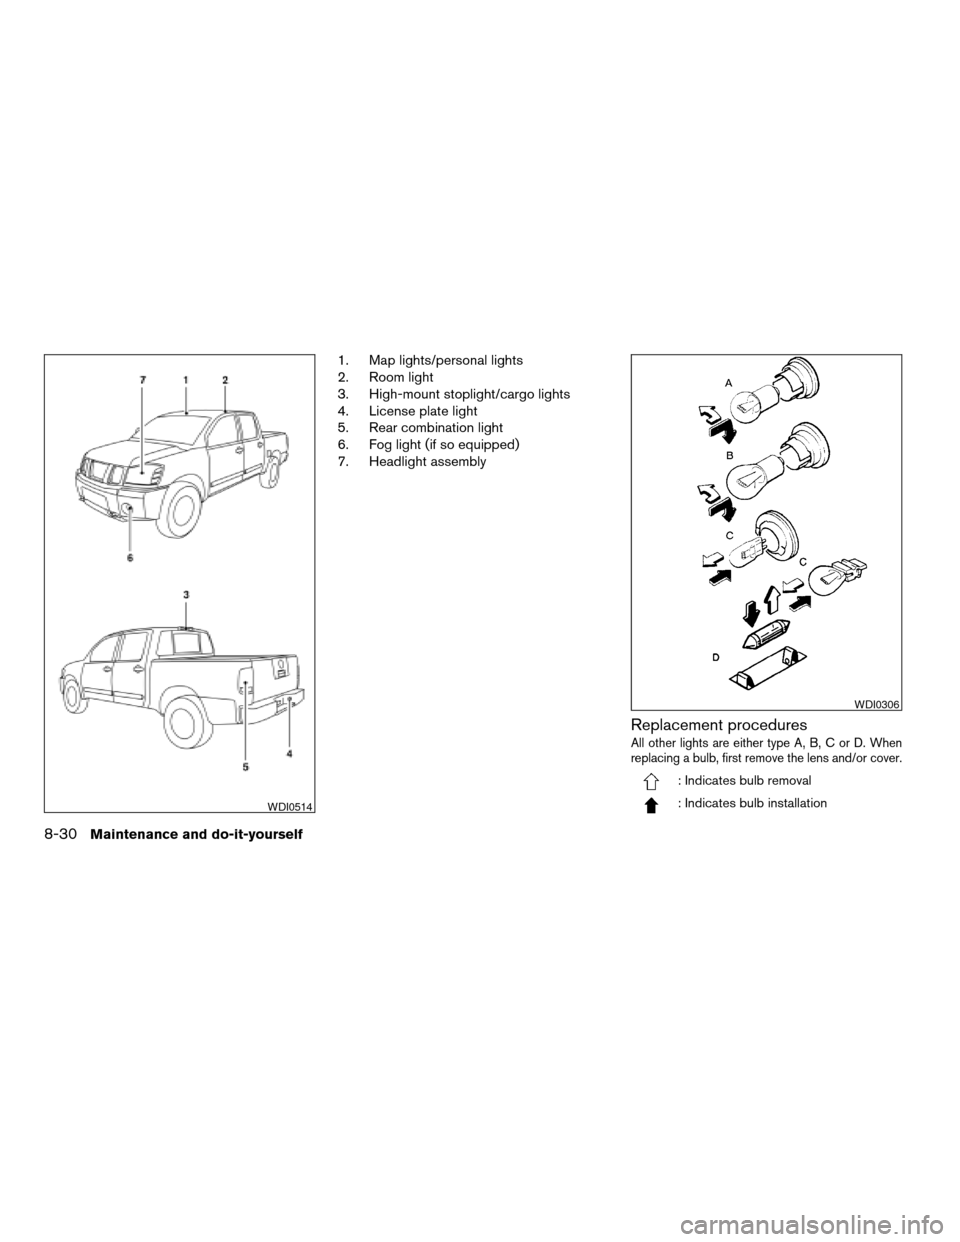
1. Map lights/personal lights
2. Room light
3. High-mount stoplight/cargo lights
4. License plate light
5. Rear combination light
6. Fog light (if so equipped)
7. Headlight assembly
Replacement procedures
All other lights are either type A, B, C or D. When
replacing a bulb, first remove the lens and/or cover.
: Indicates bulb removal
: Indicates bulb installationWDI0514
WDI0306
8-30Maintenance and do-it-yourself
ZREVIEW COPYÐ2007 Truck/Frontier(d22)
Owners ManualÐUSA_English(nna)
12/13/06Ðcathy
X
Page 277 of 336

Use a cloths1to protect the housing.
Map lights/personal lights
LDI0459
Room light
WDI0206
Rear combination light
WDI0300
Maintenance and do-it-yourself8-31
ZREVIEW COPYÐ2007 Truck/Frontier(d22)
Owners ManualÐUSA_English(nna)
12/13/06Ðcathy
X
Page 278 of 336

If you have a flat tire, see the “In case of
emergency” section of this manual.
TIRE PRESSURE
Tire Pressure Monitoring System
(TPMS)
This vehicle is equipped with the Tire
Pressure Monitoring System (TPMS) . It
monitors tire pressure of all tires except
the spare. When the low tire pressure
warning light is lit, one or more of your
tires is significantly under-inflated.
The TPMS will activate only when the
vehicle is driven at speeds above 16 MPH
(25 km/h) . Also, this system may not de-
tect a sudden drop in tire pressure (for
example a flat tire while driving) .
For more details, refer to “Low tire pres-
sure warning light” in the “Instruments and
controls” section, “Tire Pressure Monitor-
ing System (TPMS)” in the “Starting and
driving” section, and “Flat tire” in the “In
case of emergency” section.
Tire inflation pressure
Check the tire pressures (including the
spare) often and always prior to long dis-
tance trips. The recommended tire pres-
sure specifications are shown on the
F.M.V.S.S./C.M.V.S.S. label or the Tire
and Loading Information label under the
9Cold Tire Inflation Pressure9heading.
The Tire and Loading Information label is
affixed to the driver side center pillar. Tire
pressures should be checked regularly
because:
cMost tires naturally lose air over time.
cTires can lose air suddenly when
driven over potholes or other objects
or if the vehicle strikes a curb while
parking.
The tire pressures should be checked
when the tires are cold. The tires are
considered COLD after the vehicle has
been parked for 3 or more hours, or driven
less than 1 mile (1.6 km) at moderate
speeds.
License plate light
WDI0411
WHEELS AND TIRES
8-32Maintenance and do-it-yourself
ZREVIEW COPYÐ2007 Truck/Frontier(d22)
Owners ManualÐUSA_English(nna)
12/13/06Ðcathy
X
Page 287 of 336
Replacing wheels and tires
When replacing a tire, use the same size, tread
design, speed rating and load carrying capacity
as originally equipped. Recommended types and
sizes are shown in “Wheels and tires” in the
“Technical and consumer information” section of
this manual.
WARNING
cThe use of tires other than those recom-
mended or the mixed use of tires of
different brands, construction (bias,
bias-belted or radial) , or tread patterns
can adversely affect the ride, braking,
handling, ground clearance, body-to-
tire clearance, tire chain clearance,
speedometer calibration, headlight aim
and bumper height. Some of these ef-
fects may lead to accidents and could
result in serious personal injury.
cIf the wheels are changed for any rea-
son, always replace with wheels which
have the same off-set dimension.
Wheels of a different off-set could
cause premature tire wear, degrade ve-
hicle handling characteristics and/or
interference with the brake
discs/drums. Such interference can
lead to decreased braking efficiencyand/or early brake pad/shoe wear. Re-
fer to “Wheels and tires” in the “Techni-
cal and consumer information” section
of this manual for wheel off-set
dimensions.
cWhen a spare tire is mounted or a wheel
is replaced, tire pressure will not be
indicated, the TPMS will not function
and the low tire pressure warning light
will flash for approximately 1 minute.
The light will remain on after 1 minute.
Contact your NISSAN dealer as soon as
possible for tire replacement and/or
system resetting.
cReplacing tires with those not originally
specified by NISSAN could affect the
proper operation of the TPMS.
cDo not install a deformed wheel or tire
even if it has been repaired. Such
wheels or tires could have structural
damage and could fail without warning.
cThe use of retread tires is not
recommended.
cFor additional information regarding
tires, refer to “Important Tire Safety In-
formation” (US) or “Tire Safety Informa-
tion” (Canada) in the Warranty Informa-
tion Booklet.
Four-wheel drive models
CAUTION
Always use tires of the same type, size,
brand, construction (bias, bias-belted or
radial) , and tread pattern on all four
wheels. Failure to do so may result in a
circumference difference between tires
on the front and rear axles which will
cause excessive tire wear and may dam-
age the transmission, transfer case and
differential gears.
If excessive tire wear is found, it is recommended
that all four tires be replaced with tires of the
same size, brand, construction and tread pattern.
The tire pressure and wheel alignment should
also be checked and corrected as necessary.
Contact a NISSAN dealer.
Maintenance and do-it-yourself8-41
ZREVIEW COPYÐ2007 Truck/Frontier(d22)
Owners ManualÐUSA_English(nna)
12/13/06Ðcathy
X
Page 292 of 336
If any driveability problems such as engine stall-
ing and difficult hot-starting are experienced after
using oxygenate-blend fuels, immediately
change to a non-oxygenate fuel or a fuel with a
low blend of MTBE.
Take care not to spill gasoline during refu-
eling. Gasoline containing oxygenates can
cause paint damage.
E–85 fuel
E-85 fuel is a mixture of approximately 85% fuel
ethanol and 15% unleaded gasoline. E-85 can
only be used in a Flexible Fuel Vehicle (FFV) . Do
not use E-85 in your vehicle. U.S. government
regulations require fuel ethanol dispensing
pumps to be identified by a small, square, orange
and black label with the common abbreviation or
the appropriate percentage for that region.
Aftermarket fuel additives
NISSAN does not recommend the use of any
aftermarket fuel additives (for example, fuel injec-
tor cleaner, octane booster, intake valve deposit
removers, etc.) which are sold commercially.
Many of these additives intended for gum, varnish
or deposit removal may contain active solvents or
similar ingredients that can be harmful to the fuel
system and engine.
Octane rating tips
Using unleaded gasoline with an octane
rating lower than recommended can cause
persistent, heavy “spark knock.” (“Spark
knock” is a metallic rapping noise.) If se-
vere, this can lead to engine damage. If you
detect a persistent heavy spark knock even
when using gasoline of the stated octane
rating, or if you hear steady spark knock
while holding a steady speed on level
roads, have a NISSAN dealer correct the
condition. Failure to correct the condition
is misuse of the vehicle, for which NISSAN
is not responsible.
Incorrect ignition timing may result in spark
knock, after-run and/or overheating, which may
cause excessive fuel consumption or engine
damage. If any of the above symptoms are en-
countered, have your vehicle checked at a
NISSAN dealer.
However, now and then you may notice
light spark knock for a short time while
accelerating or driving up hills. This is not a
cause for concern, because you get the
greatest fuel benefit when there is light
spark knock for a short time under heavy
engine load.
CAUTION
cYour vehicle is not designed to run on
E-85 fuel. Using E-85 fuel in a vehicle
not specifically designed for E-85 fuel
can damage fuel system components
and is not covered by the NISSAN new
vehicle limited warranty.
cE-85 is a mixture of approximately 85%
fuel ethanol and 15% unleaded
gasoline.
cU.S. government regulations require
ethanol dispensing pumps to be identi-
fied by a small, square, orange and
black label with the common abbrevia-
tion or the appropriate percentage for
that region.
9-4Technical and consumer information
ZREVIEW COPYÐ2007 Truck/Frontier(d22)
Owners ManualÐUSA_English(nna)
12/13/06Ðcathy
X
Page 300 of 336
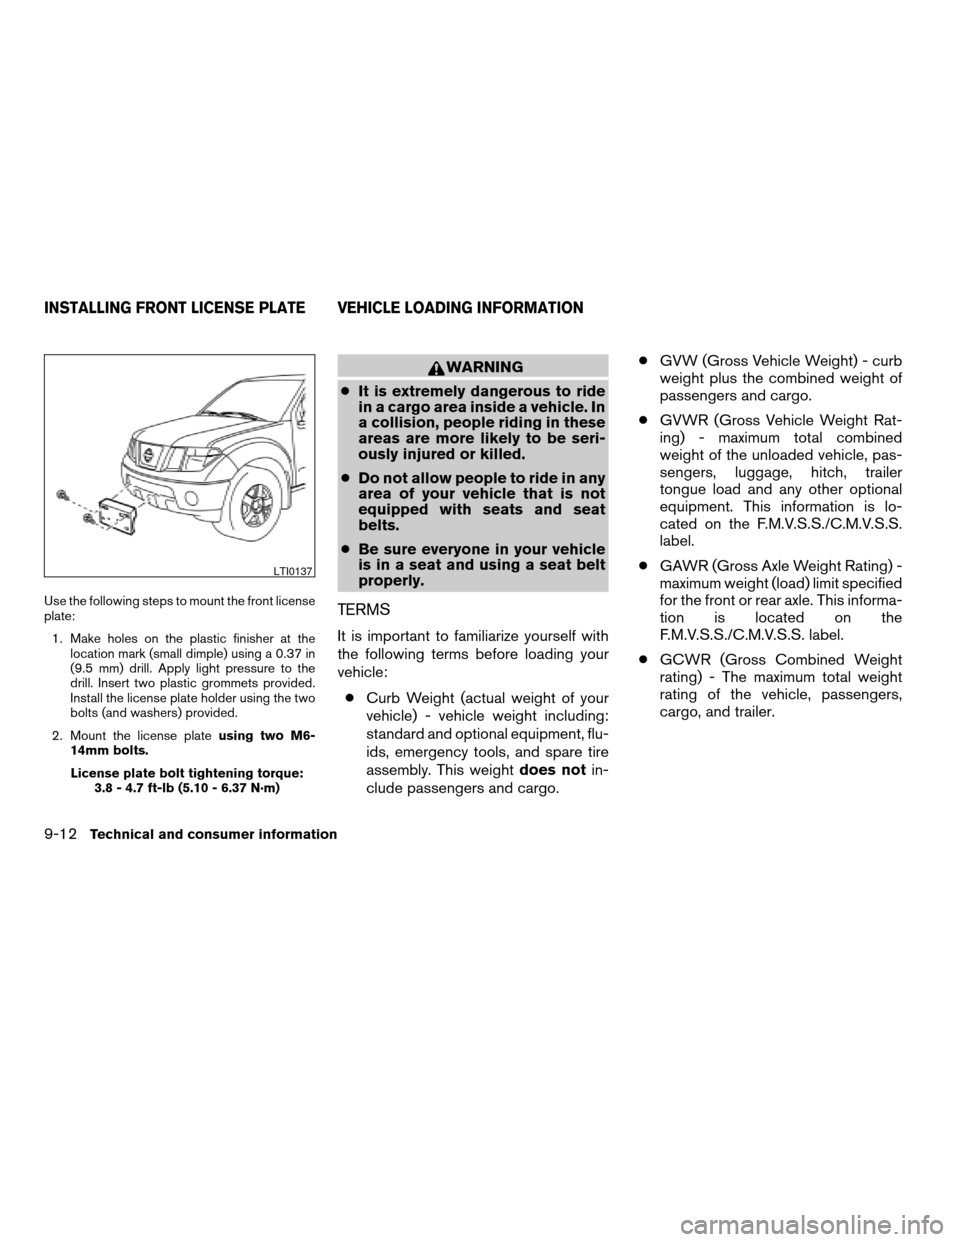
Use the following steps to mount the front license
plate:
1. Make holes on the plastic finisher at the
location mark (small dimple) using a 0.37 in
(9.5 mm) drill. Apply light pressure to the
drill. Insert two plastic grommets provided.
Install the license plate holder using the two
bolts (and washers) provided.
2. Mount the license plateusing two M6-
14mm bolts.
License plate bolt tightening torque:
3.8 - 4.7 ft-lb (5.10 - 6.37 N·m)
WARNING
cIt is extremely dangerous to ride
in a cargo area inside a vehicle. In
a collision, people riding in these
areas are more likely to be seri-
ously injured or killed.
cDo not allow people to ride in any
area of your vehicle that is not
equipped with seats and seat
belts.
cBe sure everyone in your vehicle
is in a seat and using a seat belt
properly.
TERMS
It is important to familiarize yourself with
the following terms before loading your
vehicle:
cCurb Weight (actual weight of your
vehicle) - vehicle weight including:
standard and optional equipment, flu-
ids, emergency tools, and spare tire
assembly. This weightdoes notin-
clude passengers and cargo.cGVW (Gross Vehicle Weight) - curb
weight plus the combined weight of
passengers and cargo.
cGVWR (Gross Vehicle Weight Rat-
ing) - maximum total combined
weight of the unloaded vehicle, pas-
sengers, luggage, hitch, trailer
tongue load and any other optional
equipment. This information is lo-
cated on the F.M.V.S.S./C.M.V.S.S.
label.
cGAWR (Gross Axle Weight Rating) -
maximum weight (load) limit specified
for the front or rear axle. This informa-
tion is located on the
F.M.V.S.S./C.M.V.S.S. label.
cGCWR (Gross Combined Weight
rating) - The maximum total weight
rating of the vehicle, passengers,
cargo, and trailer.
LTI0137
INSTALLING FRONT LICENSE PLATE VEHICLE LOADING INFORMATION
9-12Technical and consumer information
ZREVIEW COPYÐ2007 Truck/Frontier(d22)
Owners ManualÐUSA_English(nna)
12/21/06Ðdebbie
X
Page 318 of 336
cWhen towing with the hitch ball
mounted to the rear bumper, do not
make sharp turns. The trailer may con-
tact the bumper and cause damage to
the bumper or trailer.
Tire pressures
cWhen towing a trailer, inflate the ve-
hicle tires to the recommended cold
tire pressure indicated on the Tire
and Loading Information label.
cTrailer tire condition, size, load rating
and proper inflation pressure should
be in accordance with the trailer and
tire manufacturer’s specifications.
Safety chains
Always use suitable safety chains between your
vehicle and the trailer. The safety chains should
be crossed and should be attached to the hitch,
not to the vehicle bumper or axle. The safety
chains can be attached to the bumper if the hitch
ball is mounted to the bumper. Be sure to leave
enough slack in the chains to permit turning
corners.
Trailer lights
CAUTION
When splicing into the vehicle electrical
system, a commercially available power-
type module/converter must be used to
provide power for all trailer lighting. This
unit uses the vehicle battery as a direct
power source for all trailer lights while
using the vehicle tail light, stoplight and
turn signal circuits as a signal source. The
module/converter must draw no more
that 15 milliamps from the stop and tail
lamp circuits. Using a module/converter
that exceeds these power requirements
may damage the vehicle’s electrical sys-
tem. See a reputable trailer dealer to ob-
tain the proper equipment and to have it
installed.
Trailer lights should comply with federal and/or
local regulations. For assistance in hooking up
trailer lights, contact a NISSAN dealer or repu-
table trailer dealer. Vehicles equipped with the
optional trailer tow package are equipped with a
7-pin trailer harness connector. A flat 4–pin har-
ness is available from your dealer for vehicles
without a tow package. If your trailer is equipped
with a flat 4-pin connector, an adapter will beneeded to connect the trailer lights to the vehicle.
Adapters are available at auto parts stores and
hitch retailers.Trailer brakes
If your trailer is equipped with a braking system,
make sure it conforms to federal and/or local
regulations and that it is properly installed.
Vehicles equipped with a 7–pin trailer harness
connector are pre-wired for a trailer brake con-
troller. See a NISSAN dealer for a trailer brake
adapter harness.
WARNING
Never connect a trailer brake system di-
rectly to the vehicle brake system.
Electric trailer brake controller
Trailers equipped with electric brakes may re-
quire the installation of an aftermarket trailer
brake controller.
A Genuine NISSAN jumper harness is available
that is specifically designed to be used when
installing an aftermarket brake controller.
Install the aftermarket electric trailer brake con-
troller according to the manufacturer’s instruc-
tions.
9-30Technical and consumer information
ZREVIEW COPYÐ2007 Truck/Frontier(d22)
Owners ManualÐUSA_English(nna)
12/14/06Ðcathy
X