2007 NISSAN ARMADA remove seats
[x] Cancel search: remove seatsPage 24 of 344
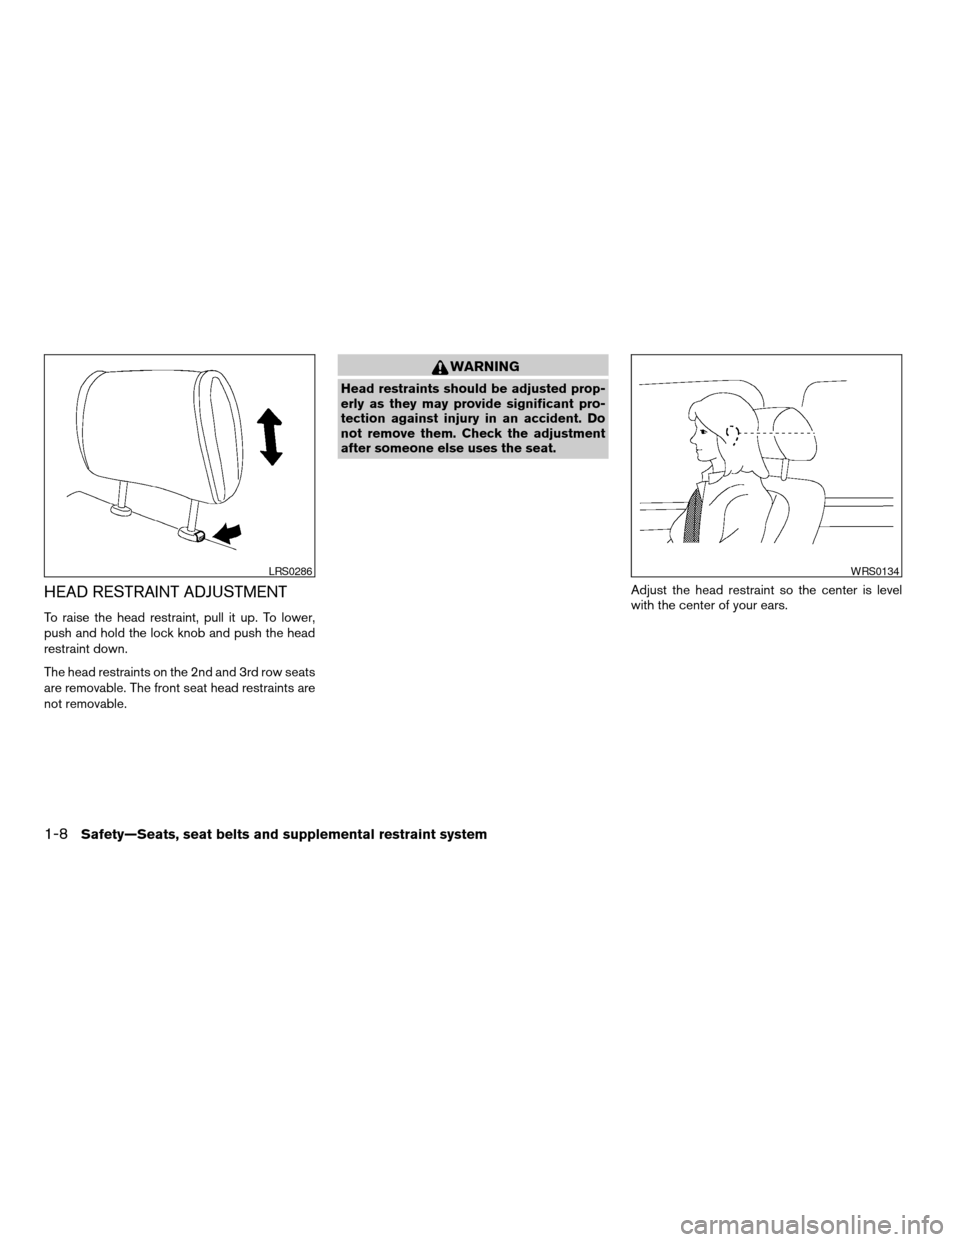
HEAD RESTRAINT ADJUSTMENT
To raise the head restraint, pull it up. To lower,
push and hold the lock knob and push the head
restraint down.
The head restraints on the 2nd and 3rd row seats
are removable. The front seat head restraints are
not removable.
WARNING
Head restraints should be adjusted prop-
erly as they may provide significant pro-
tection against injury in an accident. Do
not remove them. Check the adjustment
after someone else uses the seat.
Adjust the head restraint so the center is level
with the center of your ears.
LRS0286WRS0134
1-8Safety—Seats, seat belts and supplemental restraint system
ZREVIEW COPYÐ2007 Armada(wzw)
Owners ManualÐUSA_English(nna)
07/08/06Ðtbrooks
X
Page 26 of 344
FLEXIBLE SEATING
WARNING
cNever allow anyone to ride in the cargo
area or on the rear seats when they are
in the fold-down position. In a collision,
people riding in these areas without
proper restraints are more likely to be
seriously injured or killed.
cDo not allow people to ride in any area
of your vehicle that is not equipped with
seats and seat belts. Be sure everyone
in your vehicle is in a seat and using a
seat belt properly.
cDo not fold down the rear seats when
occupants are in the rear seat area or
any luggage is on the rear seats.
cHead restraints should be adjusted
properly as they may provide significant
protection against injury in an accident.
Always replace and adjust them prop-
erly if they have been removed for any
reason.cIf the head restraints are removed for
any reason, they should be securely
stored to prevent them from causing
injury to passengers or damage to the
vehicle in case of sudden braking or an
accident.
cWhen returning the seatbacks to the
upright position, be certain they are
completely secured in the latched posi-
tion. If they are not completely secured,
passengers may be injured in an acci-
dent or sudden stop.
cProperly secure all cargo to help pre-
vent it from sliding or shifting. Do not
place cargo higher than the seatbacks.
In a sudden stop or collision, unsecured
cargo could cause personal injury.
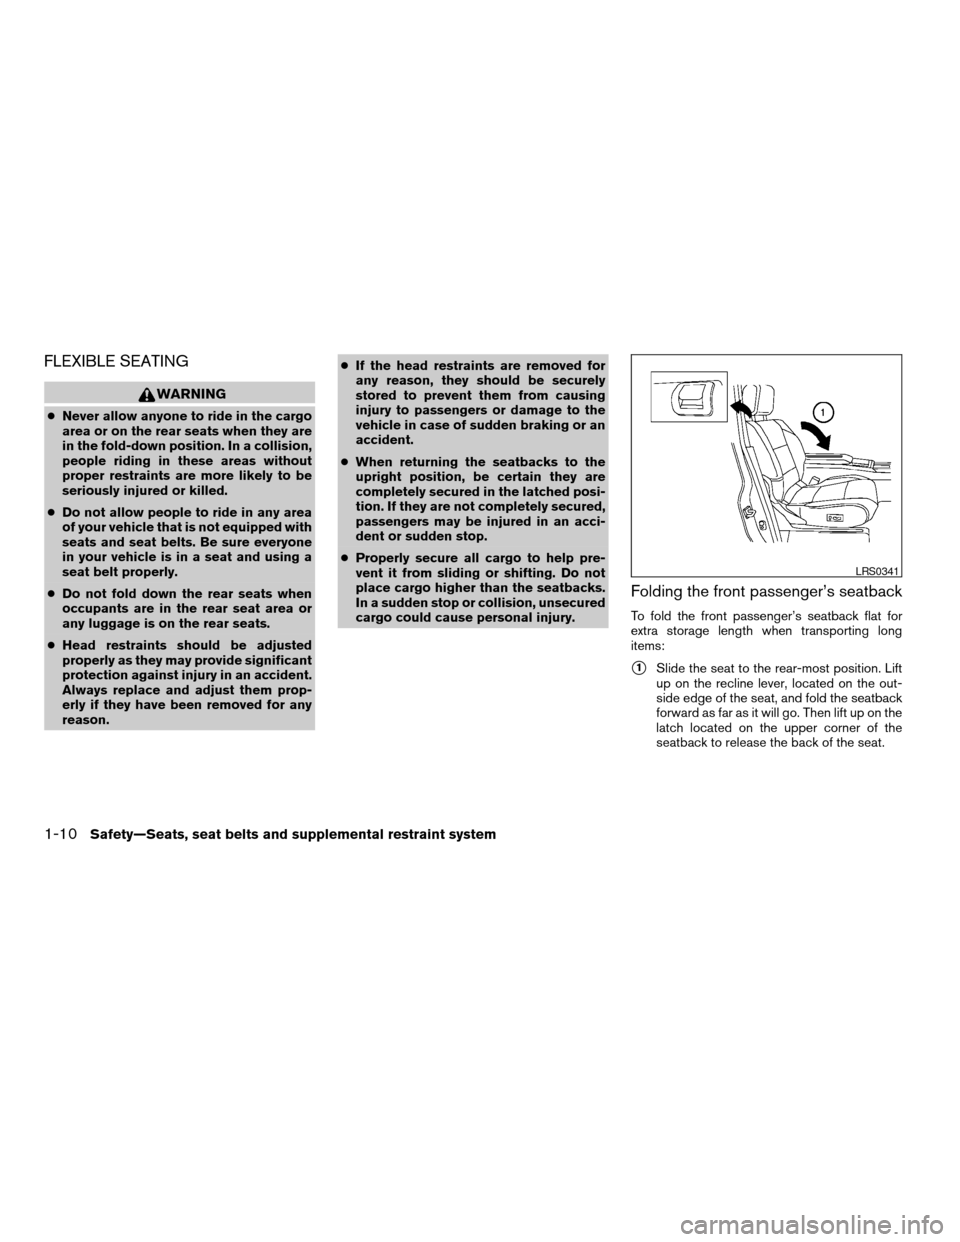
Folding the front passenger’s seatback
To fold the front passenger’s seatback flat for
extra storage length when transporting long
items:
s1Slide the seat to the rear-most position. Lift
up on the recline lever, located on the out-
side edge of the seat, and fold the seatback
forward as far as it will go. Then lift up on the
latch located on the upper corner of the
seatback to release the back of the seat.
LRS0341
1-10Safety—Seats, seat belts and supplemental restraint system
ZREVIEW COPYÐ2007 Armada(wzw)
Owners ManualÐUSA_English(nna)
07/08/06Ðtbrooks
X
Page 27 of 344
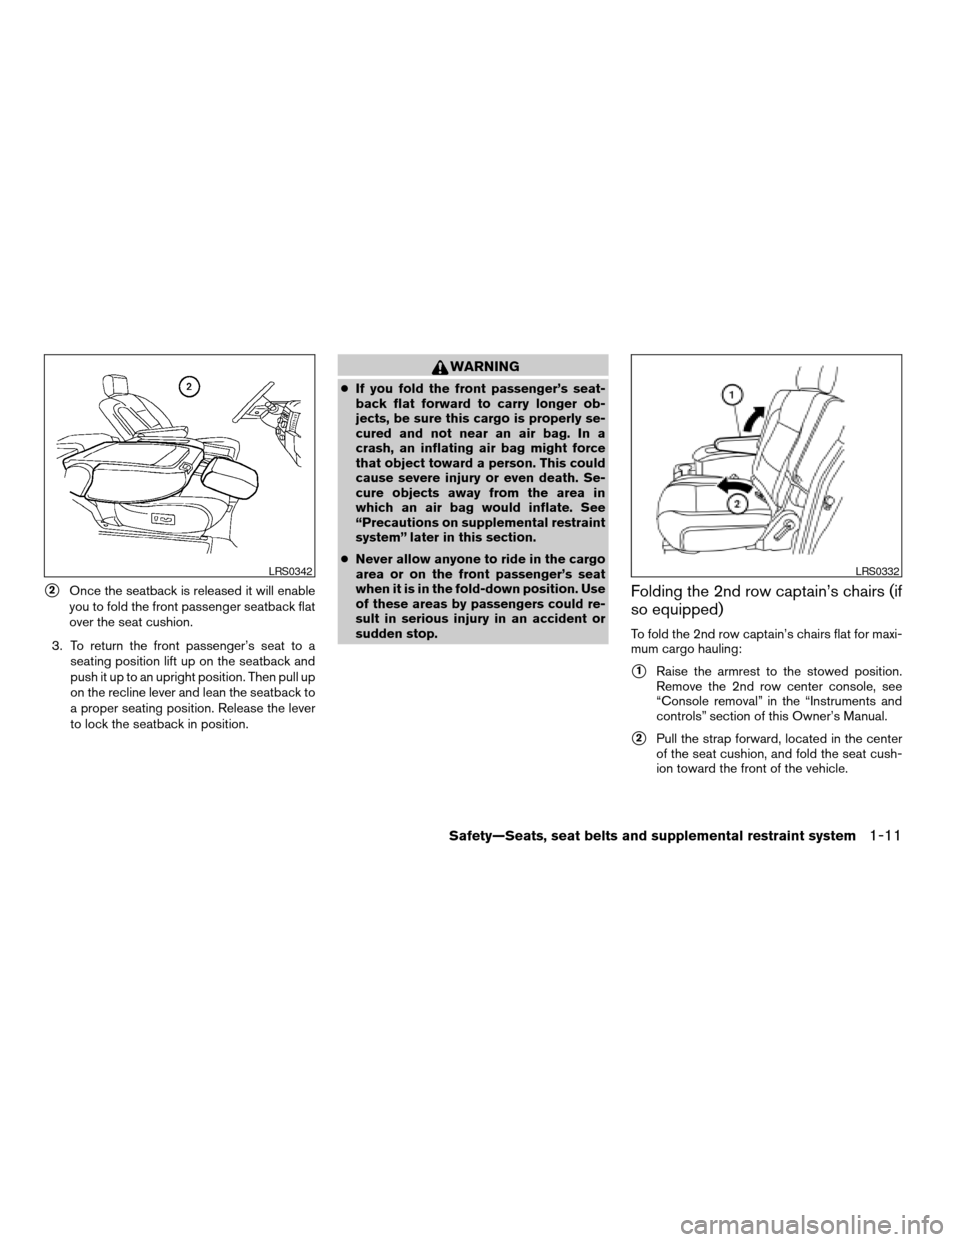
s2Once the seatback is released it will enable
you to fold the front passenger seatback flat
over the seat cushion.
3. To return the front passenger’s seat to a
seating position lift up on the seatback and
push it up to an upright position. Then pull up
on the recline lever and lean the seatback to
a proper seating position. Release the lever
to lock the seatback in position.
WARNING
cIf you fold the front passenger’s seat-
back flat forward to carry longer ob-
jects, be sure this cargo is properly se-
cured and not near an air bag. In a
crash, an inflating air bag might force
that object toward a person. This could
cause severe injury or even death. Se-
cure objects away from the area in
which an air bag would inflate. See
“Precautions on supplemental restraint
system” later in this section.
cNever allow anyone to ride in the cargo
area or on the front passenger’s seat
when it is in the fold-down position. Use
of these areas by passengers could re-
sult in serious injury in an accident or
sudden stop.
Folding the 2nd row captain’s chairs (if
so equipped)
To fold the 2nd row captain’s chairs flat for maxi-
mum cargo hauling:
s1Raise the armrest to the stowed position.
Remove the 2nd row center console, see
“Console removal” in the “Instruments and
controls” section of this Owner’s Manual.
s2Pull the strap forward, located in the center
of the seat cushion, and fold the seat cush-
ion toward the front of the vehicle.
LRS0342LRS0332
Safety—Seats, seat belts and supplemental restraint system1-11
ZREVIEW COPYÐ2007 Armada(wzw)
Owners ManualÐUSA_English(nna)
07/08/06Ðtbrooks
X
Page 47 of 344
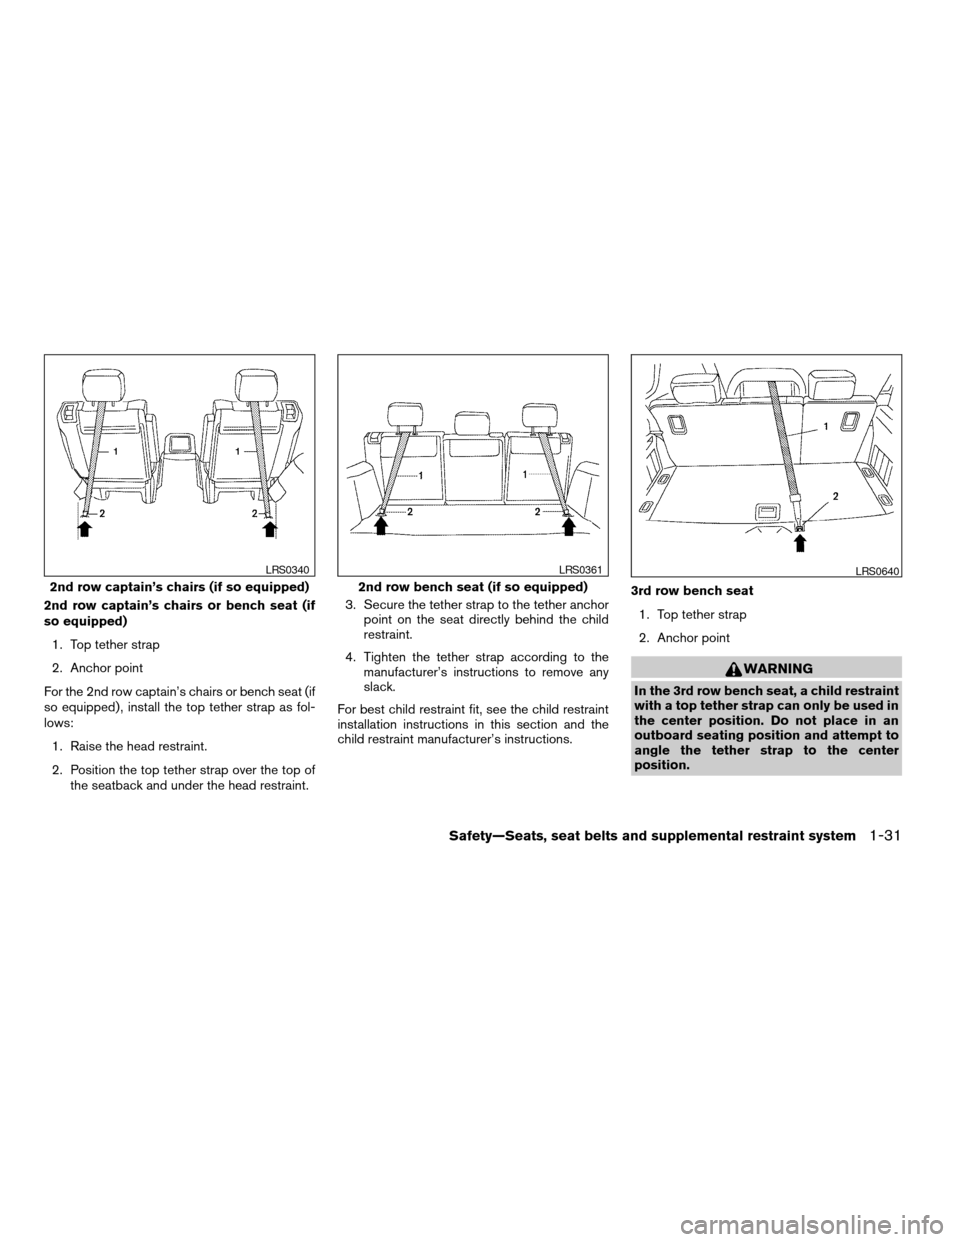
2nd row captain’s chairs or bench seat (if
so equipped)
1. Top tether strap
2. Anchor point
For the 2nd row captain’s chairs or bench seat (if
so equipped) , install the top tether strap as fol-
lows:
1. Raise the head restraint.
2. Position the top tether strap over the top of
the seatback and under the head restraint.3. Secure the tether strap to the tether anchor
point on the seat directly behind the child
restraint.
4. Tighten the tether strap according to the
manufacturer’s instructions to remove any
slack.
For best child restraint fit, see the child restraint
installation instructions in this section and the
child restraint manufacturer’s instructions.3rd row bench seat
1. Top tether strap
2. Anchor point
WARNING
In the 3rd row bench seat, a child restraint
with a top tether strap can only be used in
the center position. Do not place in an
outboard seating position and attempt to
angle the tether strap to the center
position.
2nd row captain’s chairs (if so equipped)
LRS0340
2nd row bench seat (if so equipped)
LRS0361LRS0640
Safety—Seats, seat belts and supplemental restraint system1-31
ZREVIEW COPYÐ2007 Armada(wzw)
Owners ManualÐUSA_English(nna)
07/08/06Ðtbrooks
X
Page 48 of 344
The center position of the 3rd row bench seat is
the seating position that can use a top tether
strap.
For the 3rd row bench seat, install the top tether
strap as follows:
1. Position the top tether strap over the top of
the center seating position seatback.
2. Secure the tether strap to the tether anchor
point on floor behind the child restraint.
3. Tighten the tether strap according to the
manufacturer’s instructions to remove any
slack.
For best child restraint fit, see the child restraint
installation instructions in this section and the
child restraint manufacturer’s instructions.CHILD RESTRAINT INSTALLATION
USING LATCH
WARNING
cAttach LATCH compatible child re-
straints only at the locations shown. For
the LATCH lower anchor locations, see
“Latch Anchors and Tethers for CHil-
dren System (LATCH)”. If a child re-
straint is not secured properly, your
child could be seriously injured or killed
in an accident.
cThe LATCH anchors are designed to
withstand only those loads imposed by
correctly fitted child restraints. Under
no circumstance are they to be used for
adult seat belts or harnesses.
cInspect the lower anchors by inserting
your fingers into the lower anchor area
and feeling to make sure there are no
obstructions over the LATCH anchors,
such as seat belt webbing or seat cush-
ion material. The child restraint will not
be secured properly if the LATCH an-
chors are obstructed.
Front-facing
Follow these steps to install a front-facing child
restraint in the 2nd row seats using LATCH:
1. Recline the seatback if the seatback is ad-
justable to assist in attaching the child re-
straint to the lower anchors.
2. Position the child restraint on the seat. Al-
ways follow the child restraint manufactur-
er’s instructions.
1-32Safety—Seats, seat belts and supplemental restraint system
ZREVIEW COPYÐ2007 Armada(wzw)
Owners ManualÐUSA_English(nna)
07/08/06Ðtbrooks
X
Page 49 of 344

3. Secure the child restraint anchor attach-
ments to the LATCH lower anchors.
4. Return the seatback to its normal upright
and locked position.
The back of the child restraint should be secured
against the vehicle seatback. If necessary, adjust
or remove the head restraint to obtain the correct
child restraint fit. See “Head restraint adjust-
ment” in this section. If the head restraint is re-
moved, store it in a secure place. Be sure to
install the head restraint when the child restraint
is removed. If the seating position does not have
an adjustable head restraint and it is interferingwith the proper child restraint fit, try another
seating position or a different child restraint.5. For child restraints that are equipped with
webbing mounted attachments, remove any
additional slack from the anchor attach-
ments. Press downward and rearward firmly
in the center of the child restraint with your
knee to compress the vehicle seat cushion
and seatback while tightening the webbing
of the anchor attachments.
6. If the child restraint is equipped with a top
tether strap, route the top tether strap and
secure the tether strap to the tether anchor
point. See “Top tether strap child restraint” in
this section.
Front facing web-mounted – step 3
LRS0663
Front facing rigid-mounted – step 3
LRS0664
Front facing – step 5
LRS0671
Safety—Seats, seat belts and supplemental restraint system1-33
ZREVIEW COPYÐ2007 Armada(wzw)
Owners ManualÐUSA_English(nna)
07/08/06Ðtbrooks
X
Page 51 of 344

5. For child restraints that are equipped with
webbing mounted attachments, remove any
additional slack from the anchor attach-
ments. Press downward and rearward firmly
in the center of the child restraint with your
hand to compress the vehicle seat cushion
and seatback while tightening the webbing
of the anchor attachments.6. Before placing the child in the child restraint,
hold the child restraint near the LATCH at-
tachment and use force to push the child
restraint from side to side, and tug it forward
to make sure that it is securely held in place.
It should not move more than 1 in (25 mm) . If
it does move more than 1 in (25 mm) , pull
again on the anchor attachments to further
tighten the child restraint. If you are unable to
properly secure the restraint, move the re-
straint to another seating position and try
again, or try a different child restraint. Not all
child restraints fit in all types of vehicles.7. Check to make sure the child restraint is
properly secured prior to each use. If the
child restraint is loose, repeat steps 3
through 6.
Rear facing rigid-mounted – step 3
LRS0666
Front facing – step 5
LRS0673
Front facing – step 6
LRS0674
Safety—Seats, seat belts and supplemental restraint system1-35
ZREVIEW COPYÐ2007 Armada(wzw)
Owners ManualÐUSA_English(nna)
07/08/06Ðtbrooks
X
Page 53 of 344

Front-facing
Follow these steps to install a front-facing child
restraint using the vehicle seat belt in the rear
seats or in the front passenger seat:
1.If you must install a child restraint in
the front seat, it should be placed in a
front-facing direction only. Move the
seat to the rearmost position. Child
restraints for infants must be used in
the rear-facing direction and therefore
must not be used in the front seat.2. Position the child restraint on the seat. Al-
ways follow the child restraint manufactur-
er’s instructions
The back of the child restraint should be secured
against the vehicle seatback. If necessary, adjust
or remove the head restraint to obtain the correct
child restraint fit. See “Head restraint adjust-
ment” in this section.
If the head restraint is removed, store it in a
secure place. Be sure to install the head restraint
when the child restraint is removed. If the seating
position does not have an adjustable head re-
straint and it is interfering with the proper child
restraint fit, try another seating position or a dif-
ferent child restraint.
3. Route the seat belt tongue through the child
restraint and insert it into the buckle until you
hear and feel the latch engage. Be sure to
follow the child restraint manufacturer’s in-
structions for belt routing.
Front-facing (front passenger seat) – step 1
WRS0699
Front facing – step 3
WRS0680
Safety—Seats, seat belts and supplemental restraint system1-37
ZREVIEW COPYÐ2007 Armada(wzw)
Owners ManualÐUSA_English(nna)
07/08/06Ðtbrooks
X