2007 NISSAN ALTIMA start stop button
[x] Cancel search: start stop buttonPage 80 of 344

cIf the light illuminates while driving,
avoid sudden steering maneuvers or
abrupt braking, reduce vehicle speed,
pull off the road to a safe location and
stop the vehicle as soon as possible.
Serious vehicle damage could occur
and may lead to an accident and could
result in serious personal injury. Check
the tire pressure for all four tires. Adjust
the tire pressure to the recommended
COLD tire pressure shown on the Tire
and Loading Information label to turn
the low tire pressure warning light OFF.
If the light stays on after adjusting the
tire pressure and driving over 16 mph,
have the system checked by a NISSAN
dealer. If you have a flat tire, replace it
with a spare tire as soon as possible.
cWhen a spare tire is mounted or a wheel
is replaced, tire pressure will not be
indicated, the TPMS will not function
and the low tire pressure warning light
will flash for approximately 1 minute.
The light will remain on after 1 minute.
Contact your NISSAN dealer as soon as
possible for tire replacement and/or
system resetting.cReplacing tires with those not originally
specified by NISSAN could affect the
proper operation of the TPMS.
CAUTION
cThe TPMS is not a substitute for the
regular tire pressure check. Be sure to
check the tire pressure regularly.
cIf the vehicle is being driven at speeds
of less than 16 MPH (25 km/h) , the
TPMS may not operate correctly.
cBe sure to install the specified size of
tires to the 4 wheels correctly.
Master warning light
This light comes on when various vehicle infor-
mation display warnings appear.
Seat belt warning light and
chime
The light and chime remind you to fasten your
seat belts. The light illuminates whenever the
push-button ignition switch is pushed to the ON
or START position and remains illuminated until
the driver’s seat belt is fastened. At the same
time, the chime sounds for about 6 seconds
unless the driver’s seat belt is securely fastened.The seat belt warning light may also illuminate if
the front passenger’s seat belt is not fastened
when the front passenger’s seat is occupied . For
7 seconds after the ignition switch is in the ON
position, the system does not activate the warn-
ing light for the front passenger.
Refer to “Seat belts” in the “Safety-Seats, seat
belts and supplemental restraint system” section
for precautions on seat belt usage.
Supplemental air bag warning
light
When the ignition switch is pushed to ONor
START position, the supplemental air bag warn-
ing light illuminates for about 7 seconds and then
turns off. This means the system is operational.
If any of the following conditions occur, the
supplemental front air bag, supplemental side air
bag , curtain side-impact air bags , and pre-
tensioner seat belt systems need servicing and
your vehicle must be taken to a NISSAN dealer:
cThe supplemental air bag warning light re-
mains on after approximately 7 seconds.
cThe supplemental air bag warning light
flashes intermittently.
cThe supplemental air bag warning light does
not come on at all.
2-12Instruments and controls
ZREVIEW COPYÐ2007 Altima(alt)
Owners ManualÐUSA_English(nna)
10/26/06Ðdebbie
X
Page 82 of 344

cMalfunction indicator light blinking — An en-
gine misfire has been detected which may
damage the emission control system. To re-
duce or avoid emission control system dam-
age:
– do not drive at speeds above 45 MPH
(72 km/h) .
– avoid hard acceleration or deceleration.
– avoid steep uphill grades.
– if possible, reduce the amount of cargo
being hauled or towed.
The malfunction indicator light may stop blinking
and come on steady. Have the vehicle inspected
by a NISSAN dealer. You do not need to have
your vehicle towed to the dealer.
CAUTION
Continued vehicle operation without hav-
ing the emission control system checked
and repaired as necessary could lead to
poor driveability, reduced fuel economy,
and possible damage to the emission con-
trol system.
Slip indicator light (if so
equipped)
This indicator light will blink when the traction
control system is limiting wheel spin. Slippery
road conditions may exist if the slip indicator
blinks on. If this happens, adjust your driving
accordingly.
The slip indicator light also comes on when you
turn the ignition key to the ON position. The light
will turn off after about 2 seconds if the system is
operational. If the light does not come on or does
not go off, have the traction control system
checked by a NISSAN dealer.
Traction control system off
indicator light (if so equipped)
This indicator light comes on when the traction
control off switch is pushed to OFF. This indi-
cates the traction control system is not operating.
Push the traction control off switch again or re-
start the engine and the system will operate nor-
mally. See “Traction control system (TCS)” in the
“Starting and driving” section of this manual.
The traction control light also comes on when you
turn the ignition key to the ON position. The light
will turn off after about 2 seconds if the traction
control system (TCS) is operational. If the light
stays on or comes on along with the SLIP indica-tor light while you are driving, have the traction
control system checked by a NISSAN dealer.
While the traction control system is operating,
you might feel slight vibration or hear the system
working when starting the vehicle or accelerat-
ing, but this is normal.
Turn signal/hazard indicator
lights
The appropriate light flashes when the turn signal
switch is activated.
Both lights flash when the hazard switch is turned
on.
Vehicle dynamic control off
indicator light (if so equipped)
This indicator light comes on when the vehicle
dynamic control off switch is pushed to OFF. This
indicates the vehicle dynamic control system is
not operating.
Push the vehicle dynamic control off switch again
or restart the engine and the system will operate
normally. See “Vehicle dynamic control (VDC)
system” in the “Starting and driving” section of
this manual.
The vehicle dynamic control light also comes on
when you push the push-button ignition switch to
the ON position. The light will turn off after about
2-14Instruments and controls
ZREVIEW COPYÐ2007 Altima(alt)
Owners ManualÐUSA_English(nna)
10/26/06Ðdebbie
X
Page 92 of 344

Vehicle security system activation
The vehicle security system will give the following
alarm:
cThe headlights blink and the horn sounds
intermittently.
cThe alarm automatically turns off after ap-
proximately 50 seconds. However, the alarm
reactivates if the vehicle is tampered with
again. The alarm can be shut off by unlocking
the driver’s door or trunk lid with the key, or
by pressing the
button on the intelli-
gent key.
The alarm is activated by:
copening the door or trunk lid without using
the key or intelligent key(even if the door is
unlocked by releasing the door inside lock
switch) .
How to stop an activated alarm
The alarm stops only by unlocking the driver’s
door or the trunk lid with the key, or by pressing
the
button on theintelligent key.
NISSAN VEHICLE IMMOBILIZER
SYSTEM
The NISSAN Vehicle Immobilizer System will not
allow the engine to start without the use of a
registered key.
Statement related to Section 15 of FCC
Rules for NISSAN Vehicle Immobilizer Sys-
tem
This device complies with part 15 of the
FCC Rules and RSS-210 of Industry
Canada. Operation is subject to the follow-
ing two conditions;
(1) This device may not cause harmful in-
terference, and (2) this device must accept
any interference received, including inter-
ference that may cause undesired opera-
tion of the device.
CHANGES OR MODIFICATIONS NOT EX-
PRESSLY APPROVED BY THE PARTY RE-
SPONSIBLE FOR COMPLIANCE COULD
VOID THE USER’S AUTHORITY TO OPER-
ATE THE EQUIPMENT.
Security indicator light
The security indicator light blinks whenever the
ignition switch is in the LOCK, OFF or ACC
position. This function indicates the NISSAN Ve-
hicle Immobilizer System is operational.
If the NISSAN Vehicle Immobilizer System is mal-
functioning, the light will remain on while the
ignition key is in the ON position.
If the light still remains on and/or the en-
gine will not start, see a NISSAN dealer for
NISSAN Vehicle Immobilizer System ser-
vice as soon as possible. Please bring all
registered keys that you have when visiting
your NISSAN dealer for service.
LIC0474
2-24Instruments and controls
ZREVIEW COPYÐ2007 Altima(alt)
Owners ManualÐUSA_English(nna)
10/26/06Ðdebbie
X
Page 173 of 344

When the RADIO button is pressed while the
ignition switch is in the ACC or ON position, the
radio will come on at the station last played.
If a compact disc is playing when the RADIO
button is pressed, the compact disc will auto-
matically be turned off and the last radio station
played will come on.
The FM stereo indicator, ST, illuminates during
FM stereo reception. When the stereo broadcast
signal is weak, the radio automatically changes
from stereo to monaural reception.
TUNE/FF·REW (tuning)
button:
Press the TUNE/FF·REW button
orfor manual tuning. To move quickly through the
channels, hold the tuning buttons down.
SEEK (tuning) button:
Press the SEEK/TRACK button
orto tune from high to low or low to high frequen-
cies and stop at the next broadcasting station.
SCAN (tuning) button:
Press the SCAN button. SCAN illuminates in the
display window. Scan tuning begins from low to
high frequencies. Scan tuning stops for 5 sec-
onds at each broadcasting station that has suffi-
cient signal strength. When scanning, SCANblinks in the display. Pressing the SCAN button
again during this 5 second period stops scan
tuning and the radio remains tuned to that station.
Station memory operations:
18 stations can be set for the FM and AM radio to
the A, B and C preset button in any combination
of AM or FM stations.
1. Press the PRESET A·B·C button to change
between storage banks. The radio displays
the icon A, B or C to indicate which set of
presets are active.
2. Tune to the desired station using manual
TUNE or SEEK tuning. Press and hold any of
the desired station memory buttons (1 – 6)
until a beep sound is heard. (The radio mutes
when the select button is pressed.)
3. The channel indicator will then come on and
the sound will resume. Programming is now
complete.
4. Other buttons can be set in the same man-
ner.
If the battery cable is disconnected, or if the fuse
opens, the radio memory will be canceled. In that
case, reset the desired stations.
Compact disc (CD) player operation
Place the ignition switch in the ACC or ON
position, and carefully insert the compact disc
into the slot with the label side up. The compact
disc is automatically pulled into the slot and starts
to play.
If the radio is already operating, it automatically
turns off and the compact disc begins to play.
CD button:
When the CD button is pressed with a compact
disc loaded and the radio playing, the radio turns
off and the last used compact disc starts to play.
TUNE/FF·REW (Fast For-
ward, Rewind) button:
When the TUNE/FF·REW button
oris pressed while the compact disc is playing, the
compact disc plays at an increased speed while
fast forwarding or rewinding. When the button is
released, the compact disc returns to normal play
speed.
SEEK/TRACK button:
When
is pressed while the compact disc
is playing, the next track following the present
one starts to play from the beginning.
Press
several times to skip several tracks.
Each time the button is pressed, the CD ad-
Monitor, climate, audio, phone and voice recognition systems4-29
ZREVIEW COPYÐ2007 Altima(alt)
Owners ManualÐUSA_English(nna)
10/26/06Ðdebbie
X
Page 178 of 344

SCAN (tuning) button:
Press the SCAN button. SCAN illuminates in the
display window. Scan tuning begins from low to
high frequencies. Scan tuning stops for 5 sec-
onds at each broadcasting station that has suffi-
cient signal strength. When scanning, SCAN
blinks in the display. Pressing the SCAN button
again during this 5 second period stops scan
tuning and the radio remains tuned to that station.
Station memory operations:
18 stations can be set for the FM and AM radio to
the A, B and C preset button in any combination
of AM or FM stations.
1. Press the PRESET A·B·C button to change
between storage banks. The radio displays
the icon A, B or C to indicate which set of
presets are active.
2. Tune to the desired station using manual
TUNE or SEEK tuning. Press and hold any of
the desired station memory buttons (1 – 6)
until a beep sound is heard. (The radio mutes
when the select button is pressed.)
3. The channel indicator will then come on and
the sound will resume. Programming is now
complete.
4. Other buttons can be set in the same man-
ner.If the battery cable is disconnected, or if the fuse
opens, the radio memory will be canceled. In that
case, reset the desired stations.
Radio data system (RDS):
RDS stands for Radio Data System, and is a data
information service transmitted by some radio
stations on the FM band (not AM band) and/or
SAT radio encoded within a regular radio broad-
cast. Currently, most RDS stations are in large
cities, but many stations are now considering
broadcasting RDS data.
RDS can display:
cStation call sign, such as “WHFR 98.3”.
cStation name, such as “The Groove”.
cMusic or programming type such as “Clas-
sical”, “Country”, or “Rock”.
If the station broadcasts RDS information, the
RDS icon is displayed.
Compact disc (CD) changer operation
Place the ignition switch in the ACC or ON
position and insert the compact disc into the slot
with the label side facing up. The compact disc
will be guided automatically into the slot and start
playing. To insert the disc, first press the
button.If the radio is already operating, it will automati-
cally turn off and the compact disc will play.
If the system has been turned off while the com-
pact disc was playing, pressing the PWR button
will start the compact disc.
Do not use 3.1 in (8 cm) diameter compact discs
in the CD changer.
CD load button:
To insert a CD in the CD changer, press
the
load button for less than 1.5 seconds.
Select the loading slot by pressing the CD insert
select button (1 – 6) , then insert the CD.
To insert 6 CDs to the CD changer, press
the
load button for more than 1.5 seconds.
The slot numbers (1 – 6) will illuminate on the
display when CDs are loaded into the changer.
CD button:
When the CD button is pressed with the system
off and the compact disc loaded, the system will
turn on and the compact disc will start to play.
When the CD button is pressed with the com-
pact disc loaded but the radio playing, the radio
will automatically be turned off and the compact
disc will start to play.
4-34Monitor, climate, audio, phone and voice recognition systems
ZREVIEW COPYÐ2007 Altima(alt)
Owners ManualÐUSA_English(nna)
10/26/06Ðdebbie
X
Page 185 of 344

When the CD/AUX button is pressed with the
compact disc loaded but the radio playing, the
radio will automatically be turned off and the
compact disc will start to play.
TUNE·FOLDER knob:
While playing an MP3 CD to skip through folders
turn the TUNE·FOLDER knob right or left to skip
forward or backward through the available fold-
ers.
This function will only operate on an MP3 CD with
multiple folders.
“Folder” key:
While playing an MP3 CD you can select a track
inside a folder. Touch the “Folder” key; a list
screen displays. Touch one of the folder select
keys; another list screen displays. Touch one of
the file select keys; the system will start playing
that track in the selected folder.
SEEK/TRACK button:
When the SEEK/TRACK
button is
pressed for less than 1.5 seconds while a com-
pact disc is playing, the track being played re-
turns to its beginning. Press several times to skip
back through tracks. The compact disc will go
back the number of times the button is pressed.When the SEEK/TRACK
button is
pressed for less than 1.5 seconds while the
compact disc is playing, the next track will start to
play from its beginning. Press several times to
skip through tracks. The compact disc will ad-
vance the number of times the button is pressed.
(When the last track on the compact disc is
skipped through, the first track will be played.)
When pressing the SEEK/TRACK
(fast
forward) or(rewind) button for more than
1.5 seconds, the CD being played will fast for-
ward or rewind. When the button is released, the
CD will return to normal play speed.
“Track” key:
While playing a CD or an MP3 CD you can select
a track or file on the disc. Touch the “Track” key, a
list screen displays. Touch one of the track or file
select keys, the system will start playing that track
or file.
CD select buttons:
To play another CD that has been loaded:
cTouch one of the CD select (1–6) keys on
the touch-screen or
cPress one of the station and CD select (1 –
6) buttons on the radio or
cPress one of the CD changer (1 – 6) select
buttons.“Scan” key:
While listening to a CD, touch the “Scan” key to
preview the first 10 seconds of each track on the
current CD playing. Touching the “Scan” key
during this 10 second period stops the scan and
the CD remains on that track.
“Repeat” key:
When the “Repeat” key is touched while a com-
pact disc is played, the play pattern can be
changed as follows:
CD:
1 DISC RPT!1 TRACK RPT
MP3 CD:
1 DISC RPT!1 FOLDER RPT!1 TRACK
RPT
1 DISC RPT: The disc that is currently playing will
be repeated.
1 TRACK RPT: The track that is currently playing
will be repeated
1 FOLDER RPT: The folder that is currently play-
ing will be repeated.
Monitor, climate, audio, phone and voice recognition systems4-41
ZREVIEW COPYÐ2007 Altima(alt)
Owners ManualÐUSA_English(nna)
10/27/06Ðdebbie
X
Page 220 of 344

WARNING
cDo not operate the push-button ignition
switch while driving the vehicle except
in an emergency. (The engine will stop
when the ignition switch is pushed 3
consecutive times or the ignition switch
is pushed and held for more than 2
seconds.) If the engine stops while the
vehicle is being driven, this could lead
to a crash and serious injury.
cWhen the battery of the Intelligent Key
runs down, insert the Intelligent Key
into the Intelligent Key port until a click
sounds. And then, push the ignition
switch to start the engine.
cIf the steering lock release malfunction
indicator appears on the vehicle infor-
mation display, push the push-button
ignition switch again while lightly turn-
ing the steering wheel right and left.
See “Vehicle information display” in the
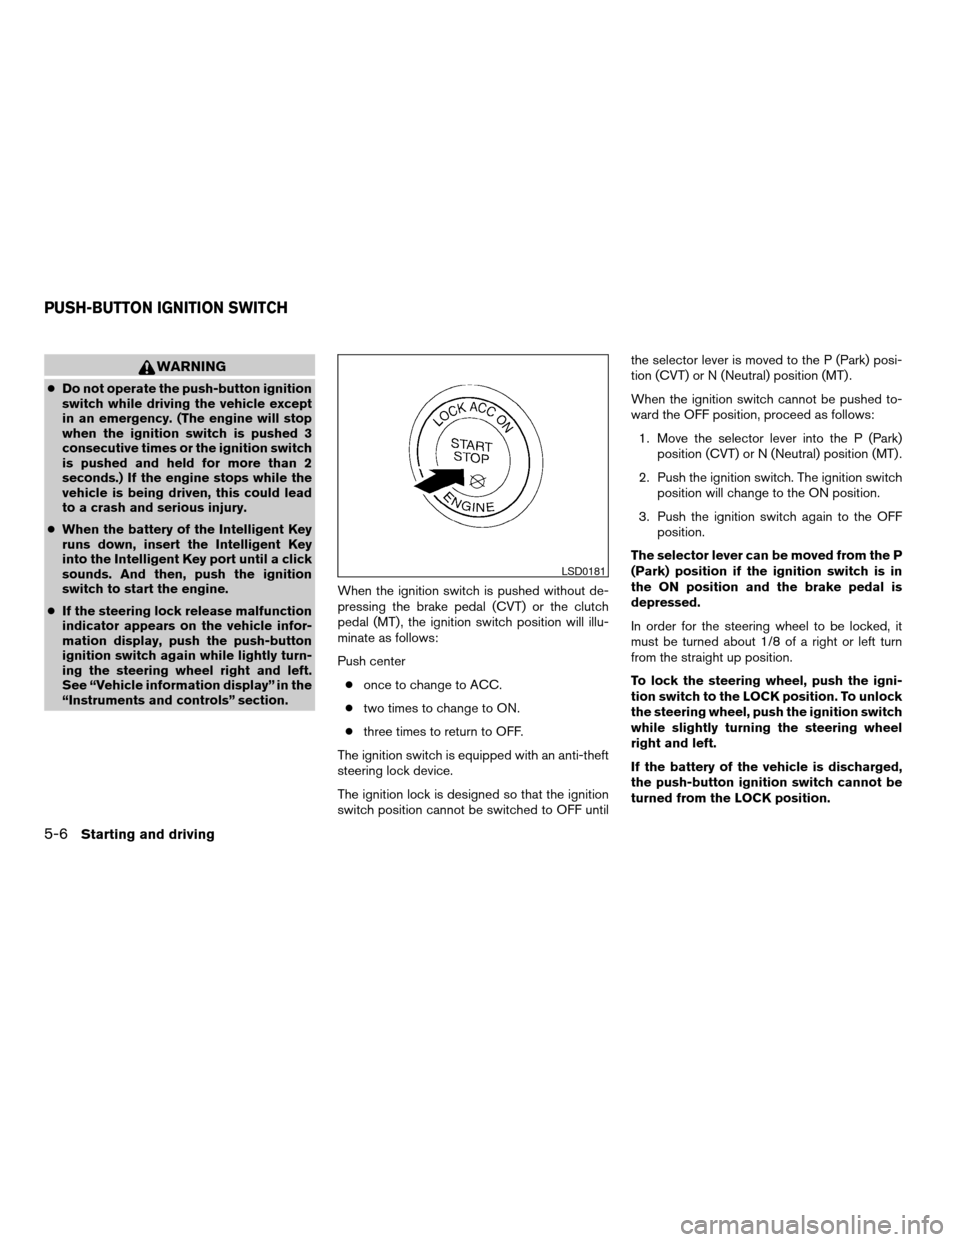
“Instruments and controls” section.When the ignition switch is pushed without de-
pressing the brake pedal (CVT) or the clutch
pedal (MT) , the ignition switch position will illu-
minate as follows:
Push center
conce to change to ACC.
ctwo times to change to ON.
cthree times to return to OFF.
The ignition switch is equipped with an anti-theft
steering lock device.
The ignition lock is designed so that the ignition
switch position cannot be switched to OFF untilthe selector lever is moved to the P (Park) posi-
tion (CVT) or N (Neutral) position (MT) .
When the ignition switch cannot be pushed to-
ward the OFF position, proceed as follows:
1. Move the selector lever into the P (Park)
position (CVT) or N (Neutral) position (MT) .
2. Push the ignition switch. The ignition switch
position will change to the ON position.
3. Push the ignition switch again to the OFF
position.
The selector lever can be moved from the P
(Park) position if the ignition switch is in
the ON position and the brake pedal is
depressed.
In order for the steering wheel to be locked, it
must be turned about 1/8 of a right or left turn
from the straight up position.
To lock the steering wheel, push the igni-
tion switch to the LOCK position. To unlock
the steering wheel, push the ignition switch
while slightly turning the steering wheel
right and left.
If the battery of the vehicle is discharged,
the push-button ignition switch cannot be
turned from the LOCK position.
LSD0181
PUSH-BUTTON IGNITION SWITCH
5-6Starting and driving
ZREVIEW COPYÐ2007 Altima(alt)
Owners ManualÐUSA_English(nna)
10/27/06Ðdebbie
X
Page 223 of 344

1. Apply the parking brake.
2.Continuously Variable Transmission
(CVT) model:
Move the shift selector lever to P (Park) or N
(Neutral) . P (Park) is recommended.
The starter is designed not to operate if
the shift selector lever is in any of the
driving positions.
Manual transmission:
Move the shift lever to N (Neutral) . Depress
the clutch pedal to the floor.
The starter is designed not to operate
unless the clutch pedal is fully de-
pressed.
3. Push the ignition switch to the ON position.
Depress the brake pedal and the clutch
pedal (if so equipped) and push the ignition
switch to start the engine.
To start the engine immediately, push and
release the ignition switch while depressing
the brake pedal with the ignition switch in
any position.cIf the engine is very hard to start in ex-
tremely cold weather or when restarting,
depress the accelerator pedal a little (ap-
proximately 1/3 to the floor) and while
holding, crank the engine. Release the
accelerator pedal when the engine starts.
cIf the engine is very hard to start because
it is flooded, depress the accelerator
pedal all the way to the floor and hold it.
Push the ignition switch to the ON posi-
tion to start cranking the engine. After 5 or
6 seconds, stop cranking by pushing the
ignition switch to LOCK. After cranking
the engine, release the accelerator pedal.
Crank the engine with your foot off the
accelerator pedal by depressing the
brake pedal and pushing the push-button
ignition switch to start the engine. If the
engine starts, but fails to run, repeat the
above procedure.
CAUTION
Do not operate the starter for more than
15 seconds at a time. If the engine does
not start, push the ignition switch to the
OFF position and wait 10 seconds before
cranking again, otherwise the starter
could be damaged.4.Warm-up
Allow the engine to idle for at least 30 sec-
onds after starting. Do not race the engine
while warming it up. Drive at moderate
speed for a short distance first, especially in
cold weather. In cold weather, keep the en-
gine running for a minimum of2-3minutes
before shutting it off. Starting and stopping
the engine over a short period of time may
make the vehicle more difficult to start.
5. To stop the engine, shift the selector lever to
the P (Park) position (CVT) or to N (Neutral)
and apply the parking brake (MT) and push
the ignition switch to the OFF position.
STARTING THE ENGINE
Starting and driving5-9
ZREVIEW COPYÐ2007 Altima(alt)
Owners ManualÐUSA_English(nna)
10/27/06Ðdebbie
X