2007 NISSAN ALTIMA clock
[x] Cancel search: clockPage 182 of 344

FM/AM/SAT RADIO WITH
COMPACT DISC (CD) CHANGER (if
so equipped)
No satellite radio reception is available unless
there is an active XMTsatellite radio service
subscription. Satellite radio is not available in
Alaska, Hawaii and Guam. If satellite radio is not
operational then pressing the RADIO button will
switch between FM and AM bands.
Reference symbols:
RADIO button — This is a button on the radio. By
pressing this button you can select the item or
perform this action.
“Display” key — This is a select key on the touch-
screen. By touching this key you can proceed to
the next function.
Audio main operation
ON·OFF/VOL control:
Place the ignition switch to the ACC or ON
position, then press the ON·OFF/VOL control
knob while the audio system is off to call up the
mode (radio or CD) which was playing immedi-
ately before the system was turned off.
To turn the system off, press the ON·OFF/VOL
control knob.Turn the ON·OFF/VOL control knob to adjust the
volume.
This vehicle may be equipped with Speed Sen-
sitive Volume (SSV) for audio. The audio volume
changes as the driving speed changes.
AUDIO knob (Bass, Treble, Balance, Fade,
and SSV):
Press the AUDIO knob to change the mode as
follows:
Bass!Treble!Balance!Fade!Audio or off
!Bass
To adjust Bass, Treble, Balance, and Fade press
the AUDIO knob until the desired mode appears
in the display. Turn the Tuning knob to adjust
Bass and Treble to the desired level. You can also
use the Tuning knob to adjust Fade and Balance
modes. Fade adjusts the sound level between the
front and rear speakers and Balance adjusts the
sound between the right and left speakers.
Once you have adjusted the sound quality to the
desired level, press the AUDIO knob repeatedly
until the radio or CD display reappears. Other-
wise, the radio or CD display will automatically
reappear after about 10 seconds.To change the SSV mode from 0 to 5, press the
SETUP button. Then touch the “Audio” key, the
audio settings screen will be displayed. Touch
the “–” or “+” key to change the SSV.
While in this screen you can also adjust the other
audio settings by touching the corresponding
key.
Once you have adjusted the sound quality to the
desired level, touch the “Back” key repeatedly
until the radio or the CD display reappears.
Clock set
For setting the clock, see “Adjusting the time”
earlier in this section.
LHA0747
4-38Monitor, climate, audio, phone and voice recognition systems
ZREVIEW COPYÐ2007 Altima(alt)
Owners ManualÐUSA_English(nna)
10/26/06Ðdebbie
X
Page 222 of 344

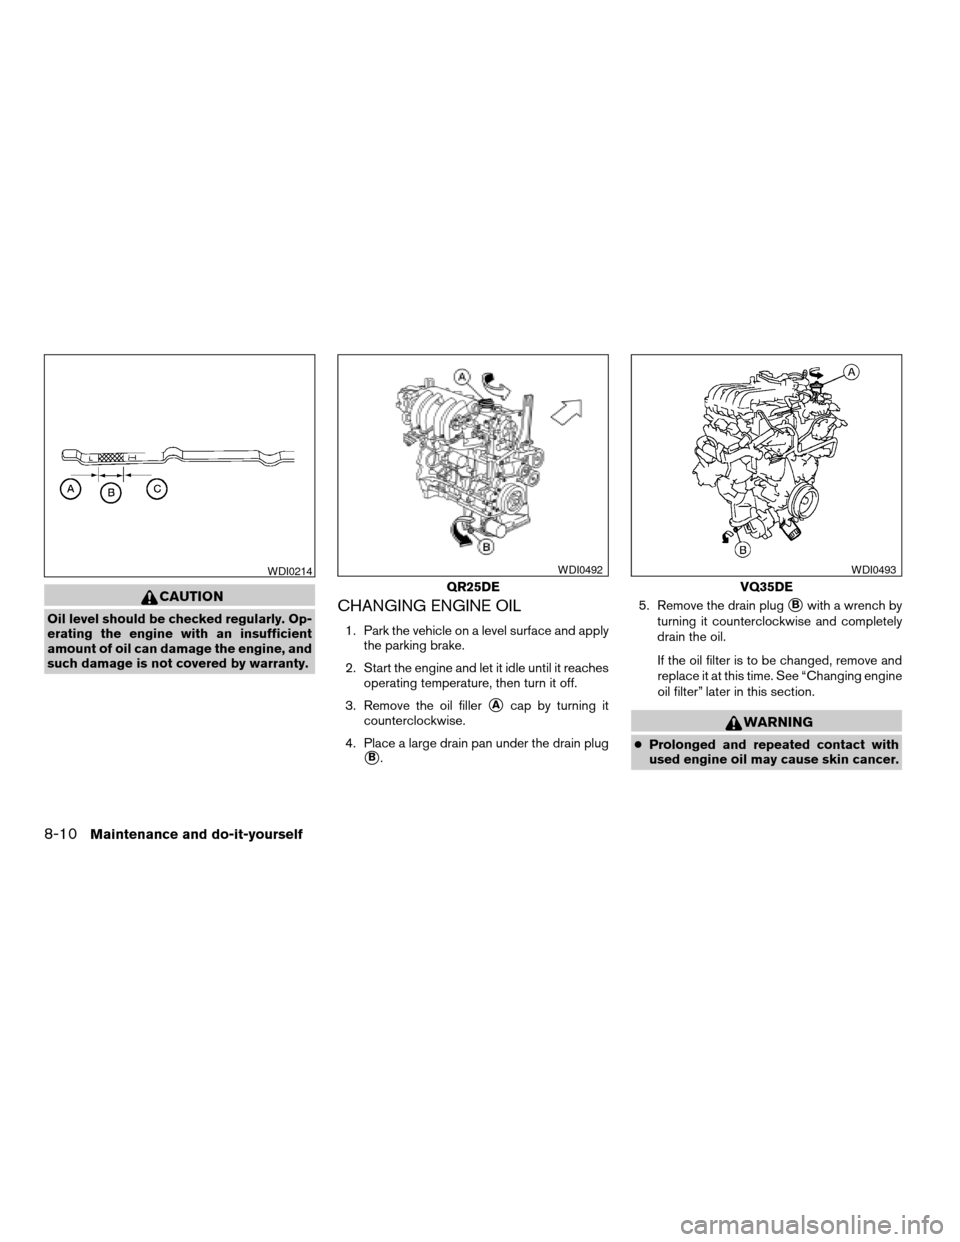
To remove the Intelligent Key from the port, push
the ignition switch to the LOCK position and pull
the Intelligent Key out of the port
sC.NOTE:
The Intelligent Key port does not charge
the Intelligent Key battery. If you see the
low battery indicator, replace the battery as
soon as possible. See “Intelligent Key bat-
tery replacement” in the “Maintenance and
do-it-yourself” section.
CAUTION
cNever place anything except the Intelli-
gent Key in the Intelligent Key port. Do-
ing so may cause damage to the
equipment.
cMake sure the Intelligent Key is in the
correct direction when inserting it to
the Intelligent Key port. The engine may
not start if it is in the wrong direction.
cRemove the Intelligent Key from the
Intelligent Key port after the ignition
switch is pushed to the LOCK position.cMake sure the area around the vehicle is
clear.
cCheck fluid levels such as engine oil, cool-
ant, brake fluid, and window washer fluid as
frequently as possible, or at least whenever
you refuel.
cCheck that all windows and lights are clean.
cVisually inspect tires for their appearance
and condition. Also check tires for proper
inflation.
cLock all doors.
cPosition seat and adjust head restraints.
cAdjust inside and outside mirrors.
cFasten seat belts and ask all passengers to
do likewise.
cCheck the operation of warning lights when
the ignition switch is pushed to the ON
position. See “Warning/indicator lights and
audible reminders” in the “Instruments and
controls” section of this manual.
LSD0186
BEFORE STARTING THE ENGINE
5-8Starting and driving
ZREVIEW COPYÐ2007 Altima(alt)
Owners ManualÐUSA_English(nna)
10/27/06Ðdebbie
X
Page 247 of 344

Always refer to the proper illustrations for the
correct placement and jack-up points for your
specific vehicle model and jack type.
Carefully read the caution label attached to
the jack body and the following instruc-
tions.
1. Loosen each wheel nut one or two turns by
turning counterclockwise with the wheel nut
wrench.Do not remove the wheel nuts
until the tire is off the ground.2. Place the jack directly under the jack-up
point as illustrated so the top of the jack
contacts the vehicle at the jack-up point.
Align the jack head between the two
notches in the front or the rear as shown.
Also fit the groove of the jack head between
the notches as shown.
The jack should be used on firm and
level ground.
3. To lift the vehicle, securely hold the jack lever
and rod with both hands. Carefully raise the
vehicle until the tire clears the ground. Re-
move the wheel nuts, and then remove the
tire.Installing the spare tire
The spare tire is designed for emergency
use. See specific instructions under the
heading “Wheels and tires” in the “Mainte-
nance and do-it-yourself” section of this
manual.
1. Clean any mud or dirt from the surface be-
tween the wheel and hub.
2. Carefully put the spare tire on and tighten
the wheel nuts finger tight.
3. With the wheel nut wrench, tighten wheel
nuts alternately and evenly as illustrated until
they are tight.
LCE0020WCE0056
In case of emergency6-5
ZREVIEW COPYÐ2007 Altima(alt)
Owners ManualÐUSA_English(nna)
10/27/06Ðdebbie
X
Page 270 of 344

CAUTION
Oil level should be checked regularly. Op-
erating the engine with an insufficient
amount of oil can damage the engine, and
such damage is not covered by warranty.CHANGING ENGINE OIL
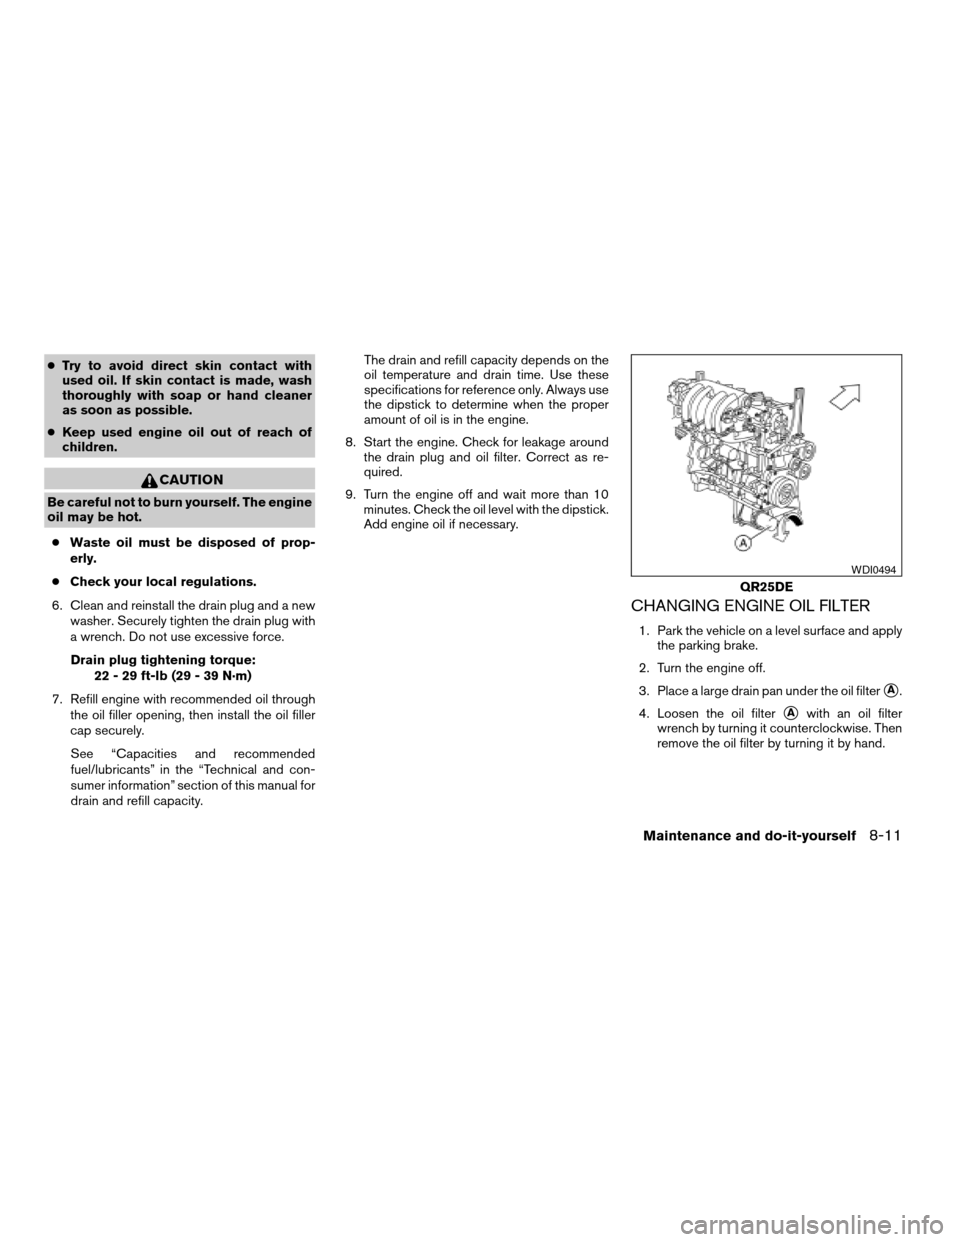
1. Park the vehicle on a level surface and apply
the parking brake.
2. Start the engine and let it idle until it reaches
operating temperature, then turn it off.
3. Remove the oil filler
sAcap by turning it
counterclockwise.
4. Place a large drain pan under the drain plug
sB.5. Remove the drain plug
sBwith a wrench by
turning it counterclockwise and completely
drain the oil.
If the oil filter is to be changed, remove and
replace it at this time. See “Changing engine
oil filter” later in this section.
WARNING
cProlonged and repeated contact with
used engine oil may cause skin cancer.
WDI0214
QR25DE
WDI0492
VQ35DE
WDI0493
8-10Maintenance and do-it-yourself
ZREVIEW COPYÐ2007 Altima(alt)
Owners ManualÐUSA_English(nna)
10/27/06Ðdebbie
X
Page 271 of 344

cTry to avoid direct skin contact with
used oil. If skin contact is made, wash
thoroughly with soap or hand cleaner
as soon as possible.
cKeep used engine oil out of reach of
children.
CAUTION
Be careful not to burn yourself. The engine
oil may be hot.
cWaste oil must be disposed of prop-
erly.
cCheck your local regulations.
6. Clean and reinstall the drain plug and a new
washer. Securely tighten the drain plug with
a wrench. Do not use excessive force.
Drain plug tightening torque:
22 - 29 ft-lb (29 - 39 N·m)
7. Refill engine with recommended oil through
the oil filler opening, then install the oil filler
cap securely.
See “Capacities and recommended
fuel/lubricants” in the “Technical and con-
sumer information” section of this manual for
drain and refill capacity.The drain and refill capacity depends on the
oil temperature and drain time. Use these
specifications for reference only. Always use
the dipstick to determine when the proper
amount of oil is in the engine.
8. Start the engine. Check for leakage around
the drain plug and oil filter. Correct as re-
quired.
9. Turn the engine off and wait more than 10
minutes. Check the oil level with the dipstick.
Add engine oil if necessary.
CHANGING ENGINE OIL FILTER
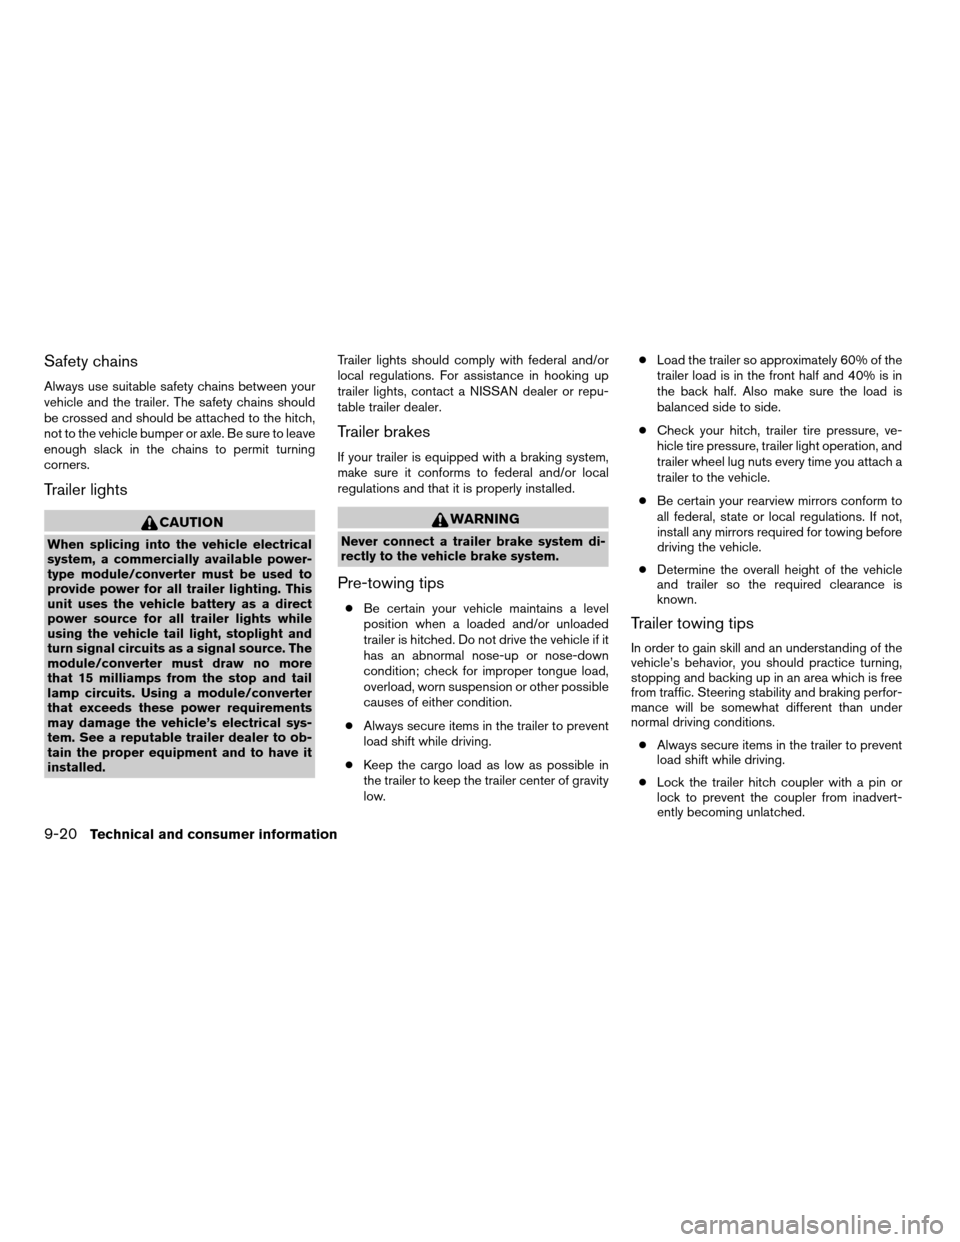
1. Park the vehicle on a level surface and apply
the parking brake.
2. Turn the engine off.
3. Place a large drain pan under the oil filter
sA.
4. Loosen the oil filter
sAwith an oil filter
wrench by turning it counterclockwise. Then
remove the oil filter by turning it by hand.
QR25DE
WDI0494
Maintenance and do-it-yourself8-11
ZREVIEW COPYÐ2007 Altima(alt)
Owners ManualÐUSA_English(nna)
10/27/06Ðdebbie
X
Page 322 of 344

Safety chains
Always use suitable safety chains between your
vehicle and the trailer. The safety chains should
be crossed and should be attached to the hitch,
not to the vehicle bumper or axle. Be sure to leave
enough slack in the chains to permit turning
corners.
Trailer lights
CAUTION
When splicing into the vehicle electrical
system, a commercially available power-
type module/converter must be used to
provide power for all trailer lighting. This
unit uses the vehicle battery as a direct
power source for all trailer lights while
using the vehicle tail light, stoplight and
turn signal circuits as a signal source. The
module/converter must draw no more
that 15 milliamps from the stop and tail
lamp circuits. Using a module/converter
that exceeds these power requirements
may damage the vehicle’s electrical sys-
tem. See a reputable trailer dealer to ob-
tain the proper equipment and to have it
installed.Trailer lights should comply with federal and/or
local regulations. For assistance in hooking up
trailer lights, contact a NISSAN dealer or repu-
table trailer dealer.
Trailer brakes
If your trailer is equipped with a braking system,
make sure it conforms to federal and/or local
regulations and that it is properly installed.
WARNING
Never connect a trailer brake system di-
rectly to the vehicle brake system.
Pre-towing tips
cBe certain your vehicle maintains a level
position when a loaded and/or unloaded
trailer is hitched. Do not drive the vehicle if it
has an abnormal nose-up or nose-down
condition; check for improper tongue load,
overload, worn suspension or other possible
causes of either condition.
cAlways secure items in the trailer to prevent
load shift while driving.
cKeep the cargo load as low as possible in
the trailer to keep the trailer center of gravity
low.cLoad the trailer so approximately 60% of the
trailer load is in the front half and 40% is in
the back half. Also make sure the load is
balanced side to side.
cCheck your hitch, trailer tire pressure, ve-
hicle tire pressure, trailer light operation, and
trailer wheel lug nuts every time you attach a
trailer to the vehicle.
cBe certain your rearview mirrors conform to
all federal, state or local regulations. If not,
install any mirrors required for towing before
driving the vehicle.
cDetermine the overall height of the vehicle
and trailer so the required clearance is
known.
Trailer towing tips
In order to gain skill and an understanding of the
vehicle’s behavior, you should practice turning,
stopping and backing up in an area which is free
from traffic. Steering stability and braking perfor-
mance will be somewhat different than under
normal driving conditions.
cAlways secure items in the trailer to prevent
load shift while driving.
cLock the trailer hitch coupler with a pin or
lock to prevent the coupler from inadvert-
ently becoming unlatched.
9-20Technical and consumer information
ZREVIEW COPYÐ2007 Altima(alt)
Owners ManualÐUSA_English(nna)
10/27/06Ðdebbie
X
Page 331 of 344

10 Index
A
Active head restraint...............1-8
Air bag (See supplemental restraint system). .1-35
Air bag system
Front (See supplemental front impact
air bag system)...............1-42
Air bag warning light...........1-50, 2-12
Air cleaner housing filter............8-18
Air conditioner
Air conditioner operation..........4-13
Air conditioner service...........4-20
Air conditioner specification label.....9-11
Air conditioner system refrigerant and oil
recommendations..............9-6
Heater and air conditioner
controls................4-10, 4-18
Servicing air conditioner..........4-20
Air flow charts..................4-14
Alarm system (See vehicle security system). .2-23
Anchor point locations.............1-20
Antenna.....................4-44
Anti-lock brake warning light..........2-9
Anti-lock braking system (ABS)........5-22
Armrests.....................1-7
Audible reminders................2-15
Audio system..................4-20
Compact Disc (CD) changer. . . .4-34, 4-40
Compact disc (CD) player.........4-29
FM-AM radio with compact disc (CD)
player....................4-27FM/AM/SAT radio with compact disc (CD)
changer................4-31, 4-38
Radio....................4-20
Autolight switch.................2-28
Automatic
Automatic power window switch.....2-43
Transmission selector lever lock release. .5-13
Automatic anti-glare inside mirror.......3-23
AUX jack..............4-30, 4-36, 4-42
B
Battery......................8-15
Charge warning light............2-10
Before starting the engine............5-8
Belts (See drive belts).............8-16
BluetoothThands-free phone
system..................4-45, 4-59
Booster seats..................1-30
Brake
Anti-lock braking system (ABS)......5-22
Brake fluid..................8-13
Brake light (See stop light).........8-27
Brake system................5-21
Brake warning light.............2-10
Brake wear indicators........2-15, 8-21
Parking brake operation..........5-16
Self-adjusting brakes............8-21
Brakes......................8-21
Break-in schedule................5-19Brightness control
Instrument panel..............2-30
Brightness/contrast button...........4-6
Bulb check/instrument panel..........2-9
Bulb replacement................8-27
C
Capacities and recommended
fuel/lubricants...................9-2
Car phone or CB radio.............4-45
Cargo (See vehicle loading information) . . .9-12
CD care and cleaning.............4-42
CD changer (See audio system). . . .4-34, 4-40
CD player (See audio system).........4-29
Child restraint with top tether strap......1-20
Child restraints.......1-11, 1-12, 1-16, 1-18
Precautions on child
restraints............1-16, 1-24, 1-30
Top tether strap anchor point locations . .1-20
Child safety rear door lock............3-5
Chimes, audible reminders...........2-15
Cleaning exterior and interior..........7-2
Clock.............4-5, 4-28, 4-32, 4-38
(models with navigation system)......4-5
(models without navigation
system)................4-28, 4-32
Clock set..............4-5, 4-28, 4-32
Clutch
Clutch fluid.................8-14
C.M.V.S.S. certification label..........9-10
ZREVIEW COPYÐ2007 Altima(alt)
Owners ManualÐUSA_English(nna)
10/27/06Ðdebbie
X