2007 NISSAN ALTIMA HYBRID display
[x] Cancel search: displayPage 22 of 28
2021
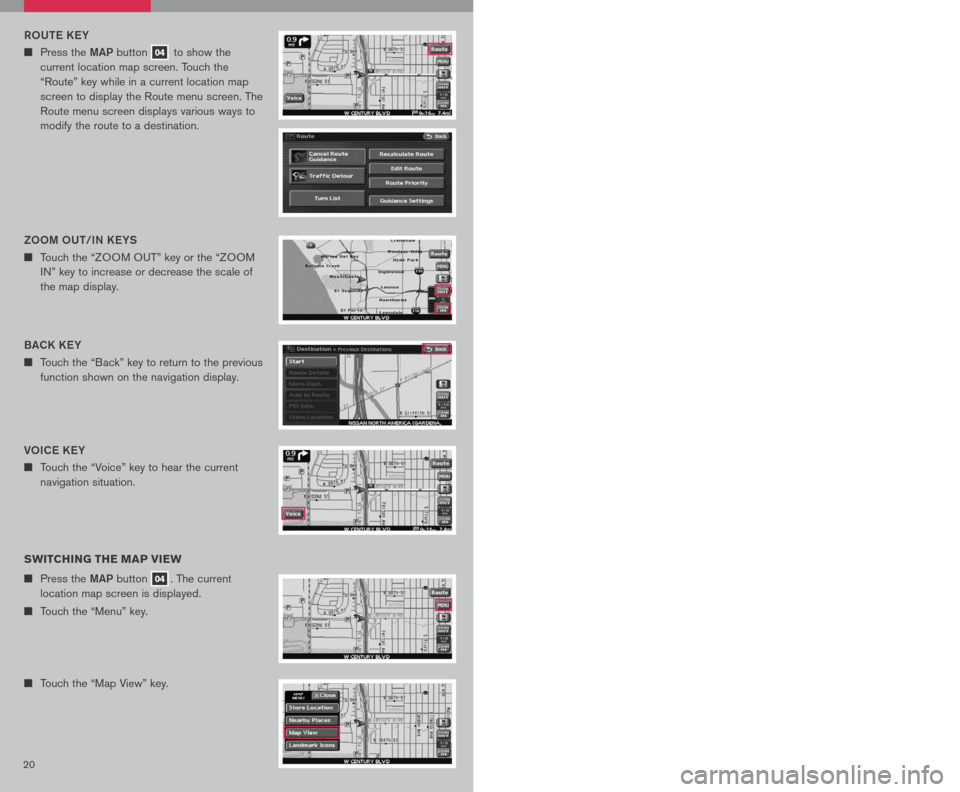
Vo IC e K eY
n Touch the “Voice” key to hear the current
navigation situation.
R o Ute KeY
n Press the MAP button 04 to show the
current location map screen. Touch the
“Route” key while in a current location map
screen to display the Route menu screen. The
Route menu screen displays various ways to
modify the route to a destination.
SWITCHING THE MAP VIEW
n Press the MAP button 04. The current
location map screen is displayed.
n Touch the “Menu” key.
n Touch the “Map View” key.
n Touch either the “2D” key or the “3D” key, to
select the map view. Press the MAP button
04 or the “Back” key to accept the changes.
SeLe C tING A M eNU SCR eeN
1. To select a preferred menu key, touch the corresponding key on the screen.
2. Depending on the key you selected, a detailed menu screen, a character input screen
or a setting screen, etc. is displayed. On the screen displayed, make adjustments,
input information, etc. accordingly.
3. Touch the “Back” key to return to the previous screen without applying any changes;
in some cases pressing the “Back” key will accept the changes you made.
4. Press the
MAP button 04 to return to the current location map screen without
applying any changes. (Depending on the menu selected, pressing the MAP button
may not return you to the current location map screen).
NOTE: Depending on the menu selected, pressing the MAP button 04 may not return
you to the current location map screen.
S to RING Y oUR H oM e IN Y oUR ADDR eSS B ooK
n Press the DeSt button 05.
n Touch the “Home (Add New)” key. If you have
already stored your home this key may not
appear.
Please refer to the Nissan Altima Navigation
Manual for detailed information.
BACK K eY
n Touch the “Back” key to return to the previous
function shown on the navigation display.
Zoo M oUt/IN K eYS
n Touch the “ZOOM OUT” key or the “ZOOM
IN” key to increase or decrease the scale of
the map display.3D BIRDVI eWtM
n Displays the map in an elevated perspective.
2D PL AN VI
eW
n Displays the map in a 2-dimensional
environment to a road map.
Page 23 of 28
2021
Vo IC e K eY
n Touch the “Voice” key to hear the current
navigation situation.
R o Ute KeY
n Press the MAP button 04 to show the
current location map screen. Touch the
“Route” key while in a current location map
screen to display the Route menu screen. The
Route menu screen displays various ways to
modify the route to a destination.
SWITCHING THE MAP VIEW
n Press the MAP button 04. The current
location map screen is displayed.
n Touch the “Menu” key.
n Touch the “Map View” key.
n Touch either the “2D” key or the “3D” key, to
select the map view. Press the MAP button
04 or the “Back” key to accept the changes.
SeLe C tING A M eNU SCR eeN
1. To select a preferred menu key, touch the corresponding key on the screen.
2. Depending on the key you selected, a detailed menu screen, a character input screen
or a setting screen, etc. is displayed. On the screen displayed, make adjustments,
input information, etc. accordingly.
3. Touch the “Back” key to return to the previous screen without applying any changes;
in some cases pressing the “Back” key will accept the changes you made.
4. Press the
MAP button 04 to return to the current location map screen without
applying any changes. (Depending on the menu selected, pressing the MAP button
may not return you to the current location map screen).
NOTE: Depending on the menu selected, pressing the MAP button 04 may not return
you to the current location map screen.
S to RING Y oUR H oM e IN Y oUR ADDR eSS B ooK
n Press the DeSt button 05.
n Touch the “Home (Add New)” key. If you have
already stored your home this key may not
appear.
Please refer to the Nissan Altima Navigation
Manual for detailed information.
BACK K eY
n Touch the “Back” key to return to the previous
function shown on the navigation display.
Zoo M oUt/IN K eYS
n Touch the “ZOOM OUT” key or the “ZOOM
IN” key to increase or decrease the scale of
the map display.3D BIRDVI eWtM
n Displays the map in an elevated perspective.
2D PL AN VI
eW
n Displays the map in a 2-dimensional
environment to a road map.
Page 24 of 28
2223
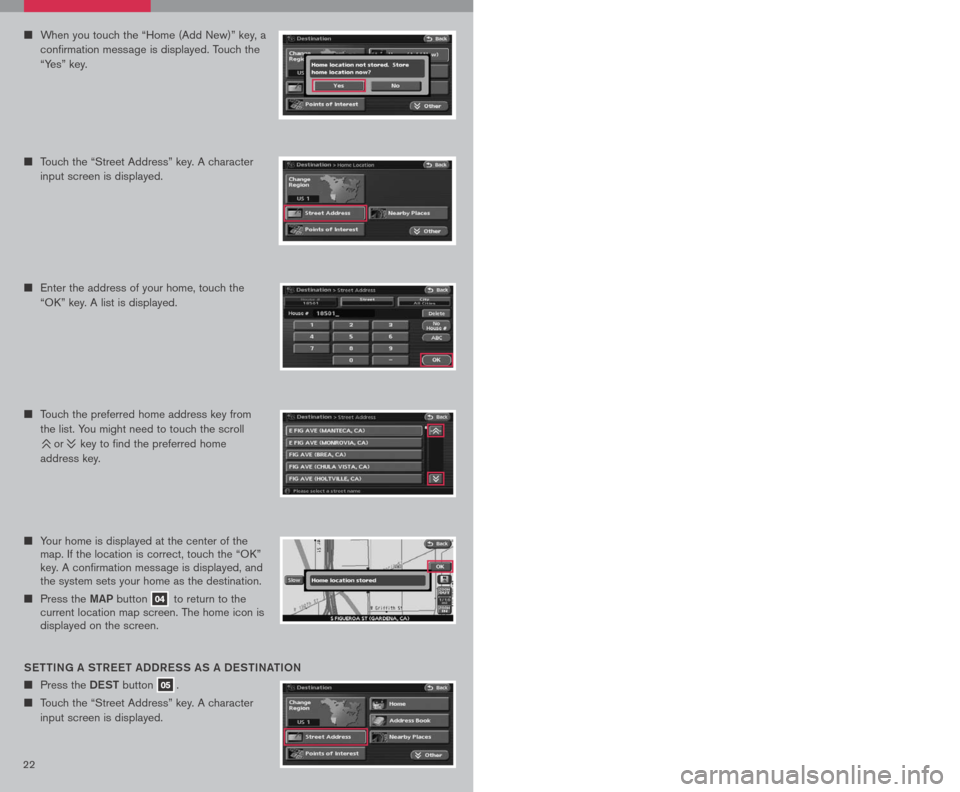
n Your home is displayed at the center of the map. If the location is correct, touch the “OK” key. A confirmation message is displayed, and the system sets your home as the destination.
n Press the MAP button 04 to return to the current location map screen. The home icon is displayed on the screen.
Sett ING A S tR eet ADDR eSS AS A D eS tINA tIo N
n Press the DeSt button 05.
n Touch the “Street Address” key. A character
input screen is displayed.
n Enter the house number; when finished touch
the “OK” key. If you do not know the house
number, touch the “No House #” key.
n Enter the name of the street. After finishing the
entry, touch the “OK” key. A list of possible
street addresses is displayed.
n Touch the correct address of the destination
from the list. You might need to touch the
scroll or key to find the preferred
home key.
n Touch the preferred home address key from
the list. You might need to touch the scroll
or key to find the preferred home
address key.
n Enter the address of your home, touch the
“OK” key. A list is displayed.
MoVING AR oUND WI tHIN A MAP
You can manually move across the map to view the surrounding area or to view a
preferred location.
n Touch the screen in the direction that you want to move across the map. Once you
begin moving on the map, the cross pointer appears.
n Press the MAP button 04 or the “Back” key to return to the current location map
screen. The cross pointer disappears.
SETTING A DESTINATION
n Press the DeSt button 05.
n Touch the “Points of Interest” key
n When you touch the “Home (Add New)” key, a
confirmation message is displayed. Touch the
“Yes” key.
n Touch the “Street Address” key. A character
input screen is displayed.
n The selected destination is displayed at the
center of the map. Touch the “Start” key after
confirming the location of the displayed
destination. The system sets the destination
to the selected location and starts calculating
a route.
Page 25 of 28
2223
n Your home is displayed at the center of the map. If the location is correct, touch the “OK” key. A confirmation message is displayed, and the system sets your home as the destination.
n Press the MAP button 04 to return to the current location map screen. The home icon is displayed on the screen.
Sett ING A S tR eet ADDR eSS AS A D eS tINA tIo N
n Press the DeSt button 05.
n Touch the “Street Address” key. A character
input screen is displayed.
n Enter the house number; when finished touch
the “OK” key. If you do not know the house
number, touch the “No House #” key.
n Enter the name of the street. After finishing the
entry, touch the “OK” key. A list of possible
street addresses is displayed.
n Touch the correct address of the destination
from the list. You might need to touch the
scroll or key to find the preferred
home key.
n Touch the preferred home address key from
the list. You might need to touch the scroll
or key to find the preferred home
address key.
n Enter the address of your home, touch the
“OK” key. A list is displayed.
MoVING AR oUND WI tHIN A MAP
You can manually move across the map to view the surrounding area or to view a
preferred location.
n Touch the screen in the direction that you want to move across the map. Once you
begin moving on the map, the cross pointer appears.
n Press the MAP button 04 or the “Back” key to return to the current location map
screen. The cross pointer disappears.
SETTING A DESTINATION
n Press the DeSt button 05.
n Touch the “Points of Interest” key
n When you touch the “Home (Add New)” key, a
confirmation message is displayed. Touch the
“Yes” key.
n Touch the “Street Address” key. A character
input screen is displayed.
n The selected destination is displayed at the
center of the map. Touch the “Start” key after
confirming the location of the displayed
destination. The system sets the destination
to the selected location and starts calculating
a route.
Page 26 of 28
24
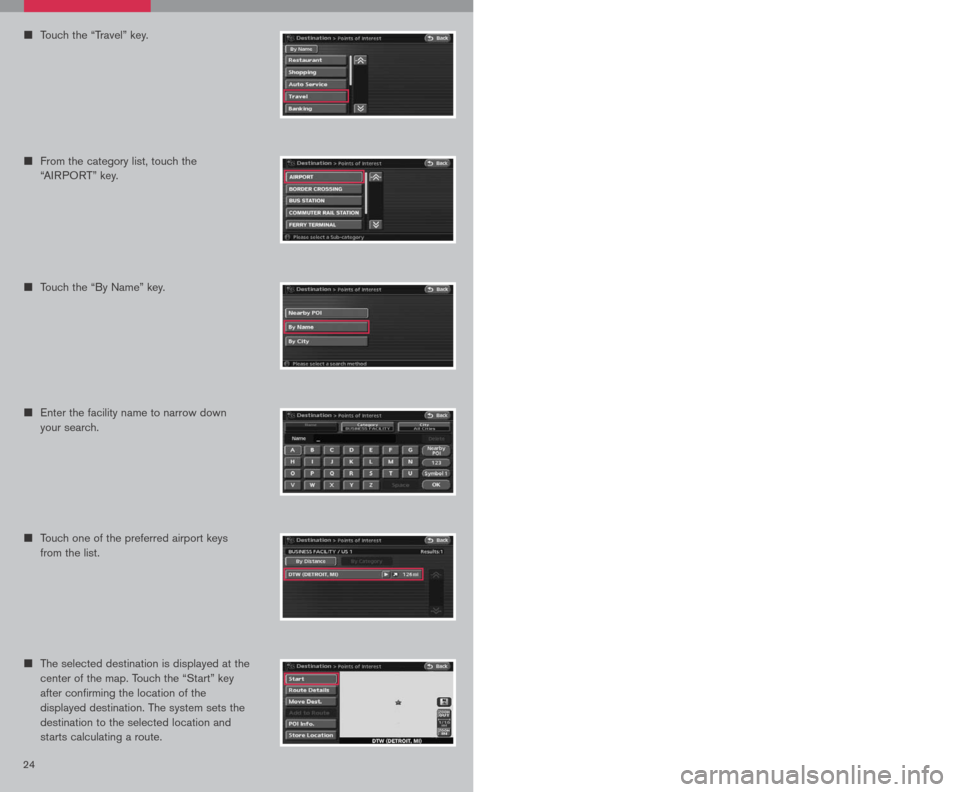
n Touch one of the preferred airport keys
from the list.
n The selected destination is displayed at the
center of the map. Touch the “Start” key
after confirming the location of the
displayed destination. The system sets the
destination to the selected location and
starts calculating a route.
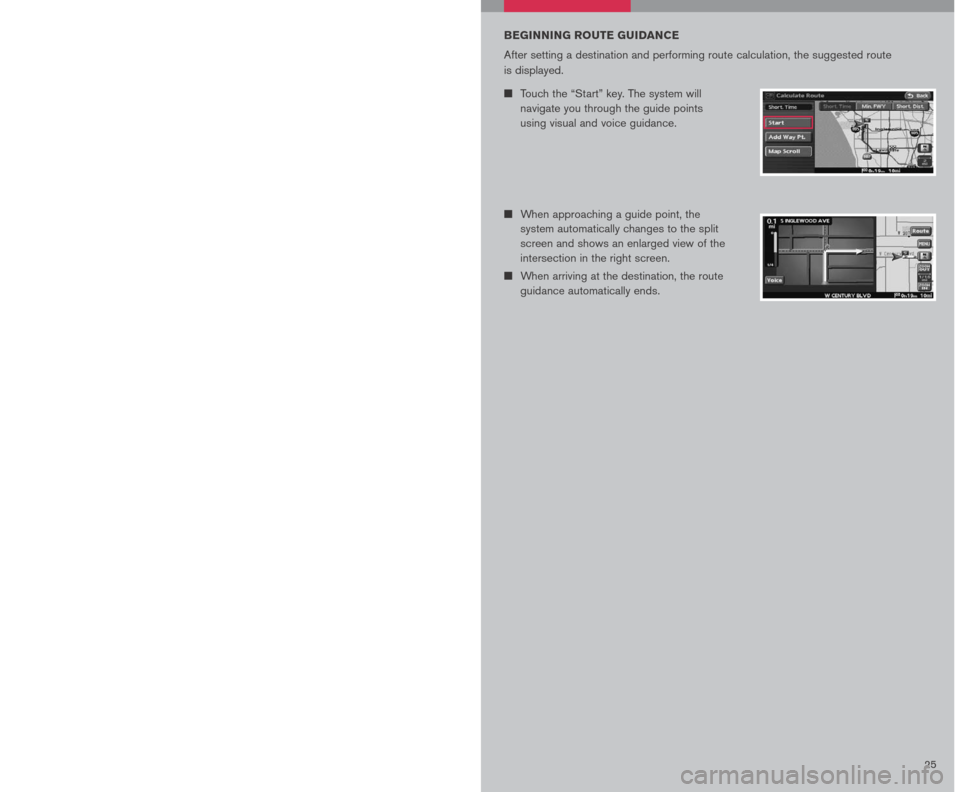
BEGINNING ROUTE GUIDANCE
After setting a destination and performing route calculation, the suggested route
is displayed.
n
Touch the “Start” key. The system will
navigate you through the guide points
using visual and voice guidance.
n When approaching a guide point, the
system automatically changes to the split
screen and shows an enlarged view of the
intersection in the right screen.
n When arriving at the destination, the route
guidance automatically ends.
n
Enter the facility name to narrow down
your search.
n Touch the “By Name” key.
n Touch the “Travel” key.
25
n From the category list, touch the
“AIRPORT” key.
Page 27 of 28
24
n Touch one of the preferred airport keys
from the list.
n The selected destination is displayed at the
center of the map. Touch the “Start” key
after confirming the location of the
displayed destination. The system sets the
destination to the selected location and
starts calculating a route.
BEGINNING ROUTE GUIDANCE
After setting a destination and performing route calculation, the suggested route
is displayed.
n
Touch the “Start” key. The system will
navigate you through the guide points
using visual and voice guidance.
n When approaching a guide point, the
system automatically changes to the split
screen and shows an enlarged view of the
intersection in the right screen.
n When arriving at the destination, the route
guidance automatically ends.
n
Enter the facility name to narrow down
your search.
n Touch the “By Name” key.
n Touch the “Travel” key.
25
n From the category list, touch the
“AIRPORT” key.