2007 NISSAN ALTIMA HYBRID key
[x] Cancel search: keyPage 14 of 28
12 13
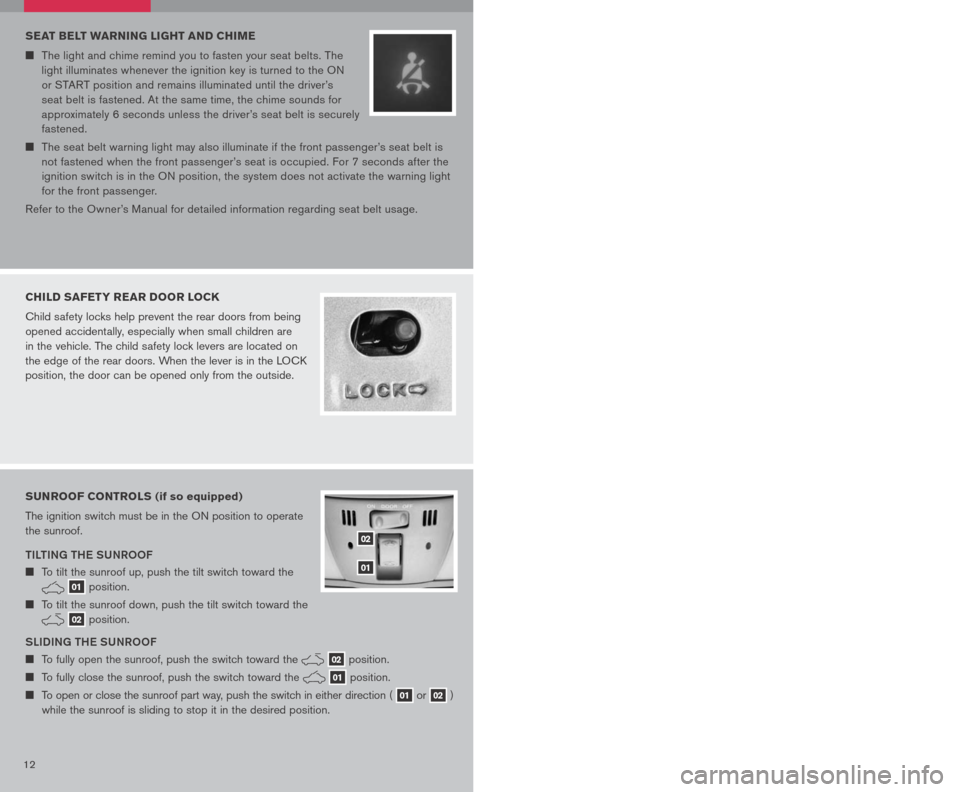
SEAT BELT WARNING LIGHT AND CHIME
The light and chime remind you to fasten your seat belts. The
light illuminates whenever the ignition key is turned to the ON
or START position and remains illuminated until the driver’s
seat belt is fastened. At the same time, the chime sounds for
approximately 6 seconds unless the driver’s seat belt is securely
fastened.
The seat belt warning light may also illuminate if the front passenger’s seat belt is
not fastened when the front passenger’s seat is occupied. For 7 seconds after the
ignition switch is in the ON position, the system does not activate the warning light
for the front passenger.
Refer to the Owner’s Manual for detailed information regarding seat belt usage.
CHILD SAFETY REAR DOOR LOCK
Child safety locks help prevent the rear doors from being
opened accidentally, especially when small children are
in the vehicle. The child safety lock levers are located on
the edge of the rear doors. When the lever is in the LOCK
position, the door can be opened only from the outside.
SUNROOF CONTROLS (if so equipped)
The ignition switch must be in the ON position to operate
the sunroof.
TILTING THE SUNROOF
To tilt the sunroof up, push the tilt switch toward the
01 position.
To tilt the sunroof down, push the tilt switch toward the
02 position.
SLIDING THE SUNROOF
To fully open the sunroof, push the switch toward the 02 position.
To fully close the sunroof, push the switch toward the 01 position.
To open or close the sunroof part way, push the switch in either direction ( 01 or 02 )
while the sunroof is sliding to stop it in the desired position.
02
01
FRONT SEAT ADJUSTMENTS
With Manual Seats (passenger’s seat):
F ORW aRD a ND back WaRD
Pull up on the lever under the front of the seat and slide backward or forward.
Release the lever to lock the seat in position.
R Ec LINING
Lift the lever on the side of the seat to adjust your seatback forward or backward;
release the lever when you have found a comfortable angle and the seat belt fits
properly.
With power Seats (driver’s seat):
F ORW aRD a ND back WaRD
Move the control 01 forward or backward
to adjust the seat cushion forward or
backward.
Pull up on the control 01 to raise the
driver’s seat cushion; press down to lower
the cushion.
R Ec LINING
Pull the switch 02 forward to move the seatback forward; push it back to move the
seatback backward.
L UM baR S Upp ORT
(driver’s seat):
Your driver’s seat has a lumbar support; adjust it by pushing the switch 03 forward
or backward.
010203
HOMELINK® UNIVERSAL TRANSCEIVER (if so equipped)
SYSTEM O pER aTING TI pS
Garage doors, electrical gates, entry doors, etc. will be activated during programming.
To avoid injury, make sure that people and objects are clear of all doors or gates
during programming. Your vehicle’s engine should be turned off while programming
the HomeLink® Transceiver. Refer to your Owner’s Manual for complete details.
To program your HomeLink® Transceiver to operate a garage door, gate, or entry door
opener, home or office lighting, you need to be at the same location as the device.
NOTE: Garage door openers (manufactured after 1996) have “rolling code
protection”. To program a garage door opener equipped with “rolling code
protection”, you will need to use a ladder to get up to the garage door opener
motor to be able to access the “smart or learn” program button.
Page 15 of 28
12 13
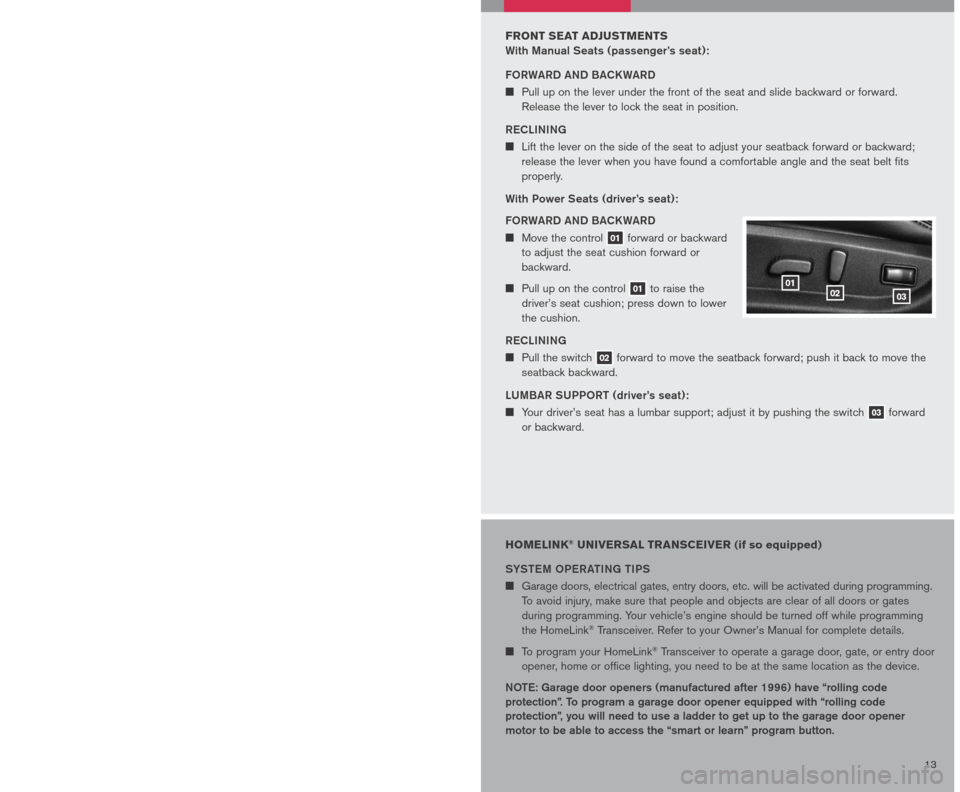
SEAT BELT WARNING LIGHT AND CHIME
The light and chime remind you to fasten your seat belts. The
light illuminates whenever the ignition key is turned to the ON
or START position and remains illuminated until the driver’s
seat belt is fastened. At the same time, the chime sounds for
approximately 6 seconds unless the driver’s seat belt is securely
fastened.
The seat belt warning light may also illuminate if the front passenger’s seat belt is
not fastened when the front passenger’s seat is occupied. For 7 seconds after the
ignition switch is in the ON position, the system does not activate the warning light
for the front passenger.
Refer to the Owner’s Manual for detailed information regarding seat belt usage.
CHILD SAFETY REAR DOOR LOCK
Child safety locks help prevent the rear doors from being
opened accidentally, especially when small children are
in the vehicle. The child safety lock levers are located on
the edge of the rear doors. When the lever is in the LOCK
position, the door can be opened only from the outside.
SUNROOF CONTROLS (if so equipped)
The ignition switch must be in the ON position to operate
the sunroof.
TILTING THE SUNROOF
To tilt the sunroof up, push the tilt switch toward the
01 position.
To tilt the sunroof down, push the tilt switch toward the
02 position.
SLIDING THE SUNROOF
To fully open the sunroof, push the switch toward the 02 position.
To fully close the sunroof, push the switch toward the 01 position.
To open or close the sunroof part way, push the switch in either direction ( 01 or 02 )
while the sunroof is sliding to stop it in the desired position.
02
01
FRONT SEAT ADJUSTMENTS
With Manual Seats (passenger’s seat):
F ORW aRD a ND back WaRD
Pull up on the lever under the front of the seat and slide backward or forward.
Release the lever to lock the seat in position.
R Ec LINING
Lift the lever on the side of the seat to adjust your seatback forward or backward;
release the lever when you have found a comfortable angle and the seat belt fits
properly.
With power Seats (driver’s seat):
F ORW aRD a ND back WaRD
Move the control 01 forward or backward
to adjust the seat cushion forward or
backward.
Pull up on the control 01 to raise the
driver’s seat cushion; press down to lower
the cushion.
R Ec LINING
Pull the switch 02 forward to move the seatback forward; push it back to move the
seatback backward.
L UM baR S Upp ORT
(driver’s seat):
Your driver’s seat has a lumbar support; adjust it by pushing the switch 03 forward
or backward.
010203
HOMELINK® UNIVERSAL TRANSCEIVER (if so equipped)
SYSTEM O pER aTING TI pS
Garage doors, electrical gates, entry doors, etc. will be activated during programming.
To avoid injury, make sure that people and objects are clear of all doors or gates
during programming. Your vehicle’s engine should be turned off while programming
the HomeLink® Transceiver. Refer to your Owner’s Manual for complete details.
To program your HomeLink® Transceiver to operate a garage door, gate, or entry door
opener, home or office lighting, you need to be at the same location as the device.
NOTE: Garage door openers (manufactured after 1996) have “rolling code
protection”. To program a garage door opener equipped with “rolling code
protection”, you will need to use a ladder to get up to the garage door opener
motor to be able to access the “smart or learn” program button.
Page 18 of 28
1617
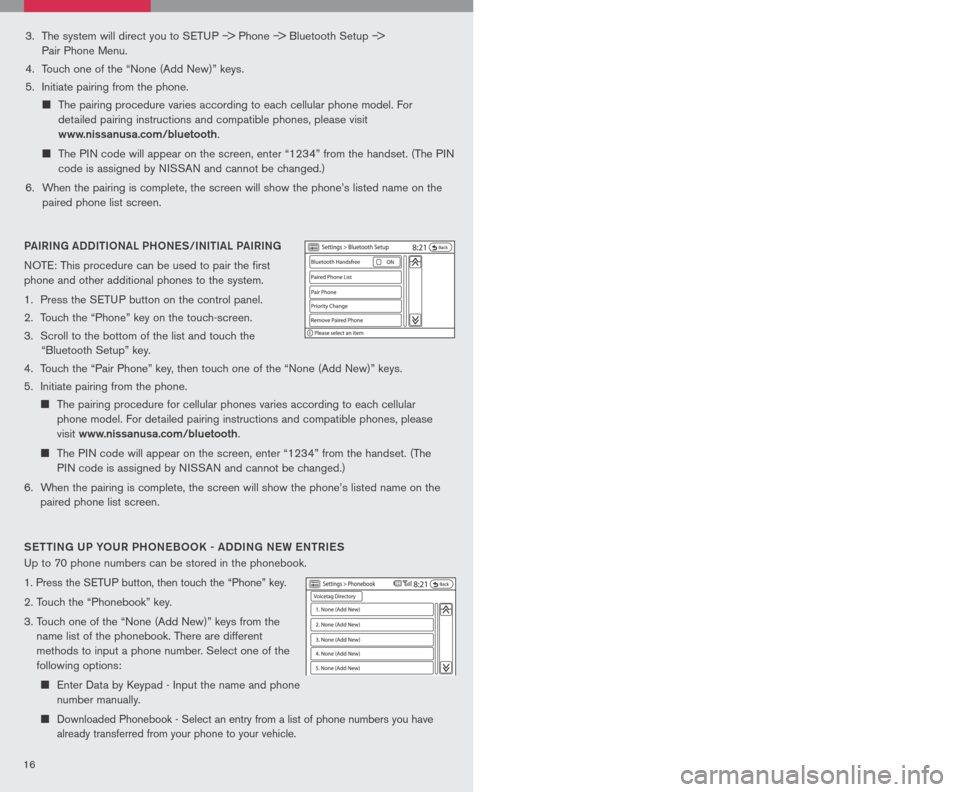
3. The system will direct you to SETUP –> Phone –> Bluetooth Setup –>
Pair Phone Menu.
4. Touch one of the “None (Add New)” keys.
5. Initiate pairing from the phone.
The pairing procedure varies according to each cellular phone model. For
detailed pairing instructions and compatible phones, please visit
www.nissanusa.com/bluetooth.
The PIN code will appear on the screen, enter “1234” from the handset. (The PIN
code is assigned by NISSAN and cannot be changed.)
6. When the pairing is complete, the screen will show the phone’s listed name on the
paired phone list screen.
PAIRING ADDI tIo NAL PH oNeS/INI tIAL PAIRING
NOTE: This procedure can be used to pair the first
phone and other additional phones to the system.
1. Press the SETUP button on the control panel.
2. Touch the “Phone” key on the touch-screen.
3. Scroll to the bottom of the list and touch the
“Bluetooth Setup” key.
4. Touch the “Pair Phone” key, then touch one of the “None (Add New)” keys.
5. Initiate pairing from the phone.
The pairing procedure for cellular phones varies according to each cellular
phone model. For detailed pairing instructions and compatible phones, please
visit
www.nissanusa.com/bluetooth.
The PIN code will appear on the screen, enter “1234” from the handset. (The
PIN code is assigned by NISSAN and cannot be changed.)
6. When the pairing is complete, the screen will show the phone’s listed name on the
paired phone list screen.
S ett ING UP Y oUR PH oNeB oo K - ADDING N eW eN tRI eS
Up to 70 phone numbers can be stored in the phonebook.
1. Press the SETUP button, then touch the “Phone” key.
2. Touch the “Phonebook” key.
3. Touch one of the “None (Add New)” keys from the
name list of the phonebook. There are different
methods to input a phone number. Select one of the
following options:
Enter Data by Keypad - Input the name and phone
number manually.
Downloaded Phonebook - Select an entry from a list of phone numbers you have
already transferred from your phone to your vehicle.
MAKING A PH oNe CALL
1. Press the
button on the steering wheel.
2. After the tone, do one of the following:
Say “Phone Dial” then follow the voice prompts
to input the phone number. After the phone
number has been said, say “Dial.”
Say “Phonebook .” For example, say “Phonebook Michelle.”
Say “Phone Redial” to redial the previous phone number called by the system.
R eC eIVING/ eNDING A PH oNe CALL
When you receive a phone call, a ring tone sounds
through the audio system (if enabled).
To accept the call, press the
LCN0090
button on the
steering wheel or touch the “Answer” key. To reject
the call, touch the “Reject Call” key.
To hang up the phone at the end of a call or to
disconnect during call placement, press the
LCN0090
button.
You can also use the touch-screen keys to do all the same activities; please refer to the
Owner’s Manual.
H o W to SAY NUMB eRS
NISSAN voice recognition permits numbers to be spoken in a variety of ways.
Say “zero” or “oh” for “0”. Example: 1-800-662-6200 – Say “One eight zero zero six
six two six two oh oh.”
Say “Pound” for “#”. Say “star” for “*”. Example: 1-555-1212*123 – Say “One five
five five one two one two star one two three.”
Please refer to the NISSAN Owner’s Manual and cellular phone manufacturer owner’s
manual for detailed information regarding the Bluetooth® Hands-Free Phone System with
Navigation System.
Outgoing Calls - Store the name and phone
number from the outgoing call list.
Incoming Calls - Store the name and phone
number from the incoming call list.
Bluetooth - Transfers an entry from your cellular
phone to the Downloaded Phonebook in the
vehicle. The memory sending procedure from
the cellular phone varies according to each cellular phone model. See the cellular
phone owner’s manual for more details.
Page 19 of 28
1617
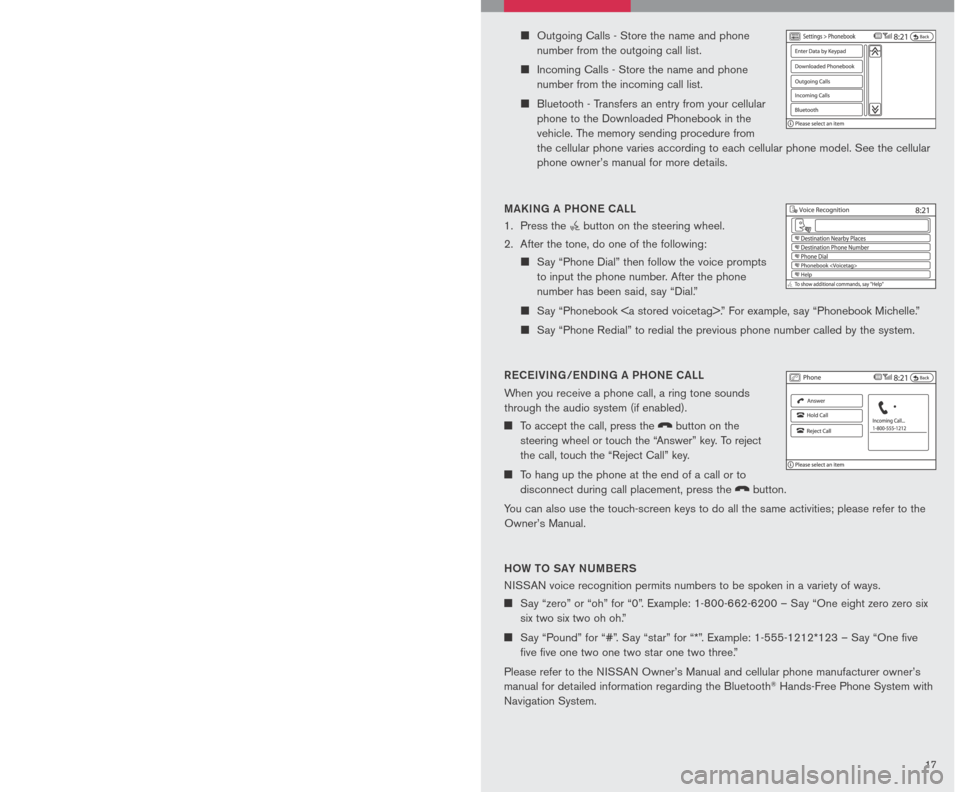
3. The system will direct you to SETUP –> Phone –> Bluetooth Setup –>
Pair Phone Menu.
4. Touch one of the “None (Add New)” keys.
5. Initiate pairing from the phone.
The pairing procedure varies according to each cellular phone model. For
detailed pairing instructions and compatible phones, please visit
www.nissanusa.com/bluetooth.
The PIN code will appear on the screen, enter “1234” from the handset. (The PIN
code is assigned by NISSAN and cannot be changed.)
6. When the pairing is complete, the screen will show the phone’s listed name on the
paired phone list screen.
PAIRING ADDI tIo NAL PH oNeS/INI tIAL PAIRING
NOTE: This procedure can be used to pair the first
phone and other additional phones to the system.
1. Press the SETUP button on the control panel.
2. Touch the “Phone” key on the touch-screen.
3. Scroll to the bottom of the list and touch the
“Bluetooth Setup” key.
4. Touch the “Pair Phone” key, then touch one of the “None (Add New)” keys.
5. Initiate pairing from the phone.
The pairing procedure for cellular phones varies according to each cellular
phone model. For detailed pairing instructions and compatible phones, please
visit
www.nissanusa.com/bluetooth.
The PIN code will appear on the screen, enter “1234” from the handset. (The
PIN code is assigned by NISSAN and cannot be changed.)
6. When the pairing is complete, the screen will show the phone’s listed name on the
paired phone list screen.
S ett ING UP Y oUR PH oNeB oo K - ADDING N eW eN tRI eS
Up to 70 phone numbers can be stored in the phonebook.
1. Press the SETUP button, then touch the “Phone” key.
2. Touch the “Phonebook” key.
3. Touch one of the “None (Add New)” keys from the
name list of the phonebook. There are different
methods to input a phone number. Select one of the
following options:
Enter Data by Keypad - Input the name and phone
number manually.
Downloaded Phonebook - Select an entry from a list of phone numbers you have
already transferred from your phone to your vehicle.
MAKING A PH oNe CALL
1. Press the
button on the steering wheel.
2. After the tone, do one of the following:
Say “Phone Dial” then follow the voice prompts
to input the phone number. After the phone
number has been said, say “Dial.”
Say “Phonebook .” For example, say “Phonebook Michelle.”
Say “Phone Redial” to redial the previous phone number called by the system.
R eC eIVING/ eNDING A PH oNe CALL
When you receive a phone call, a ring tone sounds
through the audio system (if enabled).
To accept the call, press the
LCN0090
button on the
steering wheel or touch the “Answer” key. To reject
the call, touch the “Reject Call” key.
To hang up the phone at the end of a call or to
disconnect during call placement, press the
LCN0090
button.
You can also use the touch-screen keys to do all the same activities; please refer to the
Owner’s Manual.
H o W to SAY NUMB eRS
NISSAN voice recognition permits numbers to be spoken in a variety of ways.
Say “zero” or “oh” for “0”. Example: 1-800-662-6200 – Say “One eight zero zero six
six two six two oh oh.”
Say “Pound” for “#”. Say “star” for “*”. Example: 1-555-1212*123 – Say “One five
five five one two one two star one two three.”
Please refer to the NISSAN Owner’s Manual and cellular phone manufacturer owner’s
manual for detailed information regarding the Bluetooth® Hands-Free Phone System with
Navigation System.
Outgoing Calls - Store the name and phone
number from the outgoing call list.
Incoming Calls - Store the name and phone
number from the incoming call list.
Bluetooth - Transfers an entry from your cellular
phone to the Downloaded Phonebook in the
vehicle. The memory sending procedure from
the cellular phone varies according to each cellular phone model. See the cellular
phone owner’s manual for more details.
Page 20 of 28
1819
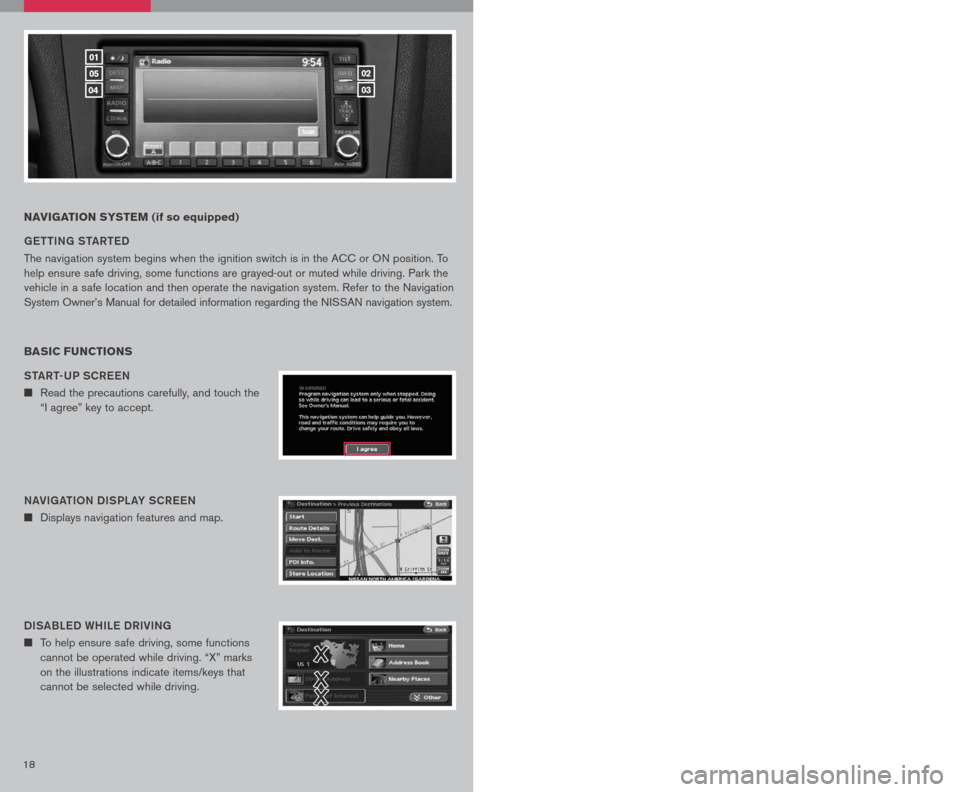
NAVIGATION SYSTEM (if so equipped)
G ett ING S tAR teD
The navigation system begins when the ignition switch is in the ACC or ON position. To
help ensure safe driving, some functions are grayed-out or muted while driving. Park the
vehicle in a safe location and then operate the navigation system. Refer to the Navigation
System Owner’s Manual for detailed information regarding the NISSAN navigation system.
BASIC FUNCTIONS
StAR t-UP SCR eeN
n Read the precautions carefully, and touch the
“I agree” key to accept.
NAVIGA tIo N DISPL AY SCR eeN
n Displays navigation features and map.
DISABL eD WHIL e DRIVING
n To help ensure safe driving, some functions
cannot be operated while driving. “X” marks
on the illustrations indicate items/keys that
cannot be selected while driving.
DAY/NIGH t BU tto N
n Press the button 01 to switch between
the day screen (bright) and the night screen
(dark). Within 10 seconds of pressing the
button 01, you can adjust the brightness
of the map display screen by touching the
key or the key.
01
05
04
02
03
USING tH e to UCH-SCR eeN
n To maneuver around the navigation display
screen, touch the screen to select the item
or key displayed. To move around the map
screen touch and hold to scroll around.
Set UP BU ttoN
n Press the SetUP button 03 to change or set
navigation preferences.
D eS t ( D eS tINA tIo N ) BU ttoN
n Press the DeSt button 05 to display
the address book and alternative ways of
programming a destination.
MAP BU ttoN
n Press the MAP button 04 to display the
current location map screen.
INFo BU tto N
n Press the INFo button 02 to set or view
various information that is helpful for using the
vehicle safely and comfortably.
Page 21 of 28
1819
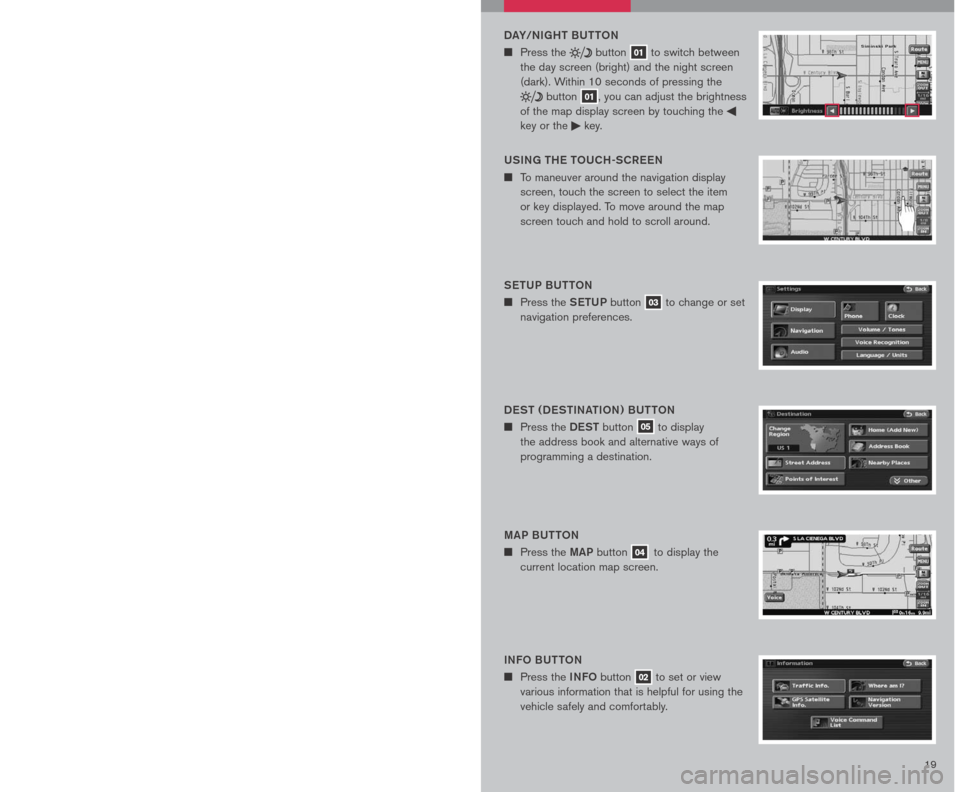
NAVIGATION SYSTEM (if so equipped)
G ett ING S tAR teD
The navigation system begins when the ignition switch is in the ACC or ON position. To
help ensure safe driving, some functions are grayed-out or muted while driving. Park the
vehicle in a safe location and then operate the navigation system. Refer to the Navigation
System Owner’s Manual for detailed information regarding the NISSAN navigation system.
BASIC FUNCTIONS
StAR t-UP SCR eeN
n Read the precautions carefully, and touch the
“I agree” key to accept.
NAVIGA tIo N DISPL AY SCR eeN
n Displays navigation features and map.
DISABL eD WHIL e DRIVING
n To help ensure safe driving, some functions
cannot be operated while driving. “X” marks
on the illustrations indicate items/keys that
cannot be selected while driving.
DAY/NIGH t BU tto N
n Press the button 01 to switch between
the day screen (bright) and the night screen
(dark). Within 10 seconds of pressing the
button 01, you can adjust the brightness
of the map display screen by touching the
key or the key.
01
05
04
02
03
USING tH e to UCH-SCR eeN
n To maneuver around the navigation display
screen, touch the screen to select the item
or key displayed. To move around the map
screen touch and hold to scroll around.
Set UP BU ttoN
n Press the SetUP button 03 to change or set
navigation preferences.
D eS t ( D eS tINA tIo N ) BU ttoN
n Press the DeSt button 05 to display
the address book and alternative ways of
programming a destination.
MAP BU ttoN
n Press the MAP button 04 to display the
current location map screen.
INFo BU tto N
n Press the INFo button 02 to set or view
various information that is helpful for using the
vehicle safely and comfortably.
Page 22 of 28
2021
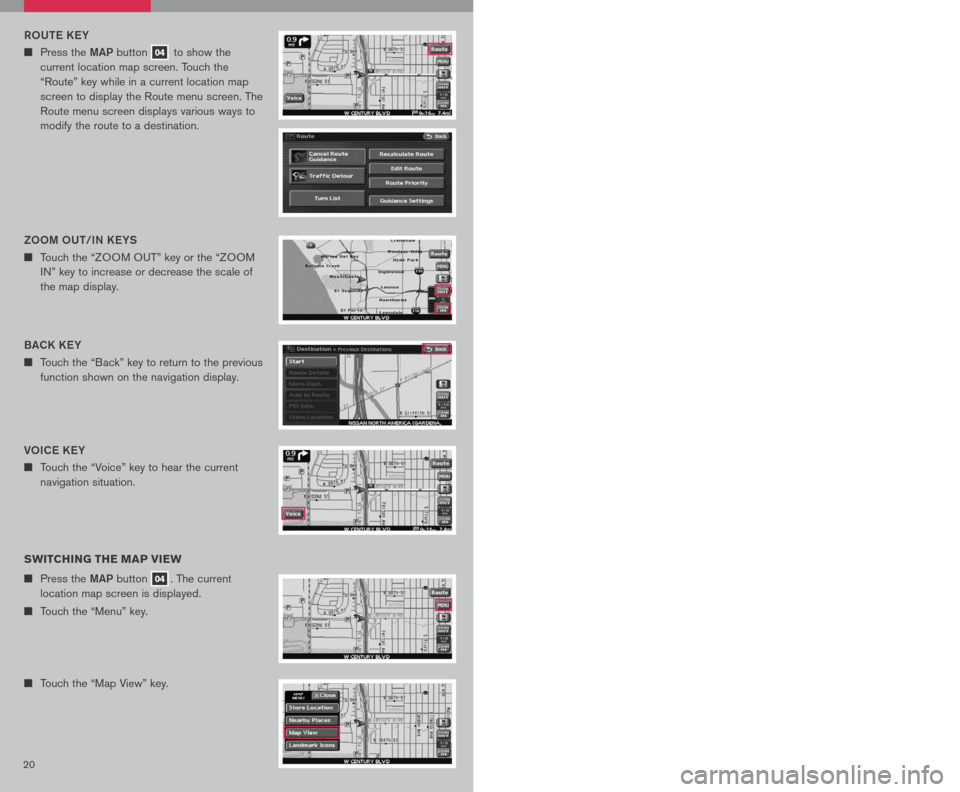
Vo IC e K eY
n Touch the “Voice” key to hear the current
navigation situation.
R o Ute KeY
n Press the MAP button 04 to show the
current location map screen. Touch the
“Route” key while in a current location map
screen to display the Route menu screen. The
Route menu screen displays various ways to
modify the route to a destination.
SWITCHING THE MAP VIEW
n Press the MAP button 04. The current
location map screen is displayed.
n Touch the “Menu” key.
n Touch the “Map View” key.
n Touch either the “2D” key or the “3D” key, to
select the map view. Press the MAP button
04 or the “Back” key to accept the changes.
SeLe C tING A M eNU SCR eeN
1. To select a preferred menu key, touch the corresponding key on the screen.
2. Depending on the key you selected, a detailed menu screen, a character input screen
or a setting screen, etc. is displayed. On the screen displayed, make adjustments,
input information, etc. accordingly.
3. Touch the “Back” key to return to the previous screen without applying any changes;
in some cases pressing the “Back” key will accept the changes you made.
4. Press the
MAP button 04 to return to the current location map screen without
applying any changes. (Depending on the menu selected, pressing the MAP button
may not return you to the current location map screen).
NOTE: Depending on the menu selected, pressing the MAP button 04 may not return
you to the current location map screen.
S to RING Y oUR H oM e IN Y oUR ADDR eSS B ooK
n Press the DeSt button 05.
n Touch the “Home (Add New)” key. If you have
already stored your home this key may not
appear.
Please refer to the Nissan Altima Navigation
Manual for detailed information.
BACK K eY
n Touch the “Back” key to return to the previous
function shown on the navigation display.
Zoo M oUt/IN K eYS
n Touch the “ZOOM OUT” key or the “ZOOM
IN” key to increase or decrease the scale of
the map display.3D BIRDVI eWtM
n Displays the map in an elevated perspective.
2D PL AN VI
eW
n Displays the map in a 2-dimensional
environment to a road map.
Page 23 of 28
2021
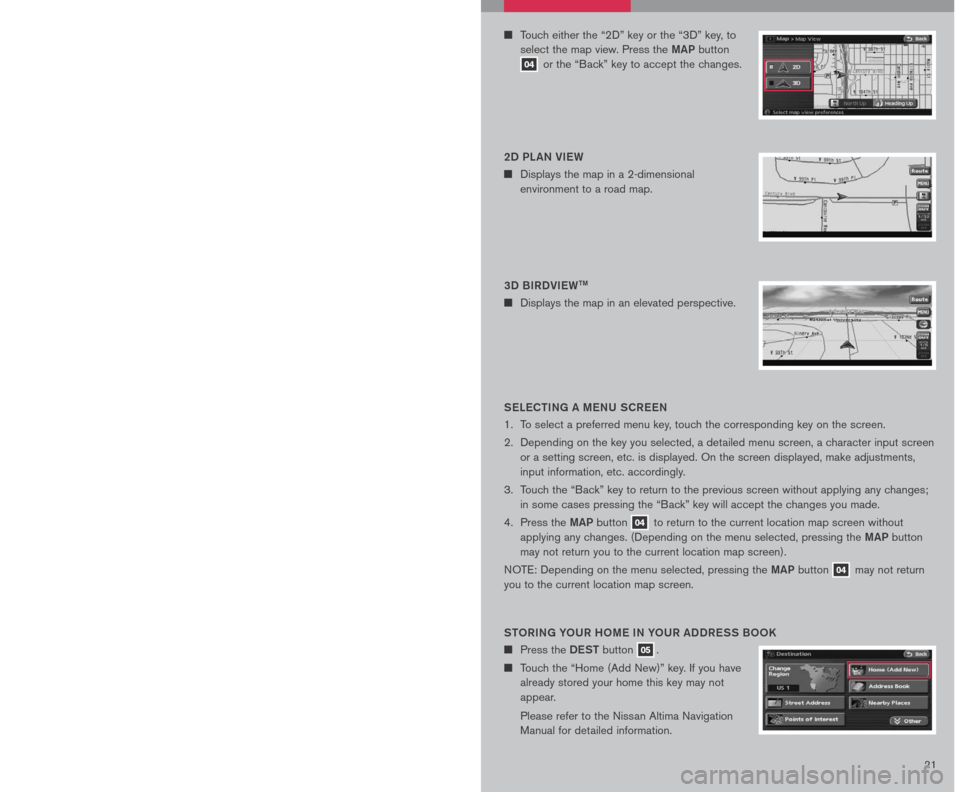
Vo IC e K eY
n Touch the “Voice” key to hear the current
navigation situation.
R o Ute KeY
n Press the MAP button 04 to show the
current location map screen. Touch the
“Route” key while in a current location map
screen to display the Route menu screen. The
Route menu screen displays various ways to
modify the route to a destination.
SWITCHING THE MAP VIEW
n Press the MAP button 04. The current
location map screen is displayed.
n Touch the “Menu” key.
n Touch the “Map View” key.
n Touch either the “2D” key or the “3D” key, to
select the map view. Press the MAP button
04 or the “Back” key to accept the changes.
SeLe C tING A M eNU SCR eeN
1. To select a preferred menu key, touch the corresponding key on the screen.
2. Depending on the key you selected, a detailed menu screen, a character input screen
or a setting screen, etc. is displayed. On the screen displayed, make adjustments,
input information, etc. accordingly.
3. Touch the “Back” key to return to the previous screen without applying any changes;
in some cases pressing the “Back” key will accept the changes you made.
4. Press the
MAP button 04 to return to the current location map screen without
applying any changes. (Depending on the menu selected, pressing the MAP button
may not return you to the current location map screen).
NOTE: Depending on the menu selected, pressing the MAP button 04 may not return
you to the current location map screen.
S to RING Y oUR H oM e IN Y oUR ADDR eSS B ooK
n Press the DeSt button 05.
n Touch the “Home (Add New)” key. If you have
already stored your home this key may not
appear.
Please refer to the Nissan Altima Navigation
Manual for detailed information.
BACK K eY
n Touch the “Back” key to return to the previous
function shown on the navigation display.
Zoo M oUt/IN K eYS
n Touch the “ZOOM OUT” key or the “ZOOM
IN” key to increase or decrease the scale of
the map display.3D BIRDVI eWtM
n Displays the map in an elevated perspective.
2D PL AN VI
eW
n Displays the map in a 2-dimensional
environment to a road map.