Page 134 of 311
OPENER OPERATIONTo open the fuel-filler door, push the opener
switch located below the instrument panel. To
lock, close the fuel-filler door securely.
FUEL-FILLER CAP
�1To remove the fuel-filler cap, turn it counter-
clockwise.
�2Hang the string of the cap on the hook
�Aas
shown while refueling.
The fuel-filler cap is a ratcheting type. Tighten
the cap clockwise until ratcheting clicks are
heard.
WARNING
�Gasoline is extremely flammable andhighly explosive under certain condi-
tions. You could be burned or seri-
ously injured if it is misused or mis-
handled. Always stop the engine and
do not smoke or allow open flames
or sparks near the vehicle when refu-
eling.
�Fuel may be under pressure. Turn the
cap a third of a turn, and wait for any
“hissing” sound to stop to prevent
fuel from spraying out and possibly
causing personal injury. Then remove
SPA1508
SPA1509A
FUEL-FILLER DOOR
Pre-driving checks and adjustments
3-23
�
07.2.9/Z33-D/V5.0
�
Page 136 of 311
TILT OPERATIONPush the lock lever down and adjust the steering
wheel up or down to the desired position.
Push the lock lever up securely to lock the
steering wheel in place.
WARNING
Do not adjust the steering wheel while
driving. You could lose control of your
vehicle and cause an accident.1. To block out glare from the front, swing down
the main sun visor
�1.
2. To block glare from the side, remove the main
sun visor from the center mount and swing it
to the side
�2.
3. To use the extension sun visor
�3
(if so
equipped), pull it out from the main sun visor
as shown.
CAUTION
Do not store the main sun visor before
storing the extension sun visor.
SPA2314
SPA2176
STEERING WHEEL SUN VISORS
Pre-driving checks and adjustments
3-25
�
07.2.9/Z33-D/V5.0
�
Page 137 of 311
INSIDE MIRRORAdjust the height and the angle of the inside
mirror to the desired position.The night position
�1
will reduce glare from the
headlights of vehicles behind you at night.
Use the day position�2when driving in daylight
hours.
WARNING
Use the night position only when neces-
sary, because it reduces rear view clar-
ity.
AUTOMATIC ANTI-GLARE INSIDE
MIRROR (if so equipped)The inside mirror is designed so that it automati-
cally changes reflection according to the inten-
sity of the headlight of the following vehicle.
When the inside mirror is in the “I” (AUTO)
position
�1, excessive glare from the headlights
of the vehicle behind you will be reduced. The
AUTO indicator light
�A
(green) will be on.
When the switch of the inside mirror is in the
“�” (OFF) position
�2, the inside mirror will
operate normally.
For HomeLink
Universal Transceiver, see the
SPA1792
SPA2143
SPA2157
MIRRORS3-26
Pre-driving checks and adjustments
�
07.2.9/Z33-D/V5.0
�
Page 138 of 311
description in the “2. Instruments and controls”
section.
OUTSIDE MIRRORS
WARNING
Objects viewed in the outside mirror on
the passenger side are closer than they
appear. Be careful when moving to the
right. Using only this mirror could cause
an accident. Use the inside mirror or
glance over your shoulder to properly
judge distances to other objects.The outside mirror will operate only when the
ignition switch is in the ACC or ON position.
Turn the control knob(located on the driver side
door armrest) to right or left to select the right or
left outside mirror, then adjust using the knob.
SPA1390
Pre-driving checks and adjustments
3-27
�
07.2.9/Z33-D/V5.0
�
Page 141 of 311

WARNING
�Do not disassemble or modify this
system. If you do, it may result in
accidents, fire, or electric shock.
�Do not use this system if you notice
any abnormality, such as a frozen
screen or lack of sound. Continued
use of the system may result in acci-
dent, fire or electric shock.
�In case you notice any foreign object
in the system hardware, spill liquid
on it, or notice smoke or smell com-
ing from it, stop using the system
immediately and contact a NISSAN
dealer. Ignoring such conditions may
lead to accidents, fire, or electric
shock.When you use this system, make sure the engine
is running.
If you use the system with the engine not
running (ignition ONor ACC) for a long
time, it will use up all the battery power,
and the engine will not start.
Reference symbols:
“ENTER”button
This is a button on the control panel.
“Display”key
This is a select key on the screen. By selecting
this key you can proceed to the next function.
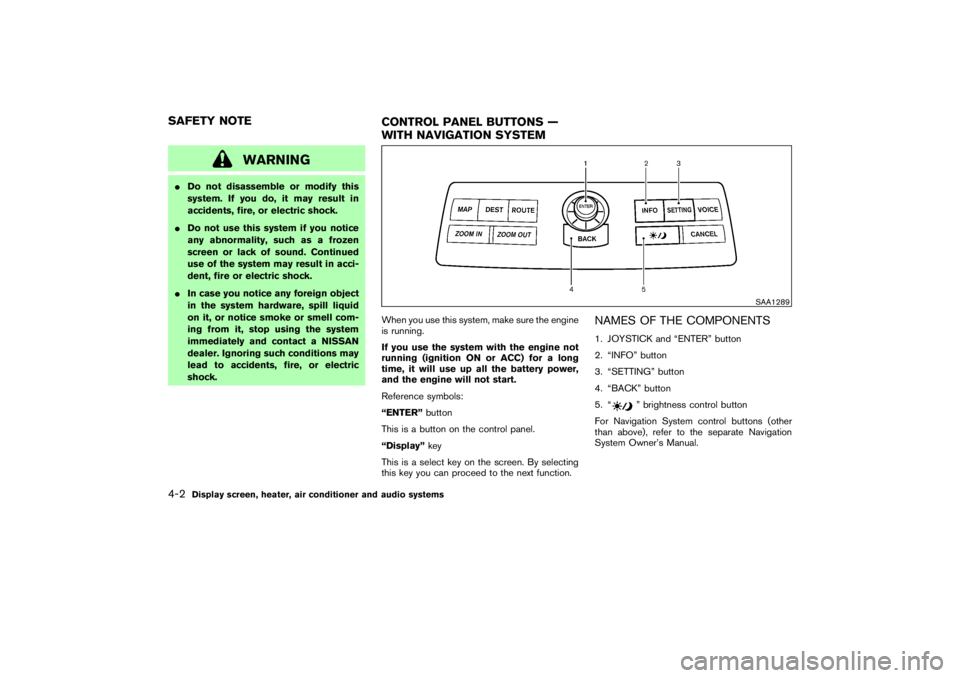
NAMES OF THE COMPONENTS1. JOYSTICK and “ENTER” button
2. “INFO” button
3. “SETTING” button
4. “BACK” button
5. “
” brightness control button
For Navigation System control buttons (other
than above), refer to the separate Navigation
System Owner’s Manual.
SAA1289
SAFETY NOTE
CONTROL PANEL BUTTONS —
WITH NAVIGATION SYSTEM4-2
Display screen, heater, air conditioner and audio systems
�
07.2.9/Z33-D/V5.0
�
Page 142 of 311

HOW TO USE JOYSTICK AND
“ENTER” BUTTONChoose an item on the display using the joystick
and push the ENTER button for operation.HOW TO USE “BACK” BUTTONThis button has two functions.
To return to the previous screen:
When this button is pushed during setup, setup
will be canceled, and the screen will return to the
previous screen.
To finish the set-up:
When this button is pushed after setup is com-
pleted, the settings will be renewed as directed,
and the screen will return to the map.
INFO:
When the “BACK” button must be pushed, (for
example, after the setup is finished) instructions
are given in the operation procedure of each
section in this manual. If the “BACK” button is
pushed when not finished with the setup, the
setting will be canceled, and the screen will
return to the previous screen.
SETTING UP THE START-UP
SCREENWhen you turn the ignition key to the ACC
position, the SYSTEM START-UP warning is
displayed on the screen. Read the warning and
select the “OK” key then push the “ENTER”
button.
If you do not push the ENTER button, this
system will not proceed to the next step display.
To proceed to the next step, refer to the separate
Navigation System Owner’s Manual.
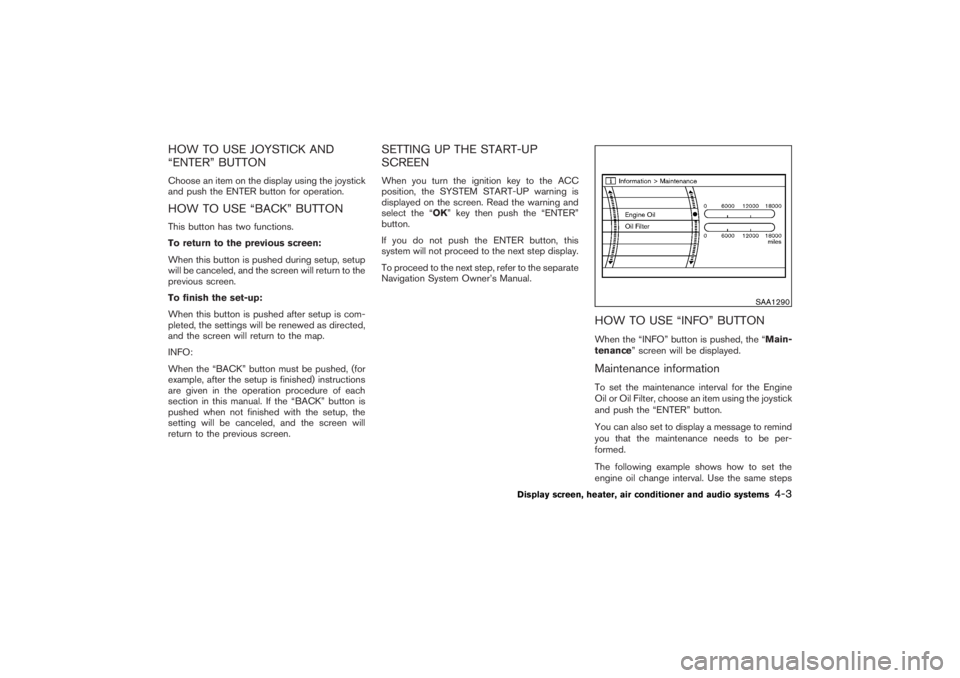
HOW TO USE “INFO” BUTTONWhen the “INFO” button is pushed, the “Main-
tenance” screen will be displayed.Maintenance informationTo set the maintenance interval for the Engine
Oil or Oil Filter, choose an item using the joystick
and push the “ENTER” button.
You can also set to display a message to remind
you that the maintenance needs to be per-
formed.
The following example shows how to set the
engine oil change interval. Use the same steps
SAA1290
Display screen, heater, air conditioner and audio systems
4-3
�
07.2.9/Z33-D/V5.0
�
Page 148 of 311

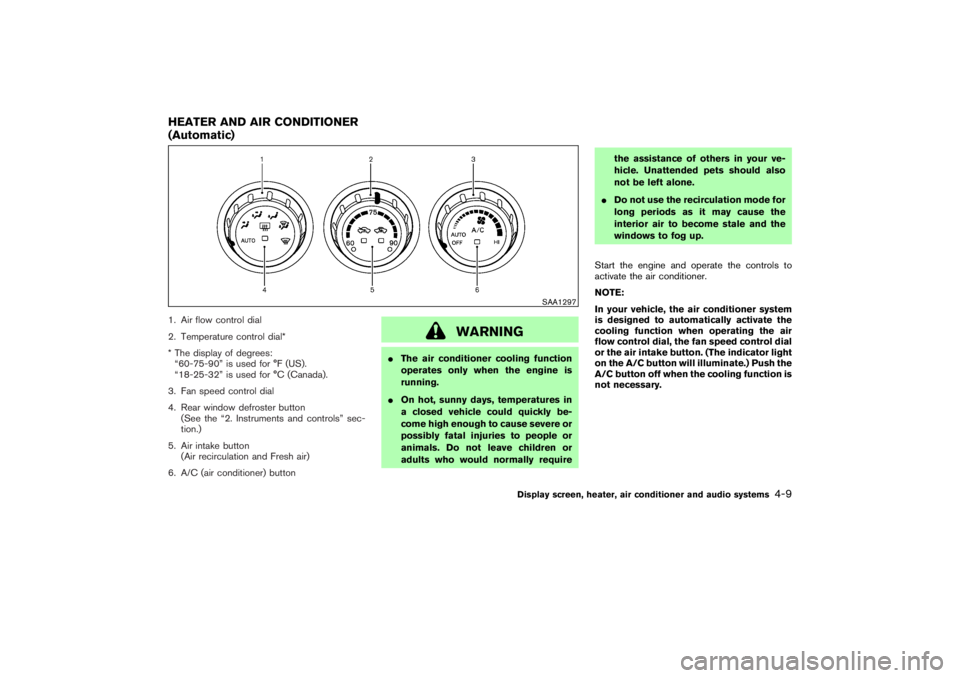
1. Air flow control dial
2. Temperature control dial*
* The display of degrees:
“60-75-90” is used for °F (US).
“18-25-32” is used for °C (Canada).
3. Fan speed control dial
4. Rear window defroster button
(See the “2. Instruments and controls” sec-
tion.)
5. Air intake button
(Air recirculation and Fresh air)
6. A/C (air conditioner) button
WARNING
�The air conditioner cooling function
operates only when the engine is
running.
�On hot, sunny days, temperatures in
a closed vehicle could quickly be-
come high enough to cause severe or
possibly fatal injuries to people or
animals. Do not leave children or
adults who would normally requirethe assistance of others in your ve-
hicle. Unattended pets should also
not be left alone.
�Do not use the recirculation mode for
long periods as it may cause the
interior air to become stale and the
windows to fog up.
Start the engine and operate the controls to
activate the air conditioner.
NOTE:
In your vehicle, the air conditioner system
is designed to automatically activate the
cooling function when operating the air
flow control dial, the fan speed control dial
or the air intake button. (The indicator light
on the A/C button will illuminate.) Push the
A/C button off when the cooling function is
not necessary.
SAA1297
HEATER AND AIR CONDITIONER
(Automatic)
Display screen, heater, air conditioner and audio systems
4-9
�
07.2.9/Z33-D/V5.0
�
Page 151 of 311

The air conditioning system in your NISSAN
vehicle is charged with a refrigerant designed
with the environment in mind.This refrigerant
will not harm the earth’s ozone layer.How-
ever, special charging equipment and lubricant
are required when servicing your NISSAN air
conditioner. Using improper refrigerants or lubri-
cants will cause severe damage to your air
conditioning system. See “Capacities and rec-
ommended fuel/lubricants” in the “9. Technical
and consumer information” section for air con-
ditioning system refrigerant and lubricant recom-
mendations.
A NISSAN dealer will be able to service your
environmentally friendly air conditioning system.
WARNING
The air conditioner system contains re-
frigerant under high pressure. To avoid
personal injury, any air conditioner ser-
vice should be done only by an experi-
enced technician with proper equip-
ment.
RADIOTurn the ignition key to ACC or ON and press
the POWER, FM or AM button to turn on the
radio. If you listen to the radio with the engine not
running, the key should be turned to the ACC
position.
Radio reception is affected by station signal
strength, distance from radio transmitter, build-
ings, bridges, mountains and other external in-
fluences. Intermittent changes in reception qual-
ity normally are caused by these external
influences.
Using a cellular phone in or near the ve-
hicle may influence radio reception quality.Radio receptionYour radio system is equipped with state-of-the-
art electronic circuits to enhance radio recep-
tion. These circuits are designed to extend re-
ception range, and to enhance the quality of that
reception.
However there are some general characteristics
of FM, AM and SAT (satellite — if so equipped)
radio signals that can affect radio reception
quality in a moving vehicle, even when the finest
equipment is used. These characteristics are
completely normal in a given reception area, anddo not indicate any malfunction in your radio
system.
Remember that a moving vehicle is not the ideal
place to listen to a radio. Because of the move-
ment, reception conditions will constantly
change. Buildings, terrain, signal distance and
interference from other vehicles can work
against ideal reception. Described below are
some of the factors that can affect your radio
reception.
SERVICING AIR CONDITIONER AUDIO SYSTEM4-12
Display screen, heater, air conditioner and audio systems
�
07.2.9/Z33-D/V5.0
�