Page 122 of 311
�Push the power door lock switch to the
UNLOCK side. (After locking the doors with a
keyfob, this switch is not available due to the
security system.)
To close, push the trunk lid down securely.
The trunk lid release switch is linked with the
driver side door lock. To open the trunk lid,
unlock the driver side door.
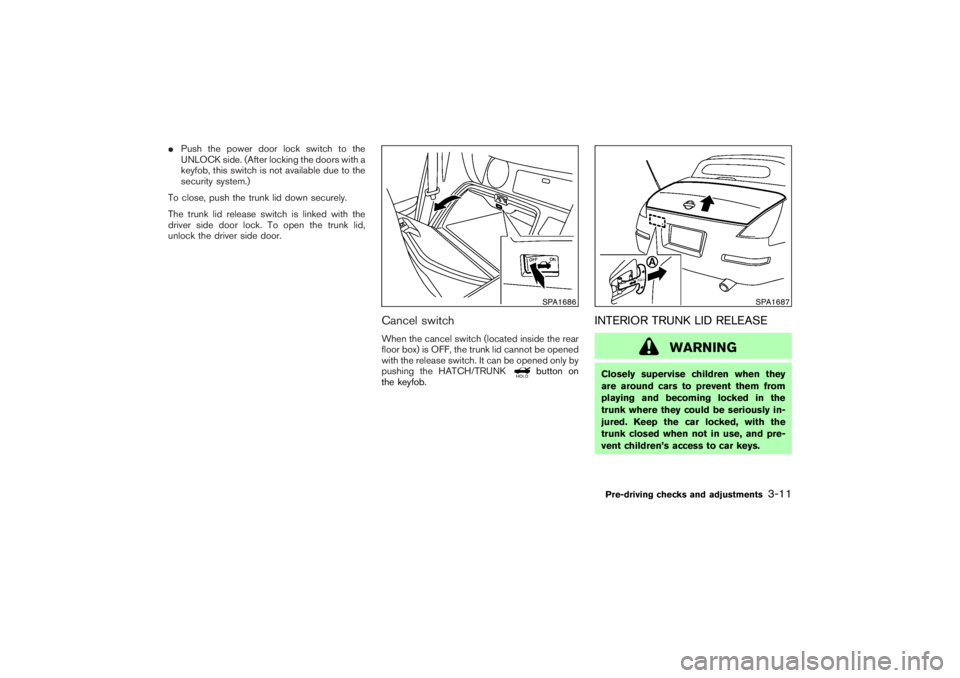
Cancel switchWhen the cancel switch (located inside the rear
floor box) is OFF, the trunk lid cannot be opened
with the release switch. It can be opened only by
pushing the HATCH/TRUNK
button on
the keyfob.
INTERIOR TRUNK LID RELEASE
WARNING
Closely supervise children when they
are around cars to prevent them from
playing and becoming locked in the
trunk where they could be seriously in-
jured. Keep the car locked, with the
trunk closed when not in use, and pre-
vent children’s access to car keys.
SPA1686
SPA1687
Pre-driving checks and adjustments
3-11
�
07.2.9/Z33-D/V5.0
�
Page 123 of 311
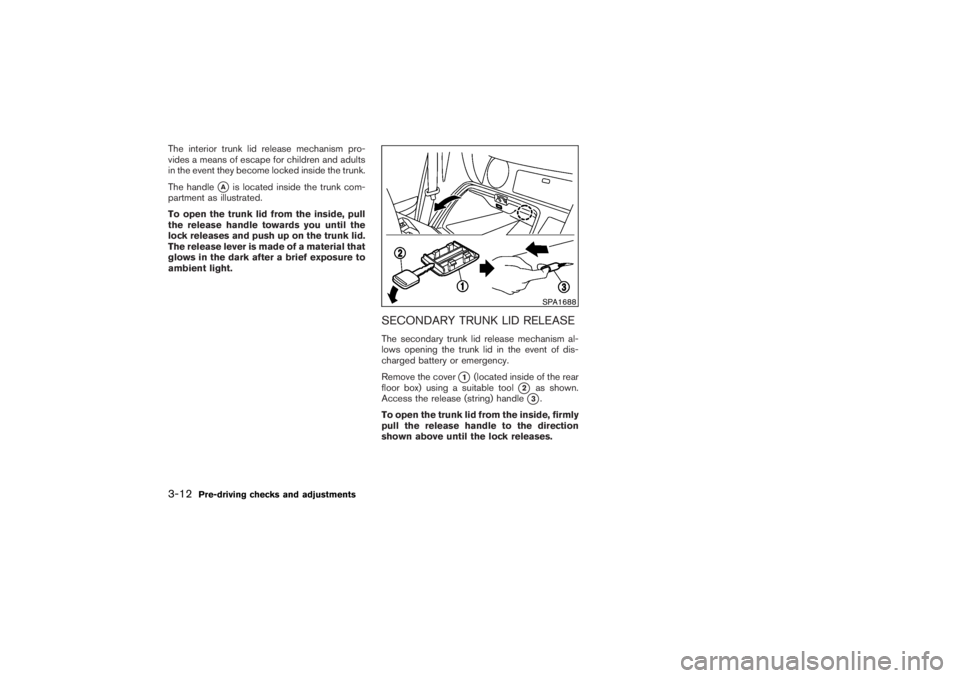
The interior trunk lid release mechanism pro-
vides a means of escape for children and adults
in the event they become locked inside the trunk.
The handle
�A
is located inside the trunk com-
partment as illustrated.
To open the trunk lid from the inside, pull
the release handle towards you until the
lock releases and push up on the trunk lid.
The release lever is made of a material that
glows in the dark after a brief exposure to
ambient light.
SECONDARY TRUNK LID RELEASEThe secondary trunk lid release mechanism al-
lows opening the trunk lid in the event of dis-
charged battery or emergency.
Remove the cover
�1
(located inside of the rear
floor box) using a suitable tool
�2
as shown.
Access the release (string) handle�3.
To open the trunk lid from the inside, firmly
pull the release handle to the direction
shown above until the lock releases.SPA1688
3-12
Pre-driving checks and adjustments
�
07.2.9/Z33-D/V5.0
�
Page 126 of 311

vehicle body.
�Do not place anything in the top stor-
age area. The top will not fit there
properly, and this could damage the
top and/or the vehicle body.
�Do not sit or place excessive weight
on the top and the storage lid, espe-
cially when the top is being operated.
The top may be damaged.
�Do not drive the vehicle with the top
partially opened. Always make sure
the top is either fully opened or
closed before driving.
�Secure items so that they cannot be
blown from the vehicle while driving
with the top open.
�When a child restraint is installed in
the passenger seat, be sure to turn
the seatback tilt cancel switch (lo-
cated on the passenger seatback) to
the CANCEL position, or the child
restraint may be damaged.
Make sure the trunk lid is securely closed before
operating the top.
WHEN OPERATING THE TOP
WARNING
Keep hands and other parts of the body
away from moving parts such as the top,
storage lid and power windows.
CAUTION
Keep all parts of the top linkage clear of
obstructions, or the top latch may not be
securely locked.NOTE:
�In case of low battery or low tempera-
ture, the top may temporarily stop mov-
ing during the operation. This functions
to protect the top control mechanism,
and it is not a malfunction.
�If the top is opened and closed repeat-
edly in a short period of time, it may
stop moving to protect the top motor.
Wait for a few minutes before operating
the top again.
Pre-driving checks and adjustments
3-15
�
07.2.9/Z33-D/V5.0
�
Page 127 of 311

Top latch leverThe soft top has three locking points to engage
the front edge of the top to the vehicle body.
Operating the top latch lever enables you to lock
or unlock all three locking points at the same
time.
CAUTION
Before opening the top, be sure to
release the top latch. After closing,
securely engage the top to the vehicle
body.
To release the latch (before opening the
top):�1Push the safety switch
�A
.
�2The latch lever
�B
is lowered.
�3Swing the lever forward until the latch is
released.
To engage the latch (after closing the top):
Check that the top is in the fully closed position.
�1Push the safety switch
�A
.
�2The latch lever
�B
is lowered.
�3Rotate the lever forward until the front edge
of the top is completely joined to the vehicle
body.
�4Rotate the lever toward you and push it up
into the stored position. Make sure the top is
securely engaged to the vehicle body.
The soft top indicator light will flash with the
ignition switch ON when the top is not en-
gaged. See “Soft top indicator light” later in
this section.
When releasing or engaging the top latch,
you may hear the latch operating. This is
normal and not a malfunction.
SPA1690
3-16
Pre-driving checks and adjustments
�
07.2.9/Z33-D/V5.0
�
Page 131 of 311
1. Open the trunk lid. In the event of discharged
battery, you need to open the trunk lid as
follows:
a. Open the rear floor box behind the passenger
seat.
b. Remove the cap
�A
using a suitable tool
�B.
c. Pull the string handle (secondary trunk lid
release)
�Cuntil the trunk lid lock is released.
d. Lift up the trunk lid.2. Open the top storage lid
a. Remove floorboard inside of the trunk.
b. Remove the harness connector
�D
of the
storage lid motor installed on the back right
side of the trunk by pulling in a downward
direction.
c. Pull down the lock release cable (right and
left)
�E.
d. Listen for a clicking sound of the lock releas-
ing.
e. Pull up the storage lid from the left and right
side of vehicle by hand.
CAUTION
The storage lid is extremely heavy. Pull-
ing it up should be done by two people.
SPA1694
SPA1695
3-20
Pre-driving checks and adjustments
�
07.2.9/Z33-D/V5.0
�
Page 132 of 311
 and
�H
(left side).
CAUTION
Two harness connectors are installed on
the right side and three on")
3. Close the soft top.
a. Remove the harness connectors of the top
motor,
�F
(right side of the vehicle) and
�H
(left side).
CAUTION
Two harness connectors are installed on
the right side and three on the left side
as shown. Only the harness connectors�F
and
�H
should be removed. (Do not
remove the other harness connectors
�G,�I
and
�J.)b. A person on each side of the vehicle should
slowly pull the top to the closed position.
c. Latch the front edge of the top to the vehicle
body with the top latch lever.
4. Push the storage lid down to the vehicle body
panel and close it. (Listen for locking sounds
from both right and left sides of the lid.)5. Lower the rear section of the top.
a. Remove the shock absorber
�K
which sup-
ports the rear section of the top from the
vehicle body. (Both the left and right side
must be removed — the figure above shows
the left side.) To remove the shock absorber,
remove the holder
�L
on the terminal part
using a flat-bladed screwdriver
�M.
CAUTION
When the shock absorber is removed,
the rear section of the top loses support
SPA1734
Right side
SPA1708
Left side
SPA1697
Pre-driving checks and adjustments
3-21
�
07.2.9/Z33-D/V5.0
�
Page 133 of 311

and falls simultaneously. Support the
top by hand so it does not strike the
body.
b. Lower the rear part of the top and push it
onto the top storage lid. The top is locked to
the storage lid, but the bottom of the rear part
is not closed tightly.
CAUTION
�After closing the top manually, have
the system checked and/or repaired
by a NISSAN dealer as soon as pos-
sible.
�Avoid leaving the vehicle outside for
long periods or driving at high
speeds. The rear of the top is not
locked completely, and this may al-
low wind and rain to get into your
vehicle.CARE OF THE SOFT TOP AND THE
VEHICLE BODYTo use your Roadster safely and comfortably,you need to observe all the warnings and cau-
tions shown in the previous pages. Also, to
maintain a good appearance of the soft top and
the vehicle body, you need to care for them by
cleaning and/or washing properly.
CAUTION
�Do not use an automatic car wash or
a high-pressure car wash to clean
your vehicle. The top may be dam-
aged and water may leak into the
inside of the vehicle.
�Store the vehicle with the top closed
if it is not to be used for long periods.
Keeping the top stowed for long pe-
riods may cause wrinkles on the sur-
face of the top.
See “Cleaning exterior” in the “7. Appearance
and care” section for detailed instructions.
�A protective clear tape is applied to the top
storage lid painted surface where the soft top
contacts the surface. When the top is fully
closed, the tape may transmit some light,
visible from the inside of the vehicle. This
does not affect the water and air tightness of
the seal.�The inner surface of the trunk and top storage
lids may show a fibrous, or marbled pattern.
This is the normal appearance of the material
used in these parts.
3-22
Pre-driving checks and adjustments
�
07.2.9/Z33-D/V5.0
�
Page 134 of 311
OPENER OPERATIONTo open the fuel-filler door, push the opener
switch located below the instrument panel. To
lock, close the fuel-filler door securely.
FUEL-FILLER CAP
�1To remove the fuel-filler cap, turn it counter-
clockwise.
�2Hang the string of the cap on the hook
�Aas
shown while refueling.
The fuel-filler cap is a ratcheting type. Tighten
the cap clockwise until ratcheting clicks are
heard.
WARNING
�Gasoline is extremely flammable andhighly explosive under certain condi-
tions. You could be burned or seri-
ously injured if it is misused or mis-
handled. Always stop the engine and
do not smoke or allow open flames
or sparks near the vehicle when refu-
eling.
�Fuel may be under pressure. Turn the
cap a third of a turn, and wait for any
“hissing” sound to stop to prevent
fuel from spraying out and possibly
causing personal injury. Then remove
SPA1508
SPA1509A
FUEL-FILLER DOOR
Pre-driving checks and adjustments
3-23
�
07.2.9/Z33-D/V5.0
�