Page 118 of 311

The panic alarm stops when:
�It has run for 30 seconds, or
�The LOCK
button or the UNLOCK
button is pushed, or
�The PANIC
button or the
HATCH/TRUNKbutton is pushed on
the keyfobfor longer than 0.5 second.
Setting hazard indicator and horn
modeThis vehicle is set in hazard indicator and horn
mode when you first receive the vehicle.
In hazard indicator and horn mode, when the
LOCK
button is pushed, the hazard indi-
cator flashes twice and the horn chirps once.
When the UNLOCK
button is pushed, the
hazard indicator flashes once.
If hazard indicator and horn mode is not neces-
sary, you can switch to hazard indicator only
mode by following the switching procedure.
In hazard indicator only mode, when the LOCK
button is pushed, the hazard indicator
flashes twice. When the UNLOCK
button
is pushed, neither the hazard indicator nor the
horn operates.
(Switching procedure)
Push the LOCK
and UNLOCK
but-
tons on the keyfobsimultaneously for more than
2 seconds to switch from one mode to the other.
When pushing the buttons to set hazard indica-
tor only mode, the hazard indicator flashes 3
times.
When pushing the buttons to set hazard indica-
tor and horn mode, the hazard indicator flashes
SPA1260
Pre-driving checks and adjustments
3-7
�
07.2.9/Z33-D/V5.0
�
Page 120 of 311

WARNING
Do not drive with the rear hatch open.
This could allow dangerous exhaust
gases to be drawn into the vehicle. See
“Precautions when starting and driving”
in the “5. Starting and driving” section
for exhaust gas.
OPENER OPERATIONThe rear hatch release switch is located be-
tween the license plate lights.
To open the rear hatch, unlock it with one of the
following operations then push the release
switch:
�Push the UNLOCK
button on the key-
fobonce. (Pushing the HATCH/TRUNK
button on the keyfob can open the rear
hatch at once without pushing the release
switch.)
�Insert the key into the door key cylinder and
turn the door key counterclockwise once.�Push the power door lock switch to the
UNLOCK side.
The rear hatch employs a spring component
which enables you to lift up the hatch by one
hand. Because of this, sometimes the rear hatch
may clatter when the lock is released, but it is not
a malfunction.
To close, push the rear hatch down securely.
The rear hatch release switch is linked with the
driver side door lock. To open the rear hatch,
unlock the driver side door.
SPA1507
REAR HATCH (Coupe models)
Pre-driving checks and adjustments
3-9
�
07.2.9/Z33-D/V5.0
�
Page 121 of 311
 handle is located under the
s")
SECONDARY REAR HATCH
RELEASEThe secondary rear hatch release mechanism
allows opening the rear hatch in the event of
discharged battery or emergency.
The release (string) handle is located under the
strut tower bar inside the luggage compartment.
To open the rear hatch from the inside,
firmly pull the release handle to the direc-
tion shown above until the lock releases.
WARNING
�Do not drive with the trunk lid open.
This could allow dangerous exhaust
gases to be drawn into the vehicle.
See “Precautions when starting and
driving” in the “5. Starting and driv-
ing” section for exhaust gas.
�Closely supervise children when they
are around cars to prevent them from
playing and becoming locked in the
trunk where they could be seriously
injured. Keep the car locked, with the
trunk closed when not in use, and
prevent children’s access to car keys.
OPENER OPERATIONThe trunk lid release switch is located between
the license plate lights.
To open the trunk lid, unlock it with one of the
following operations then push the release
switch:
�Push the UNLOCK
button on the key-
fobonce. (Pushing the HATCH/TRUNK
button on the keyfob can open the
trunk lid at once without pushing the release
switch.)
�Insert the key into the door key cylinder and
turn it counterclockwise once.
SPA1556
SPA1685
TRUNK LID (Roadster models)
3-10
Pre-driving checks and adjustments
�
07.2.9/Z33-D/V5.0
�
Page 122 of 311
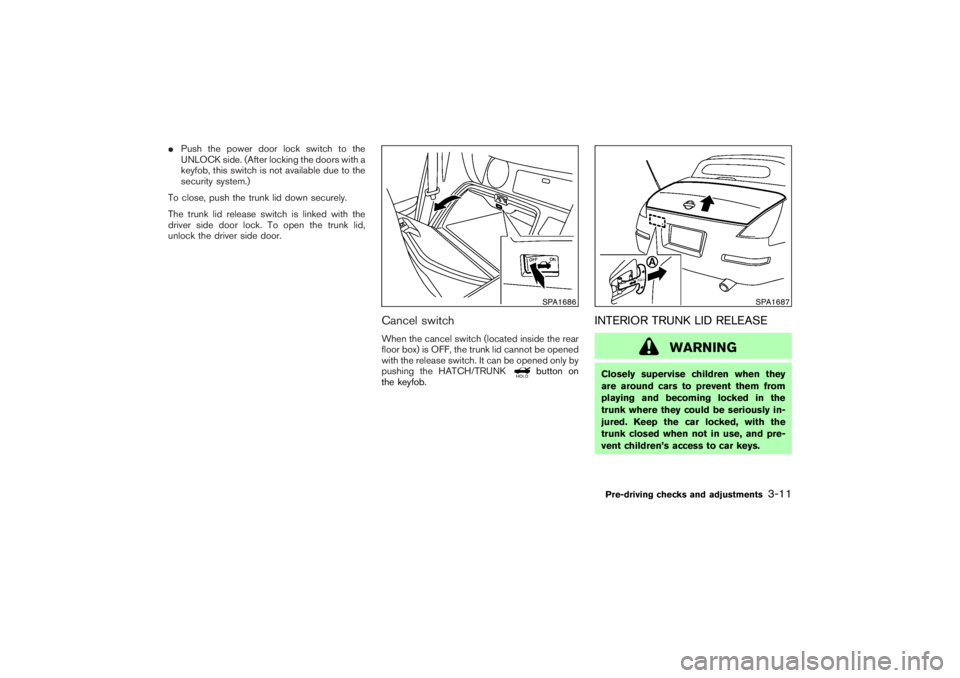
�Push the power door lock switch to the
UNLOCK side. (After locking the doors with a
keyfob, this switch is not available due to the
security system.)
To close, push the trunk lid down securely.
The trunk lid release switch is linked with the
driver side door lock. To open the trunk lid,
unlock the driver side door.
Cancel switchWhen the cancel switch (located inside the rear
floor box) is OFF, the trunk lid cannot be opened
with the release switch. It can be opened only by
pushing the HATCH/TRUNK
button on
the keyfob.
INTERIOR TRUNK LID RELEASE
WARNING
Closely supervise children when they
are around cars to prevent them from
playing and becoming locked in the
trunk where they could be seriously in-
jured. Keep the car locked, with the
trunk closed when not in use, and pre-
vent children’s access to car keys.
SPA1686
SPA1687
Pre-driving checks and adjustments
3-11
�
07.2.9/Z33-D/V5.0
�
Page 141 of 311

WARNING
�Do not disassemble or modify this
system. If you do, it may result in
accidents, fire, or electric shock.
�Do not use this system if you notice
any abnormality, such as a frozen
screen or lack of sound. Continued
use of the system may result in acci-
dent, fire or electric shock.
�In case you notice any foreign object
in the system hardware, spill liquid
on it, or notice smoke or smell com-
ing from it, stop using the system
immediately and contact a NISSAN
dealer. Ignoring such conditions may
lead to accidents, fire, or electric
shock.When you use this system, make sure the engine
is running.
If you use the system with the engine not
running (ignition ONor ACC) for a long
time, it will use up all the battery power,
and the engine will not start.
Reference symbols:
“ENTER”button
This is a button on the control panel.
“Display”key
This is a select key on the screen. By selecting
this key you can proceed to the next function.
NAMES OF THE COMPONENTS1. JOYSTICK and “ENTER” button
2. “INFO” button
3. “SETTING” button
4. “BACK” button
5. “
” brightness control button
For Navigation System control buttons (other
than above), refer to the separate Navigation
System Owner’s Manual.
SAA1289
SAFETY NOTE
CONTROL PANEL BUTTONS —
WITH NAVIGATION SYSTEM4-2
Display screen, heater, air conditioner and audio systems
�
07.2.9/Z33-D/V5.0
�
Page 142 of 311

HOW TO USE JOYSTICK AND
“ENTER” BUTTONChoose an item on the display using the joystick
and push the ENTER button for operation.HOW TO USE “BACK” BUTTONThis button has two functions.
To return to the previous screen:
When this button is pushed during setup, setup
will be canceled, and the screen will return to the
previous screen.
To finish the set-up:
When this button is pushed after setup is com-
pleted, the settings will be renewed as directed,
and the screen will return to the map.
INFO:
When the “BACK” button must be pushed, (for
example, after the setup is finished) instructions
are given in the operation procedure of each
section in this manual. If the “BACK” button is
pushed when not finished with the setup, the
setting will be canceled, and the screen will
return to the previous screen.
SETTING UP THE START-UP
SCREENWhen you turn the ignition key to the ACC
position, the SYSTEM START-UP warning is
displayed on the screen. Read the warning and
select the “OK” key then push the “ENTER”
button.
If you do not push the ENTER button, this
system will not proceed to the next step display.
To proceed to the next step, refer to the separate
Navigation System Owner’s Manual.
HOW TO USE “INFO” BUTTONWhen the “INFO” button is pushed, the “Main-
tenance” screen will be displayed.Maintenance informationTo set the maintenance interval for the Engine
Oil or Oil Filter, choose an item using the joystick
and push the “ENTER” button.
You can also set to display a message to remind
you that the maintenance needs to be per-
formed.
The following example shows how to set the
engine oil change interval. Use the same steps
SAA1290
Display screen, heater, air conditioner and audio systems
4-3
�
07.2.9/Z33-D/V5.0
�
Page 143 of 311
to set the other maintenance information.
1. Reset the driving distance to the new main-
tenance schedule.
2. Set the interval (mileage) of the maintenance
schedule. To determine the recommended
maintenance interval, refer to your “NISSAN
Service and Maintenance Guide”.
3. To display the MAINTENANCE INFORMA-
TION automatically when the set trip distance
is reached, highlight the “Interval Re-
minder” key with the joystick and push the
“ENTER” button.
4. To return the display to the “Maintenance”
screen, push the “BACK” button.“Maintenance” display cannot be operated
when the vehicle is moving. Stop the vehicle in a
safe place to see the information.
SAA1291
4-4
Display screen, heater, air conditioner and audio systems
�
07.2.9/Z33-D/V5.0
�
Page 145 of 311

Display settingsThe following menu will appear when pushing
the “SETTING” button, selecting “Display” key
and pushing the “ENTER” button.
Display:
To turn off the screen, select the “Display” key
and push the “ENTER” button to turn off the
“ON” indicator. When any mode button is
pushed with the screen off, the screen turns on
for further operation. The screen will turn off
automatically 5 seconds after the operation is
finished on the map display.
To turn on the screen, select the “Display” keyand turn on the “ON” indicator.
Brightness/Contrast:
To adjust the brightness and contrast of the
screen, select the “Brightness”or“Contrast”
key and push the “ENTER” button. Then you can
adjust the brightness to darker or brighter and
the contrast to lower or higher using the joystick.
Clock settingsThe following display will appear when pushing
the “SETTING” button, selecting the “Clock”
key and pushing the “ENTER” button.
On-screen Clock:
When this item is turned to ON, a clock is always
displayed in the upper right corner of the screen.
This clock will indicate the time almost exactly
because it is always adjusted by the GPS
system.
SAA1540
SAA1091
4-6
Display screen, heater, air conditioner and audio systems
�
07.2.9/Z33-D/V5.0
�
 of the maintenance
schedule. To determine the recommended
maint")