Page 162 of 311

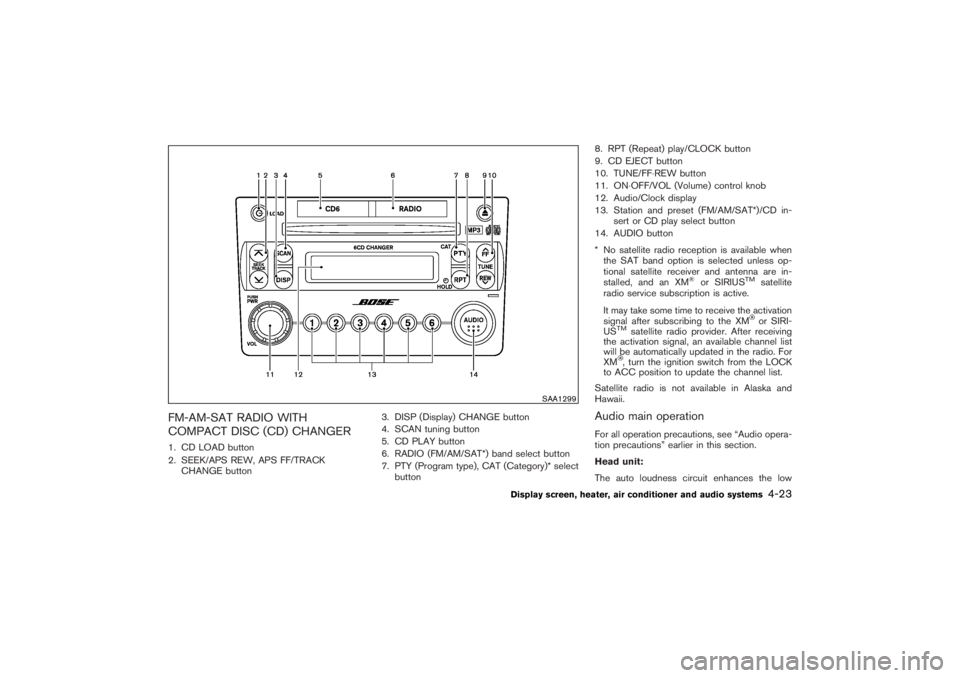
FM-AM-SAT RADIO WITH
COMPACT DISC (CD) CHANGER1. CD LOAD button
2. SEEK/APS REW, APS FF/TRACK
CHANGE button3. DISP (Display) CHANGE button
4. SCAN tuning button
5. CD PLAY button
6. RADIO (FM/AM/SAT*) band select button
7. PTY (Program type), CAT (Category)* select
button8. RPT (Repeat) play/CLOCK button
9. CD EJECT button
10. TUNE/FF⋅REW button
11. ON⋅OFF/VOL (Volume) control knob
12. Audio/Clock display
13. Station and preset (FM/AM/SAT*)/CD in-
sert or CD play select button
14. AUDIO button
* No satellite radio reception is available when
the SAT band option is selected unless op-
tional satellite receiver and antenna are in-
stalled, and an XM
®
or SIRIUS
TM
satellite
radio service subscription is active.
It may take some time to receive the activation
signal after subscribing to the XMor SIRI-
US
TM
satellite radio provider. After receiving
the activation signal, an available channel list
will be automatically updated in the radio. For
XM, turn the ignition switch from the LOCK
to ACC position to update the channel list.
Satellite radio is not available in Alaska and
Hawaii.
Audio main operationFor all operation precautions, see “Audio opera-
tion precautions” earlier in this section.
Head unit:
The auto loudness circuit enhances the low
SAA1299
Display screen, heater, air conditioner and audio systems
4-23
�
07.2.9/Z33-D/V5.0
�
Page 217 of 311

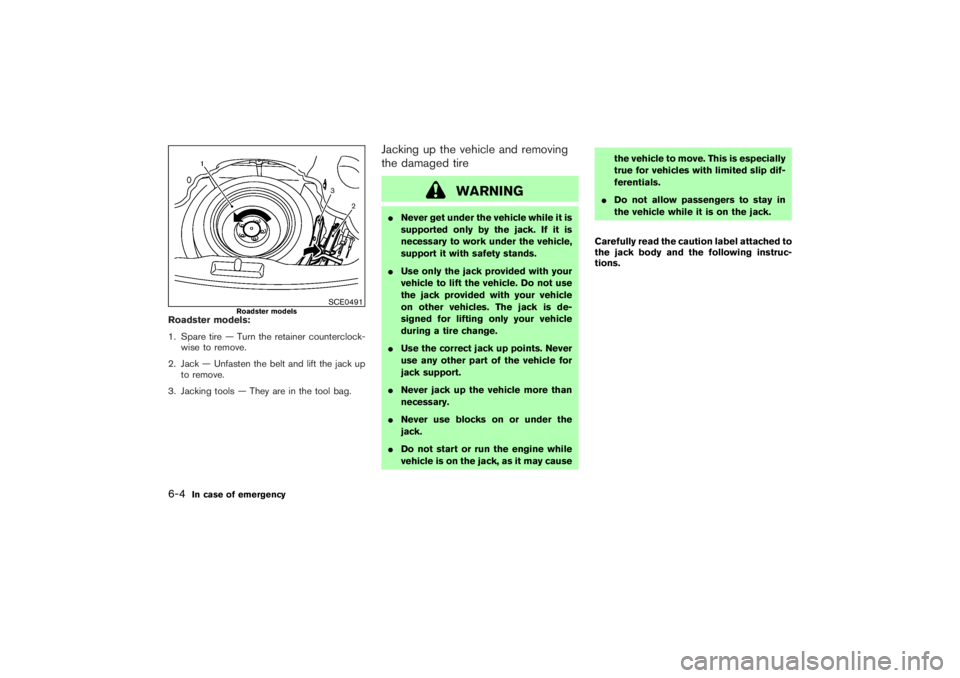
Roadster models:
1. Spare tire — Turn the retainer counterclock-
wise to remove.
2. Jack — Unfasten the belt and lift the jack up
to remove.
3. Jacking tools — They are in the tool bag.
Jacking up the vehicle and removing
the damaged tire
WARNING
�Never get under the vehicle while it is
supported only by the jack. If it is
necessary to work under the vehicle,
support it with safety stands.
�Use only the jack provided with your
vehicle to lift the vehicle. Do not use
the jack provided with your vehicle
on other vehicles. The jack is de-
signed for lifting only your vehicle
during a tire change.
�Use the correct jack up points. Never
use any other part of the vehicle for
jack support.
�Never jack up the vehicle more than
necessary.
�Never use blocks on or under the
jack.
�Do not start or run the engine while
vehicle is on the jack, as it may causethe vehicle to move. This is especially
true for vehicles with limited slip dif-
ferentials.
�Do not allow passengers to stay in
the vehicle while it is on the jack.
Carefully read the caution label attached to
the jack body and the following instruc-
tions.
SCE0491
Roadster models
6-4
In case of emergency
�
07.2.9/Z33-D/V5.0
�
Page 246 of 311

�Try to avoid direct skin contact with
used oil. If skin contact is made,
wash thoroughly with soap or hand
cleaner as soon as possible.
�Keep used engine oil out of reach of
children.
CAUTION
Be careful not to burn yourself, as the
engine oil is hot.
�Waste oil must be disposed of properly.
�Check your local regulations.
4. Loosen the oil filter with an oil filter wrench�2. Remove the oil filter by turning it by hand.
5. Wipe the engine oil filter mounting surface
with a clean rag.
Be sure to remove any old rubber gas-
ket remaining on the mounting surface
of the engine.
6. Coat the gasket on the new filter with clean
engine oil.
7. Screw in the oil filter clockwise until a slightresistance is felt, then tighten additionally
more than 2/3 turn.
Oil filter tightening torque:
11 to 15 ft-lb
(14.7 to 20.5 N⋅m)
8. Clean and re-install the drain plug and a new
washer. Securely tighten the drain plug with a
wrench.
Drain plug tightening torque:
22 to 29 ft-lb
(29 to 39 N⋅m)
Do not use excessive force.
9. Refill engine with recommended oil and in-
stall the cap securely.
CAUTION
The dipstick must be inserted in place to
prevent oil spillage from the dipstick
hole while filling the engine with oil.
See “Capacities and recommended fuel/
lubricants” in the “9. Technical and consumer
information” section for drain and refill capac-
ity. The drain and refill capacity depends on
the oil temperature and drain time. Use these
specifications for reference only. Always usethe dipstick to determine the proper amount
of oil in the engine.
10. Start the engine and check for leakage
around the drain plug and the oil filter.
Correct as required.
11. Turn the engine off and wait more than 10
minutes. Check the oil level with the dip-
stick. Add engine oil if necessary.
After the operation1. Install the engine undercover into position as
outlined in the following steps.
a. Pull the center of the small plastic clip out.
b. Hold the engine undercover into position.
c. Insert the clip through the undercover into the
hole in the frame, then push the center of the
clip in to lock the clip in place.
d. Install the other bolts that hold the under-
cover in place. Be careful not to strip the
bolts or over-tighten them.
2. Lower the vehicle carefully to the ground.
3. Dispose of waste oil and filter properly.
Maintenance and do-it-yourself
8-11
�
07.2.9/Z33-D/V5.0
�