Page 246 of 311

�Try to avoid direct skin contact with
used oil. If skin contact is made,
wash thoroughly with soap or hand
cleaner as soon as possible.
�Keep used engine oil out of reach of
children.
CAUTION
Be careful not to burn yourself, as the
engine oil is hot.
�Waste oil must be disposed of properly.
�Check your local regulations.
4. Loosen the oil filter with an oil filter wrench�2. Remove the oil filter by turning it by hand.
5. Wipe the engine oil filter mounting surface
with a clean rag.
Be sure to remove any old rubber gas-
ket remaining on the mounting surface
of the engine.
6. Coat the gasket on the new filter with clean
engine oil.
7. Screw in the oil filter clockwise until a slightresistance is felt, then tighten additionally
more than 2/3 turn.
Oil filter tightening torque:
11 to 15 ft-lb
(14.7 to 20.5 N⋅m)
8. Clean and re-install the drain plug and a new
washer. Securely tighten the drain plug with a
wrench.
Drain plug tightening torque:
22 to 29 ft-lb
(29 to 39 N⋅m)
Do not use excessive force.
9. Refill engine with recommended oil and in-
stall the cap securely.
CAUTION
The dipstick must be inserted in place to
prevent oil spillage from the dipstick
hole while filling the engine with oil.
See “Capacities and recommended fuel/
lubricants” in the “9. Technical and consumer
information” section for drain and refill capac-
ity. The drain and refill capacity depends on
the oil temperature and drain time. Use these
specifications for reference only. Always usethe dipstick to determine the proper amount
of oil in the engine.
10. Start the engine and check for leakage
around the drain plug and the oil filter.
Correct as required.
11. Turn the engine off and wait more than 10
minutes. Check the oil level with the dip-
stick. Add engine oil if necessary.
After the operation1. Install the engine undercover into position as
outlined in the following steps.
a. Pull the center of the small plastic clip out.
b. Hold the engine undercover into position.
c. Insert the clip through the undercover into the
hole in the frame, then push the center of the
clip in to lock the clip in place.
d. Install the other bolts that hold the under-
cover in place. Be careful not to strip the
bolts or over-tighten them.
2. Lower the vehicle carefully to the ground.
3. Dispose of waste oil and filter properly.
Maintenance and do-it-yourself
8-11
�
07.2.9/Z33-D/V5.0
�
Page 248 of 311

For additional brake and clutch fluid information,
refer to “Capacities and recommended fuel/
lubricants” in the “9. Technical and consumer
information” section of this manual.
WARNING
�Use only new fluid from a sealed
container. Old, inferior or contami-
nated fluid may damage the brake
and clutch systems. Do not add syn-
thetic brake fluid. The use of im-
proper fluids can damage the brake
system and affect the vehicle’s stop-
ping ability.
�Be sure to clean the filler cap before
removing.
CAUTION
Do not spill the fluid on any painted
surfaces. This will damage the paint. If
fluid is spilled, immediately wash the
surface with water.
BRAKE FLUIDCheck the fluid level in the reservoir. If the fluid is
below the MIN line
�2or the brake warning light
comes on, add Genuine NISSAN Super Heavy
Duty Brake Fluid or equivalentDOT 3fluid up to
the MAX line
�1. If fluid must be added fre-
quently, the system should be thoroughly
checked by a NISSAN dealer.
CLUTCH FLUIDCheck the fluid level in the reservoir. If the fluid
level is below the MIN line
�2, add Genuine
NISSAN Super Heavy Duty Brake Fluid or
equivalentDOT 3fluid up to the MAX line
�1.
If fluid is added frequently, the system should be
thoroughly checked by a NISSAN dealer.
SDI1923
SDI1906
BRAKE AND CLUTCH FLUID
Maintenance and do-it-yourself
8-13
�
07.2.9/Z33-D/V5.0
�
Page 249 of 311

Add fluid when the low washer fluid warning light
comes on.
Add a washer solvent to the washer fluid for
better cleaning. In the winter season, add a
windshield washer anti-freeze. Follow the manu-
facturer’s instructions for the mixture ratio.
Recommended fluid is Genuine NISSAN Wind-
shield Washer Concentrate Cleaner & Anti-
freeze or equivalent.
WARNING
Anti-freeze is poisonous and should be
stored carefully in marked containers
out of the reach of children.
CAUTION
�Do not substitute engine anti-freeze
coolant for window washer solution.
This may result in damage to the
paint.
�Do not fill the window washer reser-
voir tank with washer fluid concen-
trates at full strength. Some methyl
alcohol based washer fluid concen-
trates may permanently stain the
grille if spilled while filling the win-
dow washer reservoir tank.
�Pre-mix washer fluid concentrates
with water to the manufacturer’s rec-
ommended levels before pouring the
fluid into the window washer reser-
voir tank. Do not use the windowwasher reservoir tank to mix the
washer fluid concentrate and water.
SDI2053
WINDOW WASHER FLUID8-14
Maintenance and do-it-yourself
�
07.2.9/Z33-D/V5.0
�
Page 255 of 311

If necessary, clean the windshield washer
nozzle
�A
with a needle or small pin
�B.
*1: Only for passenger’s side wiper arm
*2: Adjustable washer nozzlesIf the brakes do not operate properly, have the
brakes checked by a NISSAN dealer.
SELF-ADJUSTING BRAKESYour vehicle is equipped with self-adjusting
brakes.
The disc-type brakes self-adjust every time the
brake pedal is applied.
WARNING
See a NISSAN dealer for a brake system
check if the brake pedal height does not
return to normal.BRAKE PAD WEAR INDICATORSThe disc brake pads on your vehicle have au-
dible wear indicators. When a brake pad re-
quires replacement, it will make a high pitched
scraping or screeching sound when the vehicle
is in motion whether or not the brake pedal is
depressed. Have the brakes checked as soon as
possible if the wear indicator sound is heard.
Under some driving or climate conditions, occa-
sional brake squeak, squeal or other noise may
be heard. Occasional brake noise during light to
moderate stops is normal and does not affectthe function or performance of the brake system.
Proper brake inspection intervals should
be followed.For additional information, see the
appropriate maintenance log shown in the
NISSAN Service and Maintenance Guide.
SDI1730A
BRAKES
8-20
Maintenance and do-it-yourself
�
07.2.9/Z33-D/V5.0
�
Page 256 of 311

Some vehicles are equipped with engine com-
partment and passenger compartment fuse
boxes that use only type
�A
fuses. Other ve-
hicles are equipped with type�A
fuses in the
engine compartment fuse box and type
�Bfuses
in the passenger compartment fuse box.
Type
�Afuses are provided as spare fuses. They
are stored in the passenger compartment fuse
box.
Type
�A
fuses can be installed in the engine
compartment and passenger compartment fuse
boxes.If a type
�A
fuse is used to replace a type
�B
fuse, the type
�A
fuse will not be level with the
fuse pocket as shown in the illustration. This will
not affect the performance of the fuse. Make
sure the fuse is installed in the fuse box securely.
Type
�B
fuses cannot be installed in the under-
hood fuse boxes. Only use type
�A
fuses in the
underhood fuse boxes.
ENGINE COMPARTMENT
CAUTION
Never use a fuse of a higher or lower
amperage rating than that specified on
the fuse box cover. This could damage
the electrical system or cause a fire.
If any electrical equipment does not operate,
check for an open fuse.
1. Be sure the ignition switch and headlight
switch are OFF.
SDI1751
SDI1752
SDI1479B
FUSES
Maintenance and do-it-yourself
8-21
�
07.2.9/Z33-D/V5.0
�
Page 258 of 311
PASSENGER COMPARTMENT
CAUTION
Never use a fuse of a higher or lower
amperage rating than that specified on
the fuse box cover. This could damage
the electrical system or cause a fire.
If any electrical equipment does not operate,
check for an open fuse.
1. Be sure the ignition switch and the headlight
switch are OFF.2. Open the fuse box lid
�1.
3. Pinch the fuse perpendicularly with the fuse
puller
�2
and pull it out.4. If the fuse is open
�A, replace it with a new
fuse
�B. Spare fuses
�3
are stored in the
fuse box.
5. If a new fuse also opens, have the electrical
system checked and repaired by a NISSAN
dealer.
SDI1962
SDI1754
Maintenance and do-it-yourself
8-23
�
07.2.9/Z33-D/V5.0
�
Page 260 of 311
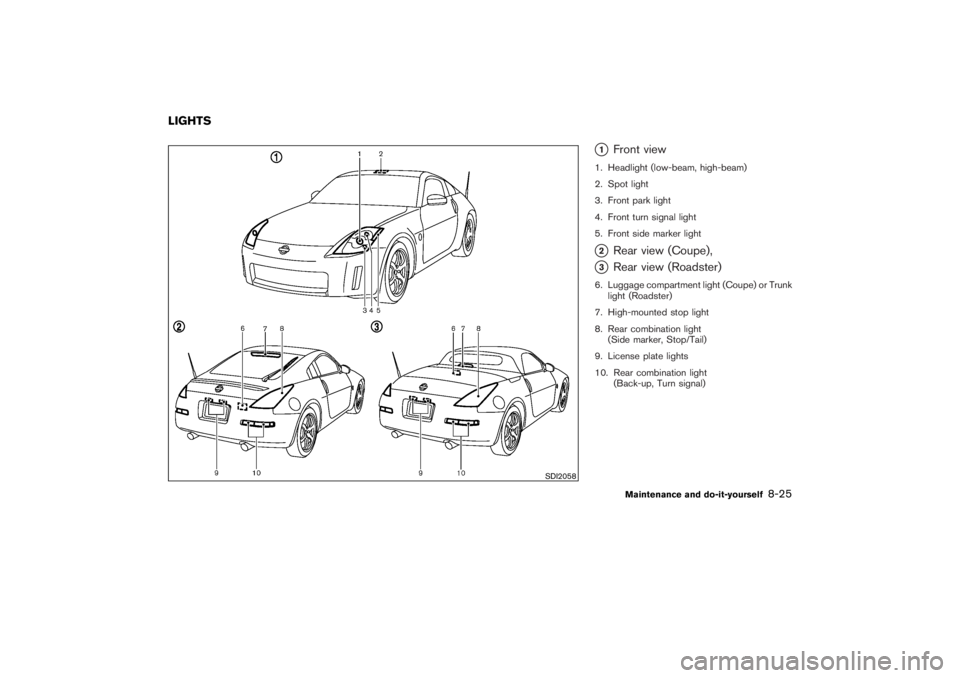
�1
Front view
1. Headlight (low-beam, high-beam)
2. Spot light
3. Front park light
4. Front turn signal light
5. Front side marker light�2
Rear view (Coupe),
�3
Rear view (Roadster)
6. Luggage compartment light (Coupe) or Trunk
light (Roadster)
7. High-mounted stop light
8. Rear combination light
(Side marker, Stop/Tail)
9. License plate lights
10. Rear combination light
(Back-up, Turn signal)
SDI2058
LIGHTS
Maintenance and do-it-yourself
8-25
�
07.2.9/Z33-D/V5.0
�
Page 261 of 311
HEADLIGHTS
ReplacingIf replacement is required, see a NISSAN dealer.
Xenon headlight bulb:
WARNINGHIGH VOLTAGE
When xenon headlights are on, they
produce a high voltage. To prevent an
electric shock, never attempt to modify
or disassemble. Always have your xe-
non headlights replaced at a NISSAN
dealer. For additional information, see
“Headlight and turn signal switch” in
the “2. Instruments and controls” sec-
tion.
CAUTION
Use the same number and wattage as
originally installed:
Bulb no. (Wattage)
D2S (35W) - Xenon low/high-beam
Fog may temporarily form inside the lens of the
exterior lights in the rain or in a car wash. A
temperature difference between the inside and
the outside of the lens causes the fog. This is not
a malfunction. If large drops of water collect
inside the lens, contact a NISSAN dealer.
8-26
Maintenance and do-it-yourself
�
07.2.9/Z33-D/V5.0
�