Page 384 of 473

383 Practical hints
Where will I find...?
1Collapsible wheel chock
2Vehicle jack
3Protective wrap
4Alignment bolt
5Towing eye bolt
6Wheel wrench
7Spare fuses, fuse extractor and valve
extractor
8Electric air pumpVehicles with TIREFIT*
1TIREFIT kit
2Vehicle jack
3Collapsible wheel chock
4Towing eye bolt
5Alignment bolt
6Wheel wrench
7Spare fuses, fuse extractor and valve
extractor
8Electric air pump
�Open the trunk (�page 100).
�Lift up trunk floor.Vehicle jack
Warning!G
The jack is designed exclusively for jacking
up the vehicle at the jack take-up brackets
built into both sides of the vehicle. To help
avoid personal injury, use the jack only to lift
the vehicle during a wheel change. Never
get beneath the vehicle while it is supported
by the jack. Keep hands and feet away from
the area under the lifted vehicle. Always
firmly set parking brake and block wheels
before raising vehicle with jack.
Do not disengage parking brake while the
vehicle is raised. Be certain that the jack is
always vertical (plumb line) when in use,
especially on hills. Always try to use the jack
on level surface. Make sure the jack arm is
fully seated in the jack take-up bracket. Al-
ways lower the vehicle onto sufficient
capacity jackstands before working under
the vehicle.
Page 386 of 473

385 Practical hints
Where will I find...?
�Tilt both plates upward1.
�Fold the lower plate outward2.
�Guide the tabs of the lower plate all the
way into the openings of the base
plate3.
For information on where to place wheel
chocks when changing a wheel, see
“Lifting the vehicle” (
�page 407).
Spare wheel with collapsible tire
The spare wheel is located in the storage
compartment underneath the trunk floor.
1Spare wheel, spare wheel bolts
(located under plastic cover on the
outside of spare wheel rim)
2Vehicle tool kit (under spare wheel)
3Retaining screw�Open the trunk (�page 100).
�Lift up trunk floor.
�Loosen retaining screw3by turning it
counterclockwise.
�Remove spare wheel1.
�Take off the wheel bolts for spare
wheel1.
Storing the spare wheel with
collapsible tire
If you wish to store the spare wheel after
use, carry out the following steps. Other-
wise the spare wheel will not fit the storage
compartment.
�Unscrew the valve cap from the valve
of the collapsible tire.
�Take the valve extractor from the vehi-
cle tool kit (
�page 382).
!Make sure the collapsible tire is dry when
storing it.
��
Page 387 of 473

386 Practical hints
Where will I find...?
�Unscrew the valve insert from the valve
and allow the air to escape.
�Screw the valve insert back into the
valve.
�Screw the valve cap back on the valve.
�Pull the protective wrap provided with
the vehicle tool kit over the spare
wheel.
�Store the spare wheel and the valve
extractor in the storage compartment
underneath the trunk floor.
�Pierce the protective wrap with retain-
ing screw3.
�Secure the spare wheel by turning
retaining screw3 clockwise.
For information on mounting the spare
wheel, see “Flat tire” (
�page 401).
Spare wheel bolts
1Wheel bolt for light alloy rims
2Wheel bolt for spare wheel with
collapsible tire (located under plastic
cover on the outside of spare wheel
rim)
iIt may take a few minutes for the collapsible
tire to deflate completely.
!Wheel bolts2 must be used when mount-
ing the spare wheel with collapsible tire. The use
of any wheel bolts other than wheel bolts2 for
the spare wheel with collapsible tire will physi-
cally damage the vehicle’s brakes.
��
Page 388 of 473
387 Practical hints
Unlocking/locking in an emergency
�Unlocking/locking in an emergency
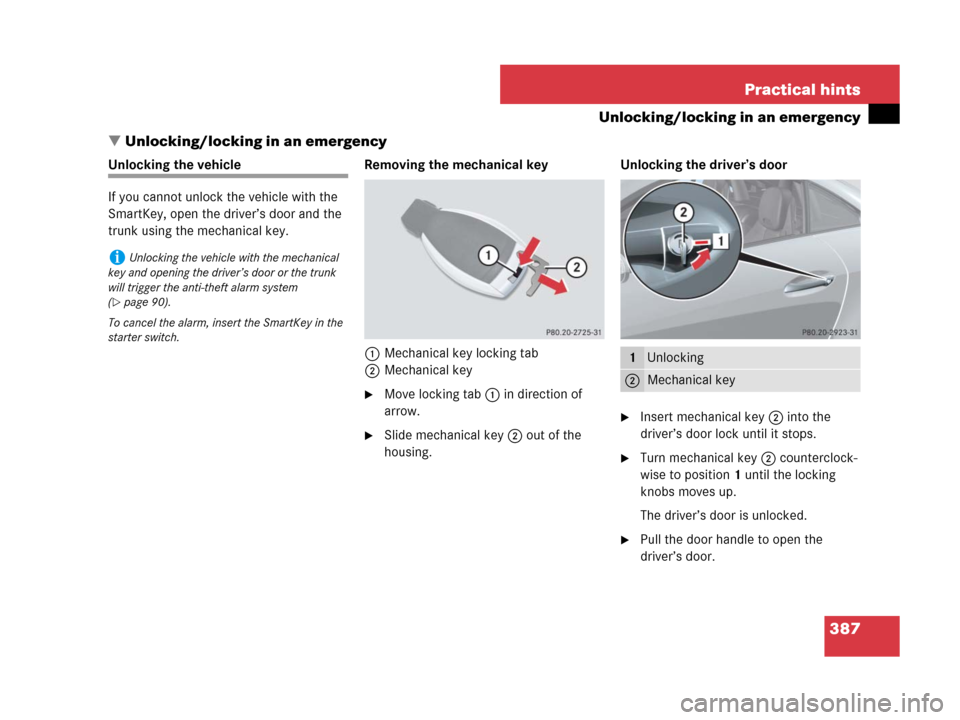
Unlocking the vehicle
If you cannot unlock the vehicle with the
SmartKey, open the driver’s door and the
trunk using the mechanical key. Removing the mechanical key
1Mechanical key locking tab
2Mechanical key
�Move locking tab1 in direction of
arrow.
�Slide mechanical key2 out of the
housing.Unlocking the driver’s door
�Insert mechanical key 2 into the
driver’s door lock until it stops.
�Turn mechanical key 2 counterclock-
wise to position1 until the locking
knobs moves up.
The driver’s door is unlocked.
�Pull the door handle to open the
driver’s door.
iUnlocking the vehicle with the mechanical
key and opening the driver’s door or the trunk
will trigger the anti-theft alarm system
(
�page 90).
To cancel the alarm, insert the SmartKey in the
starter switch.
1Unlocking
2Mechanical key
Page 389 of 473
388 Practical hints
Unlocking/locking in an emergency
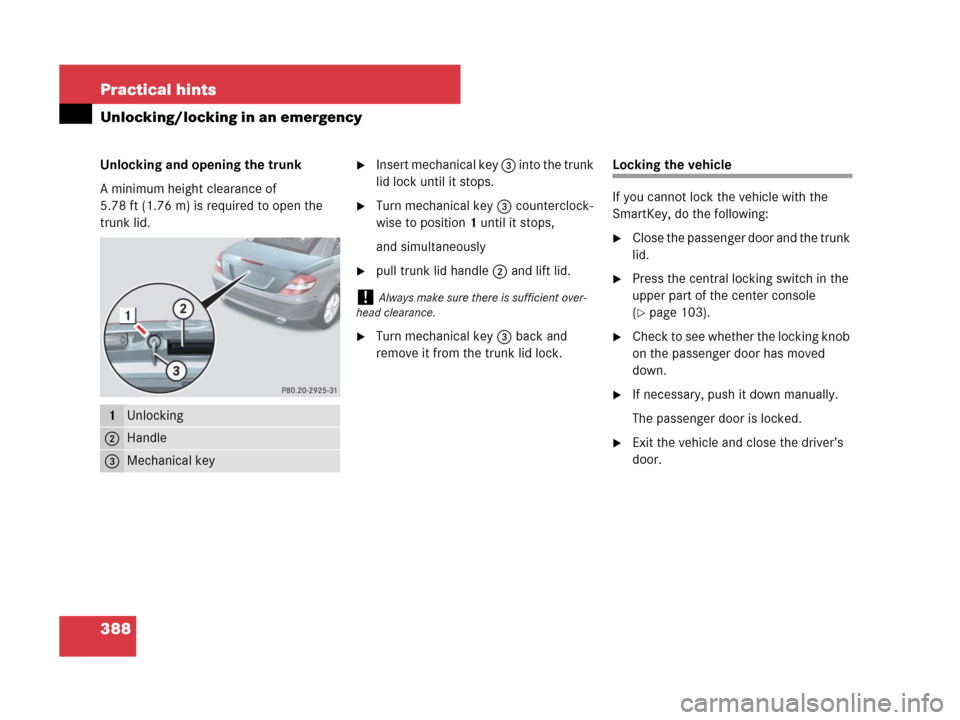
Unlocking and opening the trunk
A minimum height clearance of
5.78 ft (1.76 m) is required to open the
trunk lid.�Insert mechanical key 3 into the trunk
lid lock until it stops.
�Turn mechanical key 3 counterclock-
wise to position1 until it stops,
and simultaneously
�pull trunk lid handle 2 and lift lid.
�Turn mechanical key 3 back and
remove it from the trunk lid lock.
Locking the vehicle
If you cannot lock the vehicle with the
SmartKey, do the following:
�Close the passenger door and the trunk
lid.
�Press the central locking switch in the
upper part of the center console
(
�page 103).
�Check to see whether the locking knob
on the passenger door has moved
down.
�If necessary, push it down manually.
The passenger door is locked.
�Exit the vehicle and close the driver’s
door.
1Unlocking
2Handle
3Mechanical key
!Always make sure there is sufficient over-
head clearance.
Page 391 of 473

390 Practical hints
Opening/closing in an emergency
Raising retractable hardtop manually
Warning!G
If the retractable hardtop does not com-
pletely open or close, the roof hydraulics will
lose pressure and the retractable hardtop is
lowered
�after approximately 7 minutes when the
ignition is switched on
�after approximately 15 seconds when
the ignition is switched off
Shortly before the hardtop is lowered, a
warning will sound. In the multifunction dis-
play you will seeK and the message
Retractable roof being opened.
�Properly lock retractable hardtop before
continuing to drive (
�page 240).
Warning!G
Manually closing the retractable hardtop is a
complicated and technically demanding pro-
cedure and should only be performed by an
authorized Mercedes-Benz Center or quali-
fied technician. Attempting to manually
close the retractable hardtop may cause
damage to the retractable hardtop and/or
personal injury.
Warning!G
To prevent possible accidents, drive the
vehicle only with the retractable hardtop
either completely closed and locked, or fully
lowered into its storage compartment.
Page 392 of 473

391 Practical hints
Replacing SmartKey batteries
�Replacing SmartKey batteries
If the batteries in the SmartKey are
discharged, the vehicle can no longer be
locked or unlocked. It is recommended
to have the batteries replaced at an autho-
rized Mercedes-Benz Center.Batteries contain materials that can harm
the environment if disposed of improperly.
Recycling of batteries is the preferred
method of disposal. Many states require
sellers of batteries to accept old batteries
for recycling.SmartKey
Replacement batteries: Lithium, type
CR 2025 or equivalent.
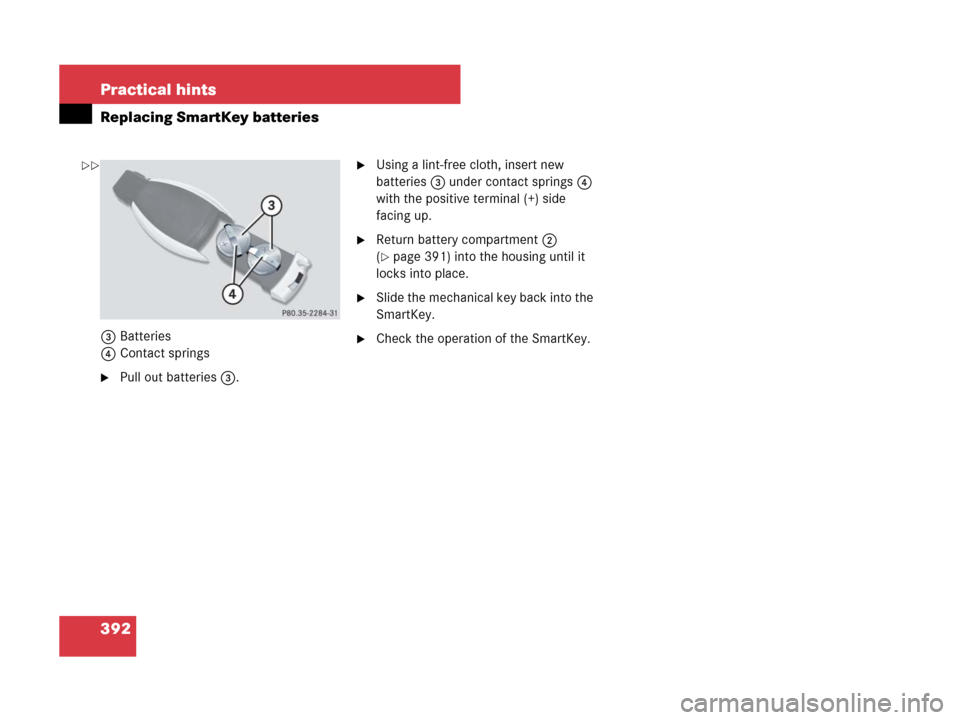
�Remove the mechanical key from the
SmartKey (
�page 387).
1Mechanical key
2Battery compartment
�Insert mechanical key1 into opening.
�Press mechanical key1 in direction of
arrow.
Battery compartment2 is unlatched.
�Pull battery compartment2 out of the
housing.
Warning!G
Batteries contain poisonous and corrosive
substances. Therefore keep the batteries
out of reach of children.
If a battery is swallowed, seek medical help
immediately.
iWhen inserting the batteries, make sure
they are clean and free of lint.
iWhen replacing batteries, always replace
both batteries.
The required replacement batteries are available
at any Mercedes-Benz Center.
��
Page 393 of 473
392 Practical hints
Replacing SmartKey batteries
3Batteries
4Contact springs
�Pull out batteries 3.
�Using a lint-free cloth, insert new
batteries3 under contact springs4
with the positive terminal (+) side
facing up.
�Return battery compartment2
(
�page 391) into the housing until it
locks into place.
�Slide the mechanical key back into the
SmartKey.
�Check the operation of the SmartKey.
��