Page 6 of 473

Contents
Automatic transmission* ................... 155
Gear selector lever ....................... 155
Shifting procedure ....................... 156
Gear selector lever positions ....... 157
Driving tips ................................... 159
Gear ranges ................................. 160
Automatic shift program .............. 161
Gear selector lever one-touch
gearshifting .................................. 162
Steering wheel gearshift control
one-touch gearshifting* ............... 163
Manual shift program* ................. 165
Emergency operation
(Limp-Home Mode) ...................... 167
Good visibility .................................... 168
Headlamp cleaning system* ........ 168
Rear view mirrors ......................... 168
Sun visors .................................... 170
Rear window defroster ................. 170Climate control ................................... 172
Switching climate control
system on/off ............................... 175
Setting the temperature................ 175
Adjusting air distribution............... 176
Adjusting air volume ..................... 177
Basic settings ............................... 177
Front defroster.............................. 177
Air recirculation mode .................. 178
Air conditioning............................. 180
Residual engine heat utilization .... 181
Automatic climate control* ................ 182
Deactivating the climate control
system .......................................... 185
Operating the climate control
system in automatic mode............ 186
Setting the temperature................ 186
Adjusting air distribution............... 187
Adjusting air volume ..................... 188
Front defroster.............................. 188
Maximum cooling MAX COOL ....... 189
Air recirculation mode .................. 189
Air conditioning............................. 191
Residual heat and ventilation ........ 192Audio system...................................... 193
Audio and telephone*, operation .. 193
Operating safety ........................... 193
Operating and display elements ... 194
Button and soft key operation ...... 196
Operation...................................... 196
Radio operation ............................ 199
Introduction to satellite radio*
(USA only) ..................................... 203
CD mode....................................... 208
GSM network phones ................... 219
TDMA or CDMA network phones .. 226
Emergency calls “911” ................. 233
Power windows .................................. 235
Opening and closing the windows 235
Synchronizing power windows ...... 239
Retractable hardtop ........................... 240
Opening and closing the
retractable hardtop ....................... 240
Wind screen* ................................ 246
Driving systems .................................. 247
Cruise control ............................... 247
Page 24 of 473
23 At a glance
Exterior view
ItemPage
1Trunk
Opening the trunk100
Closing the trunk100
Spare wheel385
Vehicle tool kit382
2Rear lamps393
3Rear window defroster170
4Fuel filler flap291
Refueling291
Gasoline446
5Doors
Locking and unlocking94
Opening99
Locking/unlocking in an
emergency387
ItemPage
6Towing421
Installing towing eye bolt422
7Tires and wheels304
Checking tire inflation
pressure314
Run Flat Indicator*315
General information304
Flat tire401
8Front lamps393
9Hood
Opening294
Engine oil296,
445
Coolant300,
448
ItemPage
aWindshield wipers56
Wiper blades, replacing399
Wiper blades, cleaning340
bWindshield
Cleaning with wiper fluid58
Cleaning340
cRetractable hardtop240
Opening/closing242
Wind screen246
Luggage cover241
dExterior rear view mirrors
Adjusting46
Auto-dimming rear view
mirrors*169
Page 31 of 473
30 At a glance
Center console
Lower partItemPage
1Automatic transmission*:
Gear selector lever155,
157
Manual transmission:
Gearshift lever153
2Retractable hardtop switch240
3Tow-away alarm
deactivation switch91
4Parking brake lever53, 59
5Storage/telephone*
compartment252
Telephone* compartment
(depending on vehicle
production date)253
ItemPage
6Passenger-side exterior rear
view mirror button46,
168
7Driver’s side exterior rear
view mirror button46,
168
8Exterior rear view mirror
adjustment button46
9Automatic transmission*:
Program mode selector
switch161
Page 32 of 473
31 At a glance
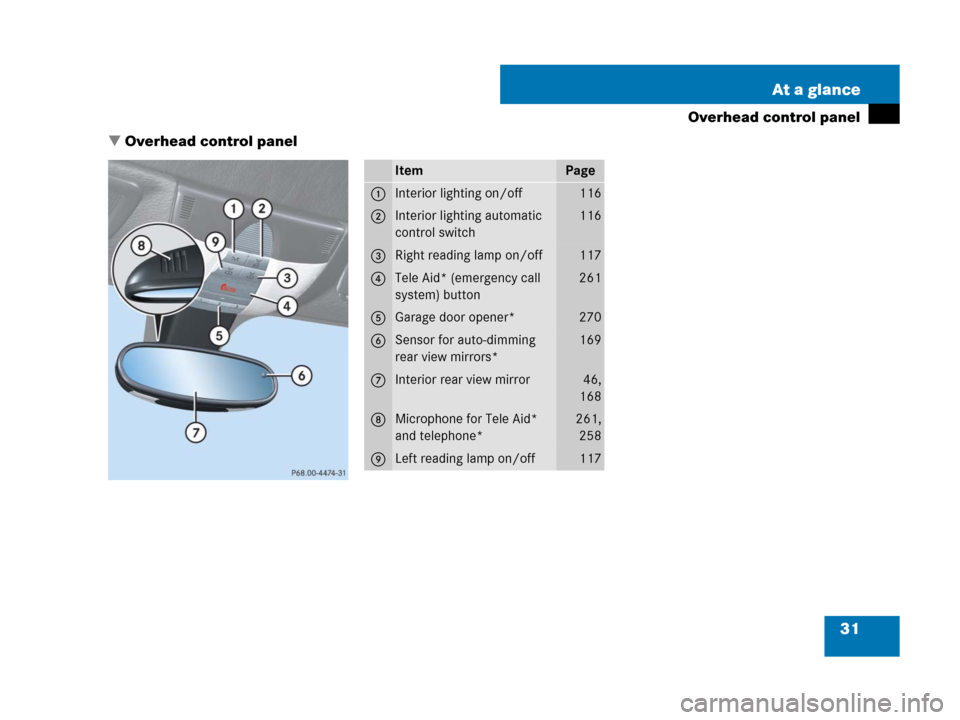
Overhead control panel
�Overhead control panel
ItemPage
1Interior lighting on/off116
2Interior lighting automatic
control switch116
3Right reading lamp on/off117
4Tele Aid* (emergency call
system) button261
5Garage door opener*270
6Sensor for auto-dimming
rear view mirrors*169
7Interior rear view mirror46,
168
8Microphone for Tele Aid*
and telephone*261,
258
9Left reading lamp on/off117
Page 40 of 473

39 Getting started
Adjusting
�Adjusting
Seats
The seats can be adjusted either manually
or electrically, depending on the vehicle’s
equipment.
Warning!G
All seat, head restraint, steering wheel, and
rear view mirror adjustments, as well as fas-
tening of seat belts, must be done before
the vehicle is put into motion.
Warning!G
Do not adjust the driver seat while driving.
Adjusting the seat while driving could cause
the driver to lose control of the vehicle.
Never ride in a moving vehicle with the seat
back in an excessively reclined position as
this can be dangerous. You could slide un-
der the seat belt in a collision. If you slide
under it, the seat belt would apply force at
the abdomen or neck. That could cause se-
rious or fatal injuries. The seat backrest and
seat belts provide the best restraint when
the wearer is in a position that is as upright
as possible and seat belts are properly posi-
tioned on the body.
Your seat must be adjusted so that you can
correctly fasten your seat belt (
�page 48).
Observe the following points:
�Adjust the seat backrest until your arms
are slightly angled when holding the
steering wheel.
�Adjust the seat to a comfortable seating
position that still allows you to reach the
accelerator/brake pedal safely.
The position should be as far back as
possible with the driver still able to
operate the controls properly.
�Adjust head restraint so that it is as
close to the head as possible and the
center of the head restraint supports
the back of the head at eye level.
�Never place hands under the seat or
near any moving parts while a seat is
being adjusted.
Failure to do so could result in result in an
accident and/or serious personal injury.
Page 43 of 473

42 Getting started
Adjusting
Seat fore and aft adjustment
�Press the horizontal switch forward or
backward in direction of arrows1.
Seat height
�Press the horizontal switch up or down
in direction of arrows2 and adjust the
seat height until your legs are slightly
supported.
Seat backrest tilt
�Press the vertical switch forward or
backward in direction of arrows3.
Seat cushion tilt
�Press the horizontal switch up or down
in direction of arrows4 until your
upper legs are lightly supported.Head restraint height
Head restraint
�Adjust the height of head restraints
manually by pulling them upwards or
pushing them downwards.
iThe memory function* (�page 107) lets
you store the settings for power seats*, steering
wheel adjustment (electrical)*, and exterior rear
view mirrors.
Warning!G
For your protection, drive only with properly
positioned head restraints.
Adjust head restraint so that the head
restraint supports the back of the head at
eye level. This will reduce the potential for
injury to the head and neck in the event of
an accident or similar situation.
Do not drive the vehicle without the seat
head restraints. Head restraints are in-
tended to help reduce injuries during an
accident.
iAdjust the head restraint in such a way that
it is as close to the head as possible.
Page 45 of 473

44 Getting started
Adjusting
Steering wheel adjustment, electrical*
The steering wheel adjustment stalk is
located on the lower left of the steering
column.
1Adjusting steering wheel, in or out
2Adjusting steering wheel, up or down
�Switch on the ignition (�page 37).
or
�Open the driver’s door.Adjusting steering wheel in or out
�Move stalk forward or back in direction
of arrows1 until a comfortable steer-
ing wheel position is reached with your
arms slightly bent at the elbow.
Adjusting steering wheel up or down
�Move the stalk up or down in direction
of arrows2.Easy-entry/exit feature*
This feature allows for easier entry into and
exit from the vehicle. When entering and
exiting the vehicle, the steering wheel is in
its uppermost position.
The easy-entry/exit feature can be activat-
ed or deactivated in the
Convenience
submenu of the control system
(
�page 147).
iThe memory function* (�page 107) lets
you store the settings for the steering wheel to-
gether with the settings for the exterior rear view
mirrors and the driver’s seat position.
Page 47 of 473

46 Getting started
Adjusting
Mirrors
Adjust the interior and exterior rear view
mirrors before driving so that you have a
good view of the road and traffic condi-
tions.
Interior rear view mirror
�Adjust the interior rear view mirror
manually.
For more information, see “Rear view
mirrors” (
�page 168).Exterior rear view mirrors
Warning!G
Let the system complete the adjustment
procedure before setting the vehicle in mo-
tion. All steering wheel adjustment must be
completed before setting the vehicle in mo-
tion. Driving off with the steering wheel still
adjusting could cause the driver to lose con-
trol of the vehicle.Warning!G
Exercise care when using the passen-
ger-side exterior rear view mirror. The mirror
surface is convex (outwardly curved surface
for a wider field of view). Objects in mirror
are closer than they appear. Check your in-
terior rear view mirror or glance over your
shoulder before changing lanes.
!If an exterior rear view mirror housing is
forcibly pushed forward (hit from the rear) or
rearward (hit from the front), reposition it by
applying firm pressure until it snaps into place.
The exterior rear view mirror housing is now
properly positioned and you can adjust the
mirror in the usual manner.