Page 377 of 473

376 Practical hints
What to do if …
Display symbolDisplay messagePossible cause/consequencePossible solution
.Brake-/tail lamp
leftThe left brake lamp is malfunction-
ing. This message will only appear if
a critical number of LEDs have
stopped working.�Contact an authorized Mercedes-Benz
Center as soon as possible.
Brake-/tail lamp
rightThe right brake lamp is malfunction-
ing. This message will only appear if
a critical number of LEDs have
stopped working.�Contact an authorized Mercedes-Benz
Center as soon as possible.
Front foglamp
leftThe left front fog lamp is malfunc-
tioning.�Contact an authorized Mercedes-Benz
Center as soon as possible.
Front foglamp
rightThe right front foglamp is malfunc-
tioning.�Contact an authorized Mercedes-Benz
Center as soon as possible.
Rear foglamp
Auxiliary bulb onThe rear fog lamp on the driver’s
side is malfunctioning. A backup
bulb has been brought into use.�Replace the bulb as soon as
possible (
�page 393).
High beam
leftThe left high beam lamp (halogen
headlamps)/high beam flasher
lamp (Bi-Xenon* headlamps) is
malfunctioning.�Replace the bulb as soon as
possible (
�page 393).
Page 384 of 473

383 Practical hints
Where will I find...?
1Collapsible wheel chock
2Vehicle jack
3Protective wrap
4Alignment bolt
5Towing eye bolt
6Wheel wrench
7Spare fuses, fuse extractor and valve
extractor
8Electric air pumpVehicles with TIREFIT*
1TIREFIT kit
2Vehicle jack
3Collapsible wheel chock
4Towing eye bolt
5Alignment bolt
6Wheel wrench
7Spare fuses, fuse extractor and valve
extractor
8Electric air pump
�Open the trunk (�page 100).
�Lift up trunk floor.Vehicle jack
Warning!G
The jack is designed exclusively for jacking
up the vehicle at the jack take-up brackets
built into both sides of the vehicle. To help
avoid personal injury, use the jack only to lift
the vehicle during a wheel change. Never
get beneath the vehicle while it is supported
by the jack. Keep hands and feet away from
the area under the lifted vehicle. Always
firmly set parking brake and block wheels
before raising vehicle with jack.
Do not disengage parking brake while the
vehicle is raised. Be certain that the jack is
always vertical (plumb line) when in use,
especially on hills. Always try to use the jack
on level surface. Make sure the jack arm is
fully seated in the jack take-up bracket. Al-
ways lower the vehicle onto sufficient
capacity jackstands before working under
the vehicle.
Page 387 of 473

386 Practical hints
Where will I find...?
�Unscrew the valve insert from the valve
and allow the air to escape.
�Screw the valve insert back into the
valve.
�Screw the valve cap back on the valve.
�Pull the protective wrap provided with
the vehicle tool kit over the spare
wheel.
�Store the spare wheel and the valve
extractor in the storage compartment
underneath the trunk floor.
�Pierce the protective wrap with retain-
ing screw3.
�Secure the spare wheel by turning
retaining screw3 clockwise.
For information on mounting the spare
wheel, see “Flat tire” (
�page 401).
Spare wheel bolts
1Wheel bolt for light alloy rims
2Wheel bolt for spare wheel with
collapsible tire (located under plastic
cover on the outside of spare wheel
rim)
iIt may take a few minutes for the collapsible
tire to deflate completely.
!Wheel bolts2 must be used when mount-
ing the spare wheel with collapsible tire. The use
of any wheel bolts other than wheel bolts2 for
the spare wheel with collapsible tire will physi-
cally damage the vehicle’s brakes.
��
Page 396 of 473

395 Practical hints
Replacing bulbs
Rear lamps Notes on bulb replacement
�Only use 12-volt bulbs of the same type
and with the specified watt rating.
�Switch the lights off before replacing a
bulb to prevent short circuits.
�Always use a clean lint-free cloth when
handling bulbs.
�Your hands should be dry and free of oil
and grease.
�If the newly installed bulb does not
come on, contact an authorized
Mercedes-Benz Center.Have the LEDs and bulbs for the following
lamps replaced by an authorized
Mercedes-Benz Center:
�Additional turn signal lamps in the
exterior rear view mirrors
�Bi-Xenon* lamps
�Front fog lamps
�High mounted brake lamp
�Brake lamps
�Front and rear side marker lamps
�Parking/standing lamps in the tail
lamp assemblies
LampType
8Rear fog lamp (driver’s
side only)P21W
9High mounted brake
lampLED
aTail, parking, standing,
side marker lamp and
brake lampLED
bLicense plate lampsC5W
cBackup lampP21W
dTurn signal lampPY 21 W
!Do not replace the LEDs yourself. You could
otherwise damage the LEDs or parts of the
vehicle. Only have the LEDs replaced by an
authorized Mercedes-Benz Center.
Page 402 of 473

401 Practical hints
Flat tire
�Flat tire
The SLK 55 AMG with Performance
Package* is equipped with a TIREFIT kit.
Preparing the vehicle
�Park the vehicle in a safe distance from
moving traffic on a hard, flat surface
when possible.
�Turn on the hazard warning flashers.
�Turn the steering wheel so that the
front wheels are in a straight ahead
position.
�Set the parking brake (�page 53).
�Move the gear selector lever* toP
(manual transmission to first or reverse
gear).
�Turn off the engine (�page 61).
�Remove the SmartKey from the starter
switch.
�Have any passenger exit the vehicle at
a safe distance from the roadway.
Sealing tires with TIREFIT
Small tire punctures, particularly those in
the tread, can be sealed with TIREFIT.
TIREFIT can be used in ambient tempera-
tures down to -4°F (-20°C).
�Foreign objects (e.g. screws or nails)
should not be removed from the tire.
�Take TIREFIT, the sticker, and the
electric air pump out of the trunk
(
�page 382).
iOpen door only when conditions are safe to
do so.
iSLK 55 AMG with Performance Package*
only.
Warning!G
Keep TIREFIT away from sparks, open flame
or heat source.
Do not smoke.
Warning!G
TIREFIT is a limited repair device. TIREFIT
cannot be used for cuts or punctures larger
than approximately 0.16 in (4 mm) and tire
damage caused by driving with extremely
low tire inflation pressure, or on a flat tire, or
a damaged wheel.
Do not drive the vehicle under such circum-
stances.
Contact the nearest Mercedes-Benz Center
for assistance or call Roadside Assistance.
��
Page 409 of 473
.
The jack t")
408 Practical hints
Flat tire
1Wheel wrench
�On wheel to be changed, loosen but do
not yet remove the wheel bolts in direc-
tion of arrow (approximately one full
turn with wheel wrench1).
The jack take-up brackets are located di-
rectly behind the front wheel housings and
in front of the rear wheel housings.2Jack
3Take-up bracket�Place jack2 on firm ground.
�Position jack2 under take-up
bracket3 so that it is always vertical
(plumb-line) as seen from the side,
even if the vehicle is parked on an
incline.
Warning!G
The jack is designed exclusively for jacking
up the vehicle at the jack take-up brackets
built into either side of the vehicle. To help
avoid personal injury, use the jack only to lift
the vehicle during a wheel change. Never
get beneath the vehicle while it is supported
by the jack. Keep hands and feet away from
the area under the lifted vehicle. Always
firmly set parking brake and block wheels
before raising vehicle with jack.
Do not disengage parking brake while the
vehicle is raised. Be certain that the jack is
always vertical (plumb line) when in use, es-
pecially on hills. Always try to use the jack
on level surface. Be sure the jack arm is fully
seated in the jack take-up bracket. Always
lower the vehicle onto sufficient capacity
jackstands before working under the
vehicle.
Warning!G
Position the jack only on the jack take-up
brackets designed for this purpose.
If the jack is not properly positioned, the
vehicle may fall off of the jack.
Page 411 of 473
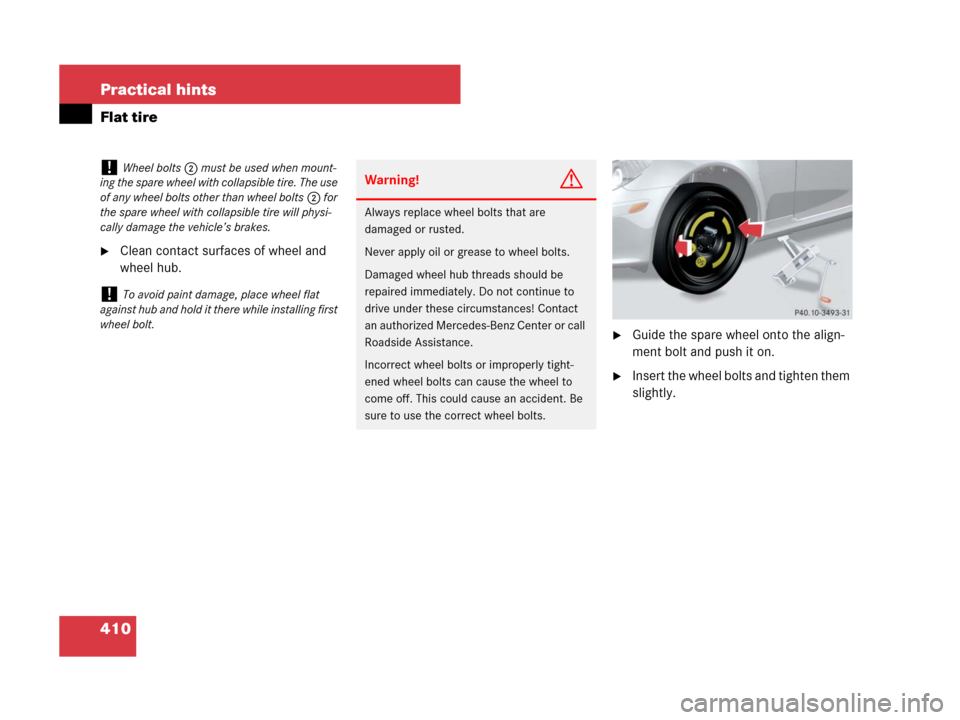
410 Practical hints
Flat tire
�Clean contact surfaces of wheel and
wheel hub.
�Guide the spare wheel onto the align-
ment bolt and push it on.
�Insert the wheel bolts and tighten them
slightly.
!Wheel bolts2 must be used when mount-
ing the spare wheel with collapsible tire. The use
of any wheel bolts other than wheel bolts2 for
the spare wheel with collapsible tire will physi-
cally damage the vehicle’s brakes.
!To avoid paint damage, place wheel flat
against hub and hold it there while installing first
wheel bolt.
Warning!G
Always replace wheel bolts that are
damaged or rusted.
Never apply oil or grease to wheel bolts.
Damaged wheel hub threads should be
repaired immediately. Do not continue to
drive under these circumstances! Contact
an authorized Mercedes-Benz Center or call
Roadside Assistance.
Incorrect wheel bolts or improperly tight-
ened wheel bolts can cause the wheel to
come off. This could cause an accident. Be
sure to use the correct wheel bolts.
Page 417 of 473
.
�Make sure the gear selector lever* is
set to positionP (manual transmission
to Neutral).")
416 Practical hints
Battery
Disconnecting the battery
1Water tray
2Lock
�Apply the parking brake (�page 59).
�Make sure the gear selector lever* is
set to positionP (manual transmission
to Neutral).
�Turn off all electrical consumers.
�Remove the SmartKey from the starter
switch.
�Open the hood (�page 294).
�Turn locks2 one quarter turn.
�Remove water tray1.
�Read and observe safety instructions
and precautions (
�page 303) and
(
�page 415).
�Use a 10 mm open-end wrench to dis-
connect the negative lead from battery
negative terminal3 (
�page 415).
�Remove the cover from battery positive
terminal 2 (
�page 415).
�Use a 10 mm open-end wrench to dis-
connect the positive lead from battery
positive terminal2 (
�page 415).
Warning!G
With a disconnected battery
�you will no longer be able to turn the
SmartKey in the starter switch
�automatic transmission*: the gear se-
lector lever will remain locked in
positionP
!Always disconnect the battery in the order
described below. Otherwise the vehicle’s
electronics can be damaged.