Page 296 of 473

295 Operation
Engine compartment
�Pull hood lock release lever1 in direc-
tion of arrow.
The hood is unlocked.
2Lever for opening the hood
�Push lever2 on the hood upward to
release hood.
�With the hood released, lift the hood by
lifting it at the front edge.
The hood will be automatically held
open at shoulder height by gas-filled
struts.
Closing�Let the hood drop from a height of
approximately 1 ft (30 cm).
The hood will lock audibly.
�Check to make sure the hood is fully
closed.
If you can raise the hood at a point
above the headlamps, then it is not
properly closed. Open it again and let it
drop with somewhat greater force.!To avoid damage to the windshield wipers or
hood, never open the hood if the wiper arms are
folded forward away from the windshield.
Warning!G
When closing the hood, use extreme caution
not to catch hand or fingers. Be careful that
you do not close the hood on anyone.
Make sure the hood is securely engaged be-
fore driving. Do not continue driving if the
hood can no longer engage after an accident
for example. The hood could otherwise
come loose while the vehicle is in motion
and injure you and/or others.
Page 299 of 473

298 Operation
Engine compartment
If there is excess engine oil with the engine
at normal operating temperature, the
following message will appear:
Engine oil level
Reduce oil level
�Have excess oil siphoned or drained
off. Contact an authorized
Mercedes-Benz Center.
For more information on messages in the
display concerning engine oil, see the
“Practical hints” section (
�page 356).Checking engine oil level with the oil
dipstick (SLK 280, SLK 350 only)
When checking the oil level
�the vehicle must be parked on level
ground.
�with the engine at operating tempera-
ture, the vehicle must have been
stationary for at least 5 minutes with
the engine turned off.
�with the engine not at operating tem-
perature, the vehicle must have been
stationary for at least 30 minutes with
the engine turned off.1Oil dipstick
2Upper (max) mark
3Lower (min) mark
To check the engine oil level with the oil
dipstick, do the following:
�Open the hood (�page 294).
�Pull out oil dipstick1.
�Wipe oil dipstick1 clean.
�Fully insert oil dipstick1 into the
dipstick guide tube.
!Excess oil must be siphoned or drained off.
It could cause damage to the engine and
catalytic converter not covered by the
Mercedes-Benz Limited Warranty.
Page 301 of 473

300 Operation
Engine compartment
�Unscrew filler cap1 from filler neck.
�Add engine oil as required.
Be careful not to overfill with oil.
Be careful not to spill any oil when adding.
Avoid environmental damage caused by oil
entering the ground or water.
�Screw filler cap1 back on filler neck.
For more information on engine oil, see
“Technical data” (
�page 443) and
(
�page 445).
Transmission fluid level*
Vehicles with automatic transmission*:
The transmission fluid level does not need
to be checked. If you notice transmission
fluid loss or gear shifting malfunctions,
have an authorized Mercedes-Benz Center
check the transmission.Coolant level
The engine coolant is a mixture of water
and anticorrosion/antifreeze. To check
the coolant level, the vehicle must be
parked on level ground and the engine
must be cool.
!Excess oil must be siphoned or drained off.
It could cause damage to the engine and
emission control system not covered by the
Mercedes-Benz Limited Warranty.Warning!G
In order to avoid any potentially serious
burns:
�Use extreme caution when opening the
hood if there are any signs of steam or
coolant leaking from the cooling system,
or if the coolant temperature gauge indi-
cates that the coolant is overheated.
�Do not remove pressure cap on coolant
reservoir if coolant temperature is
above 158°F (70°C). Allow engine to
cool down before removing cap. The
coolant reservoir contains hot fluid and
is under pressure.
Page 341 of 473

340 Operation
Vehicle care
Ornamental moldings
For regular cleaning and care of very dirty
chrome-plated parts, use a chrome clean-
er.Headlamps, tail lamps, side makers,
turn signal lenses
�Use a mild car wash detergent, such as
Mercedes-Benz approved Car
Shampoo, with plenty of water.Cleaning the windows and the wiper
blades
�Make sure the hood is fully closed.
�Switch on the ignition (�page 37).
�Turn combination switch to wiper
settingII (
�page 56).
�With wiper arms in vertical position,
switch off the ignition (
�page 37).
iAfter running the vehicle through an
automatic car wash, wipe any wax off of the
windshield (
�page 340). This will prevent
smears and reduce wiping noise which can be
caused by residual wax on the windshield.
When leaving the car wash, make sure that the
mirrors are folded out. Otherwise they may
vibrate.
!Do not use chrome cleaner on ornamental
moldings. Although ornamental moldings may
have chrome appearance, they could be made of
anodized aluminum that will be damaged when
cleaned with chrome cleaner. Instead, use a
damp cloth to clean those ornamental moldings.
For very dirty ornamental moldings of which
you are sure are chrome-plated, use a chrome
cleaner. If in doubt whether an ornamental mold-
ing is chrome-plated, contact an authorized
Mercedes-Benz Center.
!Only use window cleaners that are suitable
for plastic lamp lenses. Window cleaning solu-
tions which are not suitable may damage the
plastic lamp lenses of the headlamps. Therefore,
do not use abrasives, solvents or cleaners that
contain solvents.
Never apply strong force and use only a soft,
non-scratchy cloth when cleaning the lenses. Do
not attempt to wipe dirty lenses with a dry cloth
or sponge.
Otherwise you may scratch or damage the lens
surface.
!The windshield wipers must be in a vertical
position before folding them away from the wind-
shield. They could otherwise damage the hood.
Never open the hood when the wiper arms are
folded forward.
Warning!G
For safety reasons, switch off wipers and
remove SmartKey from starter switch be-
fore cleaning the windshield and/or the wip-
er blades. Otherwise, the wiper motor could
suddenly turn on and cause injury.
Page 370 of 473
.
Display symbolDisplay messagePossible")
369 Practical hints
What to do if …
During severe operating conditions, e.g.
stop-and-go traffic, the coolant tempera-
ture may rise close to 248°F (120°C).
Display symbolDisplay messagePossible cause/consequencePossible solution
�Observe the coolant temperature display
(
�page 127).
If the temperature rises again:
�Contact an authorized Mercedes-Benz
Center immediately.
Warning!G
Driving when your engine is overheated can
cause some fluids which may have leaked
into the engine compartment to catch fire.
You could be seriously burned.
Steam from an overheated engine can cause
serious burns and can occur just by opening
the hood. Stay away from the engine if you
see or hear steam coming from it.
Turn off the engine, get out of the vehicle
and do not stand near the vehicle until the
engine has cooled down.
!The engine should not be operated with the
coolant temperature above 248°F (120°C).
Doing so may cause serious engine damage
which is not covered by the Mercedes-Benz
Limited Warranty.
Page 376 of 473

375 Practical hints
What to do if …
Display symbolDisplay messagePossible cause/consequencePossible solution
OYou are driving with the hood open.Risk of accident!
�Stop the vehicle in a safe location or as soon
as it is safe to do so.
�Apply the parking brake (�page 59).
�Close the hood (�page 294).
IPlease
get a new keyThe SmartKey is malfunctioning.�Contact an authorized Mercedes-Benz
Center.
Remove keyYou have forgotten to remove the
SmartKey from the starter switch.�Remove the SmartKey from the starter
switch.
.3rd brake lampThe high mounted brake lamp is
malfunctioning. This message will
only appear if a critical number of
LEDs have stopped working.�Contact an authorized Mercedes-Benz
Center as soon as possible.
AUTO-Light
inoperativeThe light sensor is malfunctioning.
The headlamps switch on automati-
cally.�Contact an authorized Mercedes-Benz
Center as soon as possible.
To switch off the headlamps (U.S. vehicles only):
�In the control system, set lamp operation to
manual mode (
�page 143).
�Switch off headlamps using the exterior
lamp switch (
�page 109).
Page 397 of 473
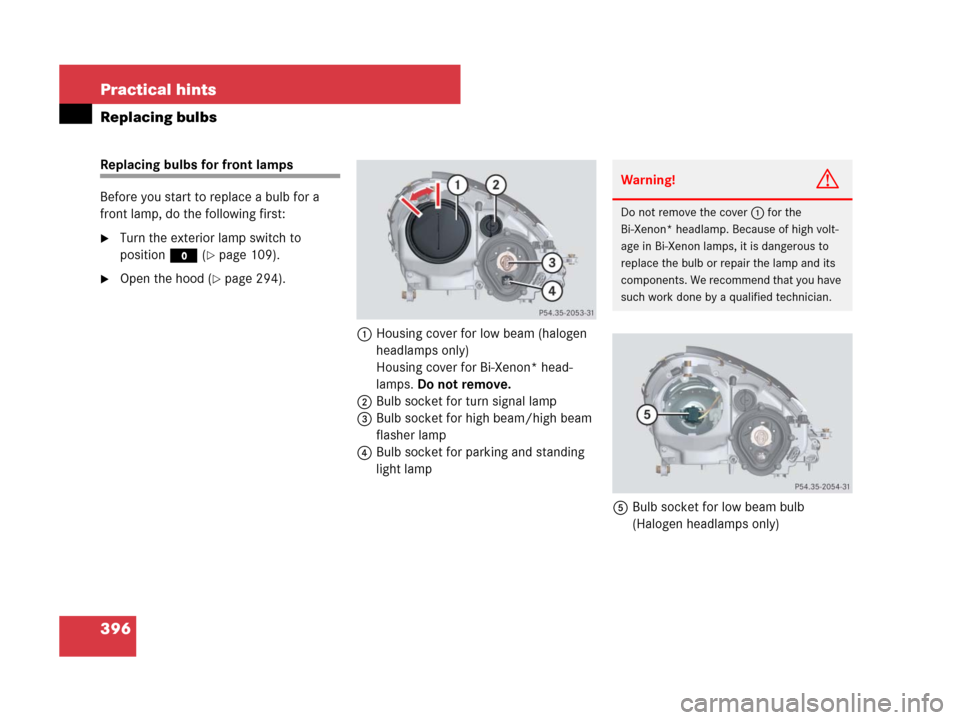
396 Practical hints
Replacing bulbs
Replacing bulbs for front lamps
Before you start to replace a bulb for a
front lamp, do the following first:
�Turn the exterior lamp switch to
positionM (
�page 109).
�Open the hood (�page 294).
1Housing cover for low beam (halogen
headlamps only)
Housing cover for Bi-Xenon* head-
lamps. Do not remove.
2Bulb socket for turn signal lamp
3Bulb socket for high beam/high beam
flasher lamp
4Bulb socket for parking and standing
light lamp
5Bulb socket for low beam bulb
(Halogen headlamps only)
Warning!G
Do not remove the cover1 for the
Bi-Xenon* headlamp. Because of high volt-
age in Bi-Xenon lamps, it is dangerous to
replace the bulb or repair the lamp and its
components. We recommend that you have
such work done by a qualified technician.
Page 400 of 473
.
�Turn combina")
399 Practical hints
Replacing wiper blades
�Replacing wiper blades
Placing wiper arms in vertical position
1Wiper arms
�Turn the SmartKey in the starter switch
to position1 (
�page 37).
�Turn combination switch to wiper
settingII (
�page 56).
�With wiper arms 1 in vertical position,
turn the SmartKey in the starter switch
to position0.
�Remover the SmartKey from the starter
switch.
Warning!G
For safety reasons, switch off wipers and
remove the SmartKey from the starter
switch before replacing a wiper blade.
Otherwise, the motor could suddenly turn
on and cause injury.
Warning!G
Wiper blades are components that are
subject to wear and tear. Replace the wiper
blades twice a year, preferably in the spring
and fall. Otherwise the windows will not be
properly wiped. As a result, you may not
be able to observe surrounding traffic condi-
tions and could cause an accident.
!To avoid damage to the hood:
�The wiper arms should only be folded for-
ward when in the vertical position.
�Never open the hood when a wiper arm is
folded forward.
!Hold on to the wiper when folding the wiper
arm back. If released, the force of the impact
from the tensioning spring could crack the wind-
shield.
Do not allow the wiper arms to contact the wind-
shield glass without a wiper blade inserted.
For your convenience, we recommend that you
have this work carried out by an authorized
Mercedes-Benz Center.