Page 423 of 473
.
The")
422 Practical hints
Towing the vehicle
Installing towing eye bolt
The towing eye bolt is supplied with the ve-
hicle tool kit, located in the compartment
underneath the trunk floor (
�page 382).
The towing eyes are located on the passen-
ger side in the front and rear bumper.
�Take vehicle tool kit out of trunk
(
�page 382).
Front cover
1Cover in front bumper
!Towing of the vehicle should only be done
using the properly installed towing eye bolt.
Never attach a tow cable, tow rope or tow rod to
the vehicle chassis, frame or suspension parts.
iWhen towing the vehicle with all wheels on
the ground, please note the following:
With the automatic central locking activated and
the SmartKey in starter switch position2, the
vehicle doors lock if the left front wheel as well
as the right rear wheel are turning at vehicle
speeds of approximately 9 mph (15 km/h) or
more.
To prevent the vehicle door locks from locking,
deactivate the automatic central locking
(
�page 102).
iTo signal turns while being towed with the
hazard warning flasher in use, switch on ignition
and activate the combination switch for the left
or right turn signal in the usual manner – only the
selected turn signal will operate.
Upon canceling the turn signal, the hazard warn-
ing flasher will operate again.
iThe gear selector lever* will remain locked
in positionP (vehicles with automatic transmis-
sion*) and the SmartKey will not turn in the
starter switch if the battery is disconnected or
discharged. For more information, see “Battery”
(
�page 415) or “Jump starting” (�page 419).
Vehicles with automatic transmission*:
For information on manual unlocking of gear
selector lever, see (
�page 389).
Page 424 of 473
423 Practical hints
Towing the vehicle
Removing
�Press mark on cover1.
�Cover1 springs open at the top right
corner.
�Pull at the protruding part of cover1
and fold cover down to reveal the
threaded hole for the towing eye bolt.
Do not disconnect cover1 from its
check strap.
�Screw towing eye bolt in to its end stop
and tighten with lug wrench.Installing
�Unscrew the towing eye bolt using the
lug wrench.
�To reinstall cover1, tilt the marked
lower left corner towards the opening.
�Maintaining its tilted position, insert
cover1 by applying the latches at the
top left and lower right corner into the
opening.
�To close cover1, press on the diago-
nal opposite side of the marked corner
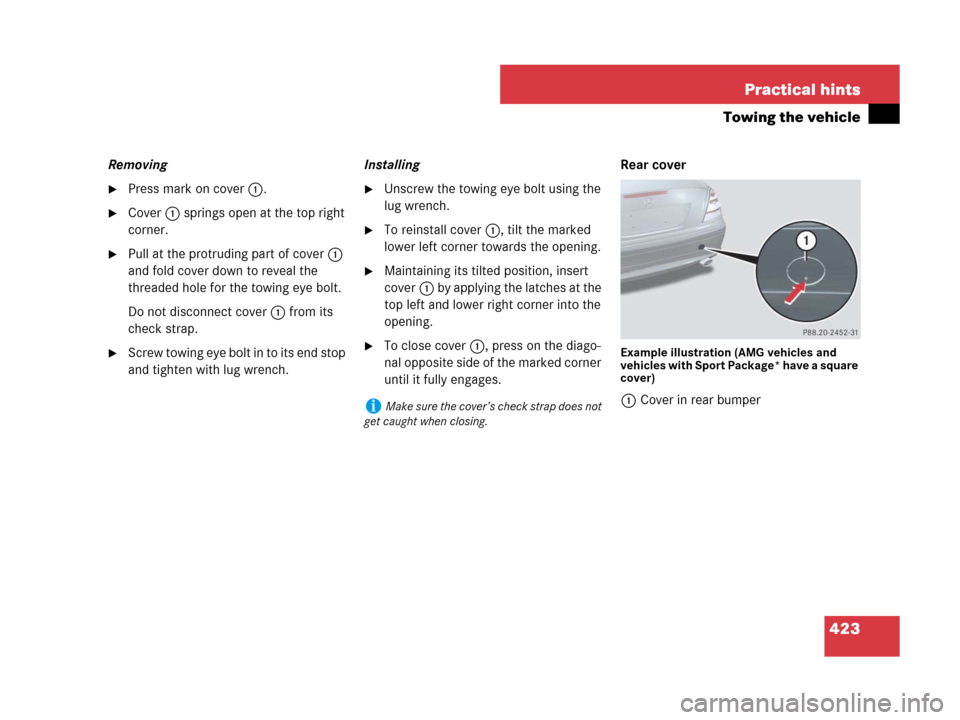
until it fully engages.Rear coverExample illustration (AMG vehicles and
vehicles with Sport Package* have a square
cover)
1Cover in rear bumperiMake sure the cover’s check strap does not
get caught when closing.
Page 425 of 473
424 Practical hints
Towing the vehicle
Removing
�Press mark on cover1.
�Cover1 springs open at the top.
�Pull at the protruding part of cover1
and fold cover down to reveal the
threaded hole for the towing eye bolt.
Do not disconnect cover1 from its
check strap.
�Screw towing eye bolt in to its end stop
and tighten with lug wrench.Installing
�Unscrew the towing eye bolt using the
lug wrench.
�To reinstall cover1, tilt the marked
lower edge towards the opening.
�Maintaining its tilted position, insert
cover1 by applying the latches at the
marked lower edge into the opening.
�To close cover1, press on the un-
marked top until it fully engages.
iMake sure the cover’s check strap does not
get caught when closing.
Page 426 of 473

425 Practical hints
Fuses
�Fuses
The electrical fuses in your vehicle serve to
switch off malfunctioning power circuits.
If a fuse is blown, the components and
systems secured by that fuse will stop
operating.If a newly inserted fuse blows again, have
the cause determined and rectified by an
authorized Mercedes-Benz Center.
The following aids are available to help you
replace fuses. The spare fuses and the fuse
extractor are located in the trunk with the
vehicle tool kit (
�page 382) and the fuse
chart is located in the fuse box in the
passenger compartment (
�page 425).
�Fuse chart
The fuse chart explains the fuse
allocation and fuse amperages.
�Spare fuses
�Fuse extractor
The electrical fuses are located in different
fuse boxes:
�in the passenger compartment on the
driver’s side (
�page 425)
�on the driver’s side of the engine
compartment (
�page 426)Before replacing fuses:
�Apply the parking brake (�page 59).
�Make sure the gear selector lever* is
set to positionP (
�page 157) (manual
transmission to Neutral).
�Turn off all electrical consumers.
�Turn off the engine (�page 61).
�Remove the SmartKey from the starter
switch.
Fuse box in passenger compartment
1Fuse box cover
Warning!G
Only use fuses approved by Mercedes-Benz
with the specified amperage for the system
in question and do not attempt to repair or
bridge a blown fuse. Using other than
approved fuses or using repaired or bridged
fuses may cause an overload leading to a
fire, and/or cause damage to electrical
components and/or systems. Have the
cause determined and remedied by an
authorized Mercedes-Benz Center.
iA blown fuse must be replaced by an
appropriate spare fuse (recognizable by its color
or the fuse rating given on the fuse) of the
amperage recommended in the fuse chart.
Any Mercedes-Benz Center will be glad to advise
you on this subject.
Page 427 of 473
426 Practical hints
Fuses
Opening
�Open the driver’s door.
�Insert flat, blunt object as a lever into
recess on the edge of cover1 at the
position indicated by the arrow.
�Loosen cover1 from dashboard using
the lever.
�Pull cover1 out and remove.
Closing
�Attach cover1 in the front.
�Fold cover1 in until it engages.
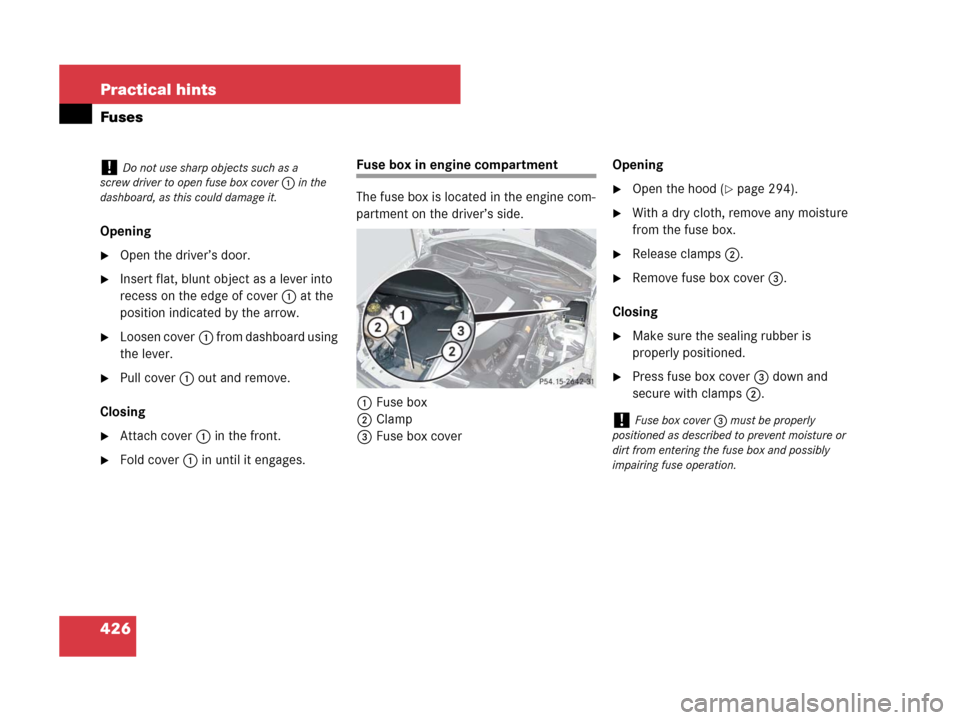
Fuse box in engine compartment
The fuse box is located in the engine com-
partment on the driver’s side.
1Fuse box
2Clamp
3Fuse box coverOpening
�Open the hood (�page 294).
�With a dry cloth, remove any moisture
from the fuse box.
�Release clamps2.
�Remove fuse box cover3.
Closing
�Make sure the sealing rubber is
properly positioned.
�Press fuse box cover3 down and
secure with clamps2.
!Do not use sharp objects such as a
screw driver to open fuse box cover1 in the
dashboard, as this could damage it.
!Fuse box cover3 must be properly
positioned as described to prevent moisture or
dirt from entering the fuse box and possibly
impairing fuse operation.
Page 463 of 473

462 Index
Phone book see Telephone*
Plastic parts, cleaning 342
Poly-V-belt drive 432
Potential problems associated with under-
inflated and overinflated tires 317
Power outlet 257
Power seat* see Seats
Power washer see Vehicle care
Power windows 235
Operating rear side windows 237
Operating with retractable hardtop
switch 237
Summer opening/convenience
closing* 238
Synchronizing 239Practical hints
Fuses 425
Lamps in instrument cluster 346
Spare wheel bolts 386
Towing vehicle 421
Vehicle jack 383
What to do if... 346
Premium unleaded gasoline 446
Problems
While driving 58
With vehicle 17
Product information 9
Production options weight 329
Program mode see Automatic transmis-
sion, Automatic shift program
Program mode selector switch
Automatic shift program 161
PSI 329R
RACETIMER see Control system menus,
AMG
Radio
Operation (Audio system) 199
Operation (Control system) 133
Satellite* (USA only) 134
Radio transmitters, control and
operation 287
Reading lamps 117
Rear view mirrors see Mirrors
Rear window defroster 170
Recommended inflation pressure 329
Recovery services for stolen vehicle (Tele
Aid*) 269
Refrigerant (Air conditioning) 445
Refueling 291
Regular checks 292
Remote control see SmartKey