Page 146 of 187
145 Navigation*
During route guidance
�Use % or &7to select a destination
from the list.
The
Page soft keys allow scrolling
through the list page by page.
�Press the Details s o f t k e y i f y o u w a n t t o
see details of a selected destination.
The details disappear again after
approx. 3 seconds, or when pressing
the
Details soft key again.
�Press ' to confirm the selection of the
destination.
The system begins to calculate the
route to the selected stop-over destina-
tion.
Changing/deleting the stop-over desti-
nation
�The soft key displays are shown
(
�page 139).
.
i
The arrows point in the direction of the
destination.
Distance information specifies the di-
rect distance to the destination.
i
A stop-over destination can be
changed or deleted only while the route
guidance to this stop-over is active (in-
dicated by .
If no route guidance to a stop-over des-
tination is active yet (
�page 144).
��
Page 148 of 187

press the
Symbols soft key.
The available options appear.
�Use %")
147 Navigation*
During route guidance
You can select which POIs will appear as
symbols on the map.
�In the Display menu (�page 146)
press the
Symbols soft key.
The available options appear.
�Use % or &7to select an option.
�Press'.
The selected option is activated. A solid
circle designates an activated op-
tion.
�Standard option:
The symbols for the system default
setting are displayed on the map;
�Personal option:
Th e s y m b o l s t o b e d i s p l a y e d c a n b e
selected from a list (
�page 147);
�None option:
No symbols will be displayed on the
map.Setting personal symbol display
�After activating the Personal option
(
�page 147), press the Change soft k ey.
The list of available symbols appears.
�Use % or &7to select a list entry.
�Press '7to activate or deactivate a se-
lected symbol depending on its previ-
ous state.
�Finally, press the Back soft key or wait
for the screen to change.
The setting is stored.
Setting symbols display
i
The symbols are on display only if the
map scale is set at 0.05 mi (50 m),
0.1 mi (100 m), 0.2 mi (200 m), or
0.5 mi (500 m).
To set the map scale (
�page 133).
i
The Change soft key is only available if
the
Personal option is selected. Other-
wise, it will appear shaded out.
i
Empty square = symbol deactivated
Solid square = symbol activated
Any number of symbols can be activat-
ed.
Page 150 of 187
,
press the
Map soft key.
The possible options appear.
�Use % or &7to")
149 Navigation*
During route guidance
�No display
The name of the current road is dis-
played.
�In the Display menu (�page 146),
press the
Map soft key.
The possible options appear.
�Use % or &7to select the desired
option.
�Press '.
The map display is switched.
�Finally, press the Back soft key or wait
for the screen to change.
If you have set the map view to full screen
(
�page 134) and the automatic map tog-
gling function is activated, then the follow-
ing happens:
�The system automatically switches to
the split-screen map display when a
driving maneuver is announced.
�As soon as the driving maneuver is
completed, the system automatically
returns to full-screen map display.Switching automatic toggling ON/OFF
�In the Display menu (�page 146),
press the
Auto soft key.
Option
On or Off appears.
�Use % or &7to select the desired
option.
i
The COMAND uses GPS to calculate
the elevation above sea level. For rea-
sons of tolerance, this value may devi-
ate from the actual value.
i
The solid circle shows the current
setting.
Automatic map toggling
i
The solid circle shows the current
setting.
��
Page 154 of 187

153 Navigation*
Last destinations and destination memory
Deleting an entry from the Destination
memory
�Select a destination.
�Press the Delete soft key.
A delete entry prompt appears.
�Use # to select the menu item Yes.
�Press '.
The system deletes the entry from the
destination memory.
Storing a destination in the
Destination memory
�In the Start Route Guidance menu
(
�page 131), press the Save soft key;
or
�Select an entry from the Last
destinations memory (�page 151) and
press the
Save soft key.The system automatically shows a de-
fault name (the city if applicable) as
Destination name; however, another
name can be chosen.
Storing under the default name
�Press and hold ' for approx. 2 sec-
onds;
or
�Use$ or & to select the sym-
bol and press'.
The system will store the destination
under the default name.
Storing under a different name
For a name upper and lower case, accents,
special characters and numbers can be en-
tered.
�Press the Delete soft key to delete the
default name.
ok
i
The name must have at least one char-
acter.
��
Page 155 of 187
154 Navigation*
Last destinations and destination memory
To select lower or upper case or to select
special characters, the following shift
fields on the display are available:
= upper case
= lower case
= special characters
�Use&, # or $7to select one of
the shift fields.
�Press'.
�Use#, $, %, &, 6 or 8 to
select the characters. Press ' after
each selection.
�If necessary, press the Delete soft key
to delete the character last entered.
�Upon completion of the name entry
press and hold ' for approx. 2 sec-
onds;
or
�Use$ or & to select the sym-
bol and press '.
The system will save the entry.
ABC
abc
...
i
Do not confuse the Delete soft key (de-
letion of the last character) with the
Back soft key (deletion of the complete
entry).
ok
Page 167 of 187

�Tones soft key
For")
166 System
System settings
�Press<.
The System menu appears.
Selectable soft keys
�Time soft key
For setting the date and time
�Lang. soft key
For setting the language (
�page 168)
�Tones soft key
For switching confirmation beeps
and acoustic signals ON and OFF
(
�page 168)
�Display soft key
For changing the display settings
(
�page 169)
�Reset soft key
For resetting COMAND to the factory
settings (
�page 170)
�Press the Time soft key.
The Date/Time setting menu appears.
The following options are now available:
�Setting the time
�Setting the date
�Setting the date/time format
Setting the time
The UTC time transmitted by the GPS sat-
ellites has to be set to the local time zone.
This enhances:
�correct navigation for routes with time-
dependent traffic guidance, and
�correct calculation of the estimated
time of arrival.
Calling up the System menu
Setting the date/time
i
There is no automatic change from day-
light saving time to standard time.
This has to be changed manually.
When you change the time zone, the
clock time also changes automatically.
If you enter an incorrect time, the time
difference remains unchanged when
you change time zone.
Page 169 of 187

168 System
System settings
Setting the format
�Use% or & to select a format.
�Press'.
The appropriate format is selected.
�Press the Back soft key or wait for the
screen to change.
The new setting is stored.
The language setting changes the display
language as well as the language used for
voice instructions in navigation announce-
ments.
�In the System menu (�page 166),
press the
Lang. soft key.
The language list is displayed.
The following options are available:
�Instr. cluster settings:
The system switches to the language
already set in the vehicle instrument
cluster (
�Vehicle Operator’s manual);
�All other options:
The system switches to the requested
language.
�Use% or & to select an entry.
�Press'.
�Press the Back soft key or wait for the
screen to change.
The new setting is stored.
�In the System menu, press the
(
�page 166) Tones soft key.
The list of available sounds is dis-
played.
i
List entry 1-3: Date formats
List entry 4 and 5: Time formats
(Entry 5 is not visible on the display ex-
ample below.)
Solid circle : format set
Empty circle : format not set
Setting the language
Switching confirmation beeps and
acoustic signals ON/OFF
Page 171 of 187
170 System
System settings
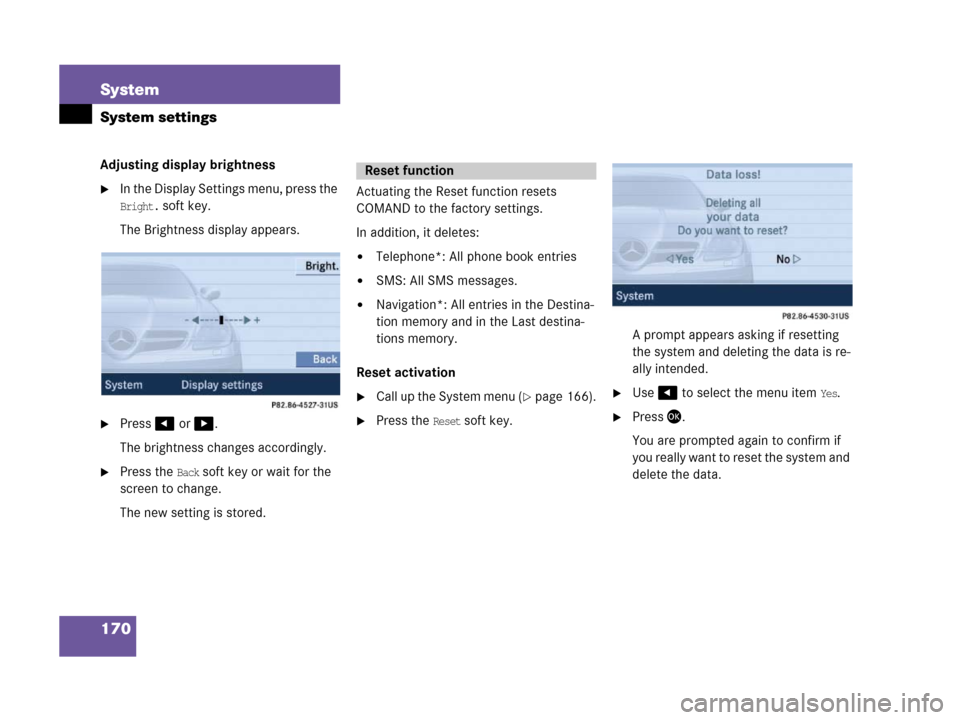
Adjusting display brightness
�In the Display Settings menu, press the
Bright. soft key.
The Brightness display appears.
�Press# or $.
The brightness changes accordingly.
�Press the Back soft key or wait for the
screen to change.
The new setting is stored.Actuating the Reset function resets
COMAND to the factory settings.
In addition, it deletes:
�Telephone*: All phone book entries
�SMS: All SMS messages.
�Navigation*: All entries in the Destina-
tion memory and in the Last destina-
tions memory.
Reset activation
�Call up the System menu (�page 166).
�Press the Reset soft key.A prompt appears asking if resetting
the system and deleting the data is re-
ally intended.
�Use# to select the menu item Yes.
�Press'.
You are prompted again to confirm if
you really want to reset the system and
delete the data.
Reset function