Page 91 of 473
 and
(
�page 355).
Warning!
G
Never switch off the ESP
® when you see the
ABS/E")
90 Safety and SecurityDriving safety systems
For more information, see the
“Practical hints” section (
�page 332) and
(
�page 355).
Warning!
G
Never switch off the ESP
® when you see the
ABS/ESP
® warning lamp v flashing in
the instrument cluster. In this case proceed
as follows:
�
While driving off, apply as little throttle
as possible.
�
While driving, ease up on the accelera-
tor.
�
Adapt your speed and driving style to
the prevailing road conditions.
Failure to observe these guidelines could
cause the vehicle to skid.
The ESP
® cannot prevent accidents result-
ing from excessive speed.
Warning!
G
The ESP
® cannot prevent the natural laws of
physics from acting on the vehicle, nor can
it increase the traction afforded. The ESP
®
cannot prevent accidents, including those
resulting from excessive speed in turns, or
hydroplaning. Only a safe, attentive, and
skillful driver can prevent accidents. The ca-
pabilities of an ESP
® equipped vehicle must
never be exploited in a reckless or danger-
ous manner which could jeopardize the us-
er’s safety or the safety of others.
!
Because the ESP
® operates automatically,
the engine must be shut off (SmartKey in starter
switch position 0 or 1or KEYLESS-GO*
start/stop button in position 0 or 1) when
�
the parking brake is being tested on a brake
test dynamometer
�
the vehicle is being towed with the
front/rear axle raised
Active braking action through the ESP
® may oth-
erwise seriously damage the brake system.
The ESP
® will only function properly if you use
wheels of the recommended tire size
(
�page 435).
i
The cruise control and the Distronic* sys-
tem deactivate automatically when the ESP
® is
in operation (
�page 220).
Page 94 of 473

93 Safety and Security
Driving safety systems
The electro-hydraulic brake system is auto-
matically activated when you�
unlock the vehicle with the SmartKey
or the SmartKey with KEYLESS-GO*
�
open the driver’s or passenger door
�
turn the SmartKey in the starter switch
to position1
�
in vehicles with KEYLESS-GO*, press
the start/stop button on the gear se-
lector lever once
�
depress the brake pedal
�
release the parking brake
Warning!
G
The electro-hydraulic brake system requires
electrical power to operate.
A malfunction in the vehicle’s power supply
or electrical system may impair brake sys-
tem operation and switch it into its emer-
gency operation mode. In such a case, the
red brake warning lamp (
�page 335)
comes on and warning messages
(
�page 366) appear in the multifunction
display while driving. To brake, the driver
must then apply significantly greater brake
pedal pressure and depress the pedal much
further to obtain the expected braking ef-
fect. If necessary, apply full pressure to the
brake pedal. Brakes are only applied to the
front wheels. Stopping distance is in-
creased!
If there is a malfunction in the
electro-hydraulic brake system, we recom-
mend that the vehicle be transported with
all wheels off the ground using flatbed or ap-
propriate wheel lift/dolly equipment.
A tow bar must be used if circumstances do
not permit the use of the recommended
towing methods and the vehicle requires
towing with all four wheels on the ground.
Towing the vehicle with all four wheels on
the ground is only permissible for distances
up to 30 miles (50 km) and at a speed not to
exceed 30 mph (50 km/h). For more infor-
mation, see “Towing the vehicle”
(�page 421).
Page 99 of 473

98 Safety and SecurityAnti-theft systemsTow-away alarm
Once the tow-away alarm is armed, a visual
and audible alarm will be triggered when
someone attempts to raise the vehicle. Arming tow-away alarm
When you lock your vehicle, the tow-away
alarm is automatically armed after about
30 seconds.
When you unlock your vehicle, the
tow-away protection disarms automatical-
ly.
Disabling tow-away alarm
To prevent triggering the tow-away alarm,
disable the tow-away alarm feature before
towing the vehicle, or when parking on a
surface subject to movement, such as a
ferry or auto train.
The button is located on the center con-
sole between the driver’s seat and the pas-
senger seat.1Tow-away alarm off button
2Indicator lamp
�
Switch off the ignition and remove the
SmartKey from the starter switch.
i
If the alarm stays on for more than
30 seconds, a call to the Response Center is ini-
tiated automatically by the Tele Aid system
(
�page 245) provided Tele Aid service was sub-
scribed to and properly activated, and that nec-
essary cellular service and GPS coverage are
available.
i
You cannot disarm the tow-away alarm
when the ignition is switched on.
Page 100 of 473
99 Safety and Security
Anti-theft systems
�
Press button1.
The indicator lamp2 in the switch
comes on briefly.
�
Exit and lock your vehicle with the
SmartKey or (vehicles with
KEYLESS-GO*) with the lock button on
each door handle or trunk lid.
The tow-away alarm remains disarmed un-
til you lock the vehicle again.
Canceling the alarm
To cancel the alarm:
With the SmartKey
�
Insert the SmartKey in the starter
switch.
or
�
Press theŒor‹button on the
SmartKey.With KEYLESS-GO*
�
Grasp an outside door handle.
The SmartKey with KEYLESS-GO must
be within 3 ft. (1 m) of the vehicle.
or
�
Press the KEYLESS-GO start/stop
button (
�page 40).
The SmartKey with KEYLESS-GO must
be inside the vehicle.
Page 171 of 473

170 Controls in detailAutomatic transmissionGear selector lever position
Effect
ì
Park position
Gear selector lever position
when the vehicle is parked. Place
gear selector lever in positionP
only when vehicle is stopped.
The park position is not intended
to serve as a brake when the
vehicle is parked. Rather, the
driver should always set the
parking brake in addition to
placing the gear selector lever in
positionP to secure the vehicle.
EffectThe SmartKey can only be
removed from the starter switch
with the gear selector lever in
positionP. With the SmartKey
removed, the gear selector lever
is locked in positionP.
í
Reverse gear
Place gear selector lever in
positionR only when vehicle is
stopped.
Effect
ë
Neutral
No power is transmitted from the
engine to the drive axle. When
the brakes are released, the
vehicle can be moved freely
(pushed or towed).
To avoid damage to the trans-
mission, never engageN while
driving.
If the ESP
® is deactivated or
malfunctioning:
Move gear selector lever toN
only if the vehicle is in danger of
skidding, e.g. on icy roads.
ê
Drive
The transmission shifts
automatically. All forward gears
are available.
!
Coasting the vehicle, or driving for any other
reason with gear selector lever inN can result in
transmission damage that is not covered by the
Mercedes-Benz Limited Warranty.
Page 172 of 473

171 Controls in detail
Automatic transmission
Driving tips
Accelerator position
Your driving style influences the
transmission’s shifting behavior:
Less throttle Earlier upshifting
More throttle Later upshifting
Kickdown
Use kickdown when you want maximum
acceleration.�
Press the accelerator past the point of
resistance.
The transmission shifts into the lowest
possible gear.
�
Ease on the accelerator when you have
reached the desired speed.
The transmission shifts up again.
Warning!
G
Getting out of your vehicle with the gear
selector lever not fully engaged in positionP
is dangerous. Also, positionP alone is not
intended to or capable of preventing your
vehicle from moving, possibly hitting people
or objects.
Always set the parking brake in addition to
shifting to positionP (
�page 61).
When parked on an incline, turn the front
wheels towards the road curb.
Do not park this vehicle in areas where
combustible materials such as grass, hay or
leaves can come into contact with the hot
exhaust system, as these materials could be
ignited and cause a vehicle fire.
Warning!
G
When leaving the vehicle, always remove the
SmartKey or SmartKey with KEYLESS-GO*
from the starter switch, take it with you, and
lock the vehicle. Do not leave children unat-
tended in the vehicle, or with access to an
unlocked vehicle. Children could move the
gear selector lever from positionP, which
could result in an accident and/or serious
personal injury.
Page 206 of 473

205 Controls in detail
Retractable hardtop
2Buckle�
Guide the fastening straps around the
top of the roll bar and close buckles 2.
�
Tighten the fastening straps if neces-
sary.
�
Lower the roll bar (
�page 81).
�
Fold the upper section of the wind
screen up towards the head restraints
until it stops.Removing
�
Fold the upper section of the wind
screen back.
�
Adjust the roll bar to a height
(�page 81) that allows you to reach
easily underneath it.
1Release button
�
Undo the buckles on the upper section
of the roll bar by pressing release
button1.
�
Lower the roll bar (
�page 81).
Make sure the fastening straps do not
get caught.
�
Pull the wind screen out towards the
front of the vehicle.
Be careful not to damage interior trim
with the guide tabs.
�
Store the wind screen in a safe place.
Luggage cover
The luggage cover covers luggage/cargo
in the trunk.
!
To prevent damage to the retractable hard-
top or luggage/cargo when lowering:
�
Load trunk only to the height of the luggage
cover.
�
Do not permit luggage/cargo to push up the
closed luggage cover.
�
Do not load anything on top of or in front of
the luggage cover.
�
Do not place anything on the shelf behind
the roll bar.
Page 208 of 473
207 Controls in detail
Retractable hardtop
�
Open tensioning clasps 5 by pulling
them downward.
�
Unhook retainer springs 6 from hold-
ers and flip retainer springs all the way
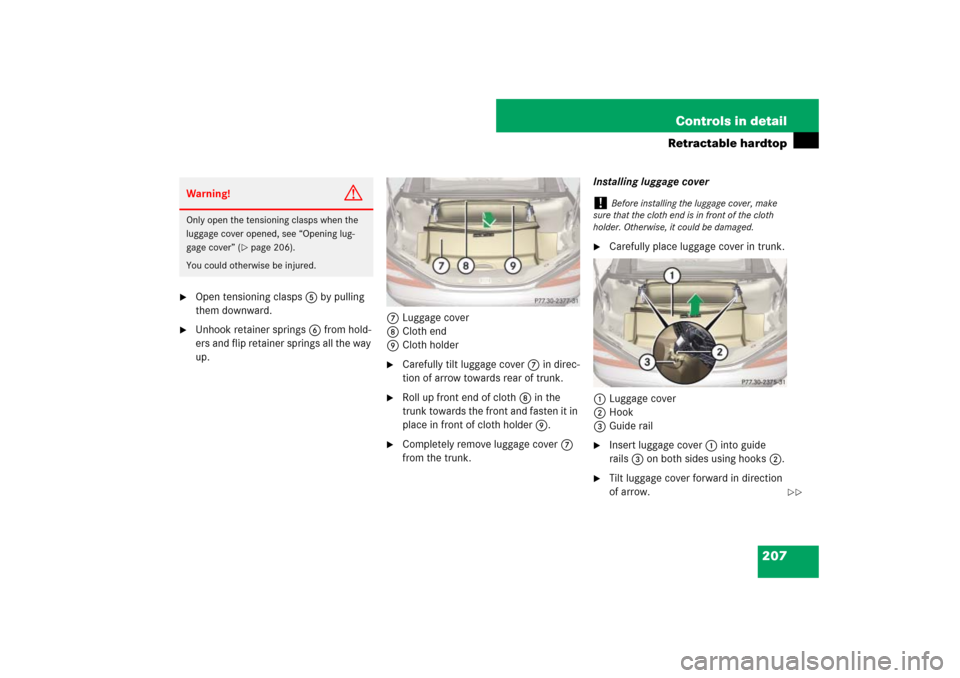
up.7Luggage cover
8Cloth end
9Cloth holder
�
Carefully tilt luggage cover 7 in direc-
tion of arrow towards rear of trunk.
�
Roll up front end of cloth 8 in the
trunk towards the front and fasten it in
place in front of cloth holder 9.
�
Completely remove luggage cover 7
from the trunk.Installing luggage cover
�
Carefully place luggage cover in trunk.
1Luggage cover
2Hook
3Guide rail
�
Insert luggage cover 1 into guide
rails3 on both sides using hooks 2.
�
Tilt luggage cover forward in direction
of arrow.
Warning!
G
Only open the tensioning clasps when the
luggage cover opened, see “Opening lug-
gage cover” (
�page 206).
You could otherwise be injured.
!
Before installing the luggage cover, make
sure that the cloth end is in front of the cloth
holder. Otherwise, it could be damaged.
��