Page 387 of 473
386 Practical hintsWhat to do if …Left display
Right display
Possible cause/consequence
Possible solution
H
Tire pressure
Check tires
The tire pressure in one or more
tires is already below the mini-
mum value.
�
Carefully bring the vehicle to a halt, avoiding abrupt
steering and braking maneuvers.
�
Check and adjust tire pressure as required.
�
If necessary, change the wheel.
Check tires
Vehicles with Advanced TPMS*:
The tire pressure in one or more
tires is already below the mini-
mum value.
The respective tire is indicated in
the multifunction display.
�
Carefully bring the vehicle to a halt, avoiding abrupt
steering and braking maneuvers.
�
Check and adjust tire pressure as required.
�
If necessary, change the wheel.
Warning!
G
Do not drive with a flat tire. A flat tire affects
the ability to steer or brake the vehicle.
You may lose control of the vehicle. Contin-
ued driving with a flat tire will cause exces-
sive heat build-up and possibly a fire.
Page 389 of 473

388 Practical hintsWhere will I find ...?First aid kit
The first aid kit is located in storage com-
partment under the passenger seat.
1Handle
2Lid�
Pull handle 1 up.
�
Fold lid 2 down.
You can now remove the first-aid kit.
Vehicle tool kit, jack, and spare wheel
The vehicle tool kit, jack, and spare wheel
are stored in the space underneath the
trunk floor.
�
Lift up the trunk floor cover.
You can now remove the tools and ac-
cessories.
The vehicle tool kit includes�
One pair of universal pliers
�
Two open-end wrenches
�
One hex-socket wrench
�
One interchangeable slot/Phillips
screwdriver
�
One towing eye bolt
�
One alignment bolt
�
One fuse extractor
�
One fuse chart
�
Spare fuses
i
Check expiration dates and contents for
completeness at least once a year and replace
missing/expired items.
Warning!
G
The jack is designed exclusively for jacking
up the vehicle at the jack tubes built into
both sides of the vehicle. To help avoid per-
sonal injury, use the jack only to lift the ve-
hicle during a wheel change. Never get
beneath the vehicle while it is supported by
the jack. Keep hands and feet away from the
area under the lifted vehicle. Always firmly
set parking brake and block wheels before
raising vehicle with jack.
Do not disengage parking brake while the
vehicle is raised. Be certain that the jack is
always vertical (plumb line) when in use, es-
pecially on hills. Always try to use the jack
on a hard level surface. Be sure that the jack
arm is fully inserted in the jack tube. Always
lower the vehicle onto sufficient capacity
jackstands before working under the vehi-
cle.
Page 390 of 473
389 Practical hints
Where will I find ...?
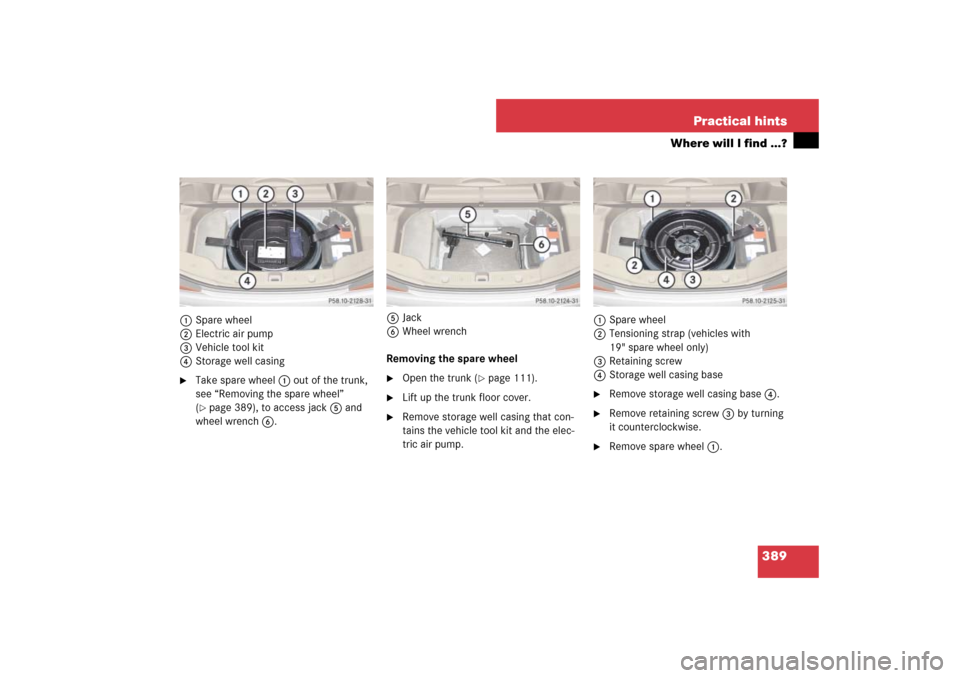
1Spare wheel
2Electric air pump
3Vehicle tool kit
4Storage well casing�
Take spare wheel 1 out of the trunk,
see “Removing the spare wheel”
(�page 389), to access jack 5 and
wheel wrench 6.5Jack
6Wheel wrench
Removing the spare wheel
�
Open the trunk (
�page 111).
�
Lift up the trunk floor cover.
�
Remove storage well casing that con-
tains the vehicle tool kit and the elec-
tric air pump.1Spare wheel
2Tensioning strap (vehicles with
19" spare wheel only)
3Retaining screw
4Storage well casing base
�
Remove storage well casing base 4.
�
Remove retaining screw 3 by turning
it counterclockwise.
�
Remove spare wheel 1.
Page 391 of 473

390 Practical hintsWhere will I find ...?Storing the spare wheel after use
If you wish to store the spare wheel after
use, carry out the following steps. Other-
wise, the spare wheel may not fit the spare
wheel well.�
Unscrew the valve cap from the valve
of the collapsible tire.
�
Take the valve extractor from the
vehicle tool kit (
�page 388).
�
Unscrew the valve insert from the valve
and allow the air to escape.
�
Screw the valve insert back into the
valve.
�
Screw the valve cap back onto the
valve.
�
Store the spare wheel by carrying out
the steps described in “Removing the
spare wheel” (
�page 389) in reverse
order.
Compressing the collapsible tire
(vehicles with 19" spare wheel only)
The collapsible tire on a 19" spare wheel
must be compressed with two tensioning
straps before you can store it back in the
trunk.
�
Extend the tensioning strap by pulling
the slider.
�
Place tensioning strap around spare
wheel rim and collapsible tire with the
buckle facing the inside of the rim.
�
Close the buckle.
�
Pull the loose end of the tensioning
strap.
The tensioning strap must be pulled as
tight as possible.
!
Make sure the spare wheel is dry before
storing it.
i
It may take a few minutes for the collapsible
tire to deflate completely.
i
Vehicles with 19" spare wheel only: Before
storing the spare wheel in trunk fasten tension-
ing straps, see “Compressing the collapsible tire
(vehicles with 19" spare wheel only)”
(
�page 390).
i
The tensioning straps are shown in red for
illustration purposes. The tensioning straps on
the spare wheel of your vehicle are black.
Page 406 of 473

405 Practical hints
Flat tire
�Flat tire
Preparing the vehicle�
Park the vehicle in a safe distance from
moving traffic on a hard, flat surface
when possible.
�
Turn on the hazard warning flashers.
�
Turn the steering wheel so that the
front wheels are in a straight ahead po-
sition.
�
Set the parking brake.
�
Move the gear selector lever to P.
Vehicles with SmartKey:
�
Turn off the engine (
�page 62).
�
Remove the SmartKey from the starter
switch.
Vehicles with KEYLESS-GO*:�
Turn off the engine by pressing the
KEYLESS-GO* button on the gear
selector lever once (
�page 62).
�
Open the driver’s door (this puts
the starter switch in position 0,
same as with the SmartKey re-
moved from the starter switch). The
driver’s door then can be closed
again.
�
Have any passenger exit the vehicle at
a safe distance from the roadway.
Mounting the spare wheel
i
Open door only when conditions are safe to
do so.
Warning!
G
The dimensions of the spare wheel are dif-
ferent from those of the road wheels. As a
result, the vehicle handling characteristics
change when driving with a mounted spare
wheel. Adapt your driving style accordingly.
The spare wheel is for temporary use only.
When driving with spare wheel mounted, en-
sure proper tire inflation pressure and do
not exceed vehicle speed of 50 mph
(80 km/h).
Drive to the nearest Mercedes-Benz Center
as soon as possible to have the spare wheel
replaced with a regular road wheel.
Never operate the vehicle with more than
one spare wheel mounted.
Do not switch off the ESP
® when a spare
wheel is mounted.
Page 407 of 473
.
�
Turn spare wheel bracket counter-
clockwise to loosen.
�
Take the spare wheel out of the trunk
(�pag")
406 Practical hintsFlat tirePreparing the vehicle
Prepare the vehicle as described
(�page 405).
�
Turn spare wheel bracket counter-
clockwise to loosen.
�
Take the spare wheel out of the trunk
(�page 389).
Removing tensioning straps
(vehicles with 19" spare wheel only)
A 19" spare wheel has two tensioning
straps on it that must both be removed be-
fore mounting the spare wheel.1Buckle
2Clip
�
Press on both clips 2 simultaneously
to release buckle 1.Lifting the vehicle
�
Prevent the vehicle from rolling away
by blocking wheels with wheel chocks
(not included) or other sizable objects.
When changing wheel on a level sur-
face:�
Place one wheel chock or other
sizable object in front of and anoth-
er wheel chock or sizable object be-
hind the wheel that is diagonally
opposite to the wheel being
changed.
Always try lifting the vehicle using the
jack on a level surface. However,
should circumstances require you to do
so on a hill, place a wheel chock or oth-
er sizable object and the other wheel
chock or sizeable object as follows:
�
Place wheel chocks or other sizable
objects on the downhill side block-
ing both wheels of the axle not be-
ing worked on.
i
The tensioning straps are shown in red for
illustration purposes. The tensioning straps on
the spare wheel of your vehicle are black.
i
Keep the tensioning straps in a safe place.
You will need them to store the spare wheel in
the trunk after use (
�page 390).
Page 408 of 473
.
�
On wheel to be changed, loosen but do
not yet remove the")
407 Practical hints
Flat tire
�
Take the vehicle tool kit and the jack
out of the storage compartment under
the trunk floor (
�page 388).
�
On wheel to be changed, loosen but do
not yet remove the wheel bolts (ap-
proximately one full turn with wrench).
The jack support tubes are located behind
the front wheel housings and in front of the
rear wheel housings.
Warning!
G
The jack is designed exclusively for jacking
up the vehicle at the jack tubes built into
both sides of the vehicle. To help avoid per-
sonal injury, use the jack only to lift the ve-
hicle during a wheel change. Never get
beneath the vehicle while it is supported by
the jack. Keep hands and feet away from the
area under the lifted vehicle. Always firmly
set parking brake and block wheels before
raising vehicle with jack.
Do not disengage parking brake while the
vehicle is raised. Be certain that the jack is
always vertical (plumb line) when in use, es-
pecially on hills. Always try to use the jack
on level surface. Be sure that the jack arm is
fully inserted in the jack tube. Always lower
the vehicle onto sufficient capacity jack-
stands before working under the vehicle.
Warning!
G
When turning the wheel wrench to loosen
the wheel bolts, make sure you position
hands on the wrench in such a way that you
avoid injury to yourself, such as scraping
your hands against the wheel. Make sure
turning the wheel wrench will not scratch or
damage the wheel rim.
��
Page 410 of 473
409 Practical hints
Flat tire
�
Keeping jack in this position, turn
crank3 clockwise until the jack base
meets the ground. Make sure the jack
is vertical (plumb line).
�
Continue to turn the crank until the tire
is a maximum of 1.2 in (3 cm) from the
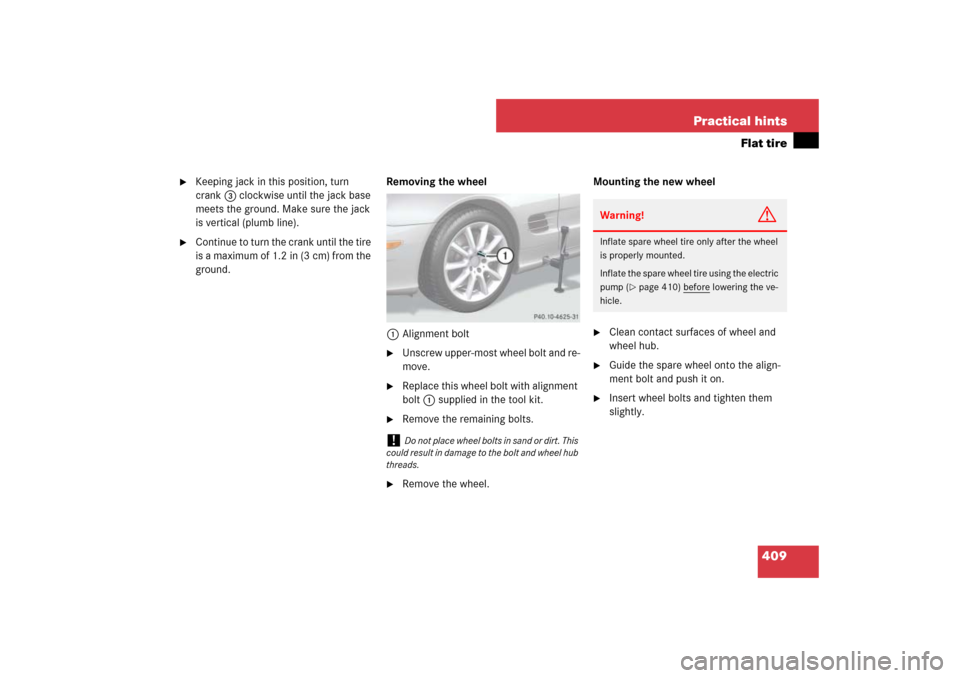
ground.Removing the wheel
1Alignment bolt
�
Unscrew upper-most wheel bolt and re-
move.
�
Replace this wheel bolt with alignment
bolt1 supplied in the tool kit.
�
Remove the remaining bolts.
�
Remove the wheel.Mounting the new wheel
�
Clean contact surfaces of wheel and
wheel hub.
�
Guide the spare wheel onto the align-
ment bolt and push it on.
�
Insert wheel bolts and tighten them
slightly.
!
Do not place wheel bolts in sand or dirt. This
could result in damage to the bolt and wheel hub
threads.
Warning!
G
Inflate spare wheel tire only after the wheel
is properly mounted.
Inflate the spare wheel tire using the electric
pump (
�page 410) before
lowering the ve-
hicle.