Page 364 of 473
363 Practical hints
What to do if …
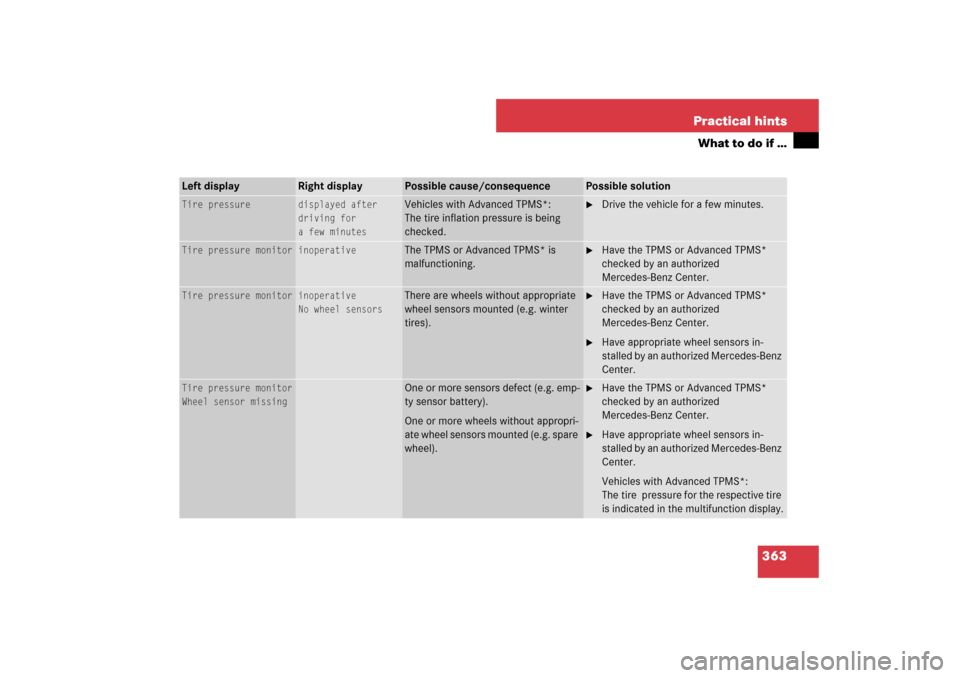
Left display
Right display
Possible cause/consequence
Possible solution
Tire pressure
displayed after
driving for
a few minutes
Vehicles with Advanced TPMS*:
The tire inflation pressure is being
checked.
�
Drive the vehicle for a few minutes.
Tire pressure monitor
inoperative
The TPMS or Advanced TPMS* is
malfunctioning.
�
Have the TPMS or Advanced TPMS*
checked by an authorized
Mercedes-Benz Center.
Tire pressure monitor
inoperative
No wheel sensors
There are wheels without appropriate
wheel sensors mounted (e.g. winter
tires).
�
Have the TPMS or Advanced TPMS*
checked by an authorized
Mercedes-Benz Center.
�
Have appropriate wheel sensors in-
stalled by an authorized Mercedes-Benz
Center.
Tire pressure monitor
Wheel sensor missing
One or more sensors defect (e.g. emp-
ty sensor battery).
One or more wheels without appropri-
ate wheel sensors mounted (e.g. spare
wheel).
�
Have the TPMS or Advanced TPMS*
checked by an authorized
Mercedes-Benz Center.
�
Have appropriate wheel sensors in-
stalled by an authorized Mercedes-Benz
Center.
Vehicles with Advanced TPMS*:
The tire pressure for the respective tire
is indicated in the multifunction display.
Page 365 of 473
364 Practical hintsWhat to do if …Left display
Right display
Possible cause/consequence
Possible solution
Tire pressure monitor
currently
unavailable
The TPMS or Advanced TPMS* is
unable to monitor the tire pres-
sure due to�
a nearby radio interference
source.
�
excessive wheel sensor tem-
peratures.
As soon as the causes for the malfunction are
no longer present, the TPMS or Advanced
TPMS* automatically becomes active again
after a few minutes driving.
Warning!
G
Do not drive with a flat tire. A flat tire affects
the ability to steer or brake the vehicle.
You may lose control of the vehicle. Contin-
ued driving with a flat tire will cause exces-
sive heat build-up and possibly a fire.
Page 386 of 473
385 Practical hints
What to do if …
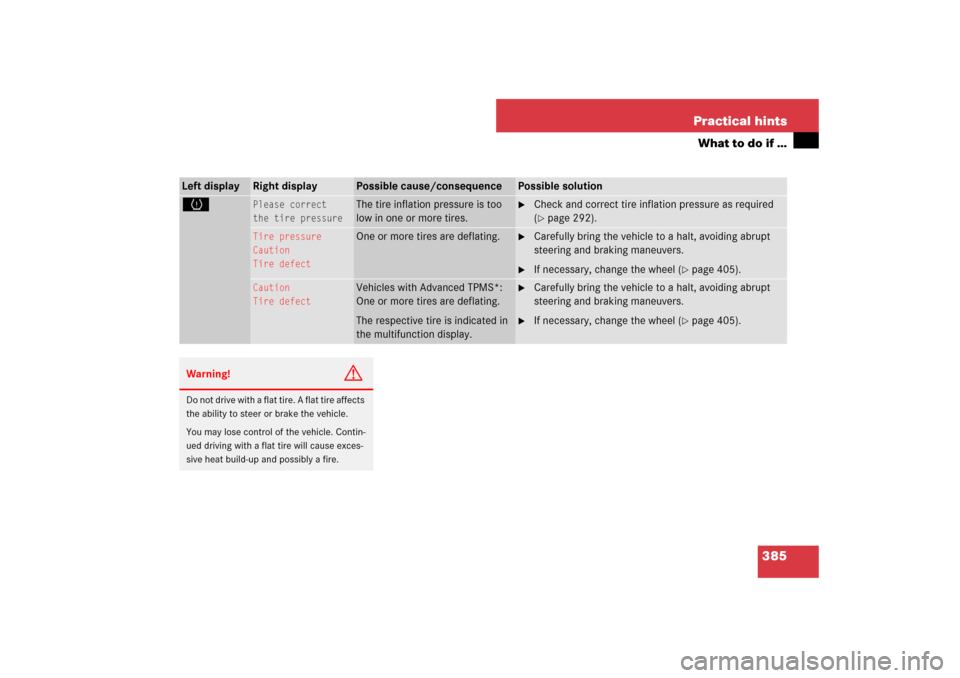
Left display
Right display
Possible cause/consequence
Possible solution
H
Please correct
the tire pressure
The tire inflation pressure is too
low in one or more tires.
�
Check and correct tire inflation pressure as required
(�page 292).
Tire pressure
Caution
Tire defect
One or more tires are deflating.
�
Carefully bring the vehicle to a halt, avoiding abrupt
steering and braking maneuvers.
�
If necessary, change the wheel (
�page 405).
Caution
Tire defect
Vehicles with Advanced TPMS*:
One or more tires are deflating.
The respective tire is indicated in
the multifunction display.
�
Carefully bring the vehicle to a halt, avoiding abrupt
steering and braking maneuvers.
�
If necessary, change the wheel (
�page 405).
Warning!
G
Do not drive with a flat tire. A flat tire affects
the ability to steer or brake the vehicle.
You may lose control of the vehicle. Contin-
ued driving with a flat tire will cause exces-
sive heat build-up and possibly a fire.
Page 387 of 473
386 Practical hintsWhat to do if …Left display
Right display
Possible cause/consequence
Possible solution
H
Tire pressure
Check tires
The tire pressure in one or more
tires is already below the mini-
mum value.
�
Carefully bring the vehicle to a halt, avoiding abrupt
steering and braking maneuvers.
�
Check and adjust tire pressure as required.
�
If necessary, change the wheel.
Check tires
Vehicles with Advanced TPMS*:
The tire pressure in one or more
tires is already below the mini-
mum value.
The respective tire is indicated in
the multifunction display.
�
Carefully bring the vehicle to a halt, avoiding abrupt
steering and braking maneuvers.
�
Check and adjust tire pressure as required.
�
If necessary, change the wheel.
Warning!
G
Do not drive with a flat tire. A flat tire affects
the ability to steer or brake the vehicle.
You may lose control of the vehicle. Contin-
ued driving with a flat tire will cause exces-
sive heat build-up and possibly a fire.
Page 391 of 473
390 Practical hintsWhere will I find ...?Storing the spare wheel after use
If you wish to store the spare wheel after
use, carry out the following steps. Other-
wise, the spare wheel may not fit the spare
wheel well.�
Unscrew the valve cap from the valve
of the collapsible tire.
�
Take the valve extractor from the
vehicle tool kit (
�page 388).
�
Unscrew the valve insert from the valve
and allow the air to escape.
�
Screw the valve insert back into the
valve.
�
Screw the valve cap back onto the
valve.
�
Store the spare wheel by carrying out
the steps described in “Removing the
spare wheel” (
�page 389) in reverse
order.
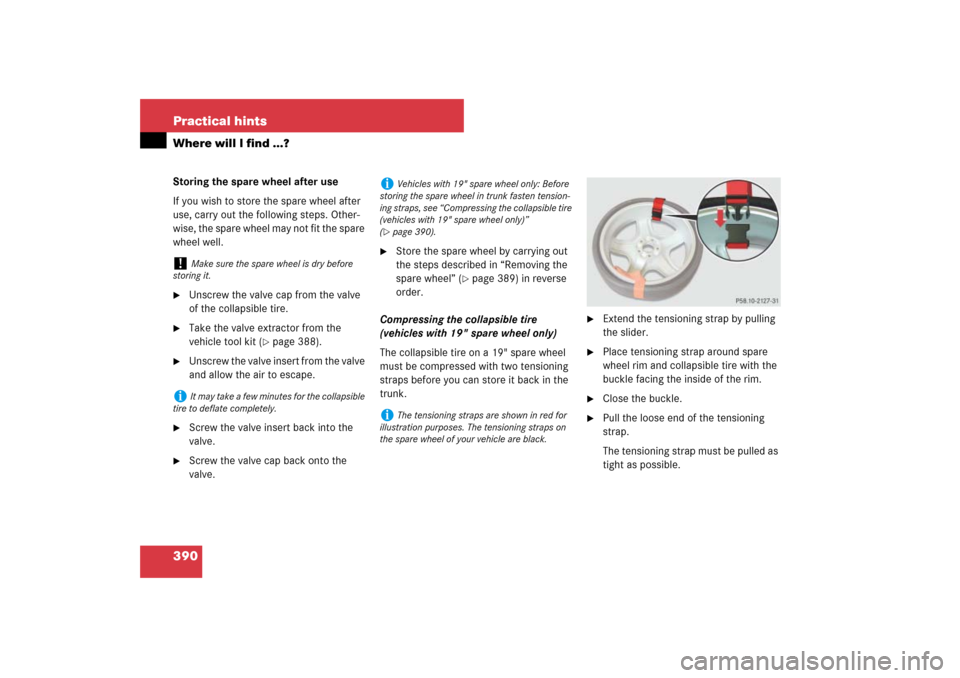
Compressing the collapsible tire
(vehicles with 19" spare wheel only)
The collapsible tire on a 19" spare wheel
must be compressed with two tensioning
straps before you can store it back in the
trunk.
�
Extend the tensioning strap by pulling
the slider.
�
Place tensioning strap around spare
wheel rim and collapsible tire with the
buckle facing the inside of the rim.
�
Close the buckle.
�
Pull the loose end of the tensioning
strap.
The tensioning strap must be pulled as
tight as possible.
!
Make sure the spare wheel is dry before
storing it.
i
It may take a few minutes for the collapsible
tire to deflate completely.
i
Vehicles with 19" spare wheel only: Before
storing the spare wheel in trunk fasten tension-
ing straps, see “Compressing the collapsible tire
(vehicles with 19" spare wheel only)”
(
�page 390).
i
The tensioning straps are shown in red for
illustration purposes. The tensioning straps on
the spare wheel of your vehicle are black.
Page 406 of 473
405 Practical hints
Flat tire
�Flat tire
Preparing the vehicle�
Park the vehicle in a safe distance from
moving traffic on a hard, flat surface
when possible.
�
Turn on the hazard warning flashers.
�
Turn the steering wheel so that the
front wheels are in a straight ahead po-
sition.
�
Set the parking brake.
�
Move the gear selector lever to P.
Vehicles with SmartKey:
�
Turn off the engine (
�page 62).
�
Remove the SmartKey from the starter
switch.
Vehicles with KEYLESS-GO*:�
Turn off the engine by pressing the
KEYLESS-GO* button on the gear
selector lever once (
�page 62).
�
Open the driver’s door (this puts
the starter switch in position 0,
same as with the SmartKey re-
moved from the starter switch). The
driver’s door then can be closed
again.
�
Have any passenger exit the vehicle at
a safe distance from the roadway.
Mounting the spare wheel
i
Open door only when conditions are safe to
do so.
Warning!
G
The dimensions of the spare wheel are dif-
ferent from those of the road wheels. As a
result, the vehicle handling characteristics
change when driving with a mounted spare
wheel. Adapt your driving style accordingly.
The spare wheel is for temporary use only.
When driving with spare wheel mounted, en-
sure proper tire inflation pressure and do
not exceed vehicle speed of 50 mph
(80 km/h).
Drive to the nearest Mercedes-Benz Center
as soon as possible to have the spare wheel
replaced with a regular road wheel.
Never operate the vehicle with more than
one spare wheel mounted.
Do not switch off the ESP
® when a spare
wheel is mounted.
Page 407 of 473
406 Practical hintsFlat tirePreparing the vehicle
Prepare the vehicle as described
(�page 405).
�
Turn spare wheel bracket counter-
clockwise to loosen.
�
Take the spare wheel out of the trunk
(�page 389).
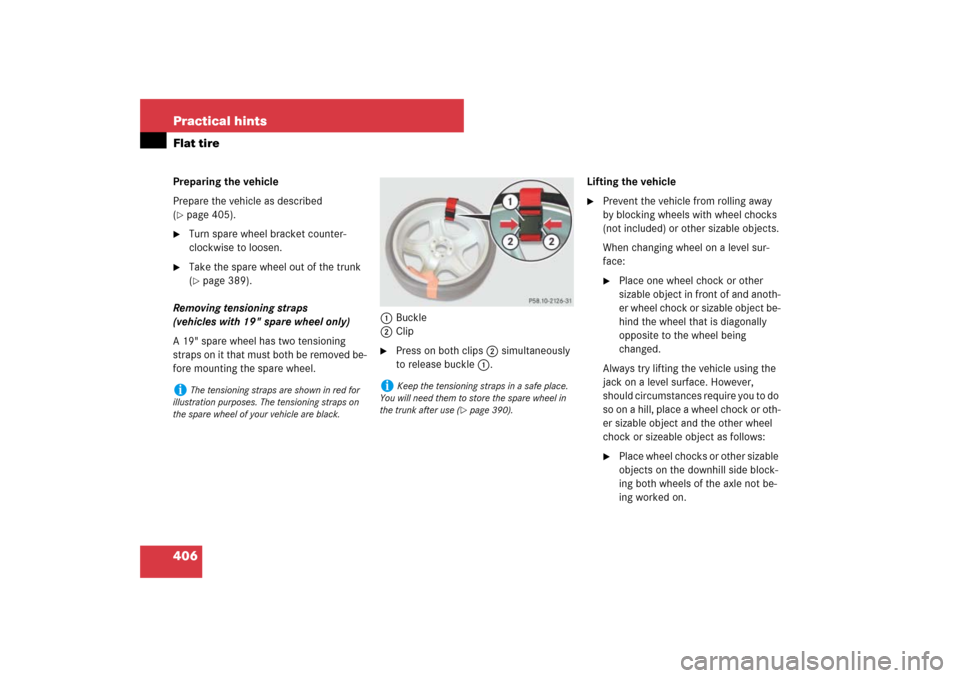
Removing tensioning straps
(vehicles with 19" spare wheel only)
A 19" spare wheel has two tensioning
straps on it that must both be removed be-
fore mounting the spare wheel.1Buckle
2Clip
�
Press on both clips 2 simultaneously
to release buckle 1.Lifting the vehicle
�
Prevent the vehicle from rolling away
by blocking wheels with wheel chocks
(not included) or other sizable objects.
When changing wheel on a level sur-
face:�
Place one wheel chock or other
sizable object in front of and anoth-
er wheel chock or sizable object be-
hind the wheel that is diagonally
opposite to the wheel being
changed.
Always try lifting the vehicle using the
jack on a level surface. However,
should circumstances require you to do
so on a hill, place a wheel chock or oth-
er sizable object and the other wheel
chock or sizeable object as follows:
�
Place wheel chocks or other sizable
objects on the downhill side block-
ing both wheels of the axle not be-
ing worked on.
i
The tensioning straps are shown in red for
illustration purposes. The tensioning straps on
the spare wheel of your vehicle are black.
i
Keep the tensioning straps in a safe place.
You will need them to store the spare wheel in
the trunk after use (
�page 390).
Page 408 of 473
407 Practical hints
Flat tire
�
Take the vehicle tool kit and the jack
out of the storage compartment under
the trunk floor (
�page 388).
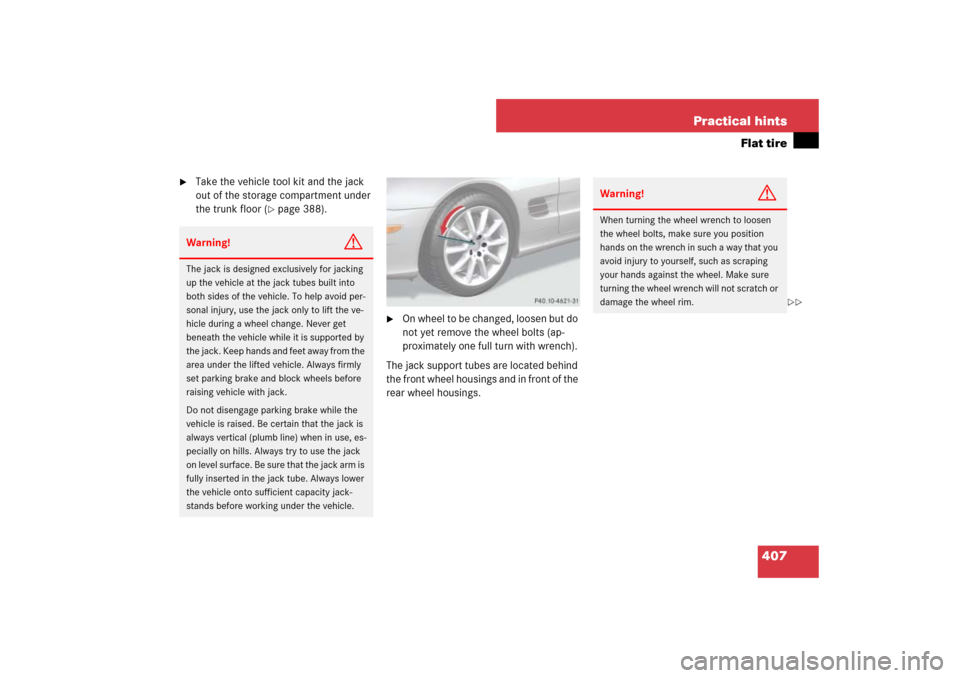
�
On wheel to be changed, loosen but do
not yet remove the wheel bolts (ap-
proximately one full turn with wrench).
The jack support tubes are located behind
the front wheel housings and in front of the
rear wheel housings.
Warning!
G
The jack is designed exclusively for jacking
up the vehicle at the jack tubes built into
both sides of the vehicle. To help avoid per-
sonal injury, use the jack only to lift the ve-
hicle during a wheel change. Never get
beneath the vehicle while it is supported by
the jack. Keep hands and feet away from the
area under the lifted vehicle. Always firmly
set parking brake and block wheels before
raising vehicle with jack.
Do not disengage parking brake while the
vehicle is raised. Be certain that the jack is
always vertical (plumb line) when in use, es-
pecially on hills. Always try to use the jack
on level surface. Be sure that the jack arm is
fully inserted in the jack tube. Always lower
the vehicle onto sufficient capacity jack-
stands before working under the vehicle.
Warning!
G
When turning the wheel wrench to loosen
the wheel bolts, make sure you position
hands on the wrench in such a way that you
avoid injury to yourself, such as scraping
your hands against the wheel. Make sure
turning the wheel wrench will not scratch or
damage the wheel rim.
��