Page 129 of 473

128 Controls in detail LightingFor information on how to switch on the
headlamps and use the turn signals, see
“Switching on headlamps” (
�page 55)
and “Turn signals” (
�page 56).
Exterior lamp switch
The exterior lamp switch is located on the
dashboard to the left of the steering wheel.
MOff
Daytime running lamp mode
(
�page 130)
UAutomatic headlamp mode
Daytime running lamp mode
(�page 130)
CParking lamps (also tail lamps, li-
cense plate lamps, side marker
lamps, instrument panel lamps)Canada only: When the engine is
running, the low beam headlamps
are also switched on.
BLow beam headlamps (or high
beam headlamps when the combi-
nation switch is pushed forward)
and parking lamps
ˆStanding lamps, right (turn left one
stop)
‚Standing lamps, left (turn left two
stops)
CIndicator lamp for parking lamps
‡Indicator lamp for front fog lamps
†Indicator lamp for rear fog lamp
i
If you drive in countries where vehicles drive
on the other side of the road than the country in
which the vehicle is registered, you must have
the headlamps modified for symmetrical low
beams. Relevant information can be obtained at
any authorized Mercedes-Benz Center.
i
With the SmartKey removed from the starter
switch or the engine turned off with
KEYLESS-GO* and the driver’s door open, a
warning sounds if the parking lamps or the low
beam headlamps are switched on.
The message $
Turn off lamps
appears in
the multifunction display.
Page 130 of 473
129 Controls in detail
Lighting
Manual headlamp mode
The low beam headlamps and parking
lamps can be switched on or off with the
exterior lamp switch (
�page 55).
Automatic headlamp mode
The following lamps switch on and off au-
tomatically depending on the brightness of
the ambient light:
�
Low beam headlamps
�
Tail lamps
�
Parking lamps
�
License plate lamps
�
Side marker lamps
�
Turn the exterior lamp switch to posi-
tion U.
With the SmartKey in starter switch
position1 or the KEYLESS-GO
start/stop button pressed once, only
the parking lamps and side marker
lamps will switch on and off automati-
cally.
When the engine is running, the low
beam headlamps, the tail and parking
lamps, the license plate lamps, and the
side marker lamps will switch on and
off automatically.
Warning!
G
If the exterior lamp switch is set toU,�
the headlamps may switch off unexpect-
edly when the system senses bright am-
bient light, for example light from
oncoming traffic.
�
the headlamps will not be automatically
switched on under foggy conditions.
To minimize risk to you and to others, acti-
vate headlamps by turning exterior lamp
switch to B when driving or when traffic
and / or ambient lighting conditions require
you to do so.
In low ambient lighting conditions, only
switch from position U to B with the
vehicle at a standstill in a safe location.
Switching from U to B will briefly
switch off the headlamps. Doing so while
driving in low ambient lighting conditions
may result in an accident.
The automatic headlamp feature is only an
aid to the driver. The driver is responsible for
the operation of the vehicle’s lights at all
times.
Page 132 of 473
131 Controls in detail
Lighting
Fog lampsFront fog lamps
�
Switch on the low beam headlamps
(�page 55).
�
Pull out the exterior lamp switch to first
stop.
The front fog lamps are switched on.
The green indicator lamp ‡ in the
exterior lamp switch comes on
(�page 128).
�
Push in the exterior lamp switch.
The front fog lamps are switched off.
The green indicator lamp ‡ in the
exterior lamp switch goes out.Rear fog lamp (driver’s side only)
�
Switch on the front fog lamps
(�page 131).
�
Pull out the exterior lamp switch to sec-
ond stop.
The rear fog lamp is switched on.
The yellow indicator lamp † in the
lamp switch comes on (
�page 128).
�
Push in the exterior lamp switch to first
stop.
The rear fog lamp is switched off.
The yellow indicator lamp † in the
exterior lamp switch goes out.
The front fog lamps remain lit.
Warning!
G
In low ambient lighting or foggy conditions,
only switch from position U to B with
the vehicle at a standstill in a safe location.
Switching from U to B will briefly
switch off the headlamps. Doing so while
driving in low ambient lighting conditions
may result in an accident.i
Fog lamps will operate with the parking
lamps and/or the low beam headlamps on. Fog
lamps should only be used in conjunction with
low beam headlamps. Consult your State or
Province Motor Vehicle Regulations regarding
permissible lamp operation.
i
The fog lamps cannot be switched on with
the exterior lamp switch in position U. To
switch on the fog lamps, turn the exterior lamp
switch to position B first.
Page 134 of 473
133 Controls in detail
Lighting
Combination switch
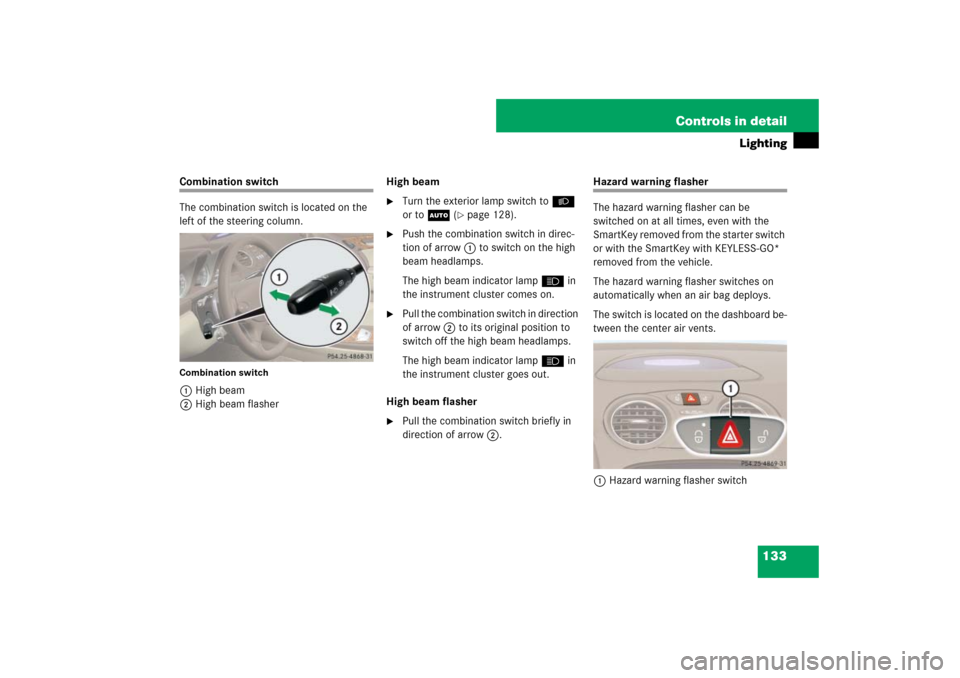
The combination switch is located on the
left of the steering column.Combination switch1High beam
2High beam flasherHigh beam
�
Turn the exterior lamp switch toB
or toU (
�page 128).
�
Push the combination switch in direc-
tion of arrow1 to switch on the high
beam headlamps.
The high beam indicator lamp A in
the instrument cluster comes on.
�
Pull the combination switch in direction
of arrow 2 to its original position to
switch off the high beam headlamps.
The high beam indicator lamp A in
the instrument cluster goes out.
High beam flasher
�
Pull the combination switch briefly in
direction of arrow2.
Hazard warning flasher
The hazard warning flasher can be
switched on at all times, even with the
SmartKey removed from the starter switch
or with the SmartKey with KEYLESS-GO*
removed from the vehicle.
The hazard warning flasher switches on
automatically when an air bag deploys.
The switch is located on the dashboard be-
tween the center air vents.
1Hazard warning flasher switch
Page 135 of 473
134 Controls in detailLightingSwitching on the hazard warning
flasher�
Press hazard warning flasher
switch1.
All turn signals are flashing.
Switching off the hazard warning
flasher
�
Press hazard warning flasher switch1
again.
Interior lighting
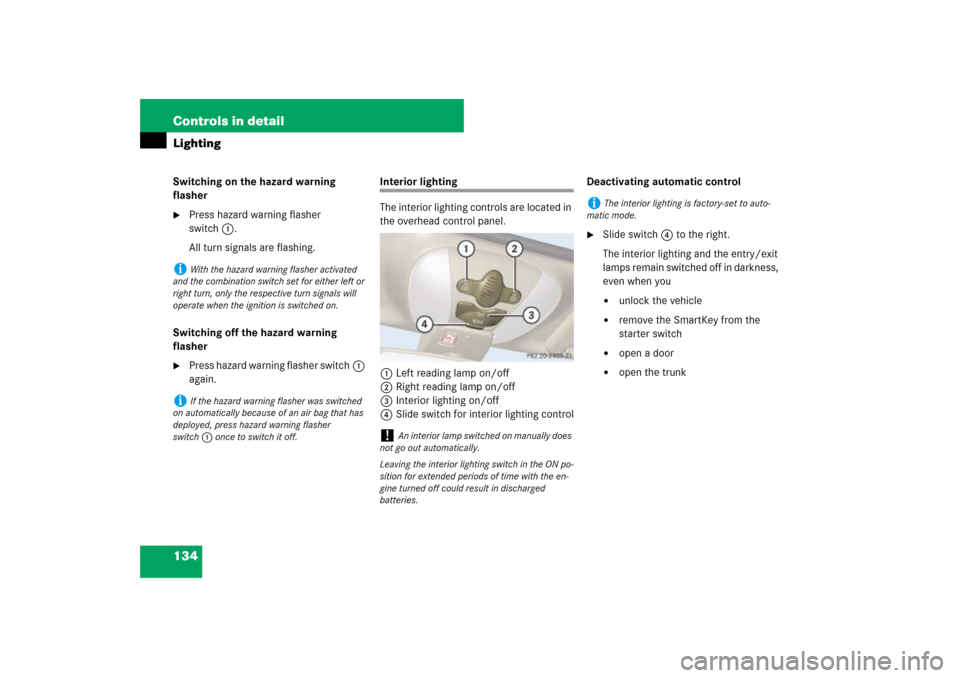
The interior lighting controls are located in
the overhead control panel.
1Left reading lamp on/off
2Right reading lamp on/off
3Interior lighting on/off
4Slide switch for interior lighting controlDeactivating automatic control
�
Slide switch4 to the right.
The interior lighting and the entry/exit
lamps remain switched off in darkness,
even when you�
unlock the vehicle
�
remove the SmartKey from the
starter switch
�
open a door
�
open the trunk
i
With the hazard warning flasher activated
and the combination switch set for either left or
right turn, only the respective turn signals will
operate when the ignition is switched on.
i
If the hazard warning flasher was switched
on automatically because of an air bag that has
deployed, press hazard warning flasher
switch1 once to switch it off.
!
An interior lamp switched on manually does
not go out automatically.
Leaving the interior lighting switch in the ON po-
sition for extended periods of time with the en-
gine turned off could result in discharged
batteries.
i
The interior lighting is factory-set to auto-
matic mode.
Page 137 of 473
136 Controls in detailInstrument clusterFor a full view illustration of the instrument
cluster, see “Instrument cluster”
(�page 26).
The instrument cluster is activated when
you
�
open a door
�
switch on the ignition
�
press the reset button (
�page 26)
�
switch on the exterior lamps
Opening a door will activate the instrument
cluster only for about 30 seconds.
You can change the instrument cluster set-
tings in the Instrument cluster submenu of
the control system (
�page 156).Adjusting instrument cluster
illumination
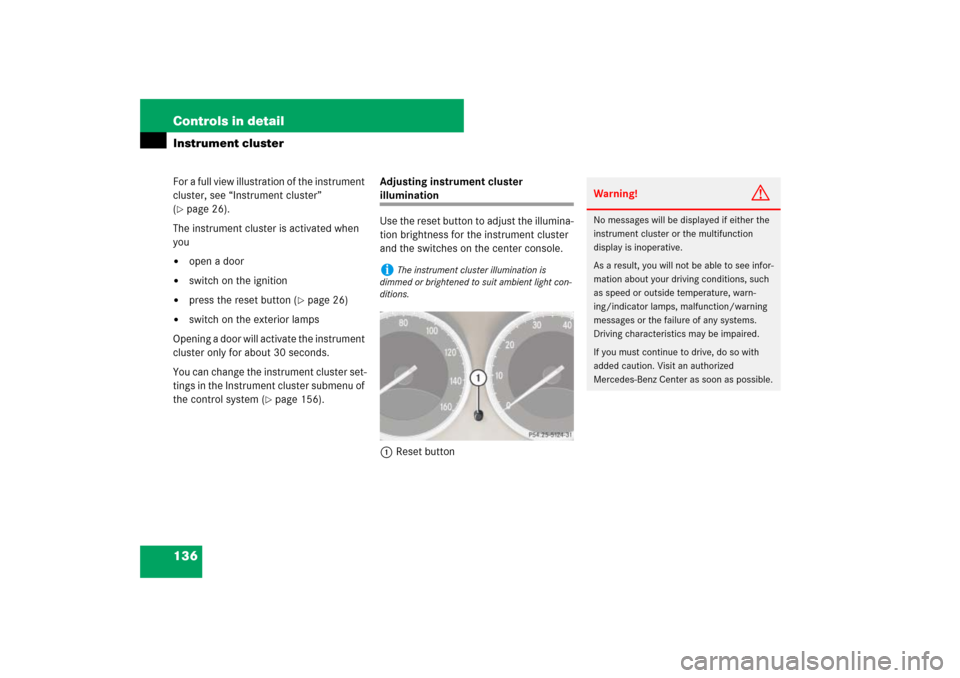
Use the reset button to adjust the illumina-
tion brightness for the instrument cluster
and the switches on the center console.
1Reset buttoni
The instrument cluster illumination is
dimmed or brightened to suit ambient light con-
ditions.
Warning!
G
No messages will be displayed if either the
instrument cluster or the multifunction
display is inoperative.
As a result, you will not be able to see infor-
mation about your driving conditions, such
as speed or outside temperature, warn-
ing/indicator lamps, malfunction/warning
messages or the failure of any systems.
Driving characteristics may be impaired.
If you must continue to drive, do so with
added caution. Visit an authorized
Mercedes-Benz Center as soon as possible.
Page 145 of 473
144 Controls in detailControl system
Menu 6
Menu 7
Menu 8
Menu 9
Vehicle status
message memory
1
Settings
Trip computer
Telephone*
(�page 152)
(�page 153)
(�page 163)
(�page 165)
Commands/submenus
Calling up vehicle mal-
function, warning and
system status messag-
es stored in memory
Resetting to factory set-
tings
Fuel consumption sta-
tistics after start
Loading phone book
Instrument cluster
submenu
Fuel consumption sta-
tistics since the last re-
set
Searching for name in
phone book
Time submenu
Distance to empty
Lighting submenuVehicle submenuConvenience submenu
1You will only see the message memory menu if there is a message.i
The headings used in the menus table are
designed to facilitate navigation within the sys-
tem and are not necessarily identical to those
shown in the control system displays. The first function displayed in each menu will au-
tomatically show you which part of the system
you are in.
Page 173 of 473
172 Controls in detailAutomatic transmissionStopping
When you stop briefly, e.g. at traffic lights:�
Leave the transmission in gear.
�
Hold the vehicle with the brake.
When you stop longer with the engine
idling and/or on a hill:
�
Set the parking brake.
�
Move the gear selector lever to
positionP.Maneuvering
When you maneuver in tight areas,
e.g. when pulling into a parking space:
�
Control the vehicle speed by gradually
releasing the brakes.
�
Accelerate gently.
�
Never abruptly step on the accelerator.
Working on the vehicle
Gear ranges
With the gear selector lever in positionD
and driving in the automatic shift
programC orS (
�page 173), you can
select a gear range for the automatic
transmission to operate within:
Gear selector lever (�page 174):
You can limit the gear range by pressing
the gear selector lever to the left (D-), and
reverse the gear range limit by pressing
the gear selector lever to the right (D+).
Steering wheel gearshift control*
(
�page 175):
You can limit the gear range by pulling the
left gearshift paddle on the steering wheel
gearshift control, and reverse the gear
range limit by pulling the right gearshift
paddle on the steering wheel gearshift
control.
Warning!
G
When working on the vehicle, set the
parking brake and move gear selector lever
to positionP. Otherwise the vehicle could
roll away.