Page 189 of 473

188 Controls in detailAutomatic climate controlAir distribution in automatic mode
You can separately adjust the air distribu-
tion for each side of the passenger com-
partment.
Activating�
Press control button1 or 5
(�page 185).
The control button is engaged.
TheU symbol on the control button
comes on. Air distribution for the re-
spective side of the passenger com-
partment is adjusted automatically.
Deactivating
�
Press control button 1 or 5
(�page 185) once more.
The control button sticks up slightly.
The U symbol on the control button
goes out. Automatic air distribution for
the respective side of the passenger
compartment is switched off. Adjust
the air distribution manually
(�page 189).Air volume in automatic mode
The air volume settings are the same for
the entire passenger compartment.
Activating
�
Press control button 9 (
�page 185).
The control button is engaged.
TheU symbol on the control button
comes on.
Deactivating
�
Press control button 9 (
�page 185)
once more.
The control button sticks up slightly.
The U symbol on the control button
goes out. Adjust the air volume manu-
ally (
�page 190).
Setting the temperature
Use temperature controls6 andb
(�page 185) to separately adjust the air
temperature on each side of the passenger
compartment. You should raise or lower
the temperature setting in small incre-
ments, preferably starting at 72°F (22°C).
The automatic climate control will adjust
to the set temperature as fast as possible.
Increasing
�
Turn temperature control6
and/orb (
�page 185) slightly
clockwise.
The automatic climate control system
will correspondingly adjust the interior
air temperature.
Decreasing
�
Turn temperature control6
and/orb (
�page 185) slightly
counterclockwise.
Page 410 of 473
409 Practical hints
Flat tire
�
Keeping jack in this position, turn
crank3 clockwise until the jack base
meets the ground. Make sure the jack
is vertical (plumb line).
�
Continue to turn the crank until the tire
is a maximum of 1.2 in (3 cm) from the
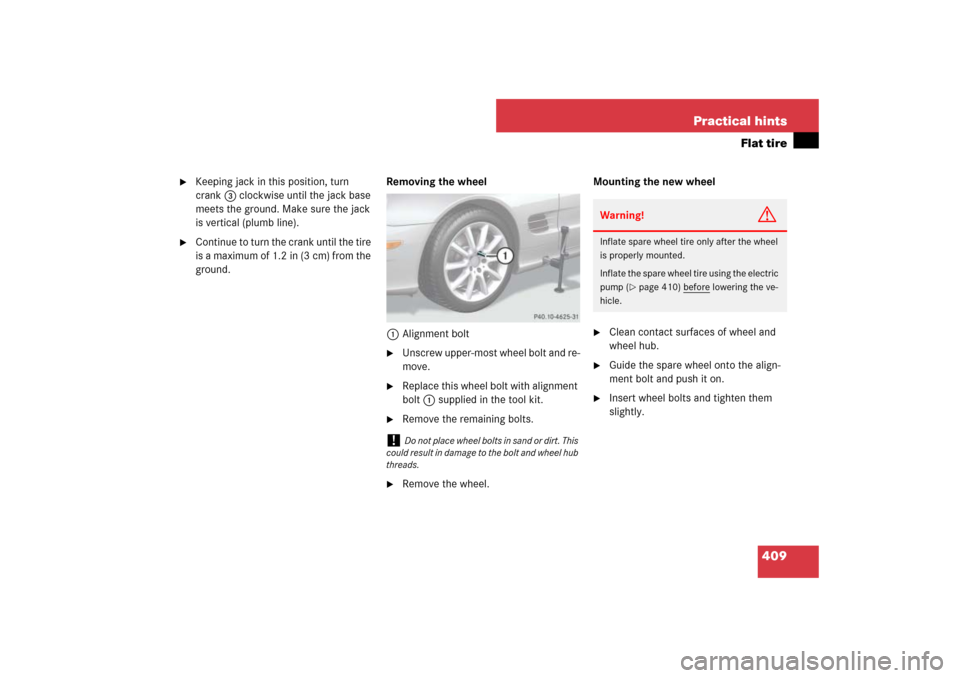
ground.Removing the wheel
1Alignment bolt
�
Unscrew upper-most wheel bolt and re-
move.
�
Replace this wheel bolt with alignment
bolt1 supplied in the tool kit.
�
Remove the remaining bolts.
�
Remove the wheel.Mounting the new wheel
�
Clean contact surfaces of wheel and
wheel hub.
�
Guide the spare wheel onto the align-
ment bolt and push it on.
�
Insert wheel bolts and tighten them
slightly.
!
Do not place wheel bolts in sand or dirt. This
could result in damage to the bolt and wheel hub
threads.
Warning!
G
Inflate spare wheel tire only after the wheel
is properly mounted.
Inflate the spare wheel tire using the electric
pump (
�page 410) before
lowering the ve-
hicle.
Page 456 of 473

455 Index
Center console
Lower part 32
Upper part 31
Central locking
Automatic 119, 162
Central locking/unlocking switch 31,
119
Locking/unlocking from inside 119
Certification label 430
Check engine see Lamps, indicator and
warning
Checking tire pressure electronically with
the Advanced Tire Pressure Monitoring
System (Advanced TPMS)*,
(Canada only) 298
Children in the vehicle
Air bags 83
Front passenger front air bag off indica-
tor lamp 76, 345
Infant and child restraint systems 83
Occupant Classification System
(OCS) 72
Cigarette lighter 239
Clock 25, 157
Cockpit 24
Cold tire inflation pressure 312COMAND system 31
Driving instructions 268
Combination switch
High beam 56, 133
Turn signals 56
Windshield wipers 57
Consumer battery 281
Control and operation of radio
transmitters 268
Control system 139, 142
Control system menus
AMG Menu 146
AUDIO 149
NAV 151
Settings 153
Standard display 145
TEL* 165
Trip computer 163
Vehicle status message memory 152
Control system submenus 143
Convenience 162
Instrument cluster 156
Lighting 159
Time 157
Vehicle 162
Convenience feature 201Coolant 449
Anticorrosion/antifreeze mixing ratio
and quantity 451
Checking coolant level 280
Coolant warning lamp 337
Messages in the multifunction
display 371, 373
Temperature 270
Temperature gauge 137
Corner-illuminating front fog lamps 132
Corner-illuminating front fog lamps*
Replacing bulbs 397
Courtesy lighting 135
Cruise control 209
Messages in the multifunction
display 352, 353
Cup holder 238
Curb weight 312
D
Daytime running lamp mode 130
Setting 159
Deep water see Standing water
Defogging, Windshield 191
Defrosting, Front 190
Defrosting, Rear 183
Page 457 of 473

456 IndexDelayed switch-off
Exterior lamps 160
Interior lighting 161
Department of Transportation see DOT
Difficulties
While driving 59
With starting the engine 53
Digital clock see Clock
Digital speedometer 145
Dimensions, Vehicle 442
Dipstick see Oil dipstick
Direction of rotation (tires) 286
Displays
Digital speedometer 145
Distronic* 215
Maintenance service indicator 319
Multifunction display 139
Outside temperature 138, 145
Symbol messages 365
Text messages 349
Vehicle status message memory 152
Vehicle status messages 347
Distance to empty (range), Trip
computer 165Distance warning function* 224
Activating 225
Deactivating 225
Intermittent warning sound 224
Symbol 217
Distronic indicator lamp* 27
Distronic* 213
“Resume” function 220
Activating 218
Cleaning system sensor cover 325
Control system 151, 217
Distance warning function 224
Driving hints 222
System sensor cover 325
Warning and indicator lamps 215,
216, 224, 339
Door
Control panel 36
Handle, Inside 36
Locking/unlocking,
KEYLESS-GO* 39, 64
Locking/unlocking, Mechanical
key 391, 393
Locking/unlocking, SmartKey 38, 63
Messages in the multifunction
display 374Opening from inside 111
Storage compartment 233
Door control panel 36
Door handle 36
DOT 312
Drinking and driving 259
Driving
Abroad 268
Driving off 262
Electro-hydraulic brake system 95
Hydroplaning 264
In winter 266, 316
Instructions 54, 259
Problems 59
Safety systems 87
Systems 209
Through standing water 267
With Distronic* 222
Driving safety systems 87
ABS 87
BAS 87, 89
Electro-hydraulic brake system 87,
92
Electronic traction system 91
ESP
®
87, 89
Page 466 of 473

465 Index
Seating capacity 287
Seats
Adjusting height 43
Adjusting lumbar support 122
Adjusting shoulder support 122
Heating 123
Massage function 122
Moving 121
Self-test
OCS 76
Service
Basic service (Service A) 319
Batteries 414
Extended service (Service B) 319
Types 319
Service life (tires) 284
Service System see Maintenance
Settings
Clock 157
Convenience functions 162
Cruise control 212
Daytime running lamp mode 159
Interior lighting delayed
switch-off 161
Lamps and lighting
(control system) 159Language, multifunction display 157
Locator lighting 160
Miles/kilometers in
speedometer 156
Night security illumination 160
Resetting all (control system) 153
Selective (SmartKey with
KEYLESS-GO*) 109
Selective (SmartKey) 104
Speedometer display mode 156
Time 157
Units in speedometer 156
Shifting
Gear selector lever 168
Gear selector lever positions 170
Into optimal gear range (Automatic
transmission) 175
Shoulder support
Seat adjustment 122
Side marker lamps 398
Cleaning lenses 325
Side windows
Automatic closing 198
Automatic opening 197
Closing 196, 197
Closing fully 198Closing with KEYLESS-GO* 198
Express-close 198
Express-open 197
Opening 196, 197
Opening fully 197
Stopping 198
Synchronizing power windows 198
Sidewall 313
SmartKey 102
Batteries 395
Checking the batteries 105
Closing retractable hardtop 201
Global locking 103, 104
Global unlocking 103
Loss of 105
Positions in starter switch 40
Restoring factory settings 104, 109
Selective setting 104
Starter switch positions 40
Starting the engine 52
Turning off the engine 62
SmartKey with KEYLESS-GO*
Checking the batteries 110
Global locking 108, 109
Global unlocking 108
Locking 110