Page 382 of 473
381 Practical hints
What to do if …
Left display
Right display
Possible cause/consequence
Possible solution
.
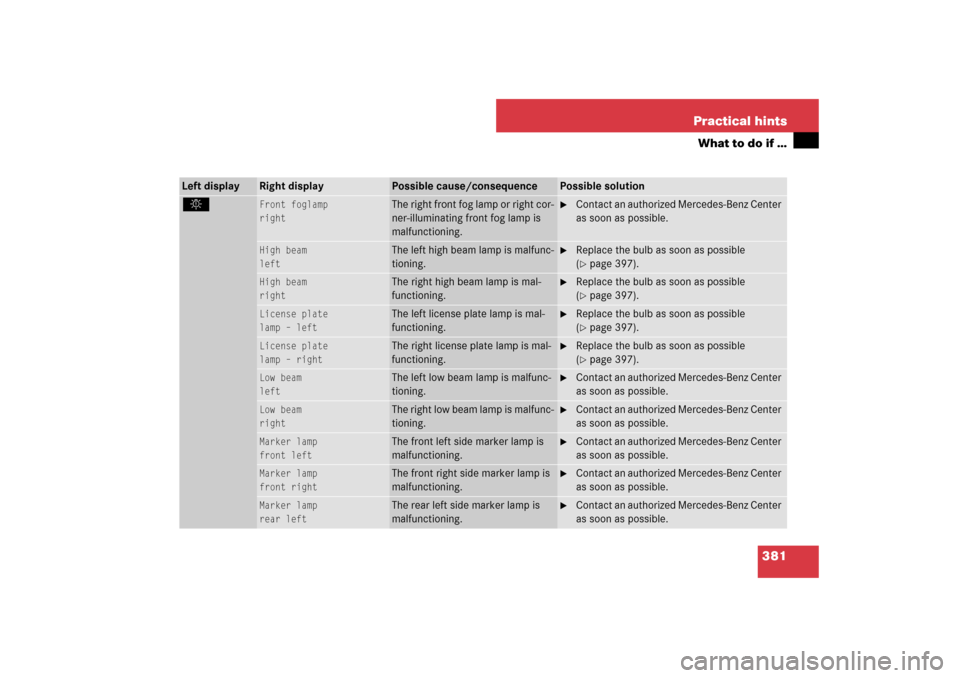
Front foglamp
right
The right front fog lamp or right cor-
ner-illuminating front fog lamp is
malfunctioning.
�
Contact an authorized Mercedes-Benz Center
as soon as possible.
High beam
left
The left high beam lamp is malfunc-
tioning.
�
Replace the bulb as soon as possible
(�page 397).
High beam
right
The right high beam lamp is mal-
functioning.
�
Replace the bulb as soon as possible
(�page 397).
License plate
lamp – left
The left license plate lamp is mal-
functioning.
�
Replace the bulb as soon as possible
(�page 397).
License plate
lamp – right
The right license plate lamp is mal-
functioning.
�
Replace the bulb as soon as possible
(�page 397).
Low beam
left
The left low beam lamp is malfunc-
tioning.
�
Contact an authorized Mercedes-Benz Center
as soon as possible.
Low beam
right
The right low beam lamp is malfunc-
tioning.
�
Contact an authorized Mercedes-Benz Center
as soon as possible.
Marker lamp
front left
The front left side marker lamp is
malfunctioning.
�
Contact an authorized Mercedes-Benz Center
as soon as possible.
Marker lamp
front right
The front right side marker lamp is
malfunctioning.
�
Contact an authorized Mercedes-Benz Center
as soon as possible.
Marker lamp
rear left
The rear left side marker lamp is
malfunctioning.
�
Contact an authorized Mercedes-Benz Center
as soon as possible.
Page 383 of 473
382 Practical hintsWhat to do if …Left display
Right display
Possible cause/consequence
Possible solution
.
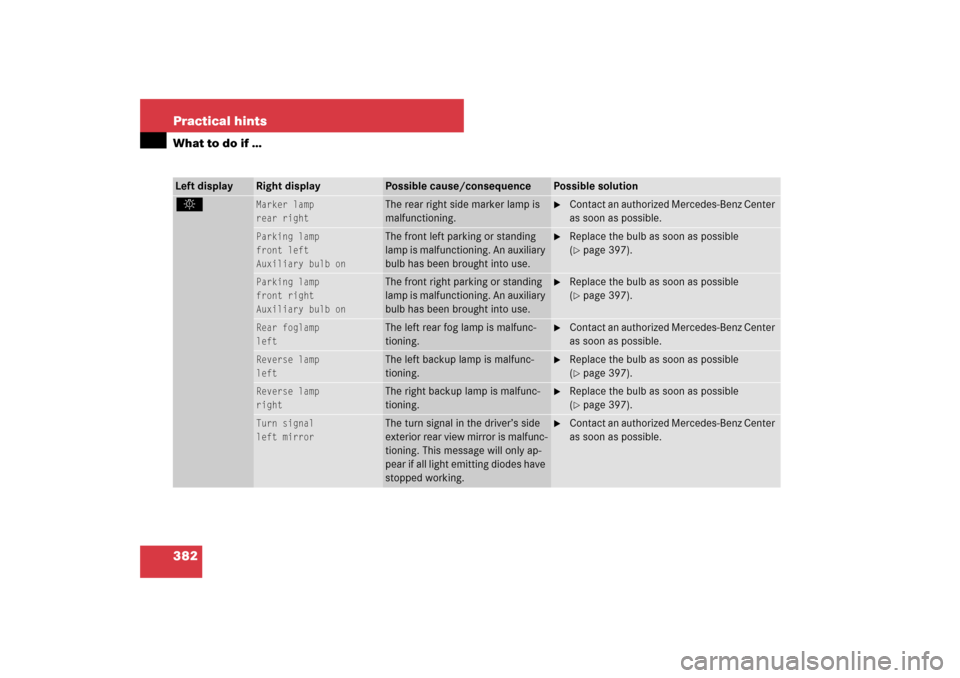
Marker lamp
rear right
The rear right side marker lamp is
malfunctioning.
�
Contact an authorized Mercedes-Benz Center
as soon as possible.
Parking lamp
front left
Auxiliary bulb on
The front left parking or standing
lamp is malfunctioning. An auxiliary
bulb has been brought into use.
�
Replace the bulb as soon as possible
(�page 397).
Parking lamp
front right
Auxiliary bulb on
The front right parking or standing
lamp is malfunctioning. An auxiliary
bulb has been brought into use.
�
Replace the bulb as soon as possible
(�page 397).
Rear foglamp
left
The left rear fog lamp is malfunc-
tioning.
�
Contact an authorized Mercedes-Benz Center
as soon as possible.
Reverse lamp
left
The left backup lamp is malfunc-
tioning.
�
Replace the bulb as soon as possible
(�page 397).
Reverse lamp
right
The right backup lamp is malfunc-
tioning.
�
Replace the bulb as soon as possible
(�page 397).
Turn signal
left mirror
The turn signal in the driver’s side
exterior rear view mirror is malfunc-
tioning. This message will only ap-
pear if all light emitting diodes have
stopped working.
�
Contact an authorized Mercedes-Benz Center
as soon as possible.
Page 384 of 473

383 Practical hints
What to do if …
Left display
Right display
Possible cause/consequence
Possible solution
.
Turn signal
right mirror
The turn signal in the passenger
side exterior rear view mirror is mal-
functioning. This message will only
appear if all light emitting diodes
have stopped working.
�
Contact an authorized Mercedes-Benz Center
as soon as possible.
Tail lamp
left
Auxiliary bulb on
The left tail lamp is malfunctioning.
An auxiliary bulb has been brought
into use.
�
Contact an authorized Mercedes-Benz Center
as soon as possible.
Tail lamp
right
Auxiliary bulb on
The right tail lamp is malfunction-
ing. An auxiliary bulb has been
brought into use.
�
Contact an authorized Mercedes-Benz Center
as soon as possible.
Turn off
lights
You have removed the SmartKey
from the starter switch and opened
the driver’s door or removed the
SmartKey with KEYLESS-GO* from
the vehicle and left the headlamps
on.
�
Turn the exterior lamp switch toM
orU.
Turn signal
front left
Auxiliary bulb on
The left front turn signal lamp is
malfunctioning. An auxiliary bulb
has been brought into use.
�
Replace the bulb as soon as possible
(�page 397).
Turn signal
front right
Auxiliary bulb on
The right front turn signal lamp is
malfunctioning. An auxiliary bulb
has been brought into use.
�
Replace the bulb as soon as possible
(�page 397).
Page 385 of 473
384 Practical hintsWhat to do if …Left display
Right display
Possible cause/consequence
Possible solution
.
Turn signal
rear left
Auxiliary bulb on
The left rear turn signal lamp is mal-
functioning. An auxiliary bulb has
been brought into use.
�
Replace the bulb as soon as possible
(�page 397).
Turn signal
rear right
Auxiliary bulb on
The right rear turn signal lamp is
malfunctioning. An auxiliary bulb
has been brought into use.
�
Replace the bulb as soon as possible
(�page 397).
C
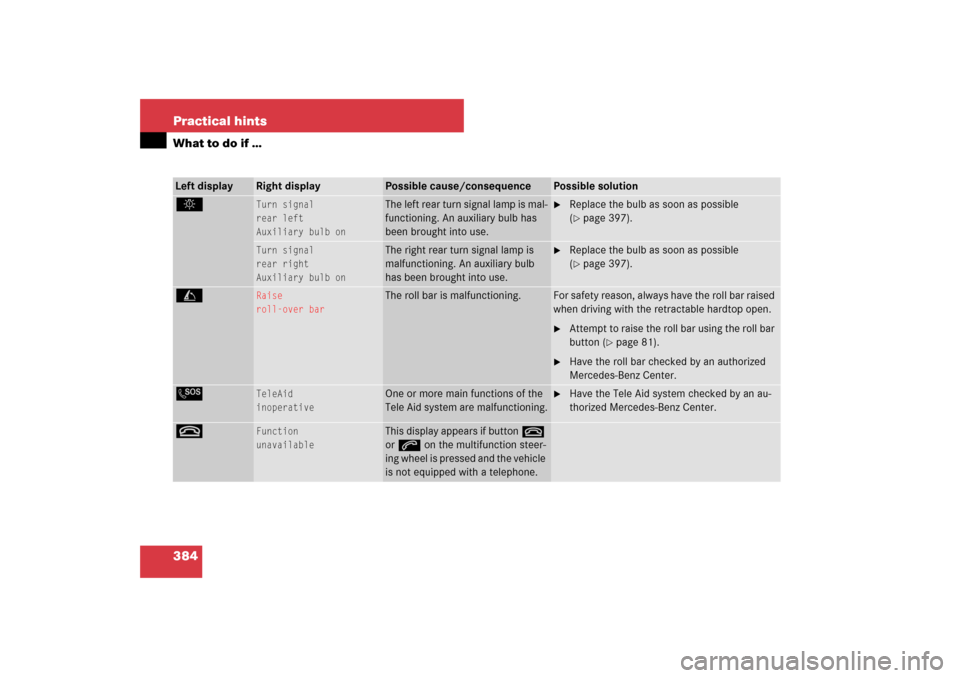
Raise
roll-over bar
The roll bar is malfunctioning.
For safety reason, always have the roll bar raised
when driving with the retractable hardtop open.�
Attempt to raise the roll bar using the roll bar
button (
�page 81).
�
Have the roll bar checked by an authorized
Mercedes-Benz Center.
L
TeleAid
inoperative
One or more main functions of the
Tele Aid system are malfunctioning.
�
Have the Tele Aid system checked by an au-
thorized Mercedes-Benz Center.
t
Function
unavailable
This display appears if button t
or s on the multifunction steer-
ing wheel is pressed and the vehicle
is not equipped with a telephone.
Page 386 of 473
385 Practical hints
What to do if …
Left display
Right display
Possible cause/consequence
Possible solution
H
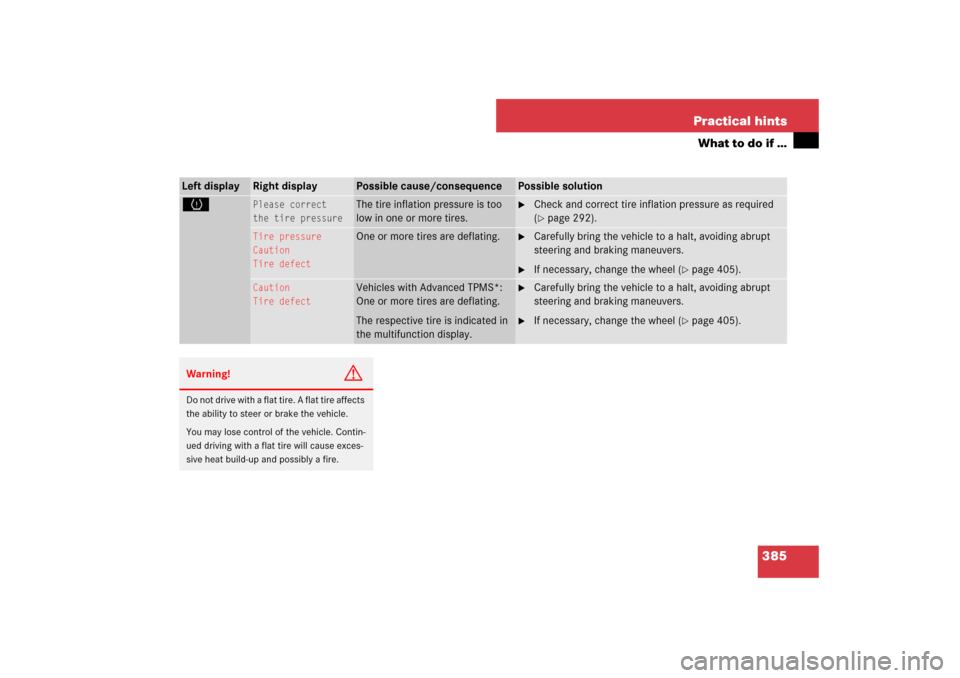
Please correct
the tire pressure
The tire inflation pressure is too
low in one or more tires.
�
Check and correct tire inflation pressure as required
(�page 292).
Tire pressure
Caution
Tire defect
One or more tires are deflating.
�
Carefully bring the vehicle to a halt, avoiding abrupt
steering and braking maneuvers.
�
If necessary, change the wheel (
�page 405).
Caution
Tire defect
Vehicles with Advanced TPMS*:
One or more tires are deflating.
The respective tire is indicated in
the multifunction display.
�
Carefully bring the vehicle to a halt, avoiding abrupt
steering and braking maneuvers.
�
If necessary, change the wheel (
�page 405).
Warning!
G
Do not drive with a flat tire. A flat tire affects
the ability to steer or brake the vehicle.
You may lose control of the vehicle. Contin-
ued driving with a flat tire will cause exces-
sive heat build-up and possibly a fire.
Page 388 of 473
387 Practical hints
What to do if …
Left display
Right display
Possible cause/consequence
Possible solution
Ê
This message will appear when the
trunk lid is open and you are trying
to open or close the retractable
hardtop.
�
Close the trunk lid.
M
Close
trunk partition
You are trying to open or close the
retractable hardtop even though
the luggage cover in the trunk is not
closed and/or properly engaged.
�
Close the luggage cover and engage it into
side holders (
�page 205).
W
Washer fluid
Please refill
The washer fluid in the washer fluid
reservoir has fallen below the mini-
mum level.
�
Add washer fluid (
�page 282).
Warning!
G
Do not spill antifreeze on hot engine parts.
Antifreeze contains ethylene glycol which
may ignite when if it comes into contact with
hot engine parts. You could be seriously
burned.
Page 390 of 473
389 Practical hints
Where will I find ...?
1Spare wheel
2Electric air pump
3Vehicle tool kit
4Storage well casing�
Take spare wheel 1 out of the trunk,
see “Removing the spare wheel”
(�page 389), to access jack 5 and
wheel wrench 6.5Jack
6Wheel wrench
Removing the spare wheel
�
Open the trunk (
�page 111).
�
Lift up the trunk floor cover.
�
Remove storage well casing that con-
tains the vehicle tool kit and the elec-
tric air pump.1Spare wheel
2Tensioning strap (vehicles with
19" spare wheel only)
3Retaining screw
4Storage well casing base
�
Remove storage well casing base 4.
�
Remove retaining screw 3 by turning
it counterclockwise.
�
Remove spare wheel 1.
Page 391 of 473
390 Practical hintsWhere will I find ...?Storing the spare wheel after use
If you wish to store the spare wheel after
use, carry out the following steps. Other-
wise, the spare wheel may not fit the spare
wheel well.�
Unscrew the valve cap from the valve
of the collapsible tire.
�
Take the valve extractor from the
vehicle tool kit (
�page 388).
�
Unscrew the valve insert from the valve
and allow the air to escape.
�
Screw the valve insert back into the
valve.
�
Screw the valve cap back onto the
valve.
�
Store the spare wheel by carrying out
the steps described in “Removing the
spare wheel” (
�page 389) in reverse
order.
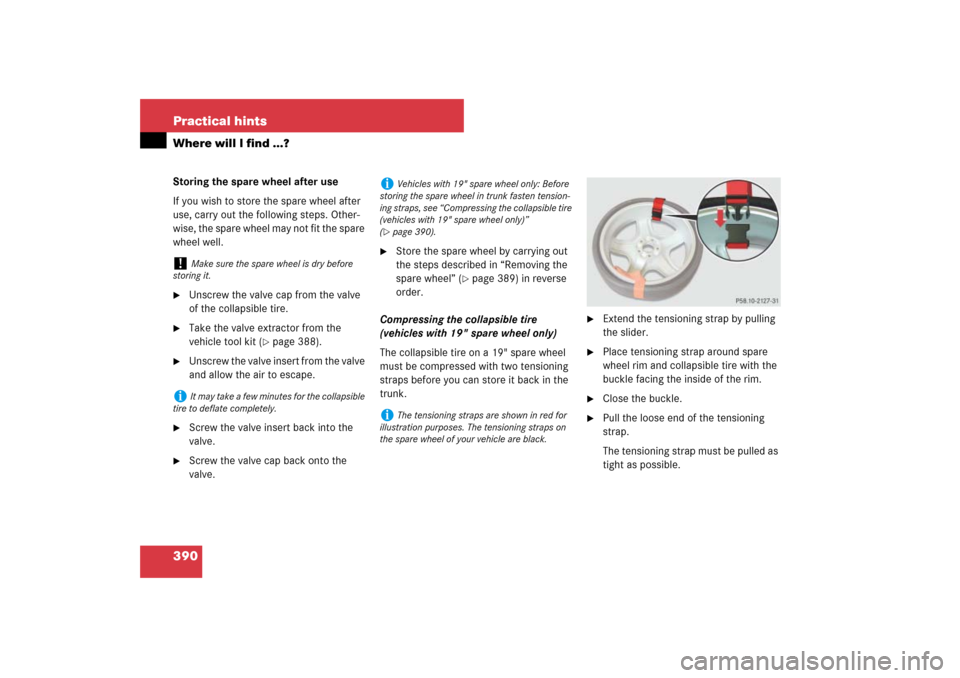
Compressing the collapsible tire
(vehicles with 19" spare wheel only)
The collapsible tire on a 19" spare wheel
must be compressed with two tensioning
straps before you can store it back in the
trunk.
�
Extend the tensioning strap by pulling
the slider.
�
Place tensioning strap around spare
wheel rim and collapsible tire with the
buckle facing the inside of the rim.
�
Close the buckle.
�
Pull the loose end of the tensioning
strap.
The tensioning strap must be pulled as
tight as possible.
!
Make sure the spare wheel is dry before
storing it.
i
It may take a few minutes for the collapsible
tire to deflate completely.
i
Vehicles with 19" spare wheel only: Before
storing the spare wheel in trunk fasten tension-
ing straps, see “Compressing the collapsible tire
(vehicles with 19" spare wheel only)”
(
�page 390).
i
The tensioning straps are shown in red for
illustration purposes. The tensioning straps on
the spare wheel of your vehicle are black.