Page 116 of 473

115 Controls in detail
Locking and unlocking
�
Press and hold switch1 until the
trunk is closed.
Indicator lamp2 in the switch goes
out when the trunk is closed.
To interrupt the closing procedure:
�
Release switch1.Closing trunk from outside
automatically*
In vehicles with trunk opening/closing sys-
tem* you can close the trunk separately
from the outside using the trunk closing
switch.
Warning!
G
Monitor the closing procedure carefully to
make sure no one is in danger of being in-
jured. To prevent possible personal injury,
always keep hands and fingers away from
the trunk lid opening when closing the trunk.
Be especially careful when small children
are around. To stop the closing procedure,
do one of the following: �
Press button Š on the SmartKey or
SmartKey with KEYLESS-GO*.
�
Press the trunk opening/closing*
switch (on the driver’s door).
�
Press trunk closing switch.
�
Press the KEYLESS-GO locking/closing
switch*.
�
Pull the trunk lid handle.
Even with the SmartKey removed from the
starter switch, the trunk opening/closing*
switch can be operated. Therefore, do not
leave children unattended in the vehicle, or
with access to an unlocked vehicle. Unsu-
pervised use of vehicle equipment may
cause an accident and/or serious personal
injury.
Page 118 of 473
.
�
Pull")
117 Controls in detail
Locking and unlocking
Valet locking
The lock is located next to the handle
above the rear license plate recess.
1Neutral position
2Locked
�
Close the trunk (
�page 113).
�
Pull the mechanical key out of the
SmartKey (
�page 391).
�
Insert the mechanical key in the trunk
lid lock.
�
Turn the mechanical key clockwise to
position2 and remove the mechani-
cal key in that position to lock the
trunk.
The trunk remains locked even when the
vehicle is centrally unlocked.
�
Insert the mechanical key in the trunk
lid lock.
�
Turn the mechanical key counterclock-
wise to neutral position1 and remove
the mechanical key in that position to
unlock the trunk.
You can now open the trunk
(�page 111).
Trunk lid emergency release
With the emergency release button, the
trunk can be opened from inside the trunk.
The emergency release button is located
on the left side of the trunk.
1Emergency release button�
Briefly press emergency release
button1.
The trunk opens.
i
To deny any unauthorized person access to
the trunk, e.g. when you valet park the vehicle,
lock it separately with the mechanical key. Leave
only the SmartKey or SmartKey with
KEYLESS-GO* less its mechanical key with the
vehicle.
i
You can only cancel the separate trunk lock-
ing mode by means of the mechanical key.
��
Page 119 of 473

118 Controls in detailLocking and unlockingIllumination of the emergency release but-
ton:�
The button flashes for 30 minutes after
opening the trunk.
�
The button flashes for 60 minutes after
closing the trunk.
Power closing assist for trunk lid
It is not necessary to slam the trunk lid
closed. A electrical power-assisted mecha-
nism draws trunk lid closed quietly and au-
tomatically once trunk lid has been
latched. When the pneumatic power-as-
sisted mechanism has stopped, trunk can
be re-opened.Power closing assist for trunk lid
�
Press the trunk lid gently into its lock.
The trunk closes automatically.
i
The emergency release button unlocks and
opens the trunk while the vehicle is standing still
or in motion.
i
The emergency release button does not
open the trunk lid if the vehicle battery is dis-
charged or disconnected.
Warning!
G
To prevent possible personal injury, always
keep hands and fingers away from the trunk
lid opening when closing the trunk. Be espe-
cially careful when small children are
around.
In case of danger, pull the inside or outside
door handle, or press the trunk lid lock.
To prevent personal injury, never actuate
the closing assist mechanism by tampering
with the door or trunk lid latch.
Warning!
G
Only drive with the trunk closed as, among
other dangers such as blocked visibility, ex-
haust fumes may enter the vehicle interior.
��
Page 202 of 473
.
�
Close the luggage cover, see “Luggage
cover” (
�page 205).
�
Close")
201 Controls in detail
Retractable hardtop
Retractable hardtop switch1Opening
2Closing�
Engage the parking brake (
�page 54).
�
Close the luggage cover, see “Luggage
cover” (
�page 205).
�
Close the trunk lid.
�
Switch on the ignition (
�page 39).Opening
�
Pull up on the retractable hardtop
switch as indicated by arrow 1 until
the retractable hardtop is completely
lowered into its trunk storage compart-
ment.
The multifunction display will briefly
show the message K
in operation
.
Closing
�
Press down on the retractable hardtop
switch as indicated by arrow 2 until
the retractable hardtop is completely
closed and locked.
The multifunction display will briefly
show the message K
in operation
.Opening/closing with the SmartKey
i
Make sure the retractable hardtop is dry be-
fore you open it. Otherwise water may enter the
trunk interior.
Warning!
G
Before operating the retractable hardtop,
make sure there is no danger of anyone
being injured by the moving parts (retract-
able roof, roof frame, and trunk lid) due to in-
attention.
Hands must never be placed near the roof
frame, upper windshield area, hardtop, shelf
behind roll bars, or trunk lid while the re-
tractable hardtop is being raised or lowered.
Serious personal injury may occur.
If potential danger exists, release the re-
spective button on the SmartKey. This im-
mediately interrupts the raising or lowering
procedure. You then can press button Œ
or ‹to raise or lower the hardtop away
from the danger zone.
Page 203 of 473
.
�
Close the luggage cover, see “Luggage
cover” (
�page 205).
�
Close the trunk lid.
Opening (Summer opening featur")
202 Controls in detailRetractable hardtop�
Engage the parking brake (
�page 54).
�
Close the luggage cover, see “Luggage
cover” (
�page 205).
�
Close the trunk lid.
Opening (Summer opening feature)
�
Aim the transmitter eye at an outside
door handle.
The SmartKey must be in close proxim-
ity to the outside door handle.
�
Press and hold button Πuntil the
retractable hardtop is completely
open.
The seat ventilation* for the driver’s
seat switches on. The rear side win-
dows open.
�
Release button Πto interrupt pro-
cedure.
Closing (Convenience feature)
�
Aim the transmitter eye at the outside
door handle.
The SmartKey must be in close proxim-
ity to the outside door handle.
�
Press and hold button ‹until the
retractable hardtop is completely
closed.
The retractable hardtop and the rear
side windows close.Locking the retractable hardtop after
raising/lowering
If the retractable hardtop is not properly
locked, lock it as follows.
i
Make sure the retractable hardtop is dry be-
fore you open it. Otherwise water may enter the
trunk interior.
Warning!
G
The hardtop is not fully closed and locked or
not fully opened and locked if:�
the message K
in operation
appears in the multifunction display
�
a warning sounds for 10 seconds and
the message K
Lock
retractable roof appears in the mul-
tifunction display when starting to drive
Page 206 of 473

205 Controls in detail
Retractable hardtop
2Buckle�
Guide the fastening straps around the
top of the roll bar and close buckles 2.
�
Tighten the fastening straps if neces-
sary.
�
Lower the roll bar (
�page 81).
�
Fold the upper section of the wind
screen up towards the head restraints
until it stops.Removing
�
Fold the upper section of the wind
screen back.
�
Adjust the roll bar to a height
(�page 81) that allows you to reach
easily underneath it.
1Release button
�
Undo the buckles on the upper section
of the roll bar by pressing release
button1.
�
Lower the roll bar (
�page 81).
Make sure the fastening straps do not
get caught.
�
Pull the wind screen out towards the
front of the vehicle.
Be careful not to damage interior trim
with the guide tabs.
�
Store the wind screen in a safe place.
Luggage cover
The luggage cover covers luggage/cargo
in the trunk.
!
To prevent damage to the retractable hard-
top or luggage/cargo when lowering:
�
Load trunk only to the height of the luggage
cover.
�
Do not permit luggage/cargo to push up the
closed luggage cover.
�
Do not load anything on top of or in front of
the luggage cover.
�
Do not place anything on the shelf behind
the roll bar.
Page 234 of 473

233 Controls in detail
Useful features
�Useful features
Storage compartments Glove box
1Glove box lid release
2Glove box lid
Opening glove box
�
Press glove box lid release1.
Glove box lid 2 opens downward.
Closing glove box
�
Push glove box lid 2 up to close.Door storage compartments
1Release button
2Storage compartment lid
Warning!
G
To help avoid personal injury during a colli-
sion or sudden maneuver, exercise care
when storing objects in the vehicle. Put lug-
gage or cargo in the trunk if possible. Do not
pile luggage or cargo higher than the seat
backs. Do not place anything on shelf be-
hind roll bar.
Parcel nets cannot secure hard or heavy ob-
jects.
Keep compartment lids closed. This will help
to prevent stored objects from being thrown
about and injuring vehicle occupants during
an accident.
Warning!
G
Keep the door storage compartments
closed while vehicle is in motion. Failure to
do so may cause the seat belt to catch at the
rear and prevent proper positioning of the
seat belt.
Page 238 of 473
237 Controls in detail
Useful features
Parcel nets in trunk
There are three nets available in the trunk
to secure loads:�
a pocket net on each side of the right
and left trunk side walls
�
a trunk floor net
�
Pull the trunk floor net from the trunk
back wall towards the front over the
luggage.
�
Hang the hooks of the net on the eyes
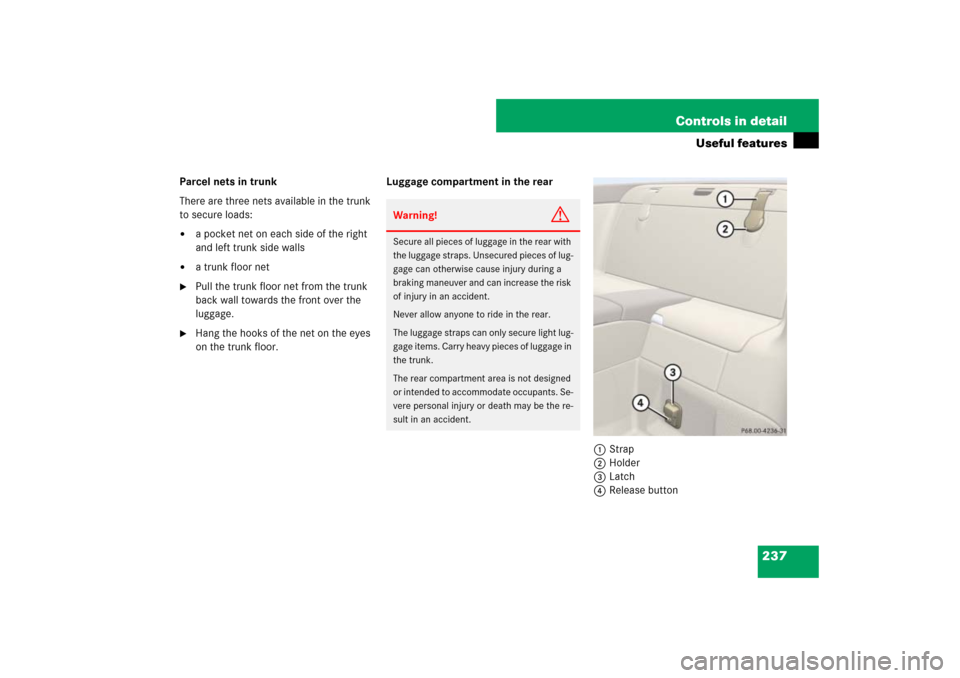
on the trunk floor.Luggage compartment in the rear
1Strap
2Holder
3Latch
4Release button
Warning!
G
Secure all pieces of luggage in the rear with
the luggage straps. Unsecured pieces of lug-
gage can otherwise cause injury during a
braking maneuver and can increase the risk
of injury in an accident.
Never allow anyone to ride in the rear.
The luggage straps can only secure light lug-
gage items. Carry heavy pieces of luggage in
the trunk.
The rear compartment area is not designed
or intended to accommodate occupants. Se-
vere personal injury or death may be the re-
sult in an accident.