Page 115 of 473

114 Controls in detailLocking and unlocking
Closing trunk from inside
automatically*
In vehicles with trunk opening/closing
system* you can close the trunk from
the inside using the remote trunk
opening/ closing* switch.
1Remote trunk opening/closing* switch
(vehicles with trunk opening/closing
system*)
2Indicator lamp
Warning!
G
To prevent possible personal injury, always
keep hands and fingers away from the trunk
lid opening when closing the trunk. Be espe-
cially careful when small children are
around.
When leaving the vehicle, always remove the
SmartKey or SmartKey with KEYLESS-GO*
from the starter switch, take it with you, and
lock the vehicle. Do not leave children unat-
tended in the vehicle, or with access to an
unlocked vehicle. Unsupervised use of vehi-
cle equipment may cause an accident
and/or serious personal injury.
Warning!
G
Maintain sight of trunk area while operating
door mounted switch. Monitor the closing
procedure carefully to make sure no one is
in danger of being injured.
To interrupt the closing procedure, release
the door mounted remote trunk open-
ing/closing* switch again.
Even with the SmartKey or SmartKey with
KEYLESS-GO* removed from the starter
switch or the SmartKey with KEYLESS-GO*
removed from the vehicle, the remote trunk
opening/closing* switch can be operated.
Therefore, do not leave children unattended
in the vehicle, or with access to an unlocked
vehicle. Unsupervised use of vehicle equip-
ment may cause an accident and/or serious
personal injury.
i
If the trunk lid comes into contact with an
object while closing (e.g. luggage that has been
piled too high) in the upper motion sequence, the
closing procedure is stopped and the trunk re-
opens slightly.
Page 116 of 473

115 Controls in detail
Locking and unlocking
�
Press and hold switch1 until the
trunk is closed.
Indicator lamp2 in the switch goes
out when the trunk is closed.
To interrupt the closing procedure:
�
Release switch1.Closing trunk from outside
automatically*
In vehicles with trunk opening/closing sys-
tem* you can close the trunk separately
from the outside using the trunk closing
switch.
Warning!
G
Monitor the closing procedure carefully to
make sure no one is in danger of being in-
jured. To prevent possible personal injury,
always keep hands and fingers away from
the trunk lid opening when closing the trunk.
Be especially careful when small children
are around. To stop the closing procedure,
do one of the following: �
Press button Š on the SmartKey or
SmartKey with KEYLESS-GO*.
�
Press the trunk opening/closing*
switch (on the driver’s door).
�
Press trunk closing switch.
�
Press the KEYLESS-GO locking/closing
switch*.
�
Pull the trunk lid handle.
Even with the SmartKey removed from the
starter switch, the trunk opening/closing*
switch can be operated. Therefore, do not
leave children unattended in the vehicle, or
with access to an unlocked vehicle. Unsu-
pervised use of vehicle equipment may
cause an accident and/or serious personal
injury.
Page 119 of 473

118 Controls in detailLocking and unlockingIllumination of the emergency release but-
ton:�
The button flashes for 30 minutes after
opening the trunk.
�
The button flashes for 60 minutes after
closing the trunk.
Power closing assist for trunk lid
It is not necessary to slam the trunk lid
closed. A electrical power-assisted mecha-
nism draws trunk lid closed quietly and au-
tomatically once trunk lid has been
latched. When the pneumatic power-as-
sisted mechanism has stopped, trunk can
be re-opened.Power closing assist for trunk lid
�
Press the trunk lid gently into its lock.
The trunk closes automatically.
i
The emergency release button unlocks and
opens the trunk while the vehicle is standing still
or in motion.
i
The emergency release button does not
open the trunk lid if the vehicle battery is dis-
charged or disconnected.
Warning!
G
To prevent possible personal injury, always
keep hands and fingers away from the trunk
lid opening when closing the trunk. Be espe-
cially careful when small children are
around.
In case of danger, pull the inside or outside
door handle, or press the trunk lid lock.
To prevent personal injury, never actuate
the closing assist mechanism by tampering
with the door or trunk lid latch.
Warning!
G
Only drive with the trunk closed as, among
other dangers such as blocked visibility, ex-
haust fumes may enter the vehicle interior.
��
Page 395 of 473
394 Practical hintsLocking/unlocking in an emergencyLowering the load assist manually
If the load assist feature does not fully low-
er the retractable hardtop into the trunk
compartment and you are unable to close
the trunk lid, follow the instructions below.
1Hex-socket wrench
2Locking screw�
Remove the trunk floor from the trunk.
�
Lift up the lid located at the lower left
side of the trunk.
�
Have a second person lift and hold the
retracted hardtop.
�
Using hex-socket 1 wrench provided
in the vehicle tool kit, carefully turn the
locking screw 2 approximately one
quarter of a turn.
�
Hook luggage cover into holders
(�page 205).
�
Let go of the hardtop.
It should gradually lower into the trunk.
�
When top is completely lowered, return
locking screw 2 to its original posi-
tion.
�
Close the lid.
�
Replace the trunk floor.
�
Visit an authorized Mercedes-Benz
Center as soon as possible.
!
Do not overtighten the screw.
Page 409 of 473
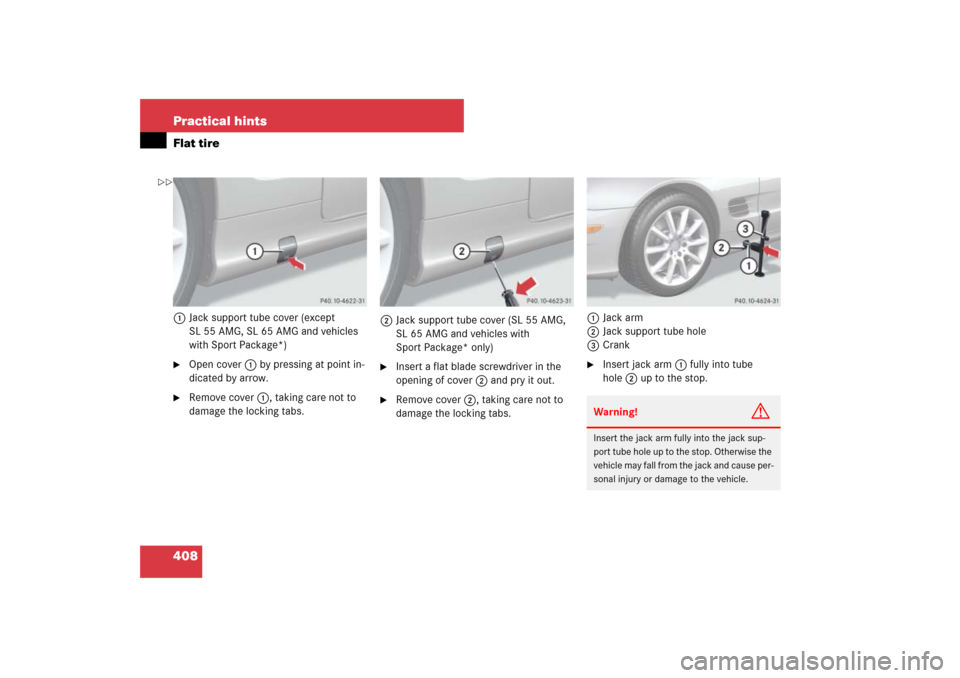
408 Practical hintsFlat tire1Jack support tube cover (except
SL 55 AMG, SL 65 AMG and vehicles
with Sport Package*)�
Open cover1 by pressing at point in-
dicated by arrow.
�
Remove cover1, taking care not to
damage the locking tabs.2Jack support tube cover (SL 55 AMG,
SL 65 AMG and vehicles with
Sport Package* only)
�
Insert a flat blade screwdriver in the
opening of cover2 and pry it out.
�
Remove cover2, taking care not to
damage the locking tabs.1Jack arm
2Jack support tube hole
3Crank
�
Insert jack arm1 fully into tube
hole2 up to the stop.Warning!
G
Insert the jack arm fully into the jack sup-
port tube hole up to the stop. Otherwise the
vehicle may fall from the jack and cause per-
sonal injury or damage to the vehicle.
��
Page 413 of 473

412 Practical hintsFlat tireLowering the vehicle�
Lower vehicle by turning crank coun-
terclockwise until the full weight of the
vehicle is resting on the ground.
�
Pull the jack out of the jack support
tube.
1 - 5 Wheel bolts
�
Tighten the five wheel bolts evenly, fol-
lowing the diagonal sequence illustrat-
ed (1 to 5), until all bolts are tight.
Observe a tightening torque of 96 lb-ft
(130 Nm).
�
Before storing the jack in the trunk,
crank back to storage position and fold
in the arm.
Replacing jack support tube cover
�
Slide tongue of cover under the upper
edge of the tube opening.
�
Applying even pressure, press cover
until it snaps into place.
Be careful not to damage the locking
tabs or clamp the plastic retaining
strap.
i
The flat tire may be transported in the trunk
when the retractable hardtop is raised. If avail-
able, use a protective sheet on the spare wheel.
Vehicles with TPMS or Advanced TPMS*:
Do not activate the tire inflation pressure moni-
tor until a full size wheel/tire with functioning
sensor has been placed back into service on the
vehicle.
Warning!
G
Have the tightening torque checked after
changing a wheel. The wheels could come
loose if they are not tightened to a torque of
96 lb-ft (130 Nm).Warning!
G
When turning the wheel wrench to tighten
the wheel bolts, make sure you position
hands on the wrench in such a way that you
avoid injury to yourself, such as scraping
your hands against the wheel. Make sure
turning the wheel wrench will not scratch or
damage the wheel rim.
i
For information on storing the spare wheel
back into the trunk, see “Storing the spare wheel
after use” (
�page 390).
��
Page 470 of 473
 230
Towing 421
Unlocking 31
Unlocking in an emergency 391
Vehicle capacity weight 314
Vehicle care
Leather uph")
469 Index
V
Vehicle
Locking 31
Locking in an emergency 393
Minimum distance (Parktronic*) 230
Towing 421
Unlocking 31
Unlocking in an emergency 391
Vehicle capacity weight 314
Vehicle care
Leather upholstery 329
Ornamental moldings 325
Upholstery 329
Wood trims 329
Vehicle Identification Number see VIN
Vehicle level
Changing 227
Setting 227
Vehicle level control (ABC) 225
Vehicle level control switch 32
Vehicle lighting
Checking 273
Vehicle loading terminology 312
Vehicle maximum load on the tire 314
Vehicle status messages 347
Vehicle tool kit 388VIN 431
Voice control system* 25
W
Warning sounds
Distance warning function* 224
Distronic* 216
Drivers seat belts 80
Parking brake 55
Warranty coverage 429
Washing the vehicle 324
Wear pattern (tires) 315
Wheel bolts
Tightening torque 412
Wheel change 405
Tightening torque 412
Wheel wrench 389
Wheels
Tires and wheels 283
Wind screen 204
Installing 204
Removing 205
Windows see Side windows
Windows, cleaning 326
Windshield
Cleaning wiper blades 326
Defogging 191Refilling washer fluid 282
Washer fluid 58, 282
Washer system 282
Windshield and headlamp washer
system 452
Windshield washer and headlamp cleaning
system 272, 273
Windshield washer fluid 58
Filler neck 282
Messages in display 387
Mixing ratio 452
Refilling 282
Windshield wipers 25, 57
Fast wiper speed 57
Intermittent wiping 57
Replacing wiper blades 403
Wiping with windshield washer
fluid 58
Winter driving
Snow chains 318
Tires 316
Winter driving instructions 266
Winter tires 316
Wood trims
Cleaning 329