Page 192 of 473
.
The indicator lamp on the button
comes on.
The air conditioning switches to the fol-
lowing functions automa")
191 Controls in detail
Automatic climate control
Activating�
Press button P (
�page 185).
The indicator lamp on the button
comes on.
The air conditioning switches to the fol-
lowing functions automatically:
�
cooling on to dehumidify
�
maximum blower speed and
heating power
�
air flows onto the windshield
and the front side windows
�
the air recirculation mode is
switched off
Deactivating
�
Press button P (
�page 185).
The indicator lamp on the button goes
out. Defrosting is turned off.
The previous settings are in effect
again.Windshield fogged on the outside
�
Switch the windshield wipers on
(�page 57).
If the automatic air distribution and air vol-
ume are switched off:
�
Turn air distribution controls1 and 5
(�page 185) to position h ork.
or
�
Press control buttons 1, 5 and 9
(�page 185).
The control buttons are engaged. The
U symbol on the control buttons
come on. Air distribution and air vol-
ume are adjusted automatically.
Air recirculation mode
Switch to air recirculation mode to prevent
unpleasant odors from entering the vehicle
from the outside. This setting cuts off the
intake of outside air and recirculates the
air in the passenger compartment.
i
The cooling remains switched on.
i
Keep this setting selected only until the
windshield is clear again.
Warning!
G
Fogged windows impair visibility, endanger-
ing you and others. If the windows begin to
fog on the inside, switching off the air
recirculation mode immediately should clear
interior window fogging. If interior window
fogging persists, make sure the air
conditioning (
�page 193) is activated, or
press buttonP.
Page 195 of 473
.
The indica")
194 Controls in detailAutomatic climate controlActivating
Moist air can fog up the windows. You can
dehumidify the air with the air condition-
ing.�
Press button 2 once more
(�page 185).
The indicator lamp on the button
comes on.
The air conditioning uses the refrigerant
R134A. This refrigerant is free of CFCs
which are harmful to the ozone layer.
Residual heat and ventilation
With the engine switched off, it is possible
to continue to heat or ventilate the interior
for up to 30 minutes. This feature makes
use of the residual heat produced by the
engine.Activating
With the SmartKey:
�
Turn the SmartKey in the starter switch
to position1 or0, or remove it from
the starter switch.
�
Press button T (
�page 185).
The indicator lamp on the button
comes on.
With KEYLESS-GO*:
�
Turn off the engine by pressing the
KEYLESS-GO* start/stop button and
open the driver’s door (with the driver’s
door open, the starter switch is in posi-
tion 0, same as with the SmartKey re-
moved from the starter switch)
�
Press button T (
�page 185).
The indicator lamp on the button
comes on.
!
If the 2 button on the automatic climate
control panel starts to flash, this indicates that
the air conditioning is losing refrigerant. The
compressor has turned off. The air conditioning
cannot be turned on again.
�
Have the air conditioning checked at the
nearest authorized Mercedes-Benz Center.
i
How long the system will provide heating de-
pends on the coolant temperature and the se-
lected temperature. The blower will run at low
speed regardless of the air distribution control
setting.
Page 196 of 473
195 Controls in detail
Automatic climate control
Deactivating�
Press button T (
�page 185).
The indicator lamp on the button goes
out.
The residual heat is automatically turned
off:
�
when the ignition is switched on
�
after about 30 minutes
�
if the battery voltage drops
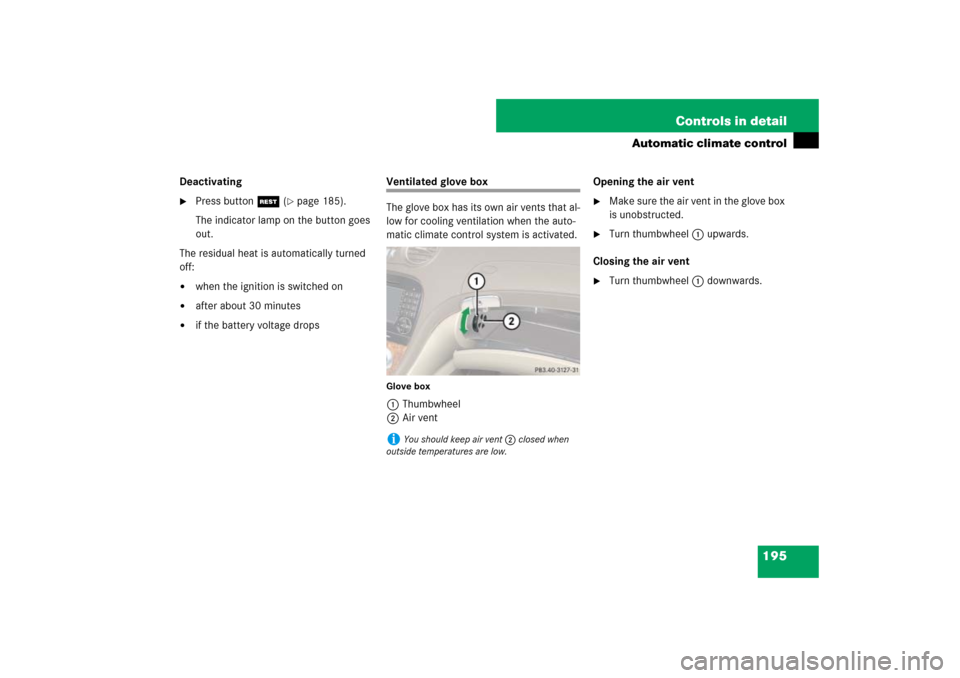
Ventilated glove box
The glove box has its own air vents that al-
low for cooling ventilation when the auto-
matic climate control system is activated.Glove box1Thumbwheel
2Air ventOpening the air vent
�
Make sure the air vent in the glove box
is unobstructed.
�
Turn thumbwheel1 upwards.
Closing the air vent
�
Turn thumbwheel1 downwards.
i
You should keep air vent 2 closed when
outside temperatures are low.
Page 240 of 473

239 Controls in detail
Useful features
Ashtray
1Cover plate
2Sliding knob
Opening ashtray�
Briefly touch cover plate1.
The ashtray opens automatically.
Closing ashtray
�
Press cover plate1 down until it
latches.Removing the ashtray insert
�
Secure vehicle from movement by set-
ting the parking brake. Move the gear
selector lever to positionN.
Now you have more room to take out
the insert.
�
Press sliding knob2 to the right.
The insert will eject a short distance.
Replacing the ashtray insert
�
Press the insert into the frame until it
snaps into place.
Cigarette lighter�
Switch on the ignition (
�page 39).
Warning!
G
Remove ashtray only with vehicle standing
still. Set the parking brake to secure vehicle
from movement. Move gear selector lever to
positionN. With gear selector lever in
positionN, turn off the engine.
Warning!
G
Never touch the heating element or sides of
the lighter; they are extremely hot. Hold the
knob only.
Make sure that any children traveling with
you do not injure themselves or start a fire
with the hot cigarette lighter.
When leaving the vehicle, always remove the
SmartKey or the SmartKey with
KEYLESS-GO* from the starter switch, take
it with you, and lock the vehicle. Do not
leave children unattended in the vehicle, or
with access to an unlocked vehicle. Unsu-
pervised use of vehicle equipment may
cause serious personal injury.
��
Page 241 of 473

240 Controls in detailUseful features1Cigarette lighter�
Push in cigarette lighter1.
The lighter will pop out automatically
when hot.
Heated steering wheel*
The steering wheel heating warms up the
leather area of the steering wheel.
The stalk is located on the lower left-hand
side of the steering wheel.
1Switching on
2Switching off
3Indicator lamp
!
The lighter socket can accommodate
12V DC electrical accessories (up to a maximum
of 85 W) designed for use with the standard
“cigarette lighter” plug type. Keep in mind, how-
ever, that connecting accessories to the lighter
socket (for example extensive connecting and
disconnecting, or using plugs that do not fit prop-
erly) can damage the lighter socket. With the
socket damaged, the lighter may no longer be
able to be placed in the heating (pushed-in) posi-
tion, or the lighter may pop out too early with the
lighter not hot enough.
To help avoid damaging the cigarette lighter
socket, we recommend connecting 12V DC elec-
trical accessories designed for use with the stan-
dard “cigarette lighter” plug type to the
12V power outlet (
�page 242) in your vehicle
whenever possible.
��
Page 242 of 473
.
�
Turn the switch at the tip of the stalk in
direction of arrow1.
The steering wheel is heated. Indicator
la")
241 Controls in detail
Useful features
Switching on�
Switch on the ignition (
�page 39).
�
Turn the switch at the tip of the stalk in
direction of arrow1.
The steering wheel is heated. Indicator
lamp3 comes on.
Switching off
�
Turn switch at the tip of the stalk in
direction of arrow2.
The steering wheel heating is switched
off. Indicator lamp3 goes out.For more information on the steering
wheel, see “Multifunction steering wheel”
(
�page 140).
Load assist in the trunk
To facilitate trunk loading after opening the
trunk lid, use the load assist feature to
raise the retracted hardtop from its stor-
age position in the trunk.
i
The steering wheel heating is temporarily
suspended while indicator lamp3 remains on
when
�
the temperature of the vehicle interior is
above 86°F (30°C)
�
the temperature of the steering wheel is
above 95°F (35°C)
When these conditions do not apply anymore,
steering wheel heating continues.
i
Indicator lamp 3 flashes or switches off
�
in case of power surge or undervoltage
�
in case of a steering wheel heating malfunc-
tion
i
The steering wheel heating switches off au-
tomatically when you remove the SmartKey from
the starter switch or, on vehicles with
KEYLESS-GO*, when you switch off the ignition
(
�page 40) and open the driver’s door.
Warning!
G
To prevent injuries, make sure that there is
no possibility of body parts getting caught in
moving parts. If potential danger exists,
press the switch again. This will immediately
stop the movement of the hardtop.
Page 460 of 473

459 Index
H
Hard plastic trim items, cleaning 328
Hardtop see Retractable hardtop
Hazard warning flasher 133
Head restraints 44
Headlamp switch-off delay see Delayed
switch-off, exterior lamps
Headlamps
Automatic mode 129
Cleaning lenses 325
Cleaning system 180
Manual mode 129
Messages in the multifunction
display 380
Replacing bulbs 397
Switch 55, 128
Headliner, cleaning 329
Head-thorax air bag 72
Heated steering wheel* 240
High beam flasher 56, 133
High beam headlamps 56, 128, 398
Indicator lamp 29
Messages in the multifunction
display 380
Replacing bulbs 397, 400
Switching on 133High mounted brake lamp 398
High-performance brake system
(AMG vehicles only) 262
Hood 274
Messages in display 377
Opening 274
Horn 25
HVAC see Automatic climate control
Hydroplaning 264
I
Identification labels 430
Identification number, Vehicle (VIN) 431
Ignition 40
Immobilizer 96
Indicator lamps see Lamps, indicator and
warning
Infant and child restraint systems 83
Infant and child restraint systems see
Children in the vehicle
Inflation pressure see
Tires, Inflation pressure
Inside door handle 111Instrument cluster 26, 136
Illumination brightness 136
Lamps 332
Language 156
Messages in the multifunction
display 26, 347
Multifunction display 139
Instrument lighting see Instrument cluster,
Illumination brightness
Instrument panel see Instrument cluster
Instruments and controls see Cockpit
Interior lighting 134
Delayed switch-off 161
Interior rear view mirror 48
Antiglare position 180
Auto-dimming 180
J
Jack 389
Jacking up the vehicle 406
Jump starting 419