Page 606 of 705

605 Practical hints
What to do if …?
Display
Possible cause/consequence
Possible solution
Restraint system
malfunction
Visit workshop
There is a malfunction in the supplemental
restraint systems. The air bags or emergen-
cy tensioning devices (ETDs) could deploy
unexpectedly or fail to activate in an acci-
dent.
�
Drive with added caution to the nearest au-
thorized Mercedes-Benz Center.
Malfunction
on front left side
Visit workshop
Components of the driver’s supplemental
restraint system may not work properly.
�
Drive with added caution to the nearest au-
thorized Mercedes-Benz Center.
Malfunction
on Front Right side
Visit workshop
Components of the front passenger’s sup-
plemental restraint system may not work
properly.
�
Drive with added caution to the nearest au-
thorized Mercedes-Benz Center.
Malfunction
on Rear Left side
Visit workshop
Components of the left rear passenger’s
supplemental restraint system may not
work properly.
�
Drive with added caution to the nearest au-
thorized Mercedes-Benz Center.
Warning!
G
In the event a malfunction of the SRS is indi-
cated as outlined above, the SRS may not be
operational. For your safety, we strongly
recommend that you visit an authorized
Mercedes-Benz Center immediately to have
the system checked; otherwise the SRS may
not be activated when needed in an
accident, which could result in serious or fa-
tal injury, or it might deploy unexpectedly
and unnecessarily which could result in an
accident and/or injury to you or to others.
Page 607 of 705

606 Practical hintsWhat to do if …?Display
Possible cause/consequence
Possible solution
Malfunction
in Rear Center
Visit workshop
Components of the center rear passenger’s
supplemental restraint system may not
work properly.
�
Drive with added caution to the nearest au-
thorized Mercedes-Benz Center.
Malfunction
on Rear Right side
Visit workshop
Components of the right rear passenger’s
supplemental restraint system may not
work properly.
�
Drive with added caution to the nearest au-
thorized Mercedes-Benz Center.
Left window curtain
airbag malfunction
Visit workshop
The left side window curtain air bag may not
work properly.
�
Drive with added caution to the nearest au-
thorized Mercedes-Benz Center.
Right window curtain
airbag malfunction
Visit workshop
The right side window curtain air bag may
not work properly.
�
Drive with added caution to the nearest au-
thorized Mercedes-Benz Center.
Warning!
G
In the event a malfunction of the SRS is indi-
cated as outlined above, the SRS may not be
operational. For your safety, we strongly
recommend that you visit an authorized
Mercedes-Benz Center immediately to have
the system checked; otherwise the SRS may
not be activated when needed in an
accident, which could result in serious or fa-
tal injury, or it might deploy unexpectedly
and unnecessarily which could result in an
accident and/or injury to you or to others.
Page 608 of 705

607 Practical hints
What to do if …?
Display
Possible cause/consequence
Possible solution
Tele Aid
inoperative
One or more main functions of the Tele Aid
system are malfunctioning.
�
Have the Tele Aid system checked by an au-
thorized Mercedes-Benz Center.
Tire pressure
Caution, tire defect
Vehicles with Advanced TPMS*:
One or more tires are deflating.
�
Carefully bring the vehicle to a halt, avoiding
abrupt steering and braking maneuvers.
�
If necessary, change the wheel (
�page 629).
Caution
Tire defect
Vehicles with Advanced TPMS*:
One or more tires are deflating. The respec-
tive tire is shown in the multifunction dis-
play.
�
Carefully bring the vehicle to a halt, avoiding
abrupt steering and braking maneuvers.
�
If necessary, change the wheel (
�page 629).
Warning!
G
Do not drive with a flat tire. A flat tire affects
the ability to steer or brake the vehicle. You
may lose control of the vehicle. Continued
driving with a flat tire will cause excessive
heat build-up and possibly a fire.
Page 610 of 705
609 Practical hints
What to do if …?
Display
Possible cause/consequence
Possible solution
Wheel sensor(s)
missing
One or more sensors malfunction (e.g. bat-
tery in one or more wheel sensor is empty).
One or more wheels without wheel sensors
mounted (e.g. spare tire).
No pressure value is shown on the multi-
function display for the tire in question.
�
Have the Advanced TPMS* checked by an
authorized Mercedes-Benz Center.
�
Have the wheel sensors installed by an
authorized Mercedes-Benz Center.
The tire pressure for the respective tire is
shown in the multifunction display after a few
minutes driving.
Tire pressure
Please rectify
Vehicles with Advanced TPMS*:
The pressure is too low in one or more tires.
Or the tire pressures of the individual
wheels differ too radically from one anoth-
er.
�
Check and adjust tire inflation pressure as
required (
�page 514).
Page 618 of 705
617 Practical hints
Opening/closing in an emergency
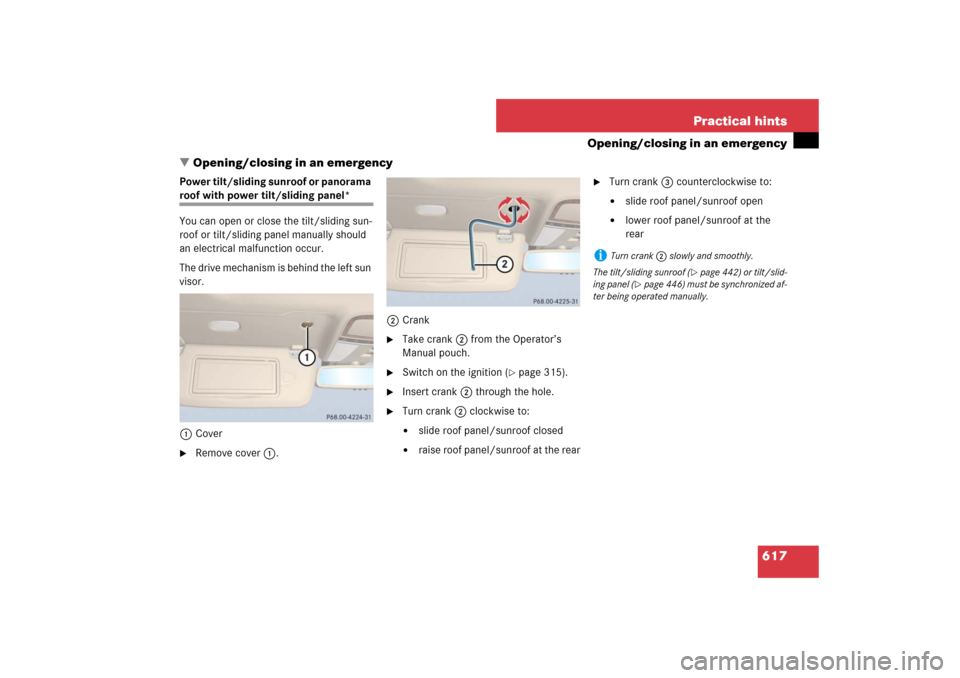
�Opening/closing in an emergency
Power tilt/sliding sunroof or panorama roof with power tilt/sliding panel*
You can open or close the tilt/sliding sun-
roof or tilt/sliding panel manually should
an electrical malfunction occur.
The drive mechanism is behind the left sun
visor.
1Cover�
Remove cover1.2Crank
�
Take crank2 from the Operator’s
Manual pouch.
�
Switch on the ignition (
�page 315).
�
Insert crank2 through the hole.
�
Turn crank2 clockwise to:�
slide roof panel/sunroof closed
�
raise roof panel/sunroof at the rear
�
Turn crank3 counterclockwise to:�
slide roof panel/sunroof open
�
lower roof panel/sunroof at the
rear
i
Turn crank2 slowly and smoothly.
The tilt/sliding sunroof (
�page 442) or tilt/slid-
ing panel (
�page 446) must be synchronized af-
ter being operated manually.
Page 622 of 705
621 Practical hints
Replacing bulbs
�Replacing bulbs
Safe vehicle operation depends on proper
exterior lighting and signaling. It is there-
fore essential that all bulbs and lamp as-
semblies are in good working order at all
times.
Correct headlamp adjustment is extremely
important. Have headlamps checked and
readjusted at regular intervals and when a
bulb has been replaced. See an authorized
Mercedes-Benz Center for headlamp ad-
justment.
i
If the headlamps or front fog lamps are
fogged up on the inside as a result of high humid-
ity, driving the vehicle a distance with the lights
on should clear up the fogging.
i
Substitute bulbs will be brought into use
when the following lamps malfunction:
�
Brake lamps
�
Rear fog lamps
�
Front parking lamps
�
Tail lamps
�
Turn signal lamps
Observe the messages in the multifunction dis-
play (�page 557).
Page 627 of 705

626 Practical hintsReplacing bulbs�
Insert bulb holder1 into guide in
headlamp. Wire2 must point down-
ward and to the right.
�
Turn bulb holder1 clockwise until it
engages and wire2 points downward
and to the left.
Corner-illuminating lamp
1Bulb holder
2Grip
3Wire position
�
Turn cover3 (
�page 624) counter-
clockwise and remove it.
�
Turn bulb holder1 counterclockwise
until it disengages.
�
Take out bulb holder1.
�
Take bulb out of holder.
�
Insert new bulb into holder and press it
all the way down.
�
Insert bulb holder1 into guide in
headlamp.
The tab of the bulb holder must be po-
sitioned on the upper left-hand side
and wire3 must point downward and
to the left for the left headlamp, up-
ward and to the right for the right head-
lamp.
�
Turn bulb holder1 clockwise until it
engages and grip2 is in a horizontal
position.Additional turn signal lamp bulbs
The additional turn signal lamps in the ex-
terior rear view mirrors have LEDs.
If a malfunction occurs or LEDs fail to func-
tion, the entire turn signal unit must be re-
placed. Have the turn signal unit replaced
by an authorized Mercedes-Benz Center.
Front side marker lamp bulbs
Since replacing the side marker lamp bulbs
is a technically highly demanding process,
we recommend you have the side marker
lamp bulbs replaced by an authorized
Mercedes-Benz Center.
��
Page 644 of 705

643 Practical hints
Towing the vehicle
Warning!
G
If circumstances require towing the vehicle
with all wheels on the ground, always tow
with a tow bar if:�
the engine will not run
�
there is a malfunction in the brake sys-
tem
�
there is a malfunction in the power sup-
ply or in the vehicle’s electrical system
as that will be necessary to adequately con-
trol the towed vehicle.
Prior to towing the vehicle with all wheels on
the ground, make sure the SmartKey is in
starter switch position 2 and automatic
locking is deactivated (
�page 223).
Warning!
G
With the engine not running, there is no
power assistance for the brake and steering
systems. In this case, it is important to keep
in mind that a considerably higher degree of
effort is necessary to brake and steer the ve-
hicle. Adapt your driving accordingly.i
The automatic transmission will remain
locked in position P and the SmartKey will not
turn in the starter switch if the consumer battery
is disconnected or discharged. See information
on the battery (
�page 634) or on jump starting
(
�page 639).
i
To signal turns while being towed with the
hazard warning flasher in use, turn SmartKey in
starter switch to position 2 and activate the com-
bination switch for the left or right turn signal in
the usual manner – only the selected turn signal
will operate.
Upon canceling the turn signal, the hazard warn-
ing flasher will operate again.
!
When towing the vehicle with all wheels on
the ground, please note the following:
With the automatic central locking activated and
the SmartKey in starter switch position 2, or
KEYLESS-GO* start/stop button (
�page 317)
in position 2, the vehicle doors lock if the left
front wheel as well as the right rear wheel are
turning at vehicle speeds of approximately
9mph (15km/h) or more.
Switch off the tow-away alarm (
�page 76).
To prevent the vehicle doors from locking, deac-
tivate the automatic central locking
(
�page 313).
Towing of the vehicle should only be done using
the properly installed towing eye bolt. Never at-
tach tow cable, tow rope or tow rod to vehicle
chassis, frame or suspension parts.

missing
One or more sensors malfunction (e.g. bat-
tery in one or more wheel sensor is empt")