383 Operation
Tires and wheels
Checking tire inflation pressure
manually
Follow the steps below to achieve correct
tire inflation pressure:
�Remove the cap from the valve on one
tire.
�Firmly press a tire gauge onto the
valve.
�Read tire inflation pressure on tire
gauge and check against the recom-
mended tire inflation pressure on the
placard on the driver’s door B-pillar
(
�page 376) or, if available, the inside
of the fuel filler flap. If necessary, add
air to achieve the recommended tire in-
flation pressure.
�Install the valve cap.
�Repeat this procedure for each tire.Run Flat Indicator (Canada only)
While the vehicle is being driven, the Run
Flat Indicator monitors the set tire inflation
pressures by evaluating each wheel’s rota-
tional speed. This allows the system to de-
tect a significant loss of pressure in a tire.
If a wheel’s rotational speed changes due
to falling tire inflation pressure, you will
see a corresponding warning message in
the multifunction display.
The Run Flat Indicator may function in a re-
stricted manner or with a delay
�if snow chains are mounted to the
vehicle
�in presence of ice and snow
�if you are driving on a loose surface
(e.g. sand or gravel)
�if you are driving in a very sporty
manner (involving rapid acceleration or
high speeds in curves)
iIf you have overfilled the tire, release tire in-
flation pressure by pushing the metal stem of the
valve with e.g. a tip of a pen. Then recheck the
tire inflation pressure with the tire gauge.
Warning!G
When the multifunction display shows the
message
Tire pressure Check tires,
one or more of your tires is significantly un-
derinflated. You should stop and check your
tires as soon as possible, and inflate them to
the proper tire inflation pressure as indicat-
ed on the vehicle’s tire information placard.
Driving on a significantly underinflated tire
causes the tire to overheat and can lead to
tire failure. Underinflation also reduces fuel
efficiency and tire tread life, and may affect
the vehicle’s handling and stopping ability.
Each tire, including the spare, should be
checked monthly when cold and set to the
recommended tire inflation pressure as
specified on the Tire And Loading Informa-
tion placard (
�page 377) or on the tire in-
flation pressure label (
�page 382).
479 Practical hints
Unlocking / locking in an emergency
Locking the vehicle
If you cannot lock the vehicle with the
SmartKey or KEYLESS-GO*, lock the
vehicle carrying out the following steps.
�Close the front passenger door, the
rear right door and the tailgate.
�Open the driver’s door and the rear left
door.
�Press the central locking switch on the
driver’s door (
�page 130).
The locking knobs of the front passen-
ger door and the rear doors move
down.
If the vehicle battery is disconnected or
drained:
�Press down the locking knobs of
the front passenger door and the
rear doors manually.
�Exit the vehicle.
�Close the driver’s door.
�Enter the vehicle through the rear left
door.
�Press down the locking knob of the
driver’s door.
�Exit the vehicle.
�Close the rear left door.
The vehicle is locked.
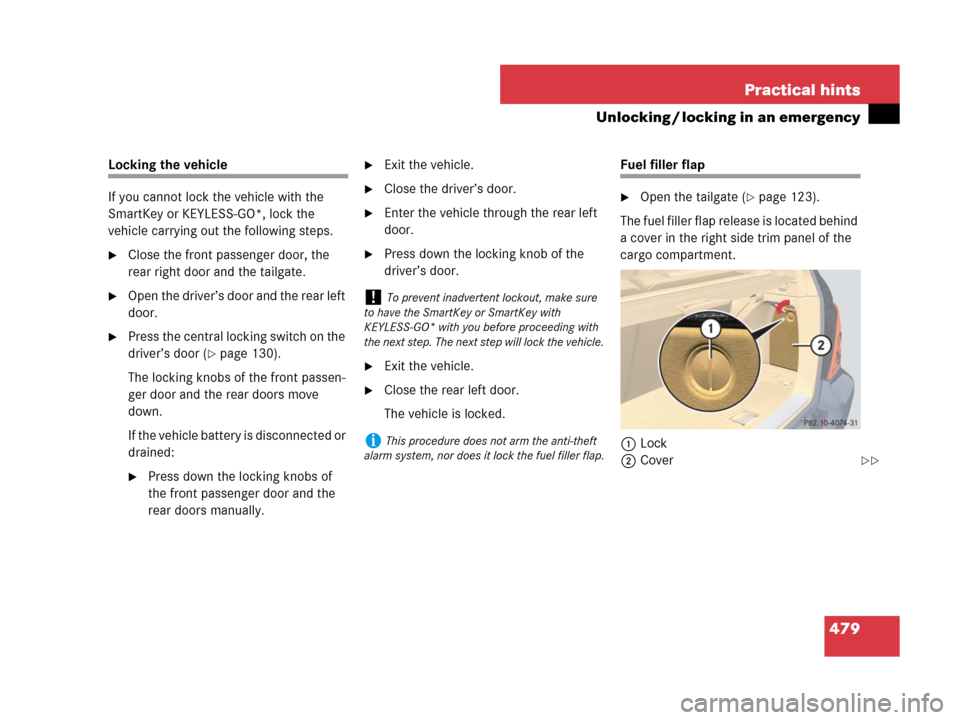
Fuel filler flap
�Open the tailgate (�page 123).
The fuel filler flap release is located behind
a cover in the right side trim panel of the
cargo compartment.
1Lock
2Cover
!To prevent inadvertent lockout, make sure
to have the SmartKey or SmartKey with
KEYLESS-GO* with you before proceeding with
the next step. The next step will lock the vehicle.
iThis procedure does not arm the anti-theft
alarm system, nor does it lock the fuel filler flap.
��