Page 499 of 570
498 Practical hints
Flat tire
Mounting the spare wheel
Preparing the vehicle
�Prepare the vehicle as described
(
�page 497).
�Take the wheel wrench and the vehicle
jack from the vehicle tool kit
(
�page 473).
�Take the spare wheel from the wheel
well under the cargo compartment
floor (
�page 476).Lifting the vehicle
�Prevent the vehicle from rolling away
by blocking wheels with wheel chocks
or other sizable objects.
One wheel chock is included with the
vehicle tool kit (
�page 473).
When changing wheel on a level surface:
�Place the wheel chock in front of and
another sizable object behind the
wheel that is diagonally opposite to the
wheel being changed.
Always try lifting the vehicle using the jack
on a level surface. However, should cir-
cumstances require you to do so on a hill,
place the wheel chock and another sizable
object as follows:
�Place the wheel chock and another
sizable object on the downhill side
blocking both wheels of the axle not
being worked on.
Warning!G
The jack is designed exclusively for jacking
up the vehicle at the jack take-up brackets
built into both sides of the vehicle. To help
avoid personal injury, use the jack only to lift
the vehicle during a wheel change. Never
get beneath the vehicle while it is supported
by the jack. Keep hands and feet away from
the area under the lifted vehicle. Always
firmly set parking brake and block wheels
before raising vehicle with jack.
Do not disengage parking brake while the
vehicle is raised. Be certain that the jack is
always vertical (plumb line) when in use,
especially on hills. Always try to use the jack
on level surface.
Make sure the jack arm is fully seated in the
jack take-up bracket. Always lower the vehi-
cle onto sufficient capacity jackstands be-
fore working under the vehicle.
Page 500 of 570
499 Practical hints
Flat tire
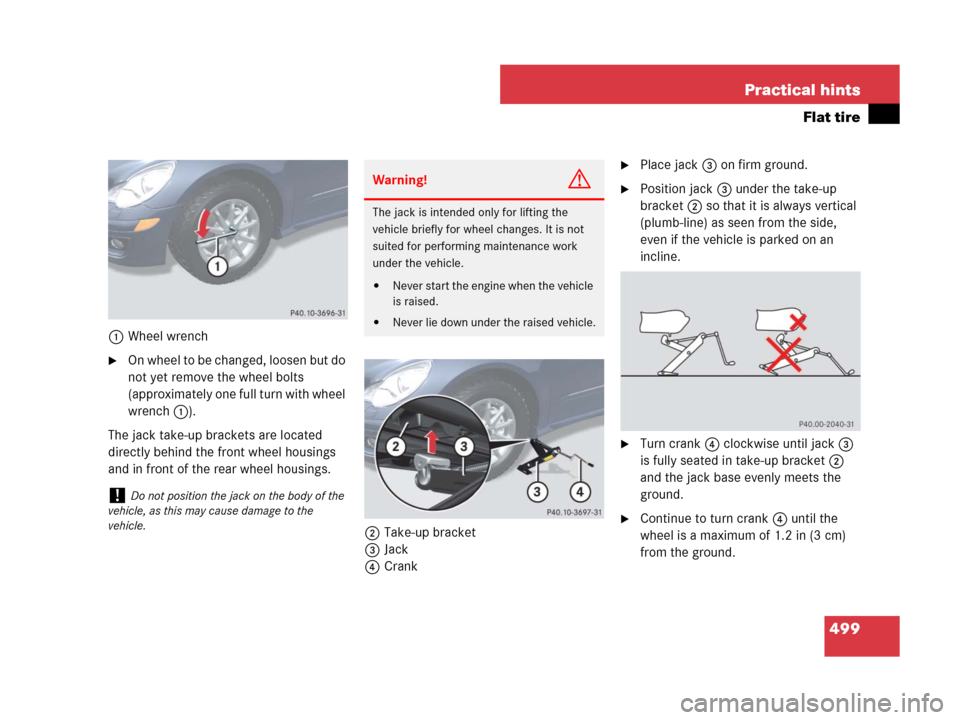
1Wheel wrench
�On whee l to b e c hang ed, l oose n but d o
not yet remove the wheel bolts
(approximately one full turn with wheel
wrench 1).
The jack take-up brackets are located
directly behind the front wheel housings
and in front of the rear wheel housings.
2Take-up bracket
3Jack
4Crank
�Place jack 3 on firm ground.
�Position jack3 under the take-up
bracket2 so that it is always vertical
(plumb-line) as seen from the side,
even if the vehicle is parked on an
incline.
�Turn crank4 clockwise until jack 3
is fully seated in take-up bracket2
and the jack base evenly meets the
ground.
�Continue to turn crank 4 until the
wheel is a maximum of 1.2 in (3 cm)
from the ground.
!Do not position the jack on the body of the
vehicle, as this may cause damage to the
vehicle.
Warning!G
The jack is intended only for lifting the
vehicle briefly for wheel changes. It is not
suited for performing maintenance work
under the vehicle.
�Never start the engine when the vehicle
is raised.
�Never lie down under the raised vehicle.
Page 512 of 570
511 Practical hints
Battery
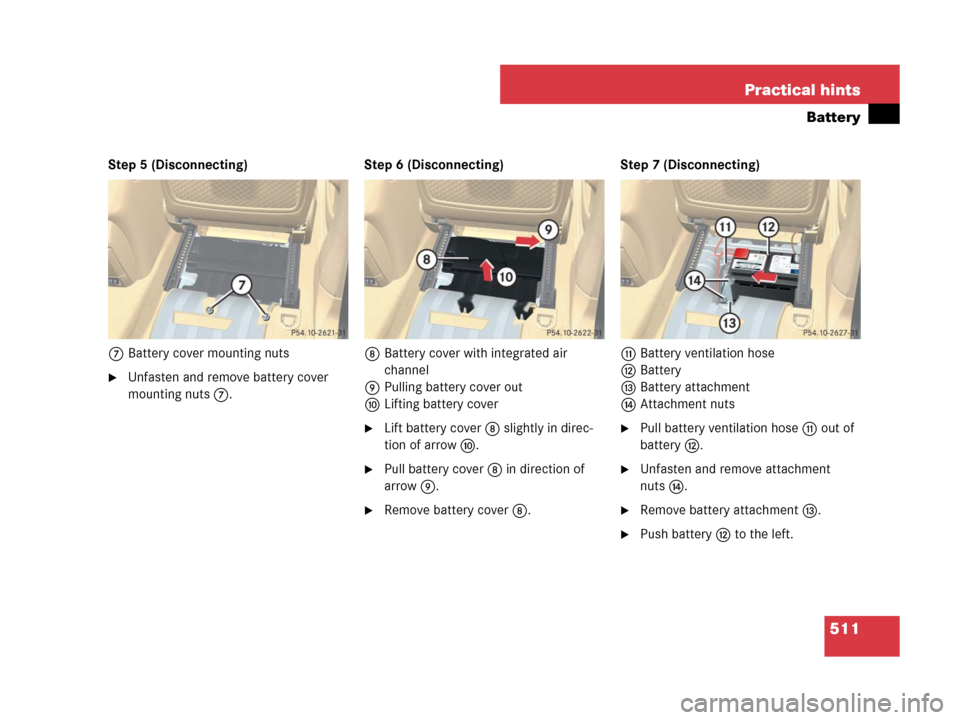
Step 5 (Disconnecting)
7Battery cover mounting nuts
�Unfasten and remove battery cover
mounting nuts 7.Step 6 (Disconnecting)
8Battery cover with integrated air
channel
9Pulling battery cover out
aLifting battery cover
�Lift battery cover 8 slightly in direc-
tion of arrow a.
�Pull battery cover 8 in direction of
arrow 9.
�Remove battery cover 8.Step 7 (Disconnecting)
bBattery ventilation hose
cBattery
dBattery attachment
eAttachment nuts
�Pull battery ventilation hose b out of
battery c.
�Unfasten and remove attachment
nutse.
�Remove battery attachment d.
�Push battery c to the left.