Page 134 of 570
133 Controls in detail
Seats
With the easy-entry/exit feature activated,
the steering wheel tilts upwards when you
�remove the SmartKey from the starter
switch
or
�open the driver’s door with the
SmartKey in starter switch position
0or1(
�page 39) or the
KEYLESS-GO* start/stop button in
position1 (
�page 41)
Easy-entry/exit feature for third-row
seats
This feature allows for easier access to and
exit from the vehicle’s third-row seats.Easy-entry feature for third-row seats
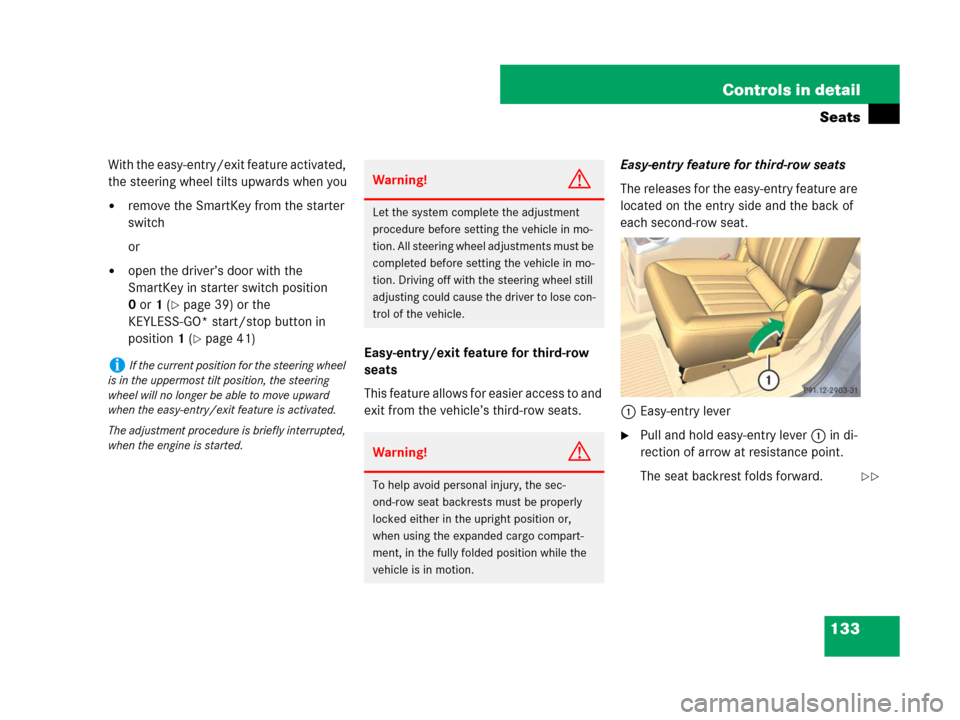
The releases for the easy-entry feature are
located on the entry side and the back of
each second-row seat.
1Easy-entry lever
�Pull and hold easy-entry lever 1 in di-
rection of arrow at resistance point.
The seat backrest folds forward.
iIf the current position for the steering wheel
is in the uppermost tilt position, the steering
wheel will no longer be able to move upward
when the easy-entry/exit feature is activated.
The adjustment procedure is briefly interrupted,
when the engine is started.
Warning!G
Let the system complete the adjustment
procedure before setting the vehicle in mo-
tion. All steering wheel adjustments must be
completed before setting the vehicle in mo-
tion. Driving off with the steering wheel still
adjusting could cause the driver to lose con-
trol of the vehicle.
Warning!G
To help avoid personal injury, the sec-
ond-row seat backrests must be properly
locked either in the upright position or,
when using the expanded cargo compart-
ment, in the fully folded position while the
vehicle is in motion.��
Page 136 of 570
135 Controls in detail
Seats
Returning second-row seats to their
original position
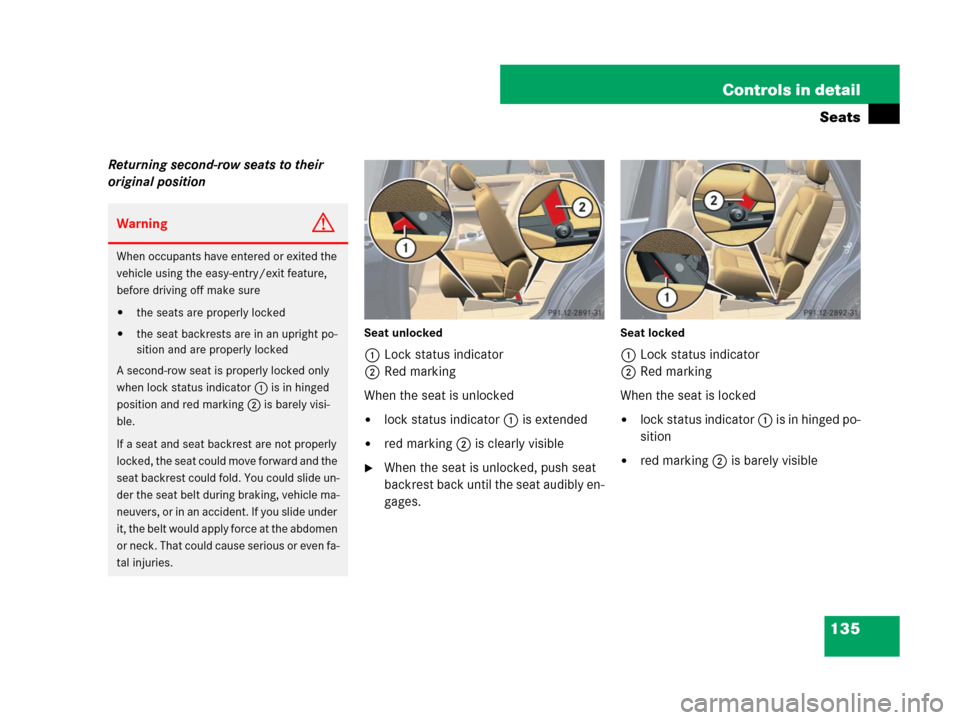
Seat unlocked
1Lock status indicator
2Red marking
When the seat is unlocked
�lock status indicator 1 is extended
�red marking 2 is clearly visible
�When the seat is unlocked, push seat
backrest back until the seat audibly en-
gages.
Seat locked
1Lock status indicator
2Red marking
When the seat is locked
�lock status indicator 1 is in hinged po-
sition
�red marking 2 is barely visible
WarningG
When occupants have entered or exited the
vehicle using the easy-entry/exit feature,
before driving off make sure
�the seats are properly locked
�the seat backrests are in an upright po-
sition and are properly locked
A second-row seat is properly locked only
when lock status indicator 1 is in hinged
position and red marking 2 is barely visi-
ble.
If a seat and seat backrest are not properly
locked, the seat could move forward and the
seat backrest could fold. You could slide un-
der the seat belt during braking, vehicle ma-
neuvers, or in an accident. If you slide under
it, the belt would apply force at the abdomen
or neck. That could cause serious or even fa-
tal injuries.
Page 139 of 570
138 Controls in detail
Seats
Fore and aft adjustment
(second-row seats only)
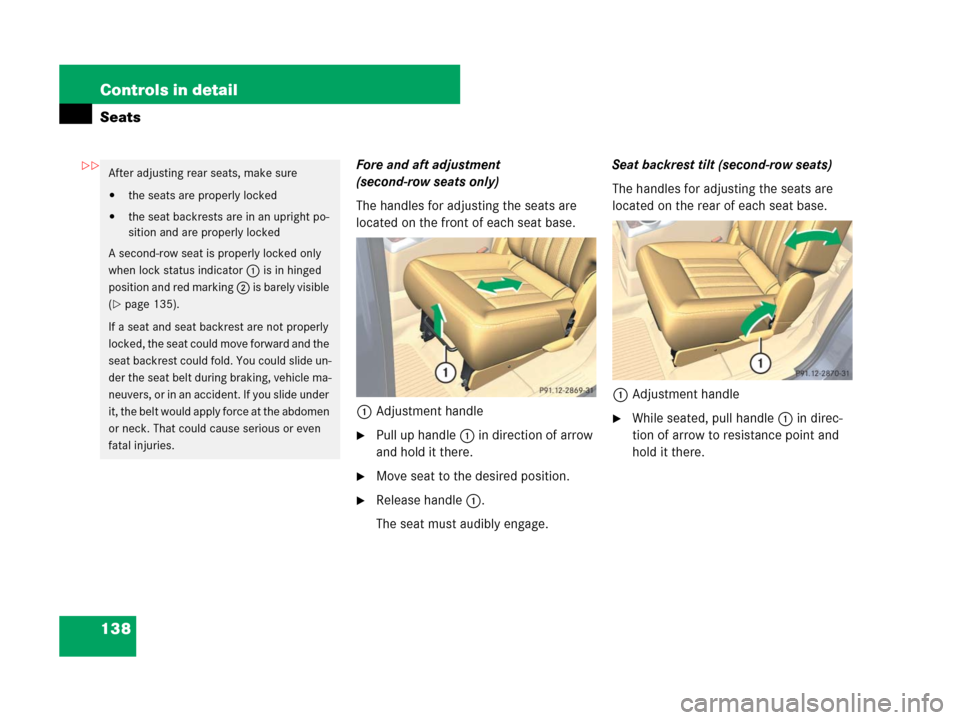
The handles for adjusting the seats are
located on the front of each seat base.
1Adjustment handle
�Pull up handle 1 in direction of arrow
and hold it there.
�Move seat to the desired position.
�Release handle 1.
The seat must audibly engage.Seat backrest tilt (second-row seats)
The handles for adjusting the seats are
located on the rear of each seat base.
1Adjustment handle
�While seated, pull handle 1 in direc-
tion of arrow to resistance point and
hold it there.
After adjusting rear seats, make sure
�the seats are properly locked
�the seat backrests are in an upright po-
sition and are properly locked
A second-row seat is properly locked only
when lock status indicator 1 is in hinged
position and red marking 2 is barely visible
(
�page 135).
If a seat and seat backrest are not properly
locked, the seat could move forward and the
seat backrest could fold. You could slide un-
der the seat belt during braking, vehicle ma-
neuvers, or in an accident. If you slide under
it, the belt would apply force at the abdomen
or neck. That could cause serious or even
fatal injuries.
��
Page 154 of 570
153 Controls in detail
Lighting
Switching on hazard warning flasher
�Press hazard warning flasher
switch1.
All turn signals are flashing.
Switching off hazard warning flasher
�Press hazard warning flasher switch1
again.
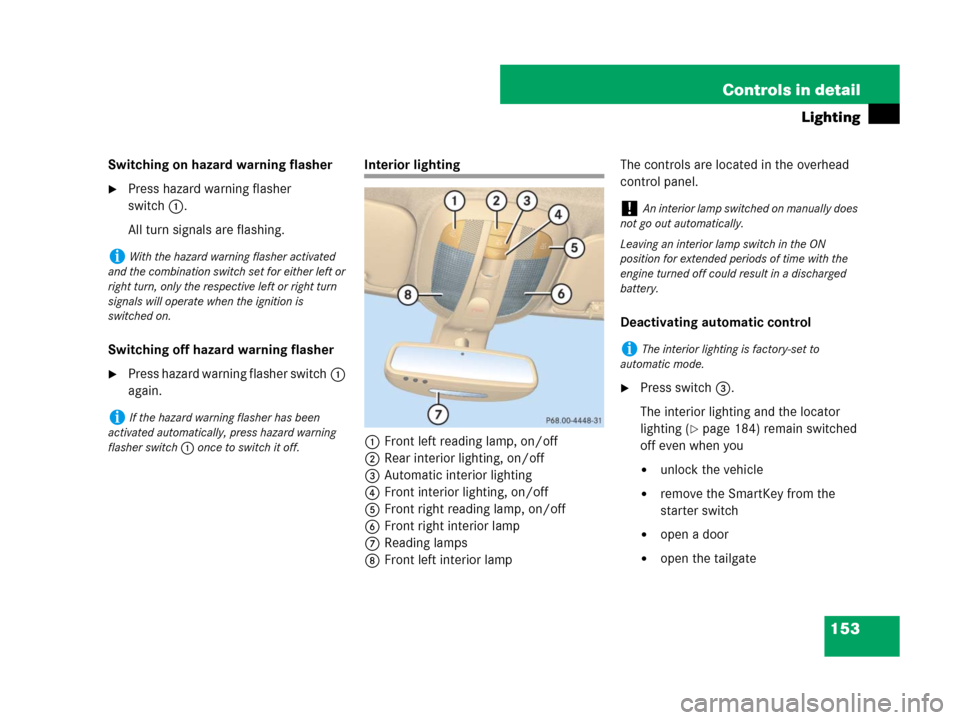
Interior lighting
1Front left reading lamp, on/off
2Rear interior lighting, on/off
3Automatic interior lighting
4Front interior lighting, on/off
5Front right reading lamp, on/off
6Front right interior lamp
7Reading lamps
8Front left interior lampThe controls are located in the overhead
control panel.
Deactivating automatic control
�Press switch3.
The interior lighting and the locator
lighting (
�page 184) remain switched
off even when you
�unlock the vehicle
�remove the SmartKey from the
starter switch
�open a door
�open the tailgate
iWith the hazard warning flasher activated
and the combination switch set for either left or
right turn, only the respective left or right turn
signals will operate when the ignition is
switched on.
iIf the hazard warning flasher has been
activated automatically, press hazard warning
flasher switch1 once to switch it off.
!An interior lamp switched on manually does
not go out automatically.
Leaving an interior lamp switch in the ON
position for extended periods of time with the
engine turned off could result in a discharged
battery.
iThe interior lighting is factory-set to
automatic mode.
Page 155 of 570
154 Controls in detail
Lighting
Activating automatic control
�Press switch3.
The interior lighting and the locator
lighting (
�page 184) come on when
you
�unlock the vehicle
�remove the SmartKey from the
starter switch
�open a door
�open the tailgate
The interior lighting switches off after
10 seconds see “Setting interior lighting
delayed shut-off” (
�page 186).Manual control
Switching front/rear interior lighting on
and off
�Press front/rear interior lighting
switch4 or 2 (
�page 153) to switch
on the desired interior light.
�Press front/rear interior lighting
switch4 or 2 again to switch off the
respective interior light.
Switching front reading lamps on and off
The front reading lamps are located in the
lower edge of the interior rear view mirror.
�Press front reading lamp
switch1or5 (
�page 153) to
switch on the desired front reading
lamp.
�Press front reading lamp
switch1or5 again to switch off the
respective front reading lamp.Switching second-row reading lamps on
and off
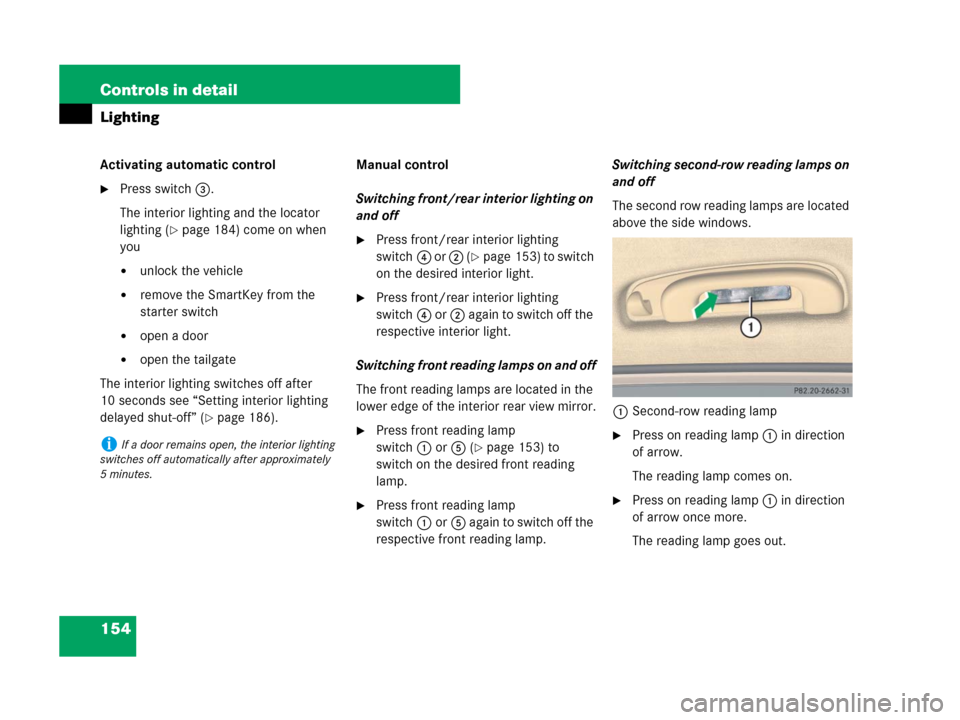
The second row reading lamps are located
above the side windows.
1Second-row reading lamp
�Press on reading lamp 1 in direction
of arrow.
The reading lamp comes on.
�Press on reading lamp 1 in direction
of arrow once more.
The reading lamp goes out.
iIf a door remains open, the interior lighting
switches off automatically after approximately
5minutes.
Page 179 of 570
178 Controls in detail
Control system
The table below shows what settings can
be changed within the various menus.
Detailed instructions on making individual
settings can be found on the following
pages.
INSTRUMENT CLUSTERTIME/DATELIGHTINGVEHICLECOMFORT*
(�page 179)(�page 181)(�page 183)(�page 186)(�page 189)
Selecting speedometer display
modeSetting the time
(hour)Setting daytime running
lamp mode (USA only)Calling up the compassActivating
easy-entry/exit feature*
Selecting languageSetting the time
(minutes)Setting locator lightingCompass adjustmentSetting fold-in function
for exterior rear view
mirrors*
Selecting display (digital
speedometer or outside
temperature) for status indicatorSetting the date
(month)Setting night security
illuminationCompass calibration
Setting the date
(day)Setting interior lighting
delayed shut-offAudio search function
Setting the date
(year)Setting automatic
locking
Limiting opening height
of tailgate*
Page 182 of 570

181 Controls in detail
Control system
Time/Date submenu
Access the
Time/Date submenu via the
Settings menu. Use the Time/Date
submenu to change the time and date
settings.
The following functions are available:Setting the time (hour)
This function is not available if your vehicle
is equipped with the COMAND system and
navigation module*.
�Move the selection marker with
buttonæ orçto the
Time/Date
submenu.
�Press buttonj ork repeatedly
until the message
Clock Set hour
appears in the multifunction display.
The selection marker is on the hour
setting.
�Press buttonæ orç to set the
hour.Setting the time (minutes)
This function is not available if your vehicle
is equipped with the COMAND system and
navigation module*.
�Move the selection marker with
buttonæ orçto the
Time/Date
submenu.
�Press buttonj ork repeatedly
until the message
Clock Set minute(s) appears in the
multifunction display.
The selection marker is on the minute
setting.
�Press buttonæ orç to set the
minutes.
FunctionPage
Setting the time (hours)181
Setting the time (minutes)181
Setting the date (month)182
Setting the date (day)182
Setting the date (year)182
iIf your vehicle is equipped with the
COMAND system and navigation module*, see
separate COMAND operating instructions for
information on how to set the date and time.
Page 185 of 570
184 Controls in detail
Control system
In low ambient light conditions the
following lamps will switch on additionally:
�Parking lamps
�Tail lamps
�License plate lamps
�Side marker lamps
For more information on the daytime
running lamp mode, see “Lighting”
(
�page 146).Setting locator lighting
With the locator lighting feature activated,
the exterior lamp switch in positionU
(
�page 147) and the interior lighting in
automatic mode (
�page 153), the
following lamps will switch on during dark-
ness when the vehicle is unlocked using
button Πon the SmartKey or SmartKey
with KEYLESS-GO*:
�Parking lamps
�Tail lamps
�License plate lamps
�Side marker lamps
�Front fog lamps*
The locator lighting switches off when the
driver’s door is opened.
If you do not open a door after unlocking
the vehicle with the SmartKey, the lamps
will switch off automatically after approxi-
mately 40 seconds.
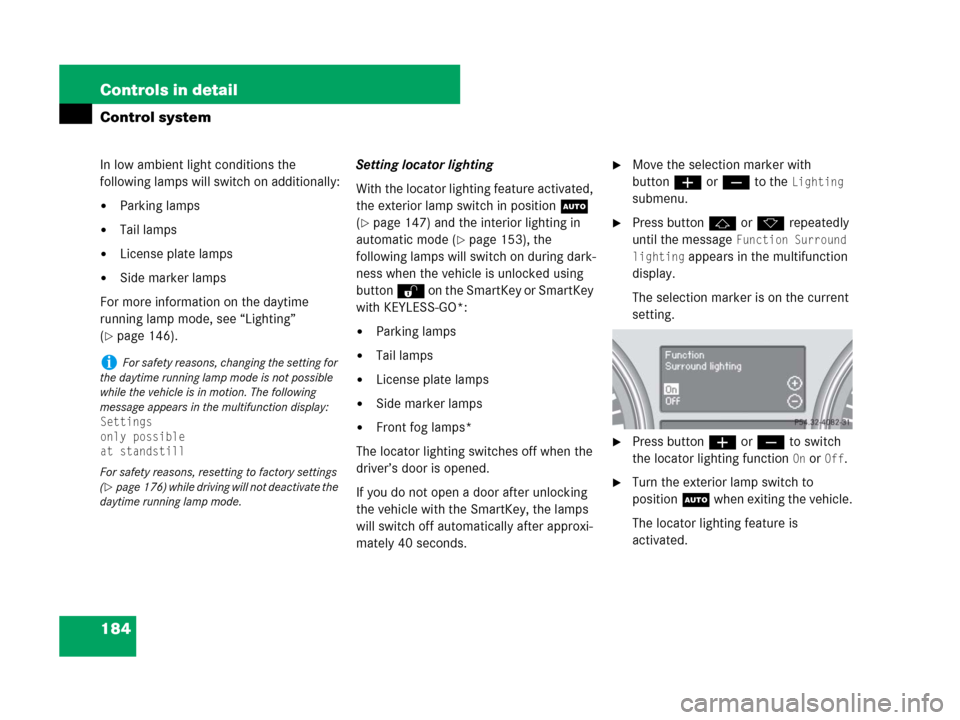
�Move the selection marker with
buttonæ orç to the
Lighting
submenu.
�Press buttonj ork repeatedly
until the message
Function Surround
lighting
appears in the multifunction
display.
The selection marker is on the current
setting.
�Press buttonæ orç to switch
the locator lighting function
On or Off.
�Turn the exterior lamp switch to
positionU when exiting the vehicle.
The locator lighting feature is
activated.
iFor safety reasons, changing the setting for
the daytime running lamp mode is not possible
while the vehicle is in motion. The following
message appears in the multifunction display:
Settings
only possible
at standstill
For safety reasons, resetting to factory settings
(
�page 176) while driving will not deactivate the
daytime running lamp mode.