Page 309 of 570

308 Controls in detail
Loading
When not in use, you can attach the cover
blind extensions to the cover blind.
5Extension guide rail
6Mounting
�With the cargo compartment cover
installed behind third-row seats, insert
extension guide rail 5 into
mounting6.
�Push extension into mounting6 as far
as it will go.
Partition net*Use of the partition net is a particularly
important safety factor when the vehicle is
loaded higher than the top of the seat
backrests with smaller objects. For your
safety, always use the partition net when
transporting cargo.
The partition net can be installed in two lo-
cations:
1Holder behind B-pillar
2Holder behind C-pillar
Warning!G
Make sure the partition net is properly
engaged at top and bottom position and the
tightening belts are securely fastened.
Never use a damaged partition net.
To help avoid personal injury from smaller
objects being thrown around in the occu-
pant compartment during a collision or
sudden maneuver, always use partition net
when transporting cargo.
The partition net cannot prevent the move-
ment of large, heavier objects into the pas-
senger compartment in an accident. Such
items must be properly secured using the
cargo tie-down rings in the cargo compart-
ment floor (
�page 299).
Passenger use of seats behind installed
partition net is restricted because of the
footwell being taken up by the net.
��
Page 310 of 570
, use holders
behind C-pillars 2 and the cargo
tie-down rings in the third-row footwell
(
�page 300).
�With")
309 Controls in detail
Loading
�With the cargo compartment expanded
in part (
�page 301), use holders
behind C-pillars 2 and the cargo
tie-down rings in the third-row footwell
(
�page 300).
�With the cargo compartment fully
expanded (
�page 302), use holders
behind B-pillars 1 and the cargo
tie-down rings in the second-row
footwell (
�page 300).
�Open the zipper on the partition net
package.
�Roll out the partition net.
�Unfold the partition net.
The partition net bars must audibly en-
gage.Installing the partition net
Partition net installed behind the B-pillar
1Holder
2Partition net bar
�Hang partition net bar2 on holder1
as indicated by the arrow.
�Push partition net bar2 forward into
holder1 in direction of arrow.Pulling the partition net tight
Belt hook attached in the second-row
footwell
1Belt hook
2Cargo tie-down ring
3Tightening belt
�Hook belt hook1 into cargo tie-down
ring2 in direction of arrow.
�Pull tightening belt3 by the loose end
in direction of arrow until the partition
net is pulled tight.
�After driving a short distance, make
sure the partition net is still tight and, if
necessary, pull it tight again.
Page 311 of 570
310 Controls in detail
Loading
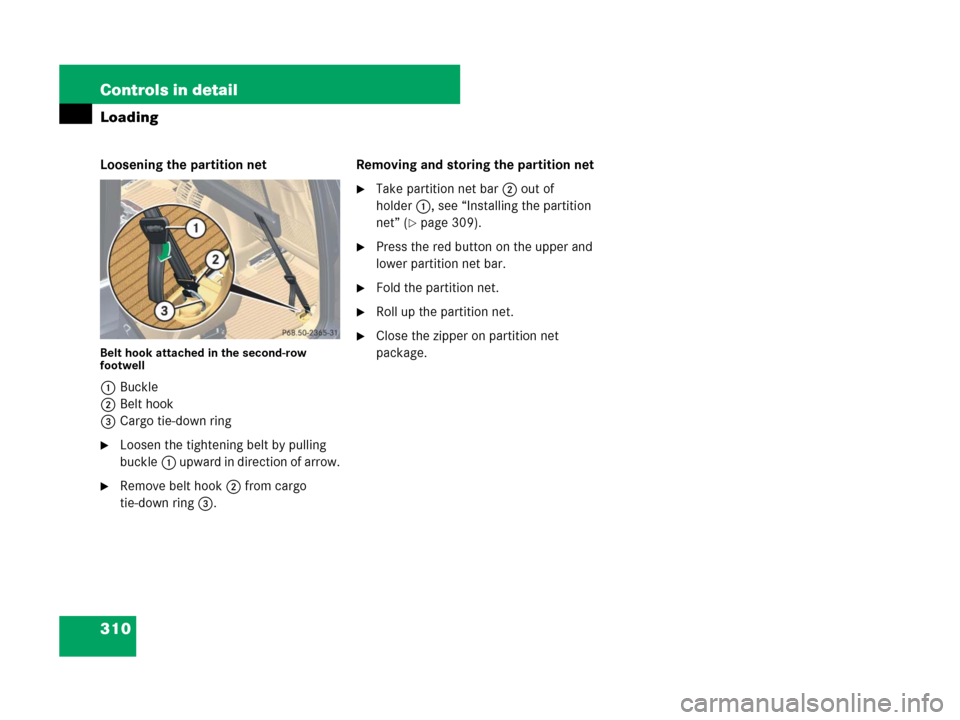
Loosening the partition net
Belt hook attached in the second-row
footwell
1Buckle
2Belt hook
3Cargo tie-down ring
�Loosen the tightening belt by pulling
buckle1 upward in direction of arrow.
�Remove belt hook2 from cargo
tie-down ring3.Removing and storing the partition net
�Take partition net bar2 out of
holder1, see “Installing the partition
net” (
�page 309).
�Press the red button on the upper and
lower partition net bar.
�Fold the partition net.
�Roll up the partition net.
�Close the zipper on partition net
package.
Page 393 of 570

392 Operation
Tires and wheels
Tire size designation, load and speed
rating
1Tire width
2Aspect ratio in %
3Radial tire code
4Rim diameter
5Tire load rating
6Tire speed ratingGeneral:
Depending on the design standards used,
the tire size molded into the sidewall may
have no letter or a letter preceding the tire
size designation.
No letter preceding the size designation
(as illustrated above): Passenger car tire
based on European design standards.
Letter “P” preceding the size designation:
Passenger car tire based on U.S. design
standards.
Letter “LT” preceding the size designation:
Light Truck tire based on U.S. design
standards.
Letter “T” preceding the size designation:
Temporary spare tires which are high
pressure compact spares designed for
temporary emergency use only. Tire width
The tire width1 (
�page 392) indicates
the nominal tire width in mm.
Aspect ratio
The aspect ratio2 (
�page 392) is the
dimensional relationship between tire
section height and section width and is
expressed in percentage. The aspect ratio
is arrived at by dividing section height by
section width.
Tire code
The tire code3 (
�page 392) indicates
the tire construction type. The “R” stands
for radial tire type. Letter “D” means diag-
onal or bias ply construction; letter “B”
means belted-bias ply construction.
At the tire manufacturer’s option, any tire
with a speed capability above 149 mph
(240 km/h) can include a “ZR” in the size
designation (for example: 245/40 ZR 18).
For additional information, see “Tire speed
rating” (
�page 393).
iFor illustration purposes only. Actual data
on tires are specific to each vehicle and may vary
from data shown in above illustration.
Page 413 of 570

412 Operation
Vehicle care
Engine cleaning
Prior to cleaning the engine compartment
make sure to protect electrical compo-
nents and connectors from the intrusion of
water and cleaning agents.
Corrosion protection, such as MB Anticor-
rosion Wax, should be applied to the en-
gine compartment after every engine
cleaning. Before applying, all control link-
age bushings and joints should be lubricat-
ed. The poly-V-belt and all pulleys should
be protected from any wax.
Vehicle washing
In the winter, thoroughly remove all traces
of road salt as soon as possible.
When washing the vehicle underbody, do
not forget to clean the inner sides of the
wheels.Hand-wash
Do not use hot water or wash your vehicle
in direct sunlight.
�Only use a mild car wash detergent,
such as Mercedes-Benz approved Car
Shampoo.
�Thoroughly spray the vehicle with a dif-
fused jet of water.
Direct only a very weak spray towards
the ventilation intake.
�Use plenty of water and rinse the
sponge and chamois frequently.
�Rinse with clean water and thoroughly
dry with a chamois.
Do not allow cleaning agents to dry on
the finish.Automatic car wash
You can have your car washed in an auto-
matic car wash from the start. Automatic
car washes without brushes are prefera-
ble.
�To protect the filter system, switch the
climate control system (
�page 218) or
the automatic climate control system*
(
�page 232) to air recirculation mode.
If the vehicle is very dirty, prewash it
before running it through the automatic
car wash.
iVehicles with KEYLESS-GO*:
If a door handle is hit by a strong jet of water, and
a SmartKey with KEYLESS-GO* is in close
proximity, i.e. within approximately
3 ft (approximately 1 m), the vehicle could be
inadvertently locked or unlocked.
!Do not use scouring agents on these parts.
Never apply strong force and only use a soft,
non-scratching cloth when cleaning the vehicle.
Do not attempt to wipe the surface with a dry
cloth or sponge.
Otherwise you may scratch or damage the paint.
!Do not clean your vehicle in an automatic
touchless car wash which uses caustic spray.
Otherwise the caustic spray will damage the
paint or ornamental moldings.
Page 418 of 570

417 Operation
Vehicle care
Hard plastic trim items
�Use Mercedes-Benz approved Interior
Care, a soft, lint-free cloth and apply
with light pressure.
Steering wheel
�Wipe with a damp cloth and dry thor-
oughly or clean with Mercedes-Benz
approved Leather Care.
Carpets
�Use Mercedes-Benz approved Carpet
and Fabric Care for cleaning the
carpets.Headliner
�Use a soft bristle brush or a
dry-shampoo cleaner in case of
excessive dirt.
Seat belts
�Only use clear, lukewarm water and
soap.Upholstery
Using aftermarket seat covers or wearing
clothing that have the tendency to give off
coloring (e.g. when wet, etc.) may cause
the upholstery to become permanently dis-
colored. By lining the seats with a proper
intermediate cover, contact-discoloration
will be prevented.
!Never apply strong force and only use a soft,
non-scratching cloth when cleaning the surface.
Do not attempt to wipe the surface with a dry
cloth or sponge.
Otherwise you may scratch or damage the
surface.
!The seat belts must not be treated with
chemical cleaning agents. Do not dry the seat
belts at temperatures above 176°F (80°C) or in
direct sunlight.
Warning!G
Do not bleach or dye seat belts as this may
severely weaken them. In a crash they may
not be able to provide adequate protection.
Warning!G
Only use seat or head restraint covers which
have been tested and approved by
Mercedes-Benz for your vehicle model.
Using other seat or head restraint covers
may interfere with or prevent the activation
of the active head restraints. Contact an
authorized Mercedes-Benz Light Truck
Center for availability.
Page 427 of 570

426 Practical hints
What to do if …
ProblemPossible cause/consequenceSuggested solution
on for a maximum of 6 seconds
after starting the engine.The seat belt telltale reminds you and your
passengers to fasten your seat belts before
driving off.�Fasten your seat belts.
Regardless of whether the seat belts
are fastened or not, the seat belt tell-
tale always comes on and remains lit
for 6 seconds after starting the
engine.
maximum of 6 seconds after
starting the engine.You have forgotten to fasten your seat belt.�Fasten your seat belt.
The warning chime stops sounding.
on while the vehicle is standing
still and the engine is running or
during driving.You and/or your front passenger have for-
gotten to fasten your seat belts.�Fasten your seat belts.
The seat belt telltale goes out.
There are items placed on the front passen-
ger seat and therefore the system senses the
front passenger seat as being occupied.�Remove the items from the front pas-
senger seat and put them in a safe
place.
The seat belt telltale goes out.
Page 428 of 570

427 Practical hints
What to do if …
ProblemPossible cause/consequenceSuggested solution
telltale flashes and you addition-
ally hear an intermittent warning
chime with increasing intensity.The vehicle’s speed once exceeded
15 mph (25 km/h) and you and/or your
front passenger have forgotten to fasten your
seat belts.�Fasten your seat belts.
The seat belt telltale goes out and the
warning chime stops sounding.
There are items placed on the front passen-
ger seat and therefore the system senses the
front passenger seat as being occupied.�Remove the items from the front
passenger seat and put them in a safe
place.
The seat belt telltale goes out and the
warning chime stops sounding.
iAfter 60 seconds with an unfastened seat
belt on one of the front seats, the warning chime
stops sounding and the seat belt telltale illumi-
nates continuously. The seat belt telltale will only
go out if both the driver and front passenger’s
seat belt are fastened, or the vehicle is standing
still and a front door is opened.