76 Safety and Security
Occupant safety
Air bags
Warning!G
Air bags are designed to reduce the poten-
tial of injury and fatality in certain frontal
impacts (front air bags), side impacts (side
impact air bags and window curtain air bags)
or rollovers (window curtain air bags).
However, no system available today can
completely eliminate injuries and fatalities.
The deployment of the air bags temporarily
releases a small amount of dust from the air
bags. This dust, however, is neither injurious
to your health, nor does it indicate a fire in
the vehicle. The dust might cause some tem-
porary breathing difficulty for people with
asthma or other breathing trouble. To avoid
this, you may wish to get out of the vehicle
as soon as it is safe to do so. If you have any
breathing difficulty but cannot get out of the
vehicle after the air bag inflates, then get
fresh air by opening a window or door.
Warning!G
To reduce the risk of injury when the front
air bags inflate, it is very important for the
driver and front passenger to always be in a
properly seated position and to wear their
respective seat belt.
For maximum protection in the event of a
collision always be in normal seated position
with your back against the seat backrest.
Fasten your seat belt and make sure it is
properly positioned on your body
(
�page 54).
Since the air bag inflates with considerable
speed and force, a proper seating and hands
on steering wheel position will help to keep
you at a safe distance from the air bag.
Occupants who are unbelted, out of position
or too close to the air bag can be seriously
injured or killed by an air bag as it inflates
with great force in the blink of an eye:
�Sit properly belted in a position that is as
upright as possible with your back
against the seat backrest.
�Adjust the driver’s seat as far as possi-
ble rearward, still permitting proper op-
eration of vehicle controls. The distance
from the center of the driver’s breast-
bone to the center of the air bag cover
on the steering wheel must be at least
10 inches (25 cm) or more. You should
be able to accomplish this by a combina-
tion of adjustments to the seat and
steering wheel. If you have any
problems, please see an authorized
Mercedes-Benz Light Truck Center.
�Do not lean your head or chest close to
the steering wheel or dashboard.
�Keep hands on the outside of steering
wheel rim. Placing hands and arms in-
side the rim can increase the risk and
potential severity of hand/arm injury
when driver’s front air bag inflates.
�Adjust the front passenger seat as far as
possible rearward from the dashboard
when the seat is occupied.
210 Controls in detail
Good visibility
For information on windshield wipers, see
“Windshield wipers” (
�page 63).
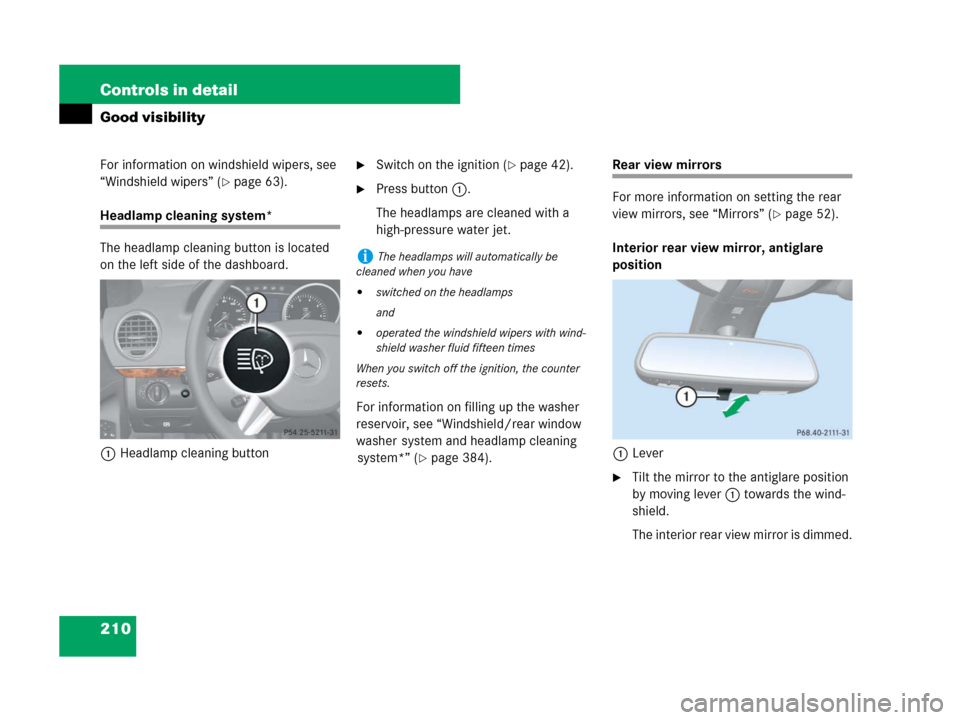
Headlamp cleaning system*
The headlamp cleaning button is located
on the left side of the dashboard.
1Headlamp cleaning button
�Switch on the ignition (�page 42).
�Press button1.
The headlamps are cleaned with a
high-pressure water jet.
For information on filling up the washer
reservoir, see “Windshield/rear window
washer system and headlamp cleaning
system*” (
�page 384).
Rear view mirrors
For more information on setting the rear
view mirrors, see “Mirrors” (
�page 52).
Interior rear view mirror, antiglare
position
1Lever
�Tilt the mirror to the antiglare position
by moving lever1 towards the wind-
shield.
The interior rear view mirror is dimmed.
iThe headlamps will automatically be
cleaned when you have
�switched on the headlamps
and
�operated the windshield wipers with wind-
shield washer fluid fifteen times
When you switch off the ignition, the counter
resets.
292 Controls in detail
Driving systems
Front sensors
Rear sensors
Minimum distance
If the system detects an obstacle in this
range, all the distance warning segments
illuminate and you hear a warning signal. If
the obstacle is closer than the minimum
distance, the actual distance may no
longer be indicated by the system.Warning indicators
Visual signals indicate to the driver the rel-
ative distance between the sensors and an
obstacle. The warning indicator for the
front area is located above the center air
vents in the dashboard. The warning indi-
cator for the rear area is located in the rear
passenger compartment under the roof.
Front area warning indicator
1Left side of the vehicle
2Right side of the vehicle
3Readiness indicatorsEach warning indicator is divided into five
yellow and two red distance segments for
either side of the vehicle. The Parktronic
system is operational when the readiness
indicators3 are illuminated.
The current transmission position deter-
mines which warning indicator will be acti-
vated.
Centerapprox. 40 in (100 cm)
Cornersapprox. 24 in (60 cm)
Centerapprox. 48 in (120 cm)
Cornersapprox. 32 in (80 cm)
Centerapprox. 8 in (20 cm)
Cornersapprox. 6 in (15 cm)
Automatic trans-
mission positionWarning indicator
DFront area activated
R or NFront and rear area
activated
PNeither activated
, side impacts (side
impac")