Page 26 of 595
25 At a glance
Cockpit
ItemPage
1Cruise control lever258
2Instrument cluster26
3Multifunction steering
wheel30
4Horn
5Steering wheel gearshift
buttons201
6Gear selector lever for
automatic transmission58
7Front Parktronic* warning
indicators292
8Overhead control panel34
9Glove box release
Glove box lock316
317
ItemPage
aGlove box316
CD changer*316
AUX-socket316
bPower outlet325
cCenter console31
dStarter switch42
eSteering wheel adjustment,
manual50
fHood lock release379
gParking brake release60
hParking brake pedal68
jPower tailgate switch*126
kDoor control panel35
ItemPage
lHeadlamp washer switch*210
mExterior lamp switch62
145
nSteering wheel adjustment,
electrical*
Heated steering wheel*51
328
oCombination switch
�High beam
�Turn signals
�Windshield wipers
�Rear window wiper
149
63
63
63
65
Page 28 of 595
27 At a glance
Instrument cluster
ItemPage
1LLeft turn signal
indicator lamp
2To dim instrument cluster
illumination155
3Reset button for:
�Resetting trip odometer
�Resetting all settings
156
171
4To brighten instrument
cluster illumination155
5KRight turn signal
indicator lamp
6Clock
Setting the time
176
ItemPage
7Speedometer with:
-Antilock Brake
System (ABS)
indicator lamp436
’Variable speed limiter
indicator lamp1
lDistance warning
lamp2265,
445
1Lamp without function. It illuminates when the
ignition is on. It should go out when the engine is
running.
2Vehicles without Distronic*: Warning lamp without
function. It illuminates when the ignition is on.
It should go out when the engine is running.
ItemPage
;Brake warning lamp,
USA only437
3Brake warning lamp,
Canada only437
vElectronic Stability
Program (ESP®)
warning lamp
441
HCombination low tire
pressure/TPMS mal-
function telltale,
USA only
Low tire pressure
telltale, Canada only446
446
Page 31 of 595
30 At a glance
Multifunction steering wheel
ItemPage
1Multifunction display157
Operating the control
system158
2Telephone*:
Press button
sto take a call
to dial
to redial
tto end a call
to reject an
incoming call
3Selecting the submenu or
setting the volume:
Press button
æup/to increase
çdown/to decrease
ItemPage
4Voice control System*1,
see separate operating
instructions
5Moving within a menu:
Press button
jfor next display
kfor previous display
6Voice control System*1,
see separate operating
instructions
7Menu systems:
Press button
èfor next menu
ÿfor previous menu
1Vehicles without Voice Control System*: Button
without function.
Page 35 of 595
34 At a glance
Overhead control panel
ItemPage
1Left reading lamp switch151
2Rear interior lighting switch151
3Automatic interior lighting
switch151
4Front interior lighting switch151
5Right reading lamp switch151
6Front right interior lamp151
7Power tilt/sliding sunroof*
switch253
8Tele Aid (emergency call
system) button335
9Interior rear view mirror210
aFront right reading lamp151
ItemPage
bFront left reading lamp151
cGarage door opener340
dVehicles without
telephone* installed:
Hands-free microphone for
Tele Aid (emergency call
system)332
eVehicles with telephone*
installed:
Hands-free microphone for
Tele Aid (emergency call
system) and telephone*332
fFront left interior lamp151
Page 36 of 595
35 At a glance
Door control panel
�Door control panel
ItemPage
1Inside door handle122
2Central unlocking switch
Central locking switch131
131
3Exterior rear view mirror
adjustment52
4Selection buttons for exteri-
or rear view mirror adjust-
ment
Power-folding exterior rear
view mirrors*52
211
5Switches for opening/clos-
ing front and rear door
windows248
6Rear door window override
switch100
7Hinged quarter window
switch*250
8Remote tailgate release
switch, power tailgate*126
125
Page 41 of 595

40 Getting started
The “Getting started” section provides an
overview of the vehicle’s most basic func-
tions. First-time Mercedes-Benz owners
should pay special attention to the infor-
mation given here.
If you are already familiar with the basic
functions described here, the “Controls in
detail” section will provide you with further
information. The corresponding page
references are located at the end of each
segment.
Unlocking
Unlocking with the SmartKey
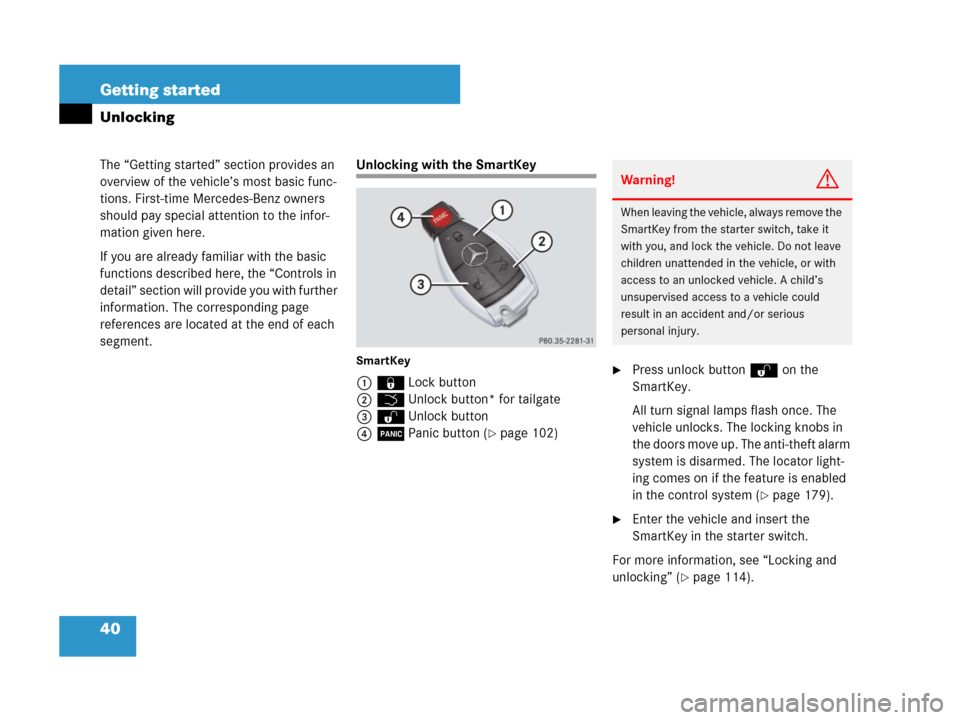
SmartKey
1‹Lock button
2ŠUnlock button* for tailgate
3ŒUnlock button
4ÂPanic button (
�page 102)
�Press unlock buttonŒ on the
SmartKey.
All turn signal lamps flash once. The
vehicle unlocks. The locking knobs in
the doors move up. The anti-theft alarm
system is disarmed. The locator light-
ing comes on if the feature is enabled
in the control system (
�page 179).
�Enter the vehicle and insert the
SmartKey in the starter switch.
For more information, see “Locking and
unlocking” (
�page 114).
Warning!G
When leaving the vehicle, always remove the
SmartKey from the starter switch, take it
with you, and lock the vehicle. Do not leave
children unattended in the vehicle, or with
access to an unlocked vehicle. A child’s
unsupervised access to a vehicle could
result in an accident and/or serious
personal injury.
Page 42 of 595

41 Getting started
Unlocking
Unlocking with KEYLESS-GO*
With the KEYLESS-GO function, you can
lock or unlock the vehicle without using
the remote control buttons on the
SmartKey and start the engine without in-
serting the SmartKey into the starter
switch.�Grasp an outside door handle.
All turn signal lamps flash once. The ve-
hicle unlocks. The locking knobs in the
doors move up. The anti-theft alarm
system is disarmed. The locator light-
ing comes on if the feature is enabled
in the control system (
�page 179).
�Enter the vehicle.
For more information, see “SmartKey with
KEYLESS-GO*” (
�page 117).
Starter switch positions
iTo unlock the vehicle, the SmartKey with
KEYLESS-GO must be outside the vehicle, no
further than approximately 3 feet (1 meter) away
from the respective door.
Warning!G
When leaving the vehicle, always take the
SmartKey with KEYLESS-GO* with you, and
lock the vehicle. Do not leave children
unattended in the vehicle, or with access to
an unlocked vehicle. A child’s unsupervised
access to a vehicle could result in an
accident and/or serious personal injury.
i If the vehicle has been parked for more than
72 hours, you must pull an outside door handle
in order to activate the KEYLESS-GO function.
Warning!G
When leaving the vehicle, always remove the
SmartKey or SmartKey with KEYLESS-GO*
from the starter switch, take it with you and
lock the vehicle. Do not leave children unat-
tended in the vehicle, or with access to an
unlocked vehicle. A child’s unsupervised
access to a vehicle could result in an
accident and/or serious personal injury.
Page 44 of 595

43 Getting started
Unlocking
SmartKey with KEYLESS-GO*
Vehicles equipped with the KEYLESS-GO
feature are supplied with a SmartKey with
integrated KEYLESS-GO function and a
removable KEYLESS-GO start/stop
button.
With the KEYLESS-GO start/stop button
inserted and the SmartKey with
KEYLESS-GO present in the vehicle, press-
ing the KEYLESS-GO start/stop button
�without the brake pedal depressed
corresponds to the various starter
switch positions (
�page 44)
�with the brake pedal firmly depressed
will start the engine (
�page 57)
If you wish or should there be a need to
insert the SmartKey with KEYLESS-GO in
the starter switch, the KEYLESS-GO
start/stop button can be easily removed
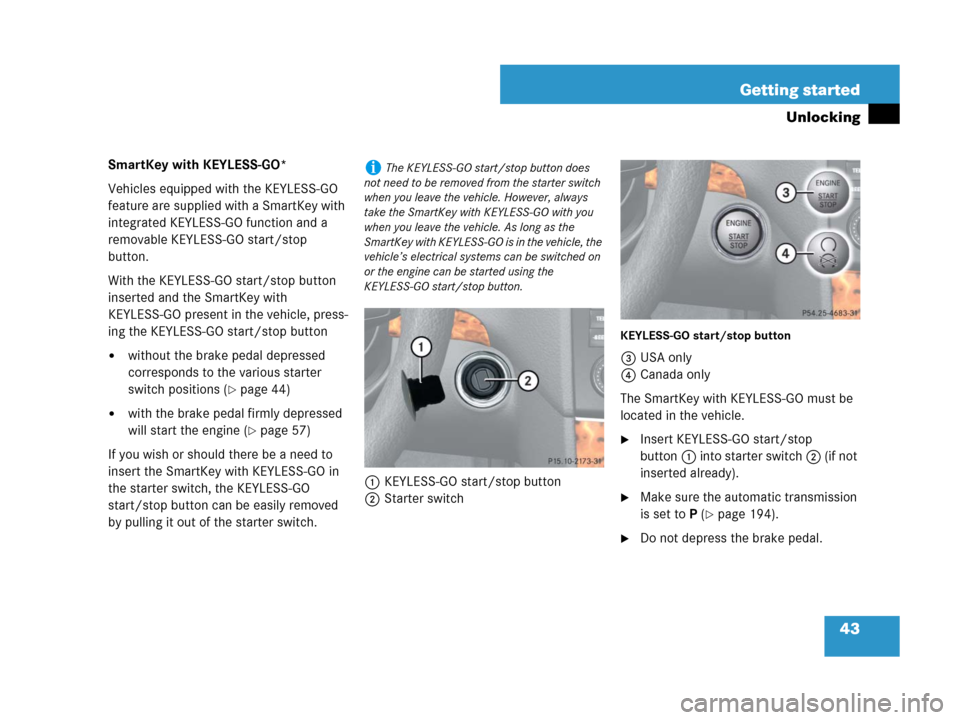
by pulling it out of the starter switch.1KEYLESS-GO start/stop button
2Starter switch
KEYLESS-GO start/stop button
3USA only
4Canada only
The SmartKey with KEYLESS-GO must be
located in the vehicle.
�Insert KEYLESS-GO start/stop
button1 into starter switch2 (if not
inserted already).
�Make sure the automatic transmission
is set toP (
�page 194).
�Do not depress the brake pedal.
iThe KEYLESS-GO start/stop button does
not need to be removed from the starter switch
when you leave the vehicle. However, always
take the SmartKey with KEYLESS-GO with you
when you leave the vehicle. As long as the
S m a r t K e y w i t h K E Y L E S S - G O i s i n t h e v e h i c l e , t h e
vehicle’s electrical systems can be switched on
or the engine can be started using the
KEYLESS-GO start/stop button.