Page 140 of 595
139 Controls in detail
Seats
�Push release button2 and pull out
head restraint.
�Second-row seat:
Fold the seat backrest rearward until it
engages.
�Third-row seat:
Fold the seat backrest rearward
(
�page 307).
Installing
�Second-row seat:
Fold the seat backrest forward
(
�page 136).
�Third-row seat:
Fold the seat backrest forward
(
�page 307).
�Insert head restraint1 into openings
on the seat backrest.
�Push head restraint1 down until it au-
dibly engages.
�Push release button2 and adjust
head restraint1 to the desired posi-
tion (
�page 137).
�Second-row seat:
Fold the seat backrest rearward until it
engages.
�Third-row seat:
Fold the seat backrest rearward
(
�page 307).
For more information on seats, see the
“Getting started” section (
�page 45).
Lumbar support
The curvature of the driver’s seat can be
adjusted to help enhance lower back sup-
port and seating comfort.
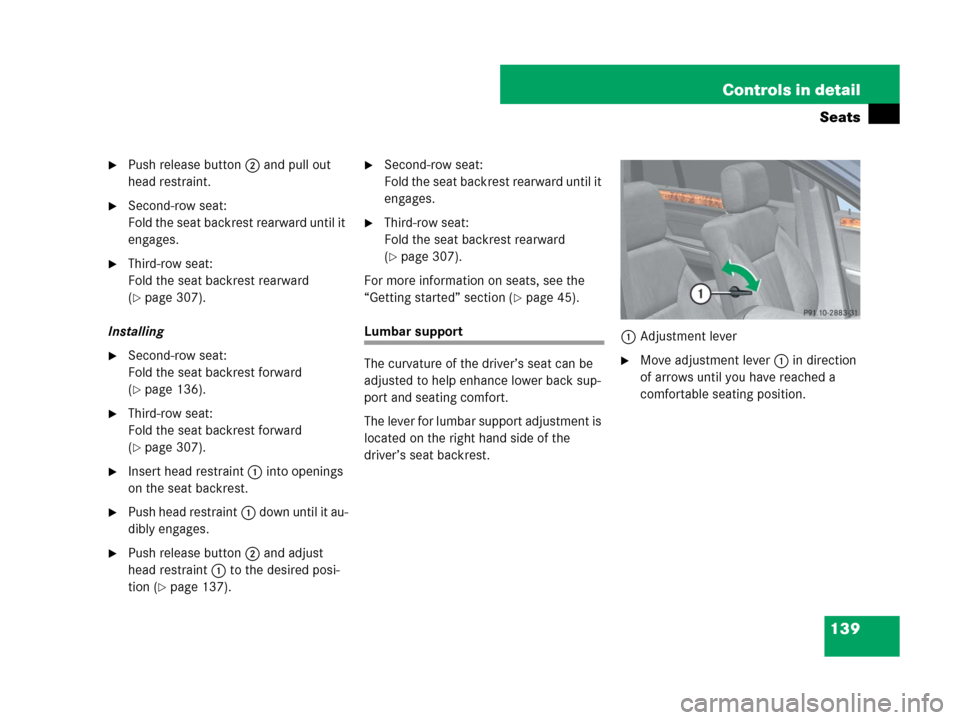
The lever for lumbar support adjustment is
located on the right hand side of the
driver’s seat backrest.1Adjustment lever
�Move adjustment lever1 in direction
of arrows until you have reached a
comfortable seating position.
Page 141 of 595
140 Controls in detail
Seats
Multicontour seat*
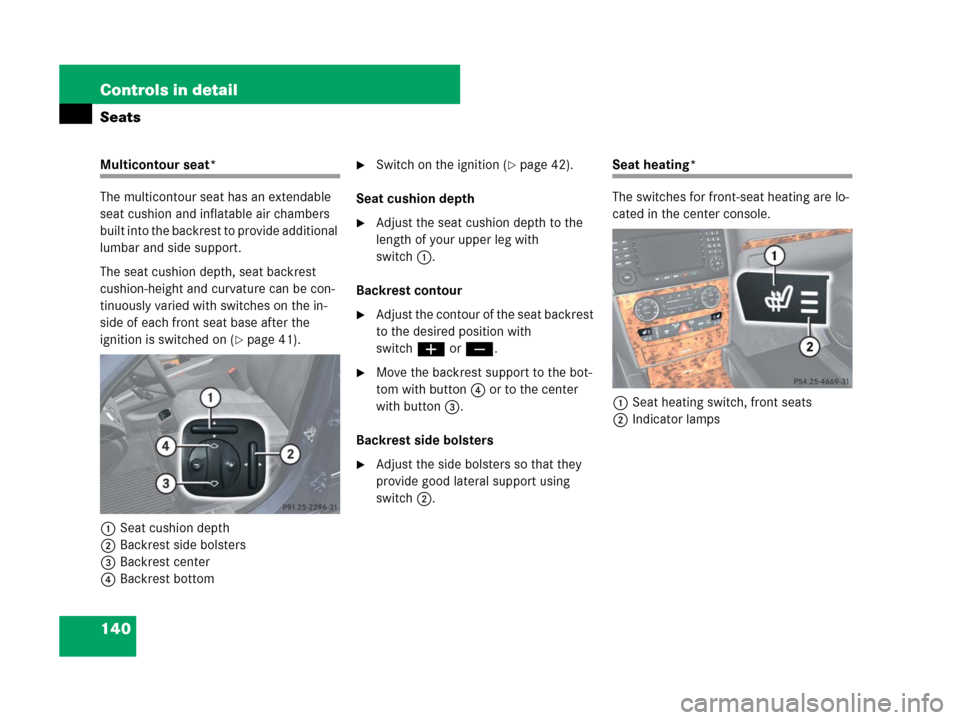
The multicontour seat has an extendable
seat cushion and inflatable air chambers
built into the backrest to provide additional
lumbar and side support.
The seat cushion depth, seat backrest
cushion-height and curvature can be con-
tinuously varied with switches on the in-
side of each front seat base after the
ignition is switched on (
�page 41).
1Seat cushion depth
2Backrest side bolsters
3Backrest center
4Backrest bottom
�Switch on the ignition (�page 42).
Seat cushion depth
�Adjust the seat cushion depth to the
length of your upper leg with
switch1.
Backrest contour
�Adjust the contour of the seat backrest
to the desired position with
switchæ orç.
�Move the backrest support to the bot-
tom with button4 or to the center
with button3.
Backrest side bolsters
�Adjust the side bolsters so that they
provide good lateral support using
switch2.
Seat heating*
The switches for front-seat heating are lo-
cated in the center console.
1Seat heating switch, front seats
2Indicator lamps
Page 142 of 595
141 Controls in detail
Seats
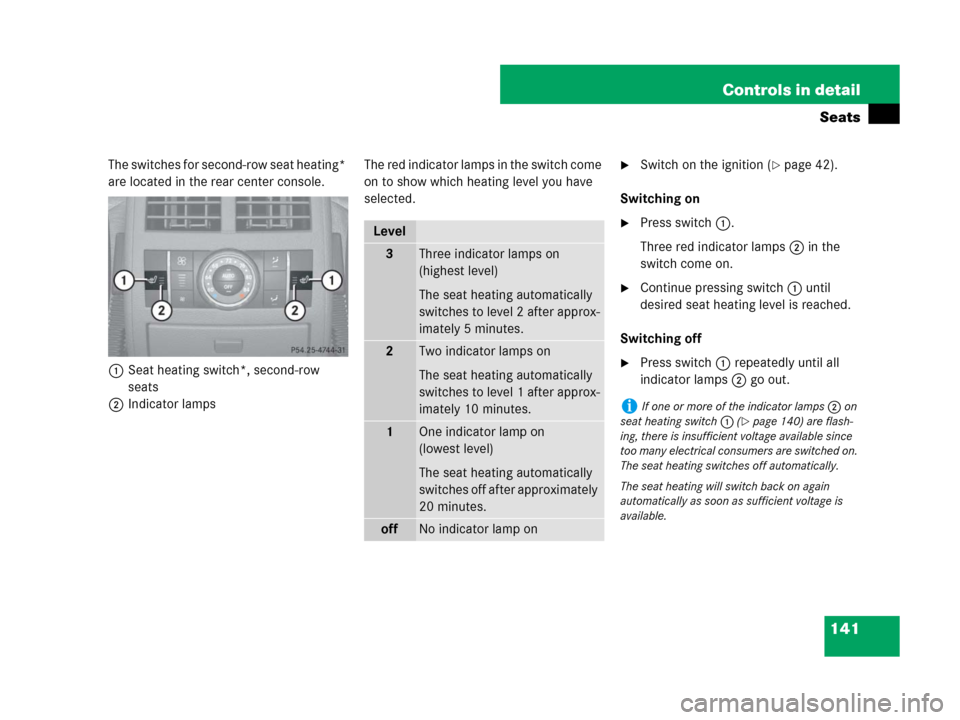
The switches for second-row seat heating*
are located in the rear center console.
1Seat heating switch*, second-row
seats
2Indicator lampsThe red indicator lamps in the switch come
on to show which heating level you have
selected.�Switch on the ignition (�page 42).
Switching on
�Press switch1.
Three red indicator lamps2 in the
switch come on.
�Continue pressing switch1 until
desired seat heating level is reached.
Switching off
�Press switch1 repeatedly until all
indicator lamps2 go out.
Level
3Three indicator lamps on
(highest level)
The seat heating automatically
switches to level 2 after approx-
imately 5 minutes.
2Two indicator lamps on
The seat heating automatically
switches to level 1 after approx-
imately 10 minutes.
1One indicator lamp on
(lowest level)
The seat heating automatically
switches off after approximately
20 minutes.
offNo indicator lamp on
iIf one or more of the indicator lamps2 on
seat heating switch1 (
�page 140) are flash-
ing, there is insufficient voltage available since
too many electrical consumers are switched on.
The seat heating switches off automatically.
The seat heating will switch back on again
automatically as soon as sufficient voltage is
available.
Page 143 of 595
142 Controls in detail
Seats
Seat ventilation*
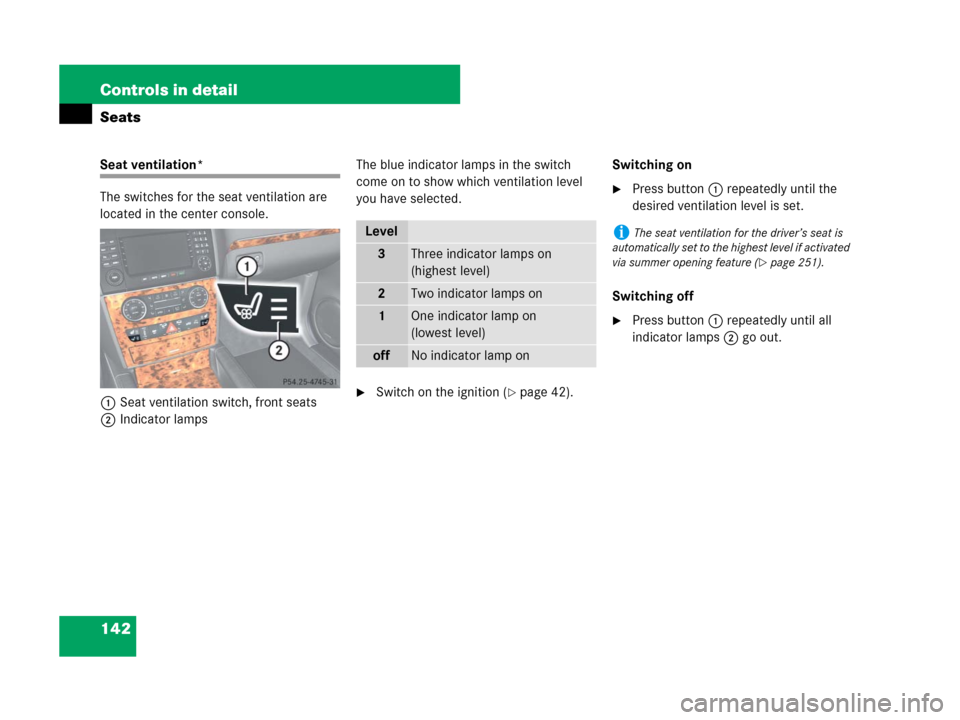
The switches for the seat ventilation are
located in the center console.
1Seat ventilation switch, front seats
2Indicator lampsThe blue indicator lamps in the switch
come on to show which ventilation level
you have selected.
�Switch on the ignition (�page 42).Switching on
�Press button1 repeatedly until the
desired ventilation level is set.
Switching off
�Press button1 repeatedly until all
indicator lamps2 go out.
Level
3Three indicator lamps on
(highest level)
2Two indicator lamps on
1One indicator lamp on
(lowest level)
offNo indicator lamp on
iThe seat ventilation for the driver’s seat is
automatically set to the highest level if activated
via summer opening feature (
�page 251).
Page 145 of 595
144 Controls in detail
Memory function*
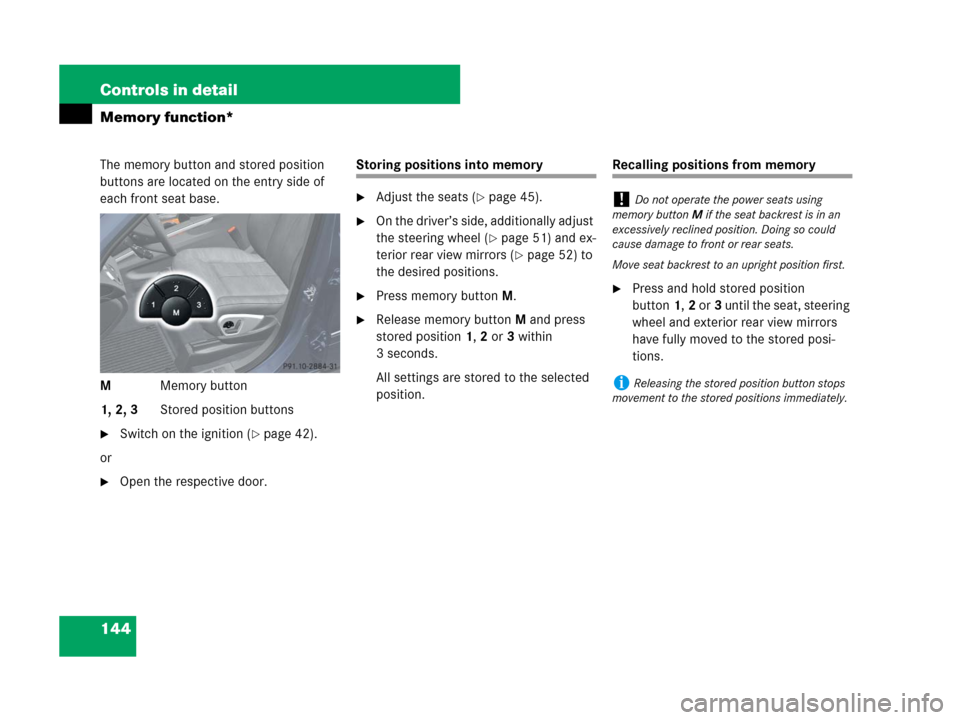
The memory button and stored position
buttons are located on the entry side of
each front seat base.
MMemory button
1, 2, 3Stored position buttons
�Switch on the ignition (�page 42).
or
�Open the respective door.
Storing positions into memory
�Adjust the seats (�page 45).
�On the driver’s side, additionally adjust
the steering wheel (
�page 51) and ex-
terior rear view mirrors (
�page 52) to
the desired positions.
�Press memory buttonM.
�Release memory buttonM and press
stored position1,2 or3 within
3 seconds.
All settings are stored to the selected
position.
Recalling positions from memory
�Press and hold stored position
button1,2 or3 until the seat, steering
wheel and exterior rear view mirrors
have fully moved to the stored posi-
tions.
!Do not operate the power seats using
memory buttonM if the seat backrest is in an
excessively reclined position. Doing so could
cause damage to front or rear seats.
Move seat backrest to an upright position first.
iReleasing the stored position button stops
movement to the stored positions immediately.
Page 215 of 595
214 Controls in detail
Good visibility
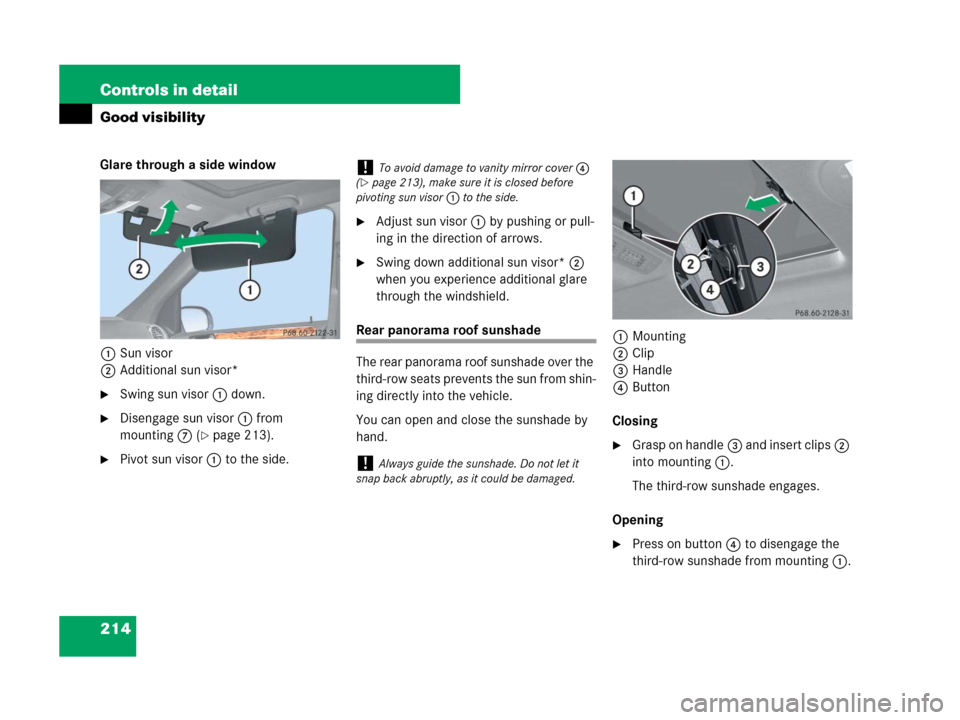
Glare through a side window
1Sun visor
2Additional sun visor*
�Swing sun visor1 down.
�Disengage sun visor1 from
mounting7 (
�page 213).
�Pivot sun visor1 to the side.
�Adjust sun visor1 by pushing or pull-
ing in the direction of arrows.
�Swing down additional sun visor*2
when you experience additional glare
through the windshield.
Rear panorama roof sunshade
The rear panorama roof sunshade over the
third-row seats prevents the sun from shin-
ing directly into the vehicle.
You can open and close the sunshade by
hand.1Mounting
2Clip
3Handle
4Button
Closing
�Grasp on handle3 and insert clips2
into mounting1.
The third-row sunshade engages.
Opening
�Press on button4 to disengage the
third-row sunshade from mounting1.
!To avoid damage to vanity mirror cover4
(
�page 213), make sure it is closed before
pivoting sun visor1 to the side.
!Always guide the sunshade. Do not let it
snap back abruptly, as it could be damaged.
Page 223 of 595
222 Controls in detail
Climate control
Adjusting air volume
Five blower speeds are available.
�Press button� to decrease or
buttonQ to increase air volume
(
�page 218) to the desired level.
The indicator lamp on buttonU
(
�page 218) goes out. The automatic
operation of air volume switches off.
The selected blower speed is shown in
the air volume displayb
(
�page 218).
Adjusting air volume for the center and
side air vents
Opening the center air vents
�Turn thumbwheels4 and7
(
�page 216) to the right.
The corresponding center air vents on
the left and right are open.Closing the center air vents
�Turn thumbwheels4 and7
(
�page 216) to the left.
The corresponding center air vents on
the left and right are closed.
Opening the side air vents
�Turn thumbwheels3 and8
(
�page 216) to the right.
The corresponding side air vents on the
left and right are open.
Closing the side air vents
�Turn thumbwheels3 and8
(
�page 216) to the left.
The corresponding side air vents on the
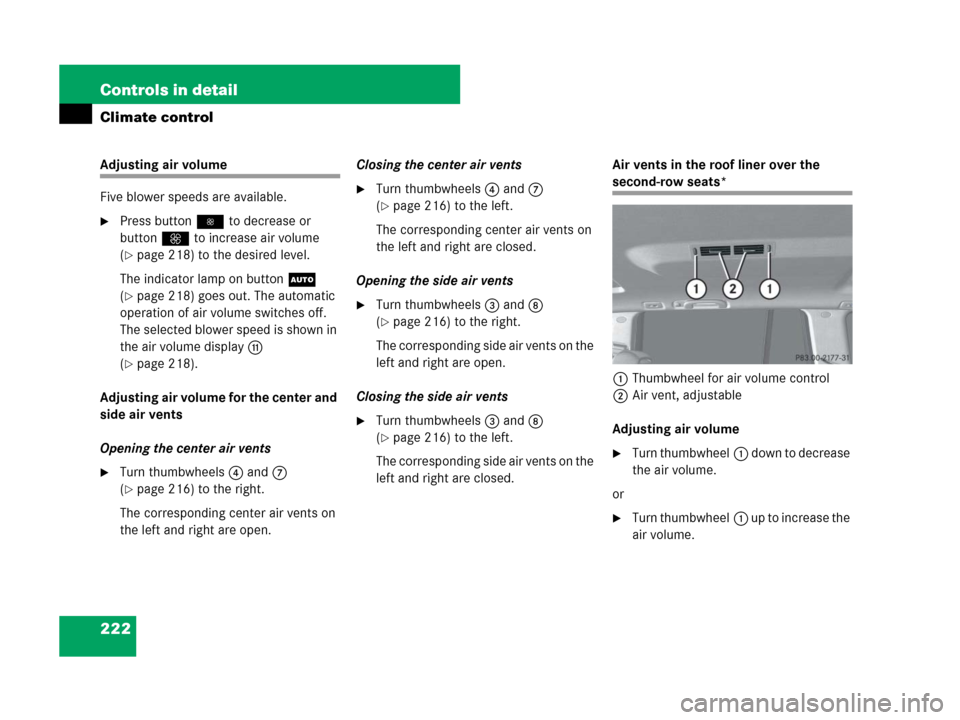
left and right are closed.Air vents in the roof liner over the
second-row seats*
1Thumbwheel for air volume control
2Air vent, adjustable
Adjusting air volume
�Turn thumbwheel1 d o w n t o d e c r e a s e
the air volume.
or
�Turn thumbwheel1 u p t o i n c r e a s e t h e
air volume.
Page 229 of 595
228 Controls in detail
Climate control
Rear climate control*
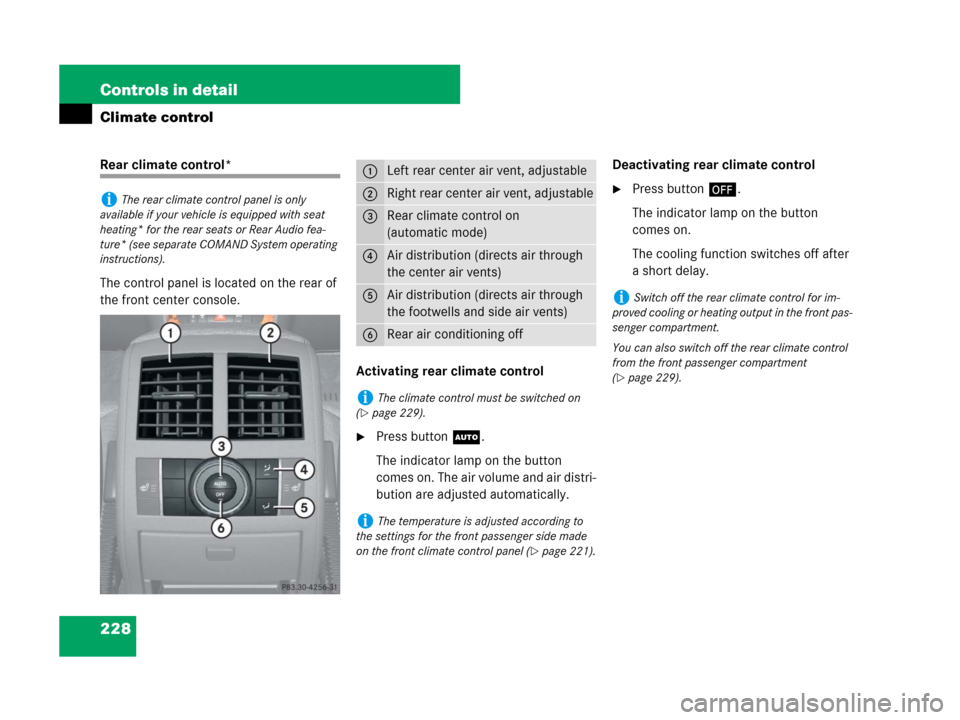
The control panel is located on the rear of
the front center console.
Activating rear climate control
�Press buttonU.
The indicator lamp on the button
comes on. The air volume and air distri-
bution are adjusted automatically.Deactivating rear climate control
�Press button´.
The indicator lamp on the button
comes on.
The cooling function switches off after
a short delay.iThe rear climate control panel is only
available if your vehicle is equipped with seat
heating* for the rear seats or Rear Audio fea-
ture* (see separate COMAND System operating
instructions).
1Left rear center air vent, adjustable
2Right rear center air vent, adjustable
3Rear climate control on
(automatic mode)
4Air distribution (directs air through
the center air vents)
5Air distribution (directs air through
the footwells and side air vents)
6Rear air conditioning off
iThe climate control must be switched on
(
�page 229).
iThe temperature is adjusted according to
the settings for the front passenger side made
on the front climate control panel (
�page 221).
iSwitch off the rear climate control for im-
proved cooling or heating output in the front pas-
senger compartment.
You can also switch off the rear climate control
from the front passenger compartment
(
�page 229).