Page 524 of 595

523 Practical hints
Flat tire
�Flat tire
Preparing the vehicle
�Park the vehicle in a safe distance from
moving traffic on a hard, flat surface
when possible.
�Turn on the hazard warning flasher
(
�page 151).
�Turn the steering wheel so that the
front wheels are in a straight-ahead
position.
�Set the parking brake (�page 60).
�Set the automatic transmission to park
positionP (
�page 194).
�Turn off the engine (�page 41).
�Remove the SmartKey from the starter
switch.
Vehicles with KEYLESS-GO*:
�Turn off the engine by pressing the
KEYLESS-GO* button once
(
�page 70).
�Open the driver’s door (this puts
the starter switch in position0,
same as with the SmartKey re-
moved from the starter switch). The
driver’s door then can be closed
again.
�Remove the KEYLESS-GO*
start/stop button from the starter
switch (
�page 43).
�Have any passenger exit the vehicle at
a safe distance from the roadway.
Warning!G
The dimensions of the Minispare wheel are
different from those of the road wheels. As
a result, the vehicle handling characteristics
change when driving with a Minispare wheel
mounted. Adapt your driving style accord-
ingly.
The Minispare wheel is for temporary use
only. When driving with a Minispare wheel
mounted, ensure proper tire pressure and
do not exceed a vehicle speed of
50 mph (80 km/h).
Drive to the nearest Mercedes-Benz Light
Truck Center as soon as possible to have the
Minispare wheel replaced with a regular
road wheel.
Never operate the vehicle with more than
one spare wheel mounted.
Do not switch off the ESP
® when a
Minispare wheel is mounted.
Warning!G
Your vehicle is equipped with air suspen-
sion. Do not open or close any doors or the
tailgate while mounting a spare wheel. The
vehicle could rise or lower to a previously se-
lected level. You or others could be injured
as a result.
iOpen door only when conditions are safe to
do so.
Page 525 of 595
.
�Take the wheel wrench, the collapsible
wheel chock, and the vehicle jack")
524 Practical hints
Flat tire
Mounting the spare wheel
Preparing the vehicle
�Prepare the vehicle as described
(
�page 523).
�Take the wheel wrench, the collapsible
wheel chock, and the vehicle jack out
of the cargo compartment
(
�page 495).
�Take the Minispare wheel out of the
cargo compartment (
�page 499).Lifting the vehicle
�Prevent the vehicle from rolling away
by blocking wheels with wheel chocks
or other sizeable objects.
One collapsible wheel chock is includ-
ed with the vehicle tool kit
(
�page 495). For information on set-
ting up the collapsible wheel chock,
see (
�page 498).
When changing wheel on a level surface:
�Place one wheel chock in front of and
another sizeable object behind the
wheel that is diagonally opposite to the
wheel being changed.
Always try lifting the vehicle using the jack
on a level surface. However, should
circumstances require you to do so on a
hill, place the wheel chock and another
sizeable object as follows:
�Place the wheel chock and another
sizeable object on the downhill side
blocking both wheels of the axle not
being worked on.
!Vehicles with factory-mounted
running-boards*:
Your vehicle is equipped with a scissors-type
jack (located under the cargo compartment
floor) designed for use with factory-mounted
running boards. Only use this jack when jacking
up vehicles with factory-mounted running boards
as otherwise the vehicle’s underbody can be
damaged. See separate instructions for
scissors-type jack.
Warning!G
The jack is designed exclusively for jacking
up the vehicle at the jack take-up brackets
built into both sides of the vehicle. To help
avoid personal injury, use the jack only to lift
the vehicle during a wheel change. Never
get beneath the vehicle while it is supported
by the jack. Keep hands and feet away from
the area under the lifted vehicle. Always
firmly set parking brake and block wheels
before raising vehicle with jack.
Do not disengage parking brake while the
vehicle is raised. Be certain that the jack is
always vertical (plumb line) when in use,
especially on hills. Always try to use the jack
on level surface. Make sure that the jack
arm is fully seated in the jack take-up brack-
et. Always lower the vehicle onto sufficient
capacity jackstands before working under
the vehicle.
Page 527 of 595
526 Practical hints
Flat tire
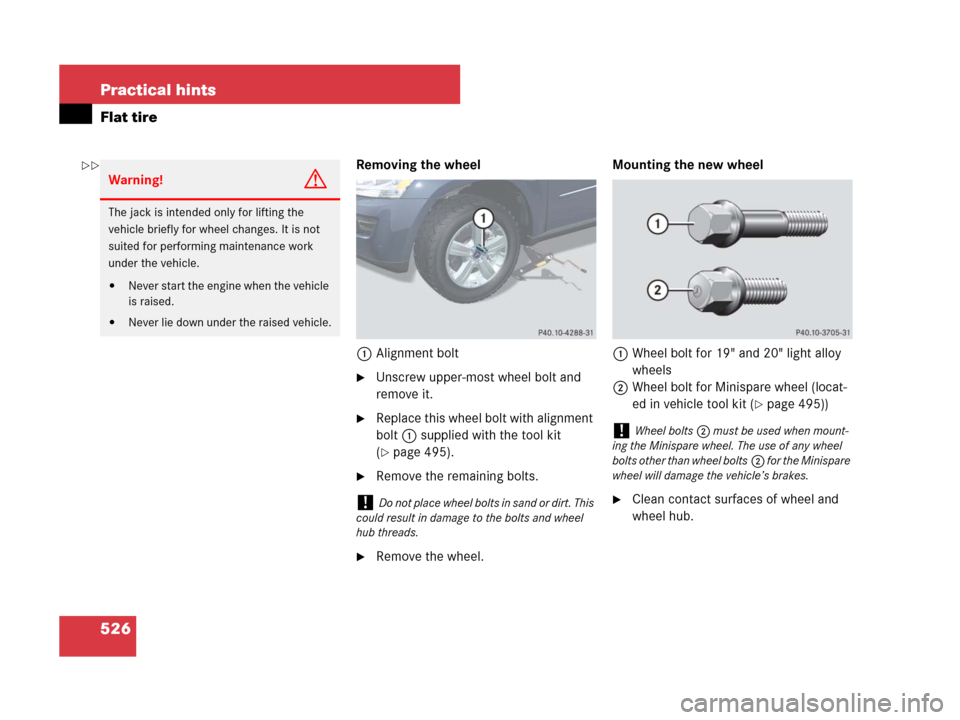
Removing the wheel
1Alignment bolt
�Unscrew upper-most wheel bolt and
remove it.
�Replace this wheel bolt with alignment
bolt1 supplied with the tool kit
(
�page 495).
�Remove the remaining bolts.
�Remove the wheel.Mounting the new wheel
1Wheel bolt for 19" and 20" light alloy
wheels
2Wheel bolt for Minispare wheel (locat-
ed in vehicle tool kit (
�page 495))
�Clean contact surfaces of wheel and
wheel hub.
Warning!G
The jack is intended only for lifting the
vehicle briefly for wheel changes. It is not
suited for performing maintenance work
under the vehicle.
�Never start the engine when the vehicle
is raised.
�Never lie down under the raised vehicle.
!Do not place wheel bolts in sand or dirt. This
could result in damage to the bolts and wheel
hub threads.
!Wheel bolts2 must be used when mount-
ing the Minispare wheel. The use of any wheel
bolts other than wheel bolts2 for the Minispare
wheel will damage the vehicle’s brakes.
��
Page 528 of 595

527 Practical hints
Flat tire
�Guide spare wheel onto the alignment
bolt and push it on the wheel hub.
�Insert wheel bolts and tighten them
slightly.
�Unscrew the alignment bolt.
�Insert the remaining wheel bolt and
tighten it slightly.
!To avoid paint damage, place wheel flat
against hub and hold it there while installing first
wheel bolt.
Warning!G
Always replace wheel bolts that are
damaged or rusted.
Never apply oil or grease to wheel bolts.
Damaged wheel hub threads should be
repaired immediately. Do not continue to
drive under these circumstances! Contact
an authorized Mercedes-Benz Light Truck
Center or call Roadside Assistance.
Incorrect wheel bolts or improperly tight-
ened wheel bolts can cause the wheel to
come off. This could cause an accident.
Make sure to use the correct wheel bolts.
Warning!G
Only use genuine Mercedes-Benz wheel
bolts. Other wheel bolts may come loose.
Do not tighten the wheel bolts when the
vehicle is raised. Otherwise the vehicle
could fall off the jack.
Page 529 of 595
528 Practical hints
Flat tire
Lowering the vehicle
�Lower vehicle by turning crank coun-
terclockwise until vehicle is resting ful-
ly on its own weight.
�Remove the jack.
1-5Wheel bolts
�Tighten the five wheel bolts evenly, fol-
lowing the diagonal sequence illustrat-
ed (1 to 5), until all bolts are tight.
Observe a tightening torque of
110 lb-ft (150 Nm).
�Store jack and all other vehicle tool kit
items back into the storage well.
Warning!G
Have the tightening torque checked after
changing a wheel. The wheels could come
loose if they are not tightened to a torque of
110 lb-ft (150 Nm).
iThe removed road wheel cannot be stored in
the spare wheel well under the cargo compart-
ment floor, but should be transported in the car-
go compartment wrapped in a protective cover.
Vehicles with TPMS or Advanced TPMS*:
Do not activate the tire inflation pressure moni-
tor until a full size wheel/tire with functioning
sensor has been placed back into service on the
vehicle.
Page 557 of 595
556 Technical data
Rims and tires
Minispare wheel
ModelGL 320 CDI,
GL 450
Rim4.5B x 19 H2
Wheel offset1.58 in (40 mm)
TireT 165/90D-19 119M1
1Must not be used with snow chains.
!Please compare the recommended tire
inflation pressure for your vehicle with the tire
inflation pressure on the yellow label located on
the Minispare wheel rim.
If the tire inflation pressure on the yellow label
on the Minispare wheel rim differs from the
values given in this Operator’s Manual, inflate
the tire to the recommended tire inflation pres-
sure given on the yellow label on the Minispare
wheel rim.
iPlease note that the tire inflation pressure of
the Minispare tire differs from the tire inflation
pressure of the road tires.
Inflate the Minispare tire to approximately 61 psi
(4.2 bar).
Page 572 of 595

571 Index
Battery, Vehicle 530
Charging 537
Disconnecting and connecting 532
Jump starting 538
Removing and installing 532
Bead 416
Beverage holder see Cup holder
Bi-Xenon headlamps* see headlamps
Bolts, Spare wheel 499
Brake fluid 562
Checking 377
Messages in the
multifunction display 472
Brake lamp
Cleaning lenses 429
Messages in the
multifunction display 481
Replacing bulbs 515
Brake pads 350
Messages in the
multifunction display 470
Brakes 350
Warning lamp 437
Break-in period 348
Bulbs, replacing see Replacing bulbsButton for Voice control* system 30,
158
C
California retail buyers and lessees,
Important notice for 11
Camera see Rear view camera*
Can holder see Cup holder
Capacities and recommended
fuel/lubricants 560
Card holder 33, 37, 321
Cargo compartment cover blind 312
Cargo net* 313
Cargo tie-down rings 304
Carpets, Cleaning 433
Carriers* 297
Catalytic converter
(gasoline engine) 373
CD changer 167, 316
CD player 167
Center console
Lower part 33
Upper part (Vehicles with
enhanced off-road package*) 32
Upper part (Vehicles without
enhanced off-road package*) 31Central locking
Automatic 130
Locking/unlocking from the
inside 130
Switch 130
Certification label 550
CHECK ENGINE malfunction indicator
lamp 439, 440
Checking tire pressure electronically with
the Advanced Tire Pressure Monitoring
System (Advanced TPMS)*,
(Canada only) 402
Checking tire pressure electronically with
the Tire Pressure Monitoring System
(TPMS), (USA only) 399
Checklist
Off-road driving 359
Returning from off-road driving 365
Page 577 of 595

576 Index
ETD 91, 445
Safety guidelines 78
Expanding cargo compartment 306
Exterior rear view mirrors 52, 211
Folding 212
Power folding* 211
Synchronizing 212
F
Fastening the seat belts 54
Filler neck, Engine oil 382
First aid kit 495
Flat tire 523
Lifting the vehicle 524
Lowering the vehicle 528
Minispare wheel 499
Mounting the spare wheel 524
Preparing the vehicle 524
Floormats* 326Fluids
Automatic transmission fluid 382,
560
Brake fluid 378, 561, 562
Capacities 560
Engine coolant 378, 382, 561, 565
Engine oil 381, 560, 562
Power steering fluid 561
Windshield washer and headlamp
cleaning system* 378, 567
Fog lamps 148
Corner-illuminating
front fog lamps* 150
Messages in the
multifunction display 481
Rear fog lamp 149
Replacing bulbs 514
4-ETS 109
Off-road - 4-ETS 110
Front air bags 79
Front defroster 223, 237
Front lamps see Headlamps
Front passenger front air bag 74, 79
Messages in the multifunction
display 463, 464, 465, 466Front passenger front air bag off indicator
lamp 31, 32, 85
Front seat heat restraints see
Head restraints
Front towing eye 542
Fuel 376, 561
Additives 564
Capacities, Fuel tank 561
Consumption statistics 187, 188
Filling the tank 375
Fuel filler flap and cap 375, 501
Fuel gauge 29
Fuel tank reserve warning lamp 29,
442
Premium unleaded gasoline 376,
561, 563
Requirements, Octane rating 563
Fuel cap
Messages in the
multifunction display 478


TireT 165/90D-19 119M1
1Must not be used with snow chains.
!Please compare the rec")