Page 520 of 595
519 Practical hints
Replacing bulbs
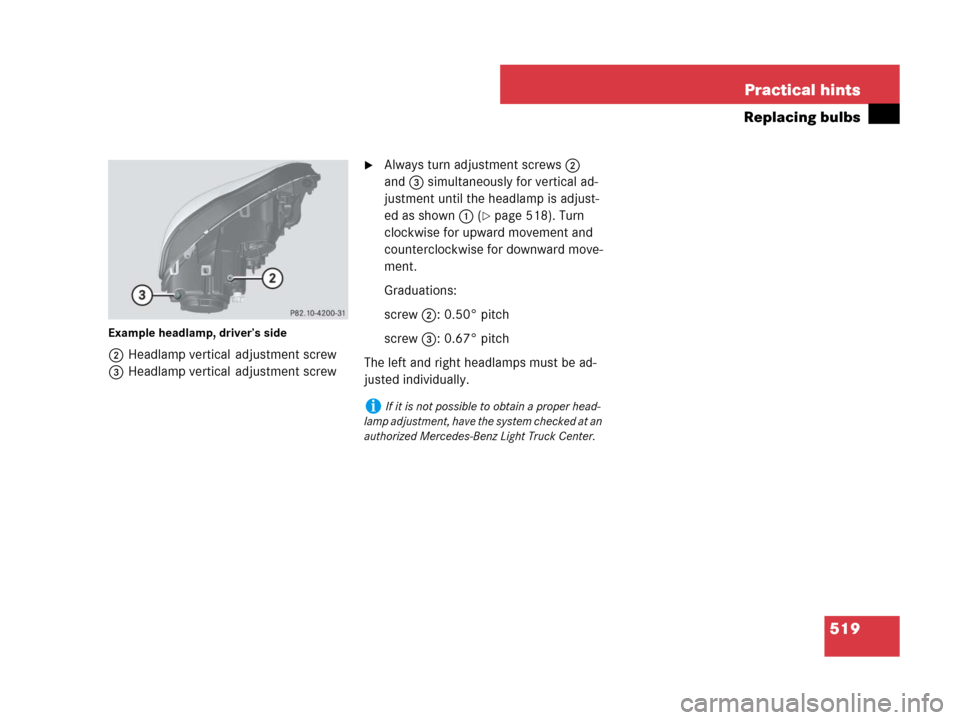
Example headlamp, driver’s side
2Headlamp vertical adjustment screw
3Headlamp vertical adjustment screw
�Always turn adjustment screws2
and3 simultaneously for vertical ad-
justment until the headlamp is adjust-
ed as shown1 (
�page 518). Turn
clockwise for upward movement and
counterclockwise for downward move-
ment.
Graduations:
screw2:0.50° pitch
screw3:0.67° pitch
The left and right headlamps must be ad-
justed individually.
iIf it is not possible to obtain a proper head-
lamp adjustment, have the system checked at an
authorized Mercedes-Benz Light Truck Center.
Page 521 of 595

520 Practical hints
Replacing wiper blades
Front wiper blades
Removing
�Remove the SmartKey from the starter
switch.
Vehicles with KEYLESS-GO*:
�Make sure the vehicle’s on-board
electronics have status0
(
�page 44).
�Fold the wiper arms forward until they
engage.
1Wiper blade
2Cover
3Attachment
4Tab
5Removing
�Press tabs4 together and tilt wiper
blade1 to detach tabs4 on both
recesses of attachment3.
Wiper blade1 is released on one end.
�Maintaining its tilted position, slide
wiper blade1 out of attachment3 in
direction of arrow5.
Warning!G
For safety reasons, switch off wipers and
remove SmartKey from starter switch (vehi-
cles with KEYLESS-GO*: Make sure the
vehicle’s on-board electronics have
status
0) before replacing a wiper blade.
Otherwise the motor could suddenly turn on
and cause injury.
Warning!G
Wiper blades are components that are sub-
ject to wear and tear. Replace the wiper
blades twice a year, preferably in the spring
and fall. Otherwise the windows will not be
properly wiped. As a result, you may not be
able to observe surrounding traffic condi-
tions and could cause an accident.
!Never open the hood when the wiper arms
are folded forward.
Hold on to the wiper when folding the wiper arm
back. If released, the force of the impact from
the tensioning spring could crack the windshield.
Do not allow the wiper arms to contact the wind-
shield glass without a wiper blade inserted.
Make sure the wiper blades are properly
installed. Improperly installed wiper blades may
cause windshield damage.
For your convenience, we recommend that you
have this work carried out by an authorized
Mercedes-Benz Light Truck Center.
!Do not pull on the wiper blade inserts. They
could tear.
Page 522 of 595

521 Practical hints
Replacing wiper blades
Installing
1Installing
2Tab
3Attachment
4Guide tab
5Cover
�Slide the wiper blade into
attachment3 in direction of
arrow1.
�Make sure guide tab4 will be placed
under cover5 when fully inserting the
wiper blade into attachment.
�Let tab2 latch into both recesses of
attachment3.
�Check if the wiper blade is securely
fastened.
�Fold the wiper arm backward to rest on
the windshield.
Make sure you hold on to the wiper arm
when folding it back.
Rear wiper blade
Warning!G
For safety reasons, switch off wipers and
remove SmartKey from starter switch
(vehicles with KEYLESS-GO*: Make sure the
vehicle’s on-board electronics have
status
0) before replacing a wiper blade.
Otherwise the motor could suddenly turn on
and cause injury.
!Hold on to the wiper when folding the wiper
arm back. If released, the force of the impact
from the tensioning spring could crack the rear
window.
Do not allow the wiper arm to contact the rear
window glass without a wiper blade inserted.
Make sure the wiper blade is properly installed.
Improperly installed wiper blades may cause
rear window damage.
For your convenience, we recommend that you
have this work carried out by an authorized
Mercedes-Benz Light Truck Center.
Page 524 of 595

523 Practical hints
Flat tire
�Flat tire
Preparing the vehicle
�Park the vehicle in a safe distance from
moving traffic on a hard, flat surface
when possible.
�Turn on the hazard warning flasher
(
�page 151).
�Turn the steering wheel so that the
front wheels are in a straight-ahead
position.
�Set the parking brake (�page 60).
�Set the automatic transmission to park
positionP (
�page 194).
�Turn off the engine (�page 41).
�Remove the SmartKey from the starter
switch.
Vehicles with KEYLESS-GO*:
�Turn off the engine by pressing the
KEYLESS-GO* button once
(
�page 70).
�Open the driver’s door (this puts
the starter switch in position0,
same as with the SmartKey re-
moved from the starter switch). The
driver’s door then can be closed
again.
�Remove the KEYLESS-GO*
start/stop button from the starter
switch (
�page 43).
�Have any passenger exit the vehicle at
a safe distance from the roadway.
Warning!G
The dimensions of the Minispare wheel are
different from those of the road wheels. As
a result, the vehicle handling characteristics
change when driving with a Minispare wheel
mounted. Adapt your driving style accord-
ingly.
The Minispare wheel is for temporary use
only. When driving with a Minispare wheel
mounted, ensure proper tire pressure and
do not exceed a vehicle speed of
50 mph (80 km/h).
Drive to the nearest Mercedes-Benz Light
Truck Center as soon as possible to have the
Minispare wheel replaced with a regular
road wheel.
Never operate the vehicle with more than
one spare wheel mounted.
Do not switch off the ESP
® when a
Minispare wheel is mounted.
Warning!G
Your vehicle is equipped with air suspen-
sion. Do not open or close any doors or the
tailgate while mounting a spare wheel. The
vehicle could rise or lower to a previously se-
lected level. You or others could be injured
as a result.
iOpen door only when conditions are safe to
do so.
Page 527 of 595
526 Practical hints
Flat tire
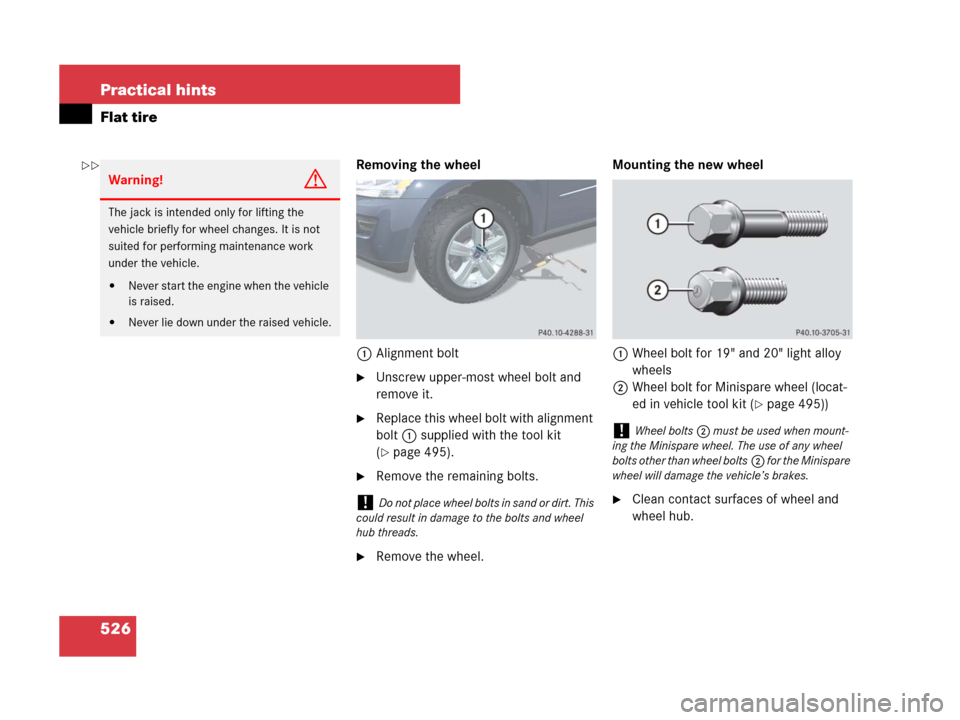
Removing the wheel
1Alignment bolt
�Unscrew upper-most wheel bolt and
remove it.
�Replace this wheel bolt with alignment
bolt1 supplied with the tool kit
(
�page 495).
�Remove the remaining bolts.
�Remove the wheel.Mounting the new wheel
1Wheel bolt for 19" and 20" light alloy
wheels
2Wheel bolt for Minispare wheel (locat-
ed in vehicle tool kit (
�page 495))
�Clean contact surfaces of wheel and
wheel hub.
Warning!G
The jack is intended only for lifting the
vehicle briefly for wheel changes. It is not
suited for performing maintenance work
under the vehicle.
�Never start the engine when the vehicle
is raised.
�Never lie down under the raised vehicle.
!Do not place wheel bolts in sand or dirt. This
could result in damage to the bolts and wheel
hub threads.
!Wheel bolts2 must be used when mount-
ing the Minispare wheel. The use of any wheel
bolts other than wheel bolts2 for the Minispare
wheel will damage the vehicle’s brakes.
��
Page 528 of 595

527 Practical hints
Flat tire
�Guide spare wheel onto the alignment
bolt and push it on the wheel hub.
�Insert wheel bolts and tighten them
slightly.
�Unscrew the alignment bolt.
�Insert the remaining wheel bolt and
tighten it slightly.
!To avoid paint damage, place wheel flat
against hub and hold it there while installing first
wheel bolt.
Warning!G
Always replace wheel bolts that are
damaged or rusted.
Never apply oil or grease to wheel bolts.
Damaged wheel hub threads should be
repaired immediately. Do not continue to
drive under these circumstances! Contact
an authorized Mercedes-Benz Light Truck
Center or call Roadside Assistance.
Incorrect wheel bolts or improperly tight-
ened wheel bolts can cause the wheel to
come off. This could cause an accident.
Make sure to use the correct wheel bolts.
Warning!G
Only use genuine Mercedes-Benz wheel
bolts. Other wheel bolts may come loose.
Do not tighten the wheel bolts when the
vehicle is raised. Otherwise the vehicle
could fall off the jack.
Page 530 of 595

�Bleeding the fuel system (diesel engine only)
Driving the vehicle until the fuel tank is
empty is not recommended. Otherwise, air
m")
529 Practical hints
Bleeding the fuel system (diesel engine only)
�Bleeding the fuel system (diesel engine only)
Driving the vehicle until the fuel tank is
empty is not recommended. Otherwise, air
may be sucked into the fuel system. If this
happens, the? malfunction indicator
lamp (USA only) or the± malfunction
indicator lamp (Canada only) comes on
and the engine may not start immediately
after refueling the vehicle.
After refueling:
�Make sure the automatic transmission
is set toP.
The gear position indicator in the multi-
function display should be on
P.
�Do not depress the accelerator.
�Turn the SmartKey in the starter switch
to position 2 for at least 10 seconds
(
�page 41).
�Return the SmartKey in the starter
switch to position 0 (
�page 41).
�Turn the SmartKey in the starter switch
to position3 (
�page 41) and hold it
there for a maximum of 40 seconds or
until the engine runs surge-free.
If the engine does not start:
�Wait for approximately 2 minutes.
�Turn the SmartKey in the starter switch
to position3 (
�page 41) and hold it
there for a maximum of 40 seconds or
until the engine runs surge-free.
If the engine still does not start, do not
make any further attempts to start the
engine. Contact an authorized
Mercedes-Benz Light truck Center or call
Roadside Assistance (
�page 336).iVehicles with KEYLESS-GO*: If necessary,
remove the KEYLESS-GO start/stop button from
the starter switch (
�page 43).iWhen the ?malfunction indicator lamp
(USA only) or the ±malfunction indicator
lamp (Canada only) has been illuminated for the
above condition, it will remain illuminated until
the engine was cycled on and off four times in a
row.
Page 531 of 595

530 Practical hints
Battery
The battery is located under the front
passenger seat.
The battery should always be sufficiently
charged in order to achieve its rated ser-
vice life.
If you use your vehicle mostly for
short-distance trips, you will need to have
the battery charge checked more
frequently.
When replacing the battery, always use
batteries approved by Mercedes-Benz.
If you do not intend to operate your vehicle
for an extended period of time, consult an
authorized Mercedes-Benz Light Truck
Center about steps you need to observe.Batteries contain materials that can harm
the environment if disposed of improperly.
Recycling of batteries is the preferred
method of disposal. Many states require
sellers of batteries to accept old batteries
for recycling.
iMercedes-Benz recommends to have the
battery replaced at an authorized
Mercedes-Benz Light Truck Center.
Warning!G
Observe all safety instructions and precau-
tions when handling automotive batteries.
Risk of explosion.
Fire, open flames and smoking
are prohibited when handling
batteries. Avoid creating sparks.
Battery acid is caustic. Do not
allow it to come into contact
with skin, eyes or clothing.
Wear suitable protective cloth-
ing, especially gloves, apron and
faceguard.
Wear eye protection.
Rinse any acid spills immediate-
ly with clear water. Contact a
physician if necessary.
Keep children away.
Follow the instructions in this
Operator’s Manual.