Page 28 of 595
27 At a glance
Instrument cluster
ItemPage
1LLeft turn signal
indicator lamp
2To dim instrument cluster
illumination155
3Reset button for:
�Resetting trip odometer
�Resetting all settings
156
171
4To brighten instrument
cluster illumination155
5KRight turn signal
indicator lamp
6Clock
Setting the time
176
ItemPage
7Speedometer with:
-Antilock Brake
System (ABS)
indicator lamp436
’Variable speed limiter
indicator lamp1
lDistance warning
lamp2265,
445
1Lamp without function. It illuminates when the
ignition is on. It should go out when the engine is
running.
2Vehicles without Distronic*: Warning lamp without
function. It illuminates when the ignition is on.
It should go out when the engine is running.
ItemPage
;Brake warning lamp,
USA only437
3Brake warning lamp,
Canada only437
vElectronic Stability
Program (ESP®)
warning lamp
441
HCombination low tire
pressure/TPMS mal-
function telltale,
USA only
Low tire pressure
telltale, Canada only446
446
Page 30 of 595
29 At a glance
Instrument cluster
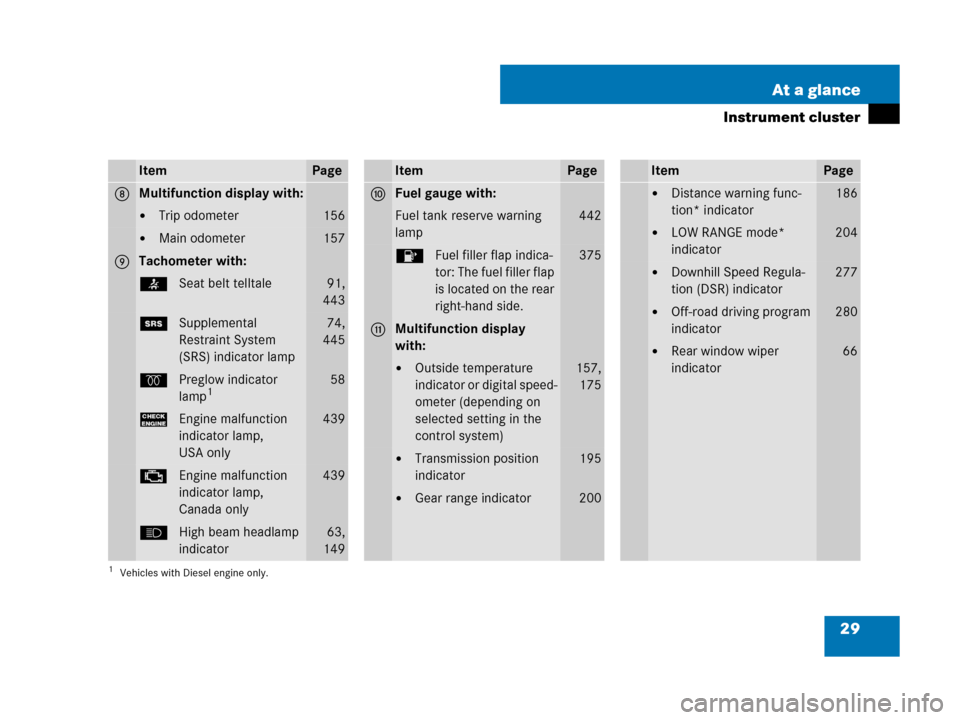
ItemPage
8Multifunction display with:
�Trip odometer156
�Main odometer157
9Tachometer with:
443
1Supplemental
Restraint System
(SRS) indicator lamp74,
445
qPreglow indicator
lamp1
1Vehicles with Diesel engine only.
58
?Engine malfunction
indicator lamp,
USA only439
±Engine malfunction
indicator lamp,
Canada only439
AHigh beam headlamp
indicator63,
149
ItemPage
aFuel gauge with:
Fuel tank reserve warning
lamp442
4Fuel filler flap indica-
tor: The fuel filler flap
is located on the rear
right-hand side.375
bMultifunction display
with:
�Outside temperature
indicator or digital speed-
ometer (depending on
selected setting in the
control system)157,
175
�Transmission position
indicator195
�Gear range indicator200
ItemPage
�Distance warning func-
tion* indicator186
�LOW RANGE mode*
indicator204
�Downhill Speed Regula-
tion (DSR) indicator277
�Off-road driving program
indicator280
�Rear window wiper
indicator66
Page 32 of 595
31 At a glance
Center console
�Center console
Upper part (Vehicles without enhanced
off-road package*)ItemPage
1COMAND system, see sepa-
rate operating instructions
2Climate control216
3-zone automatic climate
control*230
Rear window defroster215
3Seat heating*,
front passenger side140
4Seat ventilation*,
front passenger side142
5Parktronic system*
deactivation switch293
6Vehicle level control switch283
7Front passenger front air
bag off indicator lamp85,
448,
450
ItemPage
8Storage compartment*318
9Alarm system indicator
lamp112
aElectronic Stability Program
(ESP®) switch
107
bAdaptive damping system
(ADS)* switch (USA only)280
cSeat ventilation*,
driver’s side142
dSeat heating*, driver’s side140
eSwitch for Downhill Speed
Regulation (DSR)276
fHazard warning flasher151
gSwitch for Off-road driving
program280
Page 33 of 595
32 At a glance
Center console
Upper part (Vehicles with enhanced
off-road package*)ItemPage
1COMAND system, see sepa-
rate operating instructions
2Climate control216
3-zone automatic climate
control*230
Rear window defroster215
3Seat heating*,
front passenger side140
4Seat ventilation*,
front passenger side142
5Rotary switch for differential
locks*207
6Switch for LOW RANGE
mode*204
7Switch for Downhill Speed
Regulation (DSR)276
8Rotary switch for vehicle
level control285
ItemPage
9Alarm system indicator
lamp112
aSeat ventilation*,
driver’s side142
bSeat heating*, driver’s side140
cAdaptive damping system
(ADS)* switch280
dElectronic Stability Program
(ESP®) switch
107
eParktronic system*
deactivation switch293
fHazard warning flasher151
gFront passenger front air
bag off indicator lamp85,
448,
450
Page 41 of 595

40 Getting started
The “Getting started” section provides an
overview of the vehicle’s most basic func-
tions. First-time Mercedes-Benz owners
should pay special attention to the infor-
mation given here.
If you are already familiar with the basic
functions described here, the “Controls in
detail” section will provide you with further
information. The corresponding page
references are located at the end of each
segment.
Unlocking
Unlocking with the SmartKey
SmartKey
1‹Lock button
2ŠUnlock button* for tailgate
3ŒUnlock button
4ÂPanic button (
�page 102)
�Press unlock buttonŒ on the
SmartKey.
All turn signal lamps flash once. The
vehicle unlocks. The locking knobs in
the doors move up. The anti-theft alarm
system is disarmed. The locator light-
ing comes on if the feature is enabled
in the control system (
�page 179).
�Enter the vehicle and insert the
SmartKey in the starter switch.
For more information, see “Locking and
unlocking” (
�page 114).
Warning!G
When leaving the vehicle, always remove the
SmartKey from the starter switch, take it
with you, and lock the vehicle. Do not leave
children unattended in the vehicle, or with
access to an unlocked vehicle. A child’s
unsupervised access to a vehicle could
result in an accident and/or serious
personal injury.
Page 42 of 595

41 Getting started
Unlocking
Unlocking with KEYLESS-GO*
With the KEYLESS-GO function, you can
lock or unlock the vehicle without using
the remote control buttons on the
SmartKey and start the engine without in-
serting the SmartKey into the starter
switch.�Grasp an outside door handle.
All turn signal lamps flash once. The ve-
hicle unlocks. The locking knobs in the
doors move up. The anti-theft alarm
system is disarmed. The locator light-
ing comes on if the feature is enabled
in the control system (
�page 179).
�Enter the vehicle.
For more information, see “SmartKey with
KEYLESS-GO*” (
�page 117).
Starter switch positions
iTo unlock the vehicle, the SmartKey with
KEYLESS-GO must be outside the vehicle, no
further than approximately 3 feet (1 meter) away
from the respective door.
Warning!G
When leaving the vehicle, always take the
SmartKey with KEYLESS-GO* with you, and
lock the vehicle. Do not leave children
unattended in the vehicle, or with access to
an unlocked vehicle. A child’s unsupervised
access to a vehicle could result in an
accident and/or serious personal injury.
i If the vehicle has been parked for more than
72 hours, you must pull an outside door handle
in order to activate the KEYLESS-GO function.
Warning!G
When leaving the vehicle, always remove the
SmartKey or SmartKey with KEYLESS-GO*
from the starter switch, take it with you and
lock the vehicle. Do not leave children unat-
tended in the vehicle, or with access to an
unlocked vehicle. A child’s unsupervised
access to a vehicle could result in an
accident and/or serious personal injury.
Page 43 of 595

42 Getting started
Unlocking
SmartKey
Starter switch
0For removing SmartKey
1Power supply for some electrical con-
sumers, such as seat adjustment
2Ignition (power supply for all electrical
consumers) and driving position
All lamps (except high beam headlamp
indicator lamp and turn signal indicator
lamps unless activated) in the instru-
ment cluster come on. If a lamp in the
instrument cluster fails to come on
when the ignition is switched on, have
it checked and replaced if necessary. If
a lamp in the instrument cluster re-mains on after starting the engine or
comes on while driving, refer to “Lamps
in instrument cluster” (
�page 436).
3Starting position
iWhen you switch on the ignition, the indica-
tor and warning lamps (except high beam head-
lamp indicator lamp and turn signal indicator
lamps unless activated) in the instrument cluster
come on. The indicator and warning lamps (ex-
cept high beam headlamp indicator lamp and
turn signal indicator lamps if activated) will go
out when the engine is running. This indicates
that the respective systems are operational.
iWhen the SmartKey is removed from the
starter switch and the automatic transmission is
in a position other thanP, the automatic trans-
mission automatically shifts toP.
!If the SmartKey cannot be turned in the
starter switch, the battery may not be sufficient-
ly charged.
�Check the battery and charge it if necessary
(
�page 530).
�Get a jump start (�page 538).
To prevent accelerated battery discharge or a
completely discharged battery, always remove
the SmartKey from the starter switch when the
engine is not in operation.
Page 45 of 595
.
Position 1
�Press the KEYLES")
44 Getting started
Unlocking
Position 0
Before you press the KEYLESS-GO
start/stop button, the vehicle’s on-board
electronics have status0 (as with
SmartKey removed).
Position 1
�Press the KEYLESS-GO start/stop
button once.
This supplies power for some electrical
consumers, such as seat adjustment.Ignition (or Position 2)
�Press the KEYLESS-GO start/stop
button twice.
This supplies power for all electrical
consumers.
All lamps (except high beam headlamp
indicator lamp and turn signal indicator
lamps unless activated) in the instru-
ment cluster come on. If a lamp in the
instrument cluster fails to come on
when the ignition is switched on, have
it checked and replaced if necessary. If
a lamp in the instrument cluster re-
mains on after starting the engine or
comes on while driving, refer to “Lamps
in instrument cluster” (
�page 436).For information on starting the engine
using the KEYLESS-GO start/stop button,
see “Starting with KEYLESS-GO*”
(
�page 59).
For more information on KEYLESS-GO, see
“SmartKey with KEYLESS-GO*”
(
�page 117).
iIf you now press the KEYLESS-GO
start/stop button
�once more, the ignition (position2) is
switched on
�twice more, the power supply is again
switched off
iIf you now press the KEYLESS-GO
start/stop button once more, the power supply
is again switched off.
iWhen you switch on the ignition, the
indicator and warning lamps (except high beam
headlamp indicator lamp and turn signal indica-
tor lamps unless activated) in the instrument
cluster come on. The indicator and warning
lamps (except high beam headlamp indicator
lamp and turn signal indicator lamps if activated)
should go out when the engine is running. This
indicates that the respective systems are
operational.


ItemPage
1COMAND system, see sepa-
rate operating instructions
2Climate control216
3-zone automatic climate
control")