Page 525 of 595

524 Practical hints
Flat tire
Mounting the spare wheel
Preparing the vehicle
�Prepare the vehicle as described
(
�page 523).
�Take the wheel wrench, the collapsible
wheel chock, and the vehicle jack out
of the cargo compartment
(
�page 495).
�Take the Minispare wheel out of the
cargo compartment (
�page 499).Lifting the vehicle
�Prevent the vehicle from rolling away
by blocking wheels with wheel chocks
or other sizeable objects.
One collapsible wheel chock is includ-
ed with the vehicle tool kit
(
�page 495). For information on set-
ting up the collapsible wheel chock,
see (
�page 498).
When changing wheel on a level surface:
�Place one wheel chock in front of and
another sizeable object behind the
wheel that is diagonally opposite to the
wheel being changed.
Always try lifting the vehicle using the jack
on a level surface. However, should
circumstances require you to do so on a
hill, place the wheel chock and another
sizeable object as follows:
�Place the wheel chock and another
sizeable object on the downhill side
blocking both wheels of the axle not
being worked on.
!Vehicles with factory-mounted
running-boards*:
Your vehicle is equipped with a scissors-type
jack (located under the cargo compartment
floor) designed for use with factory-mounted
running boards. Only use this jack when jacking
up vehicles with factory-mounted running boards
as otherwise the vehicle’s underbody can be
damaged. See separate instructions for
scissors-type jack.
Warning!G
The jack is designed exclusively for jacking
up the vehicle at the jack take-up brackets
built into both sides of the vehicle. To help
avoid personal injury, use the jack only to lift
the vehicle during a wheel change. Never
get beneath the vehicle while it is supported
by the jack. Keep hands and feet away from
the area under the lifted vehicle. Always
firmly set parking brake and block wheels
before raising vehicle with jack.
Do not disengage parking brake while the
vehicle is raised. Be certain that the jack is
always vertical (plumb line) when in use,
especially on hills. Always try to use the jack
on level surface. Make sure that the jack
arm is fully seated in the jack take-up brack-
et. Always lower the vehicle onto sufficient
capacity jackstands before working under
the vehicle.
Page 526 of 595

525 Practical hints
Flat tire
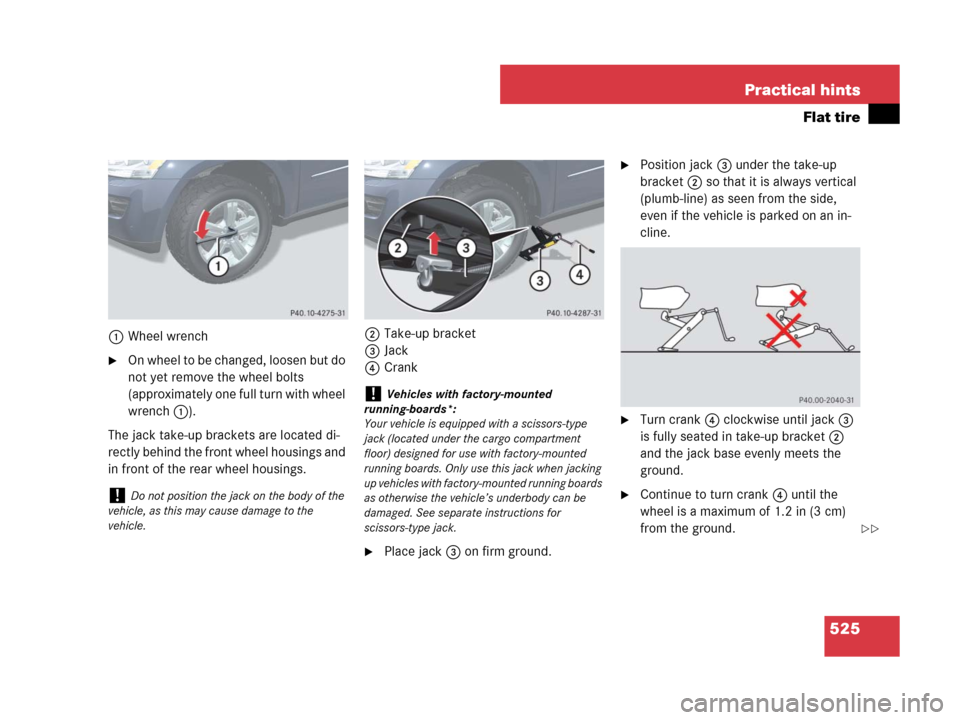
1Wheel wrench
�On whee l to b e c hang ed, l oose n but d o
not yet remove the wheel bolts
(approximately one full turn with wheel
wrench1).
The jack take-up brackets are located di-
rectly behind the front wheel housings and
in front of the rear wheel housings.2Take-up bracket
3Jack
4Crank
�Place jack3 on firm ground.
�Position jack3 under the take-up
bracket2 so that it is always vertical
(plumb-line) as seen from the side,
even if the vehicle is parked on an in-
cline.
�Turn crank4 clockwise until jack3
is fully seated in take-up bracket2
and the jack base evenly meets the
ground.
�Continue to turn crank4 until the
wheel is a maximum of 1.2 in (3 cm)
from the ground.!Do not position the jack on the body of the
vehicle, as this may cause damage to the
vehicle.
!Vehicles with factory-mounted
running-boards*:
Your vehicle is equipped with a scissors-type
jack (located under the cargo compartment
floor) designed for use with factory-mounted
running boards. Only use this jack when jacking
up vehicles with factory-mounted running boards
as otherwise the vehicle’s underbody can be
damaged. See separate instructions for
scissors-type jack.
��
Page 573 of 595

572 Index
Children in the vehicle 93
Air bags 77, 93
Blocking rear door window
operation 100
Indicator lamp, Front passenger front
air bag 85, 87, 450
Infant and child restraint systems 88,
94
LATCH-type child seat anchors 97
Occupant Classification System*
(OCS) 81
Cigarette lighter* 324
Climate control 216
Air conditioning refrigerant 561
Air conditioning, Cooling 226, 227
Air distribution, Front 221
Air distribution, rear 229
Air recirculation mode 224
Air vents*, second-row seats 222
Air vents, Front 222
Air volume 222
Control panel*, Rear 228
Control panel, Front 218
Deactivating system 220
Defogging 224
Defrosting 223Rear window defroster 215
Residual engine heat (REST) 227
Clock 27, 176
Setting time 176
Cloth upholstery, Cleaning and
care of 434
Cockpit 24
Cockpit Management and Data System
see COMAND System
Cold tire inflation pressure 416
Collapsible wheel chock 498
COMAND System see separate operating
instructions
Combination switch 63, 65, 149
Compass 345
Adjustment 181
Calibration 182
Calling up the compass 345
Control and operation of radio
transmitters 372
Control system 157
Multifunction display 157
Multifunction steering wheel 158
Resetting to factory default 171Control system menus 157
Audio 166
DISTRONIC* 169
NAV* 168
Off-road 168
Settings 170
Standard display 164
TEL* 189
Trip computer 187
Vehicle configuration 185
Vehicle status message memory 169
Control system submenus 161, 163, 173
Comfort* 184
Instrument cluster 174, 175
Lighting 178
Time/Date 176
Vehicle 181
Coolant 382, 565
Anticorrosion/antifreeze mixing ratio
and quantity 566
Capacities 560
Checking coolant level 377, 382
Messages in the
multifunction display 473, 475
Temperature 374
Temperature display 164
Page 583 of 595

582 Index
Multifunction display messages 451
ABS 453
Air suspension 490
Air suspension package* 490
Brake fluid 472
Brake lamps 481
Brake pads 470
Check engine 472
Coolant 475
Cruise control 454
Distronic* 455
Doors 478
Downhill Speed Regulation 470
EBP 471
Engine coolant 473, 475
Engine oil 476
ESP® 441
Fog lamps, Front 481
Fog lamps, Rear 484
Front passenger front air bag 463,
464, 465, 466
Fuel cap 478
Gear selector lever 461
Headlamps 481, 483, 484, 486
Hood 478Key, SmartKey 480
Key, SmartKey with
KEYLESS-GO* 479, 480
Lamps 481, 483, 484, 486
Low tire pressure 467, 488, 489
Parking brake 461, 471
Parking lamps 482
Tele Aid 487
Telephone* 487
Turn signals 486
Vehicle battery 469
Windshield washer fluid 487
Multifunction steering wheel 30, 158
Button operation 158
N
Navigation system* 168
See separate COMAND System
operating instructions
Net, Cargo* 313
Net, Parcel 320
Neutral gear position, Automatic
transmission 192
New vehicle, Break-in period 348
Night security illumination 148, 179
Normal occupant weight 417
Number, Vehicle Identification (VIN) 550O
Occupant distribution 417
Occupant safety 74
Active head restraint 92
Air bags 76
Children and air bags 77, 93, 96
Children in the vehicle 93
Fastening the seat belt 54
Front passenger front air bag off
indicator lamp 82, 85, 86
Infant and child restraint systems 94
LATCH-type child seat anchors 97
OCS* 81
OCS*, Messages in the multifunction
display 463, 464, 465, 466
Seat belts 54, 78
OCS* 81
Self-test 86
Odometer 156, 157, 164