Page 213 of 595

212 Controls in detail
Good visibility
Synchronizing exterior rear view
mirrors
The power folding rear view mirrors may
have to be synchronized after the vehicle
battery has been disconnected or dis-
charged. If the exterior rear view mirrors
do not fold properly upon locking or un-
locking the vehicle although the corre-
sponding function in the control system is
activated (
�page 185), do the following:
�Fold each exterior rear view mirror in
completely (
�page 212).
�Fold each exterior rear view mirror out
completely (
�page 212).
When the exterior rear view mirrors fold
properly upon locking the vehicle, the exte-
rior mirrors are synchronized. Otherwise
repeat the above steps.Folding the exterior rear view mirrors
in and out manually
The button is located on the door control
panel.
1Button for folding exterior rear view
mirrors in and out
�Switch on the ignition (�page 42).Folding in
�Briefly press button1.
Both exterior rear view mirrors fold in.
Folding out
�Briefly press button1 again.
Both exterior rear view mirrors fold out.
iThe exterior rear view mirrors can vibrate if
they are not folded out completely.
iIf you are driving at more than approximately
30 mph (47 km/h), you will not be able to fold
the exterior mirrors in.
!If an exterior rear view mirror housing is
forcibly pushed forward (hit from the rear) or
forcibly pushed rearward (hit from the front)
press button1 to fold mirrors in, then press
button1 again to fold mirrors out. Do not force
mirrors by hand as this may damage the adjust-
ment mechanism.
The mirror housing is then properly positioned
and you can adjust the mirror in the usual
manner.
Please make sure both rear view mirrors are
folded out before driving off.
Page 214 of 595
213 Controls in detail
Good visibility
Sun visors
The sun visors protect you from sun glare
while driving.
1Sun visor
2Additional sun visor*
3Mirror lamp
4Vanity mirror cover
5Vanity mirror
6Holder for gas cards
7MountingGlare through the windshield
�Swing sun visor1 down.
�Make sure sun visor1 is properly en-
gaged in mounting7.
�When you do not experience glare any-
more, swing sun visor1 up.
Vanity mirror
�Swing sun visor1 down.
�Flip up cover4 to access vanity
mirror5.
Vanity mirror lamp3 comes on.
�After using vanity mirror5, flip down
cover4.
�Swing sun visor1 up.
Warning!G
Do not use the vanity mirror while driving.
Keep the mirrors in the sun visors closed
while vehicle is in motion. Reflected glare
can endanger you and others.
Page 215 of 595
214 Controls in detail
Good visibility
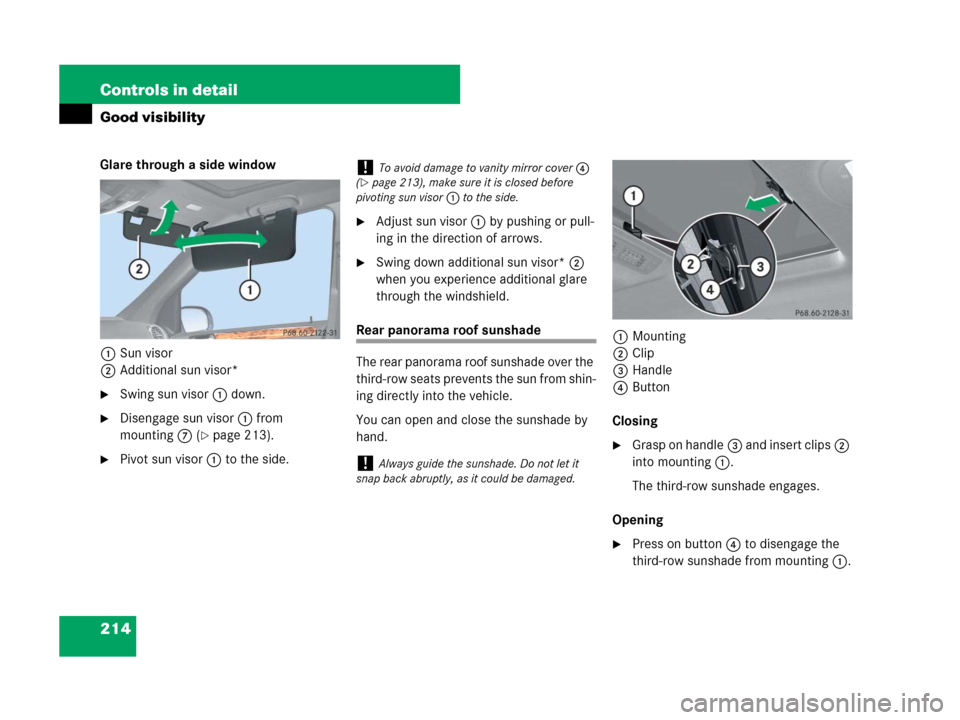
Glare through a side window
1Sun visor
2Additional sun visor*
�Swing sun visor1 down.
�Disengage sun visor1 from
mounting7 (
�page 213).
�Pivot sun visor1 to the side.
�Adjust sun visor1 by pushing or pull-
ing in the direction of arrows.
�Swing down additional sun visor*2
when you experience additional glare
through the windshield.
Rear panorama roof sunshade
The rear panorama roof sunshade over the
third-row seats prevents the sun from shin-
ing directly into the vehicle.
You can open and close the sunshade by
hand.1Mounting
2Clip
3Handle
4Button
Closing
�Grasp on handle3 and insert clips2
into mounting1.
The third-row sunshade engages.
Opening
�Press on button4 to disengage the
third-row sunshade from mounting1.
!To avoid damage to vanity mirror cover4
(
�page 213), make sure it is closed before
pivoting sun visor1 to the side.
!Always guide the sunshade. Do not let it
snap back abruptly, as it could be damaged.
Page 297 of 595
296 Controls in detail
Driving systems
The rear view camera is an optical parking
aid. It shows you the area behind the vehi-
cle in the COMAND system display when
reverse gearR is engaged, for example
during parallel parking.
The rear view camera is located near the
tailgate handle.
1Rear view cameraSwitching the rear view camera on and
off
�Switch on the ignition (�page 42).
�Shift the automatic transmission in
positionR (
�page 194).
The area behind the vehicle appears in
the COMAND system display.
�Shift the automatic transmission
intoP,N orD to switch off the rear
view camera.
iThe area behind the vehicle is shown in the
COMAND system display as a mirror image, like
in the rear view mirror.
iThe image from the rear view camera will no
longer be displayed if you select another
function on the COMAND system while reverse
gearR is engaged. To display the image again,
disengage and reengage reverse gearR.
Page 335 of 595
 or
air bags deploy.
An e")
334 Controls in detail
Useful features
Emergency calls
An emergency call is initiated automatical-
ly following an accident in which the emer-
gency tensioning devices (ETDs) or
air bags deploy.
An emergency call can also be initiated
manually by opening the cover next to the
interior rear view mirror labeled SOS, then
briefly pressing the button located under
the cover. See (
�page 335) for
instructions on initiating an emergency call
manually.Once the emergency call is in progress, the
indicator lamp on the SOS button will
begin to flash. The message
Connecting call appears in the multifunc-
tion display. When the connection is estab-
lished, the message
Call connected
appears in the multifunction display. All in-
formation relevant to the emergency, such
as the location of the vehicle (determined
by the GPS satellite location system), vehi-
cle model, identification number and color
are generated.
A voice connection between the Response
Center and the occupants of the vehicle
will be established automatically soon af-
ter the emergency call has been initiated.
The Response Center will attempt to
determine more precisely the nature of the
accident provided they can speak to an
occupant of the vehicle.The Tele Aid system is available if
�it has been activated and is operation-
al. Activation requires a subscription
for monitoring services, connection
and cellular air time
�vehicle battery power is available
�the relevant cellular phone network
and GPS signals are available and pass
the information on to the Response
Center
iLocation of the vehicle on a map is only pos-
sible if the vehicle is able to receive signals from
the GPS satellite network and pass the informa-
tion on to the Response Center.
Page 341 of 595
")
340 Controls in detail
Useful features
Interior rear view mirror with integrated
remote control
1Indicator lamp
2 3 4Signal transmitter button
Needed for programming (not part of vehi-
cle equipment):
5Hand-held remote control of ga-
rage door opener, gate operator
or other device
6Hand-held remote control but-
tonProgramming the integrated remote
control
Step 1:
�Switch on the ignition (�page 42).
Warning!G
Before programming the integrated remote
control to a garage door opener or gate
operator, make sure people and objects are
out of the way of the device to prevent po-
tential harm or damage. When programming
a garage door opener, the door moves up or
down. When programming a gate operator,
the gate opens or closes.
Do not use the integrated remote control
with any garage door opener that lacks
safety stop and reverse features as required
by U.S. federal safety standards (this
includes any garage door opener model
manufactured before April 1, 1982).
A garage door that cannot detect an object
– signaling the door to stop and reverse –
does not meet current U.S. federal safety
standards.
When programming a garage door opener,
park the vehicle outside the garage.
Do not run the engine while programming
the integrated remote control. Inhalation of
exhaust gas is hazardous to your health.
All exhaust gas contains carbon monoxide
(CO), and inhaling it can cause unconscious-
ness and possible death.
Page 580 of 595

579 Index
Instruments and controls see Cockpit
Interior lighting 151
Delayed shut-off 180
Interior rear view mirror 52
Antiglare positions 210
Auto-dimming mirrors* 211
Interior storage spaces see
Storage compartments
Intermittent wiping
Windshield wipers 64
J
Jack 496, 497
Lifting the vehicle 524
Jump starting 538
K
Key, Mechanical 500
Key, SmartKey 114
Batteries 122, 506
Battery check lamp 114
Checking battery condition 122
Closing the power windows
(Convenience closing feature) 252
Closing the tilt/sliding sunroof*
(Convenience closing feature) 252Closing, Power tailgate* 128
Factory setting 116
Locking/unlocking 40, 71, 114
Locking/unlocking, Global
setting 116
Loss of 122
Messages in the
multifunction display 480
Opening the power windows
(Summer opening feature) 251
Opening the tilt/sliding sunroof*
(Summer opening feature) 251
Remote control 114
Replacing batteries 506
Selective setting 116
Starter switch positions 42
Starting the engine 57
Turning off the engine 70
Key, SmartKey with KEYLESS-GO*
Batteries 122, 506
Battery check lamp 117
Checking battery condition 122
Closing the power windows
(Convenience closing feature) 252Closing the tilt/sliding sunroof*
(Convenience closing feature) 252
Closing/locking, Power
tailgate* 129
Factory setting 120
Important notes 119
Locking/unlocking 41, 71, 117
Locking/unlocking, Global
setting 120
Loss of 122
Messages in the
multifunction display 479, 480
Opening the power windows
(Summer opening feature) 251
Opening the tilt/sliding sunroof*
(Summer opening feature) 251
Remote control 117
Replacing batteries 506
Selective setting 121
Start/stop button 43
Starter switch positions 42, 43
Starting the engine 59
Turning off the engine 70