Page 493 of 595
492 Practical hints
What to do if …
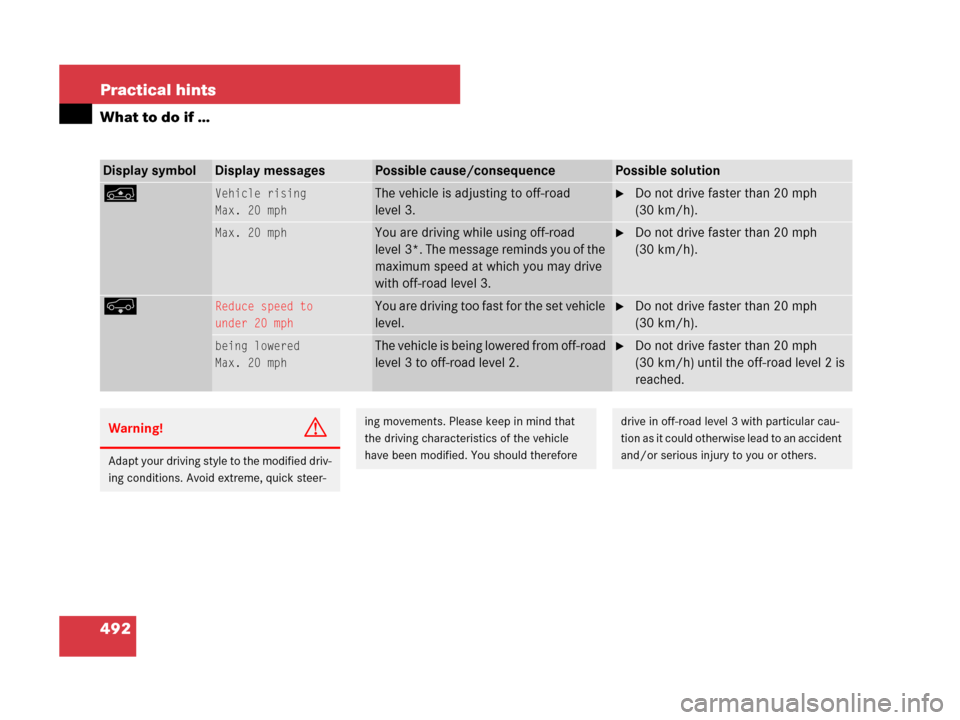
Display symbolDisplay messagesPossible cause/consequencePossible solution
nVehicle rising
Max. 20 mphThe vehicle is adjusting to off-road
level 3.�Do not drive faster than 20 mph
(30 km/h).
Max. 20 mphYou are driving while using off-road
level 3*. The message reminds you of the
maximum speed at which you may drive
with off-road level 3.�Do not drive faster than 20 mph
(30 km/h).
pReduce speed to
under 20 mphYou are driving too fast for the set vehicle
level.�Do not drive faster than 20 mph
(30 km/h).
being lowered
Max. 20 mphThe vehicle is being lowered from off-road
level 3 to off-road level 2.�Do not drive faster than 20 mph
(30 km/h) until the off-road level 2 is
reached.
Warning!G
Adapt your driving style to the modified driv-
ing conditions. Avoid extreme, quick steer-
ing movements. Please keep in mind that
the driving characteristics of the vehicle
have been modified. You should thereforedrive in off-road level 3 with particular cau-
tion as it could otherwise lead to an accident
and/or serious injury to you or others.
Page 500 of 595
499 Practical hints
Where will I find ...?
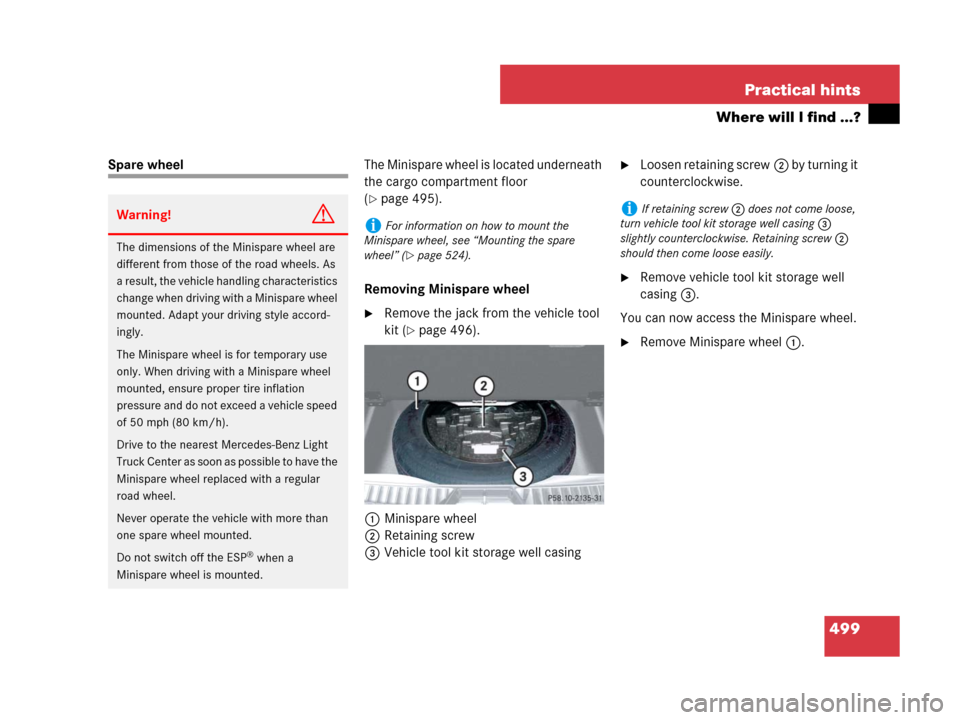
Spare wheelThe Minispare wheel is located underneath
the cargo compartment floor
(
�page 495).
Removing Minispare wheel
�Remove the jack from the vehicle tool
kit (
�page 496).
1Minispare wheel
2Retaining screw
3Vehicle tool kit storage well casing
�Loosen retaining screw2 by turning it
counterclockwise.
�Remove vehicle tool kit storage well
casing3.
You can now access the Minispare wheel.
�Remove Minispare wheel1.
Warning!G
The dimensions of the Minispare wheel are
different from those of the road wheels. As
a result, the vehicle handling characteristics
change when driving with a Minispare wheel
mounted. Adapt your driving style accord-
ingly.
The Minispare wheel is for temporary use
only. When driving with a Minispare wheel
mounted, ensure proper tire inflation
pressure and do not exceed a vehicle speed
of 50 mph (80 km/h).
Drive to the nearest Mercedes-Benz Light
Truck Center as soon as possible to have the
Minispare wheel replaced with a regular
road wheel.
Never operate the vehicle with more than
one spare wheel mounted.
Do not switch off the ESP
® when a
Minispare wheel is mounted.
iFor information on how to mount the
Minispare wheel, see “Mounting the spare
wheel” (
�page 524).
iIf retaining screw2 does not come loose,
turn vehicle tool kit storage well casing3
slightly counterclockwise. Retaining screw2
should then come loose easily.
Page 524 of 595
523 Practical hints
Flat tire
�Flat tire
Preparing the vehicle
�Park the vehicle in a safe distance from
moving traffic on a hard, flat surface
when possible.
�Turn on the hazard warning flasher
(
�page 151).
�Turn the steering wheel so that the
front wheels are in a straight-ahead
position.
�Set the parking brake (�page 60).
�Set the automatic transmission to park
positionP (
�page 194).
�Turn off the engine (�page 41).
�Remove the SmartKey from the starter
switch.
Vehicles with KEYLESS-GO*:
�Turn off the engine by pressing the
KEYLESS-GO* button once
(
�page 70).
�Open the driver’s door (this puts
the starter switch in position0,
same as with the SmartKey re-
moved from the starter switch). The
driver’s door then can be closed
again.
�Remove the KEYLESS-GO*
start/stop button from the starter
switch (
�page 43).
�Have any passenger exit the vehicle at
a safe distance from the roadway.
Warning!G
The dimensions of the Minispare wheel are
different from those of the road wheels. As
a result, the vehicle handling characteristics
change when driving with a Minispare wheel
mounted. Adapt your driving style accord-
ingly.
The Minispare wheel is for temporary use
only. When driving with a Minispare wheel
mounted, ensure proper tire pressure and
do not exceed a vehicle speed of
50 mph (80 km/h).
Drive to the nearest Mercedes-Benz Light
Truck Center as soon as possible to have the
Minispare wheel replaced with a regular
road wheel.
Never operate the vehicle with more than
one spare wheel mounted.
Do not switch off the ESP
® when a
Minispare wheel is mounted.
Warning!G
Your vehicle is equipped with air suspen-
sion. Do not open or close any doors or the
tailgate while mounting a spare wheel. The
vehicle could rise or lower to a previously se-
lected level. You or others could be injured
as a result.
iOpen door only when conditions are safe to
do so.
Page 528 of 595
527 Practical hints
Flat tire
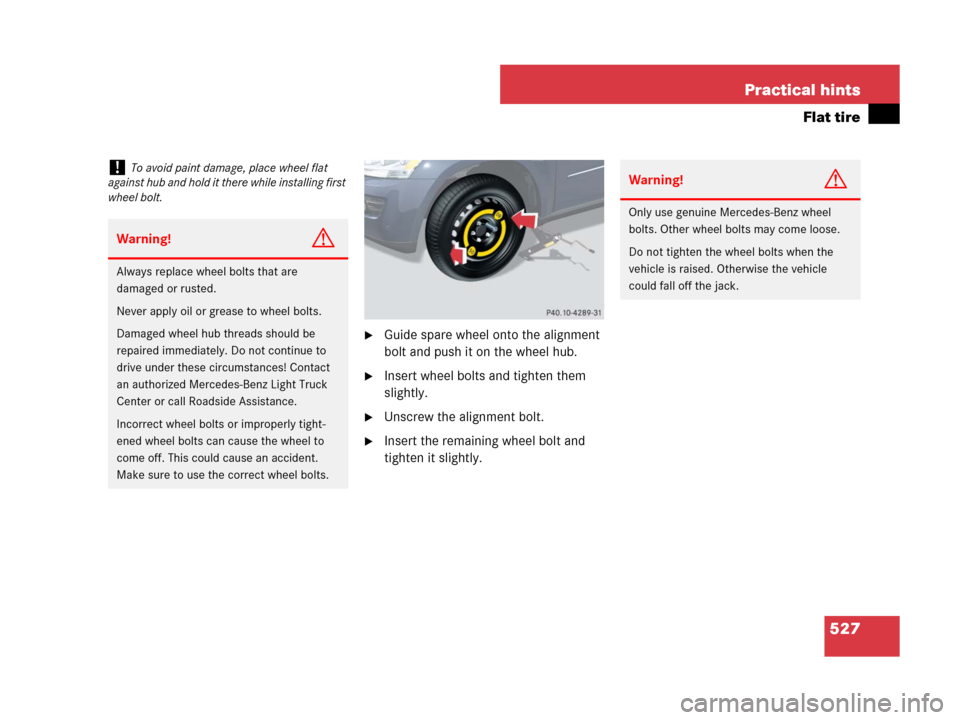
�Guide spare wheel onto the alignment
bolt and push it on the wheel hub.
�Insert wheel bolts and tighten them
slightly.
�Unscrew the alignment bolt.
�Insert the remaining wheel bolt and
tighten it slightly.
!To avoid paint damage, place wheel flat
against hub and hold it there while installing first
wheel bolt.
Warning!G
Always replace wheel bolts that are
damaged or rusted.
Never apply oil or grease to wheel bolts.
Damaged wheel hub threads should be
repaired immediately. Do not continue to
drive under these circumstances! Contact
an authorized Mercedes-Benz Light Truck
Center or call Roadside Assistance.
Incorrect wheel bolts or improperly tight-
ened wheel bolts can cause the wheel to
come off. This could cause an accident.
Make sure to use the correct wheel bolts.
Warning!G
Only use genuine Mercedes-Benz wheel
bolts. Other wheel bolts may come loose.
Do not tighten the wheel bolts when the
vehicle is raised. Otherwise the vehicle
could fall off the jack.
Page 530 of 595

529 Practical hints
Bleeding the fuel system (diesel engine only)
�Bleeding the fuel system (diesel engine only)
Driving the vehicle until the fuel tank is
empty is not recommended. Otherwise, air
may be sucked into the fuel system. If this
happens, the? malfunction indicator
lamp (USA only) or the± malfunction
indicator lamp (Canada only) comes on
and the engine may not start immediately
after refueling the vehicle.
After refueling:
�Make sure the automatic transmission
is set toP.
The gear position indicator in the multi-
function display should be on
P.
�Do not depress the accelerator.
�Turn the SmartKey in the starter switch
to position 2 for at least 10 seconds
(
�page 41).
�Return the SmartKey in the starter
switch to position 0 (
�page 41).
�Turn the SmartKey in the starter switch
to position3 (
�page 41) and hold it
there for a maximum of 40 seconds or
until the engine runs surge-free.
If the engine does not start:
�Wait for approximately 2 minutes.
�Turn the SmartKey in the starter switch
to position3 (
�page 41) and hold it
there for a maximum of 40 seconds or
until the engine runs surge-free.
If the engine still does not start, do not
make any further attempts to start the
engine. Contact an authorized
Mercedes-Benz Light truck Center or call
Roadside Assistance (
�page 336).iVehicles with KEYLESS-GO*: If necessary,
remove the KEYLESS-GO start/stop button from
the starter switch (
�page 43).iWhen the ?malfunction indicator lamp
(USA only) or the ±malfunction indicator
lamp (Canada only) has been illuminated for the
above condition, it will remain illuminated until
the engine was cycled on and off four times in a
row.
Page 541 of 595
540 Practical hints
Towing the vehicle
Mercedes-Benz recommends that the
vehicle be transported with all wheels off
the ground using flatbed or appropriate
wheel lift/dolly equipment. This method is
preferable to other types of towing.If circumstances do not permit the recom-
mended towing methods, the vehicle may
be towed with all wheels on the ground
only so far as necessary to have the vehicle
moved to a safe location where the recom-
mended towing methods can be employed.
When towing the vehicle with all wheels on
the ground, the vehicle may be towed only
for distances up to 30 miles (50 km) and at
a speed not to exceed 30 mph (50 km/h).
!Do not tow-start the vehicle.
!Use flatbed or wheel lift/dolly equipment,
with the SmartKey in starter switch turned to
position0.
Do not tow with sling-type equipment. Towing
with sling-type equipment over bumpy roads will
damage radiator and supports.
To prevent damage during transport, do not tie
down vehicle by its chassis or suspension parts.
Use the towing eyes.
Switch off the ESP
® (�page 107) and the
automatic central locking (
�page 130).
!Do not tow with one axle raised. Doing so
could damage the transfer case, which is not
covered by the Mercedes-Benz Limited
Warranty.
All wheels must be on or off the ground. Observe
instructions for towing the vehicle with all
wheels on the ground.
Warning!G
If circumstances require towing the vehicle
with all wheels on the ground, always tow
with a tow bar if
�the engine will not run
�there is a malfunction in the brake
system
�there is a malfunction in the power
supply or in the vehicle’s electrical
system
as that will be necessary to adequately
control the towed vehicle.
Prior to towing the vehicle with all wheels on
the ground, make sure the starter switch is
in position2 (
�page 42).
Page 557 of 595
556 Technical data
Rims and tires
Minispare wheel
ModelGL 320 CDI,
GL 450
Rim4.5B x 19 H2
Wheel offset1.58 in (40 mm)
TireT 165/90D-19 119M1
1Must not be used with snow chains.
!Please compare the recommended tire
inflation pressure for your vehicle with the tire
inflation pressure on the yellow label located on
the Minispare wheel rim.
If the tire inflation pressure on the yellow label
on the Minispare wheel rim differs from the
values given in this Operator’s Manual, inflate
the tire to the recommended tire inflation pres-
sure given on the yellow label on the Minispare
wheel rim.
iPlease note that the tire inflation pressure of
the Minispare tire differs from the tire inflation
pressure of the road tires.
Inflate the Minispare tire to approximately 61 psi
(4.2 bar).
Page 559 of 595
558 Technical data
Main Dimensions
ModelGL 320 CDI, GL 450
Overall vehicle length200.6 in (5096 mm)
Vehicle width (exterior rear view mirrors folded out)83.7 in (2127 mm)
Vehicle width (exterior rear view mirrors folded in)76.0 in (1930 mm)
Overall vehicle height, depending on set vehicle level72.4 in - 75.6 in (1840 mm - 1920 mm)
Overall vehicle height, depending on set vehicle level
(vehicles with enhanced off-road package*)72.4 in - 76.8 in (1840 mm - 1950 mm)
Wheelbase121.1 in (3075 mm)
Ground clearance, depending on set vehicle level7.8 in - 10.9 in (197 mm - 277 mm)
Ground clearance, depending on set vehicle level
(vehicles with enhanced off-road package*)7.8 in - 12.1 in (197 mm - 307 mm)
Turning circle39.7ft (12.1m)
Track, front65.0 in (1651 mm)
Track, rear65.1 in (1654 mm)