Page 9 of 595

Contents
Replacing wiper blades ...................... 520
Front wiper blades ....................... 520
Rear wiper blade .......................... 521
Flat tire .............................................. 523
Preparing the vehicle.................... 523
Mounting the spare wheel ............ 524
Bleeding the fuel system
(diesel engine only) ............................ 529
Battery ............................................... 530
Disconnecting, removing,
reinstalling and
reconnecting the battery .............. 532
Charging the battery .................... 537
Jump starting ..................................... 538
Towing the vehicle ............................. 540
Installing towing eye bolt.............. 542
Stranded vehicle .......................... 543
Fuses ................................................. 544
Fuse box in engine compartment . 545
Fuse box in cargo compartment ... 545
Fuse box in
passenger compartment .............. 546
Emergency engine shut-down ...... 546
Technical data................................. 547
Parts service ...................................... 548
Warranty coverage............................. 549
Loss of Service and Warranty
Information Booklet ..................... 549
Identification labels ........................... 550
Layout of poly-V-belt drive ................. 552
GL 320 CDI .................................. 552
GL 450 ......................................... 552
Engine................................................ 553
Rims and tires.................................... 554
Same size tires ............................. 555
Minispare wheel ........................... 556
Electrical system ............................... 557
Main Dimensions ............................... 558
Weights.............................................. 559Fuels, coolants, lubricants ................. 560
Capacities .................................... 560
Engine oils ................................... 562
Engine oil additives ...................... 562
Air conditioning refrigerant .......... 562
Brake fluid.................................... 562
Premium unleaded gasoline
(gasoline engine) .......................... 563
Fuel requirements ........................ 563
Gasoline additives
(gasoline engine) .......................... 564
Coolants ...................................... 565
Windshield washer system and
headlamp cleaning system*......... 567
Index................................................. 569
Page 436 of 595
435 Practical hints
What to do if …
Where will I find ...?
Unlocking/locking in an emergency
Opening/closing in an emergency
Resetting activated head restraints
Replacing SmartKey batteries
Replacing bulbs
Replacing wiper blades
Flat tire
Bleeding the fuel system
(diesel engine only)
Battery
Jump starting
Towing the vehicle
Fuses
Page 496 of 595
495 Practical hints
Where will I find ...?
�Where will I find ...?
First aid kit
The first aid kit is located on the driver’s
side in the cargo compartment behind the
cover.
1Lock
2Cover in left side trim panel
�Turn lock1 90° in direction of arrow.
�Fold down cover2.
The first aid kit can be removed.
Vehicle tool kit
The vehicle tool kit is stored under the
cargo compartment floor.
The vehicle tool kit includes:
�Towing eye bolt
�Wheel wrench
�Alignment bolt
�Vehicle jack
�Fuse chart
�Spare fuses
�Fuse extractor
�Collapsible wheel chock
�Wheel bolts for spare wheel1Cargo compartment floor, lowered
2Handle cover
�Open the tailgate (�page 124).
�Push in handle cover2 as indicated
by arrow and pull handle.
�Lift cargo compartment floor1.
iCheck expiration dates and contents for
completeness at least once a year and replace
missing/expired items.
��
Page 497 of 595
496 Practical hints
Where will I find ...?
3Securing hook
�Release securing hook3 (located be-
low the floor handle) from holder.3Securing hook
4Cargo compartment floor, raised
5Upper cargo compartment lip
�Engage securing hook3 on upper
cargo compartment lip5.
You can now access the vehicle tool kit. To
remove the vehicle tool kit storage well
casing, proceed as described on
(
�page 499).6Alignment bolt
7Towing eye bolt
8Wheel wrench
9Velcro strap
aVehicle jack
bWheel bolts for 18" light alloy rims or
Minispare wheel
cCollapsible wheel chock
dSpare fuses, fuse chart, fuse extractor
eVehicle tool kit storage well casing
�To remove vehicle jacka, loosen vel-
cro strap9.
!With the cargo compartment cover blind
installed behind the third-row seats
(
�page 312), disengage cargo compartment
cover blind and flip it forward. Otherwise the
strap of the securing hook could damage the
cargo compartment cover blind.
��
Page 545 of 595

544 Practical hints
Fuses
The electrical fuses in your vehicle serve to
switch off malfunctioning power circuits.
If a fuse is blown, the components and sys-
tems secured by that fuse will stop operat-
ing.If a newly inserted fuse blows again, have
the cause determined and rectified by an
authorized Mercedes-Benz Light Truck
Center.
The following aids are available to help you
replace fuses. They are included with the
vehicle tool kit (
�page 495):
�Fuse chart
The fuse chart explains the fuse alloca-
tion and fuse amperages.
�Spare fuses
�Fuse extractor
The electrical fuses are located in different
fuse boxes:
�Fuse box in engine compartment
(
�page 545)
�Fuse box in cargo compartment
(
�page 545)
�Fuse box in passenger compartment
(
�page 546)Before replacing fuses:
�Apply parking brake (�page 68).
�Make sure the automatic transmission
is set toP (
�page 194).
The gear position indicator in the multi-
function display should be on
P.
�Turn off all electrical consumers.
�Turn off the engine (�page 41).
�Remove the SmartKey from the starter
switch.
Vehicles with KEYLESS-GO*:
�Open the driver’s door (this puts
the starter switch in position0,
same as with the SmartKey re-
moved from the starter switch). The
driver’s door then can be closed
again.
Warning!G
Only use fuses approved by Mercedes-Benz
with the specified amperage for the system
in question and do not attempt to repair or
bridge a blown fuse. Using other than ap-
proved fuses or using repaired or bridged
fuses may cause an overload leading to a
fire, and/or cause damage to electrical
components and/or systems. Have the
cause determined and remedied by an au-
thorized Mercedes-Benz Light Truck Center.
iA blown fuse must be replaced by an appro-
priate spare fuse (recognizable by its color or the
fuse rating given on the fuse) of the amperage
recommended in the fuse chart. Any
Mercedes-Benz Light Truck Center will be glad to
advise you on this subject.
Page 546 of 595
545 Practical hints
Fuses
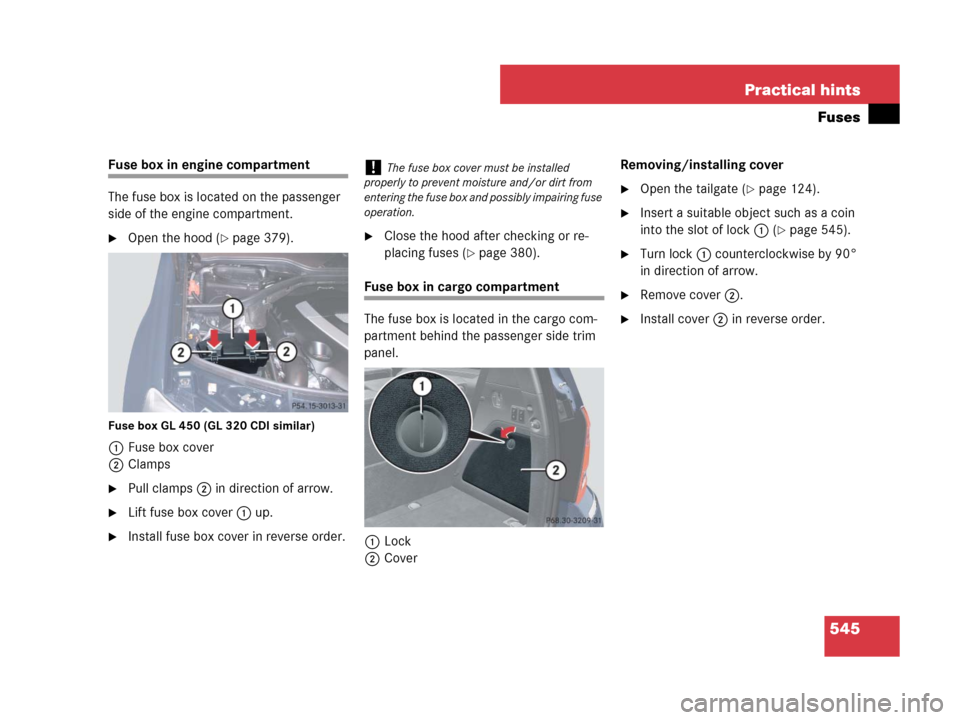
Fuse box in engine compartment
The fuse box is located on the passenger
side of the engine compartment.
�Open the hood (�page 379).
Fuse box GL 450 (GL 320 CDI similar)
1Fuse box cover
2Clamps
�Pull clamps2 in direction of arrow.
�Lift fuse box cover1 up.
�Install fuse box cover in reverse order.
�Close the hood after checking or re-
placing fuses (
�page 380).
Fuse box in cargo compartment
The fuse box is located in the cargo com-
partment behind the passenger side trim
panel.
1Lock
2CoverRemoving/installing cover
�Open the tailgate (�page 124).
�Insert a suitable object such as a coin
into the slot of lock1 (
�page 545).
�Turn lock1 counterclockwise by 90°
in direction of arrow.
�Remove cover2.
�Install cover2 in reverse order.
!The fuse box cover must be installed
properly to prevent moisture and/or dirt from
entering the fuse box and possibly impairing fuse
operation.
Page 547 of 595

546 Practical hints
Fuses
Fuse box in passenger compartment
The fuse box is located behind a cover in
the dashboard on the front passenger side.
1CoverOpening
�Open the front passenger door.
�Open the glove box (�page 316).
�Insert flat, blunt object as a lever into
the edge of the cover1 at the position
indicated by the arrow.
�Loosen cover1 from dashboard using
lever.
�Using your hands, pull cover1 out
and remove.
Closing
�Hook cover1 into the opening at the
front.
�Press cover1 back on until it engag-
es.
Emergency engine shut-down
If the engine cannot be turned off as de-
scribed in the “Getting started” section
(
�page 69), you may use the following
emergency procedure.
�Take the fuse chart from the vehicle
tool kit (
�page 496).
�Open the fuse box in engine compart-
ment (
�page 545).
�Use the fuse extractor to remove
fuse 120. Find its location in the fuse
chart.
!Do not use sharp objects such as a screw-
driver to open the fuse box cover1 in the dash-
board, as this could damage the fuse box cover
or the dashboard.
Page 575 of 595

574 Index
Door
Entry lamps 154
Locking, In an emergency 501
Locking/unlocking,
KEYLESS-GO* 41, 72
Locking/unlocking, SmartKey 40, 71
Messages in the
multifunction display 478
Opening from inside/outside 116,
122
Remote door unlock (Tele Aid) 338
Unlocking, Mechanical key 500
Door control panel 35
Door handle 35
Door windows see Power windows
DOT 410, 416
Downhill driving
Cruise control 259
Downhill Speed Regulation (DSR) 275
Messages in the
multifunction display 470
Drinking and driving 349Driving 54, 349
Abroad 372
Hydroplaning 354
In winter 355, 420
Instructions 54, 349
Problems 66
Safety systems 103
Systems 257
Through standing water 356
Through water 362
Tips 198
With Distronic* 272
Driving off 61
Driving safety systems
4-ETS 109
ABS 103
BAS 105
EBP 109
ESP® 105
Driving systems 257
Adaptive Damping System
(ADS)* 280
Air suspension package 280
Cruise control 257
Distronic* 262Downhill Speed Regulation
(DSR) 275
Off-road driving program
(Vehicles without
enhanced off-road package*) 279
Parktronic system* 290
Rear view camera* 295
Vehicle level control 281
E
Easy-entry/exit feature
Activating (driver’s seat)* 184
For third-row seats 132
Easy-entry/exit feature* 49
EBP 109
Indicator and warning lamps 438,
471
Electrical connections
Trailer 366
Electrical fuses see Fuses
Electrical system, Technical data 557
Electronic Brake Proportioning see EBP
Electronic Stability Program see ESP®
Electronic Traction System see 4-ETS
Emergency calls
Tele Aid 334