Page 47 of 595
*
2Seat cushion t")
46 Getting started
Adjusting
Seat adjustment
The seat adjustment switch is located on
the entry side of each front seat base.
1 Head restraint height (vehicles with
memory function)*
2Seat cushion tilt
3Seat height
4Backrest tilt
5Seat fore and aft adjustment
Warning!G
Vehicles with BabySmartTM air bag deactiva-
tion system, Canada only:
Children 12 years old and under must never
ride in the front seat, except in a
Mercedes-Benz authorized BabySmart
TM
compatible child seat, which operates with
the BabySmart
TM system installed in the
vehicle to deactivate the front passenger
front air bag when it is properly installed.
Otherwise they will be struck by the air bag
when it inflates in a crash. If this happens,
serious or fatal injury will result.
Warning!G
According to accident statistics, children
are safer when properly restrained in the
rear seating positions than in the front seat-
ing position. Thus, we strongly recommend
that children be placed in the rear seats
whenever possible. Regardless of seating
position, children 12 years old and under
must be seated and properly secured in an
appropriately sized infant restraint, toddler
restraint, or booster seat recommended for
the size and weight of the child. For addi-
tional information, see “Children in the vehi-
cle” (
�page 93).
A child’s risk of serious or fatal injuries is
significantly increased if the child restraints
are not properly secured in the vehicle
and/or the child is not properly secured in
the child restraint.
Page 48 of 595
.
or
Vehicles with memory function*:
�Open the respective door.
The seat can be adjusted with the
respective door opened.
or
Vehicles wi")
47 Getting started
Adjusting
�Switch on the ignition (�page 42).
or
Vehicles with memory function*:
�Open the respective door.
The seat can be adjusted with the
respective door opened.
or
Vehicles without memory function*:
�The seat can be adjusted within
3 minutes after either front door has
been opened.Seat fore and aft adjustment
�Press the switch forward or backward
in direction of arrow5.
Seat height
�Press the switch up or down in
direction of arrow3.
Seat cushion tilt
�Press the switch up or down in
direction of arrow2 until your upper
legs are lightly supported.
Seat backrest tilt
�Press the switch forward or backward
in direction of arrow4.
!When moving the seats, make sure there are
no items in the footwell or behind the seats;
otherwise you could damage the seats.
!When the second-row seats are folded
forward, e.g. for cargo compartment expansion
(
�page 306), the front seats may not be moved
to the rearmost position. Otherwise you could
damage the front and second-row seats.
!When adjusting the seat backrest tilt and
head restraint height, make sure the sun visor is
folded up (
�page 213). If the head restraint is in
the uppermost position, it could hit and damage
the sun visor.
iThe memory function* (�page 143) lets
you store the settings for the seat positions
together with the settings for the steering wheel
column and the exterior rear view mirrors.
Page 57 of 595

56 Getting started
Driving
1Seat belt outlet
2Latch plate
3Buckle
4Release button
�With a smooth motion, pull the belt out
of seat belt outlet1.
�Place the shoulder portion of the belt
across the top of your shoulder and the
lap portion across your hips.
�Push latch plate2 into buckle3
(
�page 56) until it clicks.
�If necessary, tighten the lap portion to
a snug fit by pulling shoulder portion
up.
Seat belt height adjustment
1Release button
�Press release button1 and move the
seat belt height adjuster upward or
downward.
Proper use of seat belts
�Do not twist the belt when fastening.
�Adjust seat belt so that the shoulder
portion is located as close as possible
to the middle of the shoulder (it should
not touch the neck). Never pass the
shoulder portion of the belt under your
arm. For this purpose, you can adjust
the height of the belt outlet
(
�page 56).
�Position the lap belt as low as possible
on your hips (over hip joint) and not
across the abdomen.
�Place the seat backrest in a position
that is as upright as possible.
Page 174 of 595
173 Controls in detail
Control system
The table below shows what settings can
be changed within the various menus.
Detailed instructions on making individual
settings can be found on the following
pages.
INSTRUMENT CLUSTERTIME/DATELIGHTINGVEHICLECOMFORT*
(�page 174)(�page 176)(�page 178)(�page 181)(�page 184)
Selecting speedometer
display modeSetting the time (hours)Setting daytime running
lamp mode (USA only)Compass adjustmentActivating
easy-entry/exit fea-
ture*
Selecting languageSetting the time (minutes)Setting locator lightingCompass calibrationSetting fold-in func-
tion* for exterior rear
view mirrors
Selecting display (digital
speedometer or outside
temperature) for status in-
dicatorSetting the date (month)Setting night security
illuminationAudio search function
Setting the date (day)Setting interior lighting de-
layed shut-offSetting automatic
locking
Setting the date (year)Limiting opening
height of tailgate*
Page 182 of 595
181 Controls in detail
Control system
Vehicle submenu
Access the
Vehicle submenu via the
Settings menu. Use the Vehicle submenu
to make general vehicle settings.
The following functions are available:Compass adjustment
This function is not available if your vehicle
is equipped with the COMAND system and
navigation module*.
Determine your location on the basis of the
following zone maps.
Zone map North AmericaZone map South America
�Press buttonæ orç to move
the selection marker to the
Vehicle
submenu.
FunctionPage
Compass adjustment181
Compass calibration182
Audio search function183
Setting automatic locking183
Limiting opening height of
tailgate*184
��
Page 185 of 595

184 Controls in detail
Control system
Limiting opening height of tailgate*
Use this function to activate or deactivate
the limiting opening height of the tailgate.
�Move the selection marker with
buttonæ orç to the
Vehicle
submenu.
�Press buttonj ork repeatedly
until the message
Opening limiter
Tailgate
appears in the multifunction
display.
The selection marker is on the current
setting.
�Press buttonæ orç to switch
the limiting opening height of the
tailgate
On or Off.Comfort submenu*
Access the
Comfort submenu via the
Settings menu. Use the Comfort submenu
to change the settings for a number of con-
venience features.
The following functions are available:Activating easy-entry/exit feature*
Use this function to activate and
deactivate the easy-entry/exit feature
(
�page 49).
FunctionPage
Activating easy-entry/exit
feature*184
Setting fold-in function* for
exterior rear view mirrors185
Warning!G
You must make sure no one can become
trapped or injured by the moving steering
wheel when the easy-entry/exit feature is
activated.
To stop steering wheel movement, do one of
the following:
�Move steering wheel adjustment stalk*
(
�page 51).
�Press one of the memory position
buttons or the memory buttonM*
(
�page 144).
Do not leave children unattended in the ve-
hicle, or with access to an unlocked vehicle.
Children could open the driver’s door and
unintentionally activate the easy-entry/exit
feature, which could result in an accident
and/or serious personal injury.
Page 286 of 595
 goes out. The
following message appears in the multi-
function display for 5 seconds:Vehicles")
285 Controls in detail
Driving systems
When the highway level is reached, indica-
tor lamp2 (
�page 283) goes out. The
following message appears in the multi-
function display for 5 seconds:Vehicles with enhanced Off-road
Package*
The switch is located on the upper part of
the center console.
1Rotatable outer adjustment ring
2Set higher vehicle level
3Indicator lamps
4Set lower vehicle levelBasic settings
The following vehicle chassis ride heights
can be selected using the vehicle level
switch in the center console:
iThe message can be cleared by pressing
theèÿk or buttonj on the
multifunction steering wheel.
iThe vehicle is lowered automatically to the
highway level if:
�the vehicle speed is above 55 mph
(88 km/h)
�the speed stays between 40 mph (64 km/h)
and 55 mph (88 km/h) for approximately
20 seconds
LevelDriving situation
Off-road 3For slow driving on
rough terrain. Lower,
middle and upper indi-
cator lamps are on.
Off-road 2Off-road driving. Lower
and middle indicator
lamps are on.
Off-road 1For driving on easy ter-
rain. Lower indicator
lamp is on.
HighwayFor normal driving. In-
dicator lamps are off.
iAnother available level is the high-speed
level that is set automatically.
Page 519 of 595
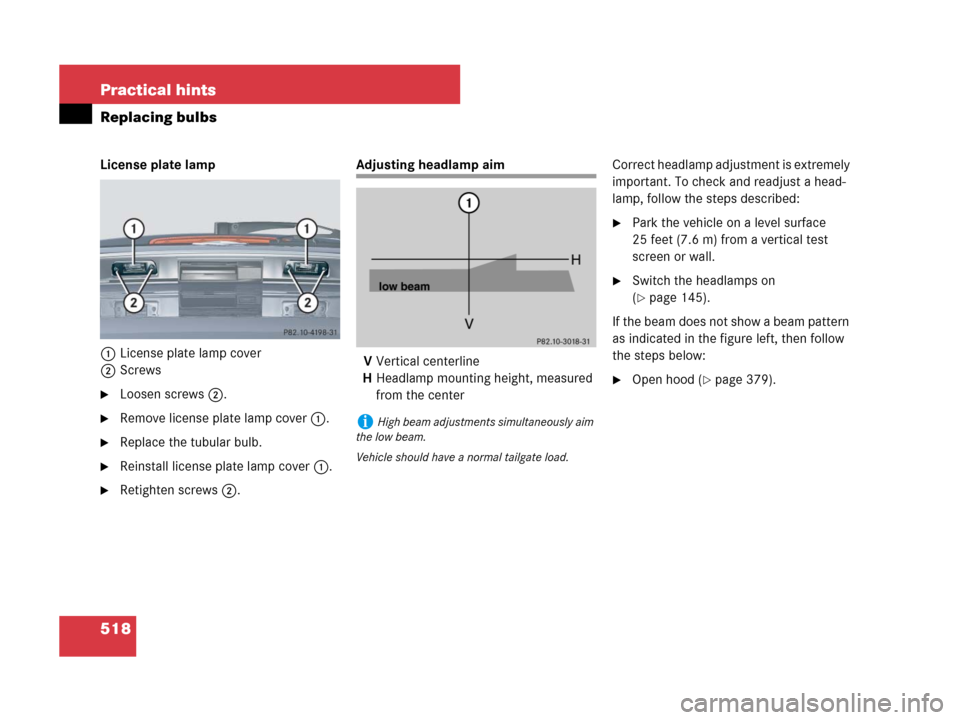
518 Practical hints
Replacing bulbs
License plate lamp
1License plate lamp cover
2Screws
�Loosen screws2.
�Remove license plate lamp cover1.
�Replace the tubular bulb.
�Reinstall license plate lamp cover1.
�Retighten screws2.
Adjusting headlamp aim
VVertical centerline
HHeadlamp mounting height, measured
from the centerCorrect headlamp adjustment is extremely
important. To check and readjust a head-
lamp, follow the steps described:
�Park the vehicle on a level surface
25 feet (7.6 m) from a vertical test
screen or wall.
�Switch the headlamps on
(
�page 145).
If the beam does not show a beam pattern
as indicated in the figure left, then follow
the steps below:
�Open hood (�page 379).
iHigh beam adjustments simultaneously aim
the low beam.
Vehicle should have a normal tailgate load.