Page 172 of 595

171 Controls in detail
Control system
The following settings and submenus are
available in the
Settings menu:Resetting all settings
You can reset the functions of all
submenus to the factory settings.
�Press the reset button in the instru-
ment cluster (
�page 155) for
approximately 3 seconds.
The request to press the reset button
once more to confirm appears in the
multifunction display.
�Press the reset button once more.
The functions of all the submenus will
reset to factory settings.
FunctionPage
Resetting all settings171
Submenus in the settings menu172
Instrument cluster submenu174
Time/date submenu176
Lighting submenu178
Vehicle submenu181
Comfort submenu*184
iThe settings you have changed will not be
reset unless you confirm the action by pressing
the reset button a second time.
After approximately 5 seconds, the
Settings
menu reappears in the multifunction display
(
�page 170).
iFor safety reasons, the function
Lamp circuit headlamp in the Lighting
submenu cannot be reset while driving.
The following message appears in the multifunc-
tion display:
Settings
Cannot be
completely reset
to factory settings
while driving
Page 179 of 595

178 Controls in detail
Control system
Lighting submenu
Access the
Lighting submenu via the
Settings menu. Use the Lighting
submenu to change the lamp and lighting
settings on your vehicle.
The following functions are available:
Setting daytime running lamp mode
(USA only)
�Move the selection marker with
buttonæ orç to the
Lighting
submenu.
�Press buttonj ork repeatedly
until the message
Lamp circuit
headlamp
appears in the multifunction
display.
The selection marker is on the current
setting.
�Press buttonæ orç to select
manual operation (
Manual) or daytime
running lamp mode (
Constant).
With daytime running lamp mode activated
and the exterior lamp switch at
positionMorU, the low beam
headlamps are switched on when the
engine is running.In low ambient light conditions the
following lamps will switch on additionally:
�Parking lamps
�Tail lamps
�License plate lamps
�Side marker lamps
For more information on the daytime
running lamp mode, see “Lighting”
(
�page 145).
FunctionPage
Setting daytime running lamp
mode (USA only)178
Setting locator lighting179
Setting night security illumination179
Setting interior lighting delayed
shut-off180
iThis function is not available in countries
where the daytime running lamp mode is
mandatory and therefore in a constant mode.
iFor safety reasons, changing the setting for
the daytime running lamp mode is not possible
while the vehicle is in motion. The following
message appears in the multifunction display:
Settings
only possible
at standstill
For safety reasons, resetting to factory settings
(
�page 171) while driving will not deactivate the
daytime running lamp mode.
Page 188 of 595

187 Controls in detail
Control system
�Press buttonæ orç repeatedly
until the desired speed is shown in the
multifunction display.
When DSR is switched on, DSR will use
the programmed default speed to regu-
late the vehicle’s speed.Trip computer menu
Use the trip computer menu to call up
statistical data on your vehicle.
The following information is available:Fuel consumption statistics since start
�Press buttonÿ orè repeatedly
until the message
From start appears
in the multifunction display.
1Distance driven since start
2Time elapsed since start
3Average speed since start
4Average fuel consumption since start
iOnce DSR is switched on, you can adjust the
set speed using the cruise control lever
(
�page 278).
FunctionPage
Fuel consumption statistics
since start187
Fuel consumption statistics
since the last reset188
Resetting fuel consumption sta-
tistics188
Distance to empty188
iWhen you enter the trip computer menu, you
will always see the fuel consumption statistics
since start first.
iAll statistics stored since the last engine
start will be reset approximately 4 hours after
the SmartKey in the starter switch is turned to
position0 or removed from the starter switch.
Resetting will not occur if you turn the SmartKey
back to position1 or2 within this time period.
Page 189 of 595

188 Controls in detail
Control system
Fuel consumption statistics since the
last reset
�Press buttonÿ orè repeatedly
until the message
From start appears
in the multifunction display.
�Press buttonj ork repeatedly
until the message
After reset appears
in the multifunction display.
1Distance driven since last reset
2Time elapsed since last reset
3Average speed since last reset
4Average fuel consumption since last
resetResetting fuel consumption statistics
�Press buttonÿ orè repeatedly
until the message
From start appears
in the multifunction display.
�Press buttonj ork repeatedly
until the message
After reset appears
in the multifunction display.
�Press and hold the reset button in the
instrument cluster (
�page 155) until
the value is reset to
0.Distance to empty
�Press buttonÿ orè repeatedly
until the message
From start appears
in the multifunction display.
�Press buttonj ork repeatedly
until the message
Range: appears in
the multifunction display.
The calculated remaining driving range
based on the current fuel tank level
appears in the multifunction display.
iThe fuel consumption statistics reset auto-
matically to 0 when either of the following values
is exceeded:
�distance covered: 100 000 miles
�time elapsed: 10 000 hours
Page 205 of 595

204 Controls in detail
Transfer case
Switching LOW RANGE mode
The switch is located on the upper part of
the center console.
1LOW RANGE switch
2Indicator lamp
3LOW RANGE displaySwitching LOW RANGE mode on
(switching from HIGH RANGE to LOW
RANGE)
�Press LOW RANGE switch1.
Indicator lamp2 flashes.
If the system senses that all conditions
are met, it will switch to LOW RANGE
mode. A chime sounds and the LOW
RANGE display3 appears in the multi-
function display.
The indicator lamp2 on the
LOW RANGE switch comes on continu-
ously, indicating that the LOW RANGE
mode has been activated.
Warning!G
Always wait until the procedure of shifting
from HIGH RANGE to LOW RANGE – and
from LOW RANGE to HIGH RANGE – has
been entirely completed. During this proce-
dure do not:
�switch off the engine
�shift the automatic transmission into
another gear
If you do not wait until the shifting proce-
dure has been entirely completed then it
might not be correctly performed. The trans-
fer case might be in neutral, thus interrupt-
ing the transfer of power between the
engine and the drive axle.
The vehicle is then freely movable, even if a
gear has been selected, and could uninten-
tionally be set into motion – particularly on
up – or downhill grades. This could lead to
an accident and cause injury to yourself and
others.
Please observe related messages appearing
in the multifunction display (
�page 493).
!The shift procedure can only be performed
when the following conditions are met:
�The engine is running (�page 41).
�The automatic transmission is in positionN
(
�page 193).
�The vehicle speed does not exceed 25 mph
(40 km/h).
iThere is no reset to HIGH after the ignition
has been switched off.
Page 206 of 595

�Press LOW RANGE switch1
(
�page 204).
Indicator lamp2 flashes.
If the system senses that")
205 Controls in detail
Transfer case
Switching LOW RANGE mode off
(switching from LOW RANGE to HIGH
RANGE)
�Press LOW RANGE switch1
(
�page 204).
Indicator lamp2 flashes.
If the system senses that all conditions
are met, it will switch to back to
HIGH RANGE mode. A chime sounds
and the LOW RANGE display3 ap-
pears in the multifunction display.
The indicator lamp2 on the
LOW RANGE switch goes out, indicat-
ing that the LOW RANGE mode has
been deactivated.
For messages in the multifunction display,
see “Practical hints” section (
�page 493).
iYou can cancel the procedure by pressing
the LOW RANGE switch again while the indicator
lamp is flashing.
!The shift procedure can only be performed
when the following conditions are met:
�The engine is running (�page 41).
�The automatic transmission is in positionN
(
�page 193).
�The vehicle speed does not exceed 43 mph
(70 km/h).
iThere is no reset to LOW after the ignition
has been switched off.
iYou can cancel the procedure by pressing
the LOW RANGE switch again while the indicator
lamp is flashing.
Page 210 of 595
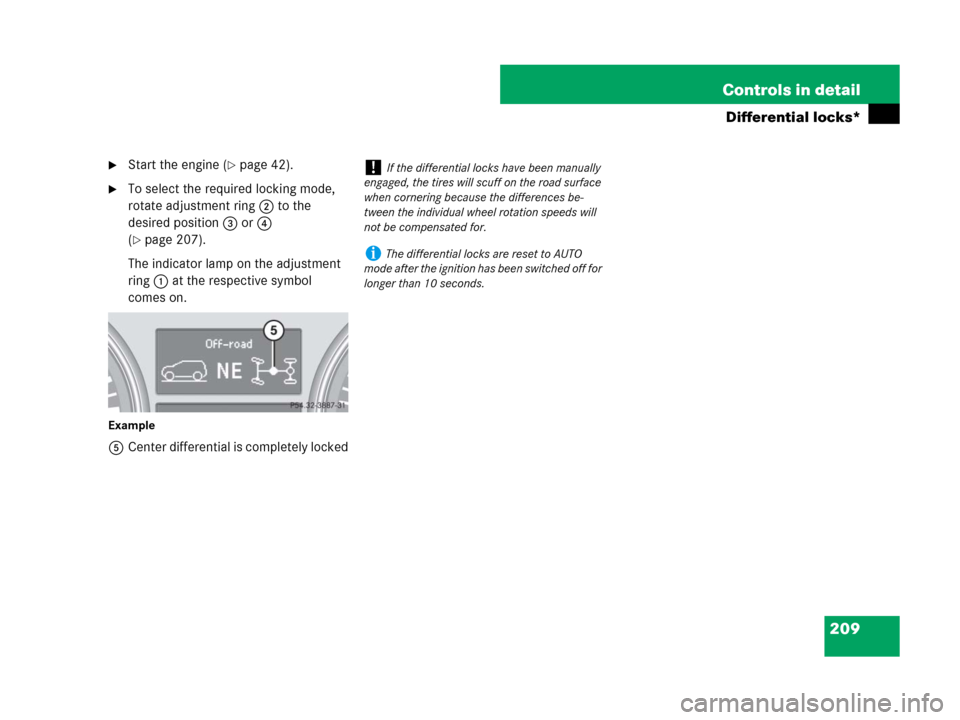
209 Controls in detail
Differential locks*
�Start the engine (�page 42).
�To select the required locking mode,
rotate adjustment ring2 to the
desired position3 or4
(
�page 207).
The indicator lamp on the adjustment
ring1 at the respective symbol
comes on.
Example
5Center differential is completely locked
!If the differential locks have been manually
engaged, the tires will scuff on the road surface
when cornering because the differences be-
tween the individual wheel rotation speeds will
not be compensated for.
iThe differential locks are reset to AUTO
mode after the ignition has been switched off for
longer than 10 seconds.
Page 211 of 595
.
Headlamp cleaning system*
The headlamp cleaning button is located
on the left si")
210 Controls in detail
Good visibility
For information on windshield wipers, see
“Windshield wipers” (
�page 63).
Headlamp cleaning system*
The headlamp cleaning button is located
on the left side of the dashboard.
1Headlamp cleaning button
�Switch on the ignition (�page 42).
�Press button1.
The headlamps are cleaned with a
high-pressure water jet.
For information on filling up the washer
reservoir, see “Windshield/rear window
washer system and headlamp cleaning
system*” (
�page 384).
Rear view mirrors
For more information on setting the rear
view mirrors, see “Mirrors” (
�page 52).
Interior rear view mirror, antiglare
position
1Lever
�Tilt the mirror to the antiglare position
by moving lever1 towards the wind-
shield.
The interior rear view mirror is dimmed.
iThe headlamps will automatically be
cleaned when you have
�switched on the headlamps
and
�operated the windshield wipers with wind-
shield washer fluid fifteen times
When you switch off the ignition, the counter
resets.